
valve cover bolt sequence for leak free seal


Thread Starter
|
Senior Member
Joined: Sep 2013
Posts: 729
Likes: 257
From: Cincinnati,Ohio USA
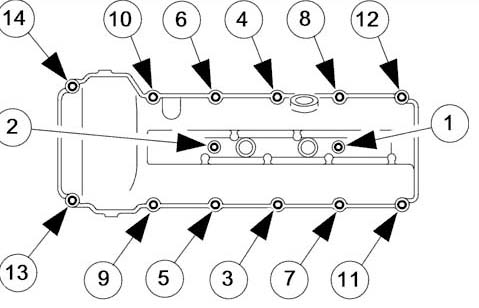
Hey guys, is this the correct valve cover torque sequence for our 4.0's?
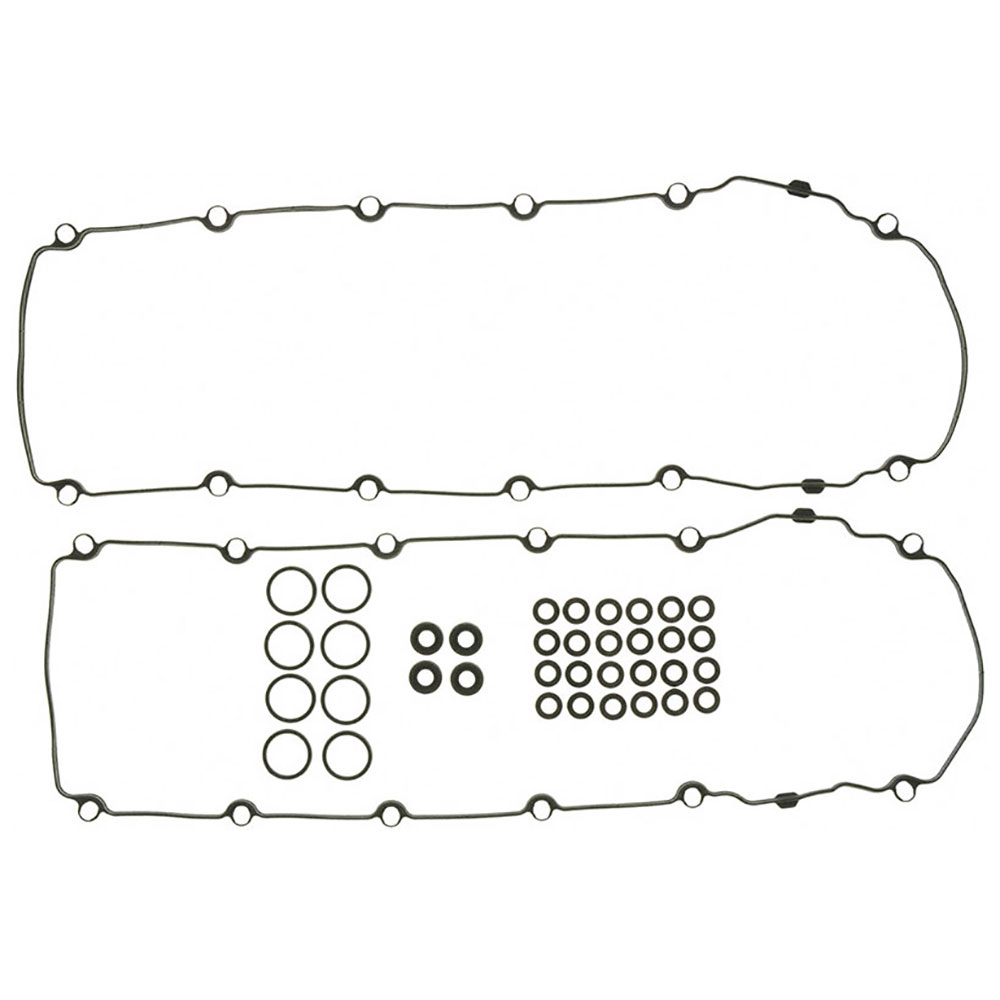
The covers have been cleaned and painted, no damage whatsoever, no chips or nothing.
Im doing timing chain tensioners, valve cover gaskets, spark plugs,cleaning and refurbishing the coil packs with new boots,water pump and gasket,coolant bypass hose,throttle body connector cleaning,maf cleaning,new air filter, coolant flush, supercharger fluid change,oil change, power steering fluid change, the whole nine yards. Im into this job over 4 hours already


kBQ+td0DtYw~~60_35.JPG)
The covers have been cleaned and painted, no damage whatsoever, no chips or nothing.
Im doing timing chain tensioners, valve cover gaskets, spark plugs,cleaning and refurbishing the coil packs with new boots,water pump and gasket,coolant bypass hose,throttle body connector cleaning,maf cleaning,new air filter, coolant flush, supercharger fluid change,oil change, power steering fluid change, the whole nine yards. Im into this job over 4 hours already
Last edited by aode06; Nov 12, 2014 at 05:26 PM.


Joined: Dec 2011
Posts: 120,439
Likes: 17,014
From: Durham, UK
Your diagram is straight out of JTIS.

(click on the image to enlarge it)
Equally important to the tightening sequence is the torque - 11Nm. I've seen several covers cracked through over tightening.
Graham
Senior Member
Joined: Jul 2010
Posts: 429
Likes: 44
From: Kirkwood, MO
I used the proper tightening sequence and applied proper torque as noted in this thread, but still had oil leaking onto the exhaust manifold on the right (passenger side on US car) side cam cover after a recent plastic secondary timing chain tensioners replacement. I just finished taking that cover off and re-doing the install. The burnt oil smell is less so I am hoping that it's from residual oil from the earlier leak which was probably the result of the gasket having a slight pinch in it. I only used gasket sealer on the cover side to hold the gasket in place during the installation, so disassembly will be easier during the inevitable next time.
It's a bitch getting to the two bolts on the outboard side of each cover: the one to the rear and the third one from the rear. Lots of cursing required and strange combination of socket, universal, extension and wrench needed.
It's a bitch getting to the two bolts on the outboard side of each cover: the one to the rear and the third one from the rear. Lots of cursing required and strange combination of socket, universal, extension and wrench needed.
Thread Starter
|
Senior Member
Joined: Sep 2013
Posts: 729
Likes: 257
From: Cincinnati,Ohio USA
1. I used 1/4in ratchet, 1/4in swivel, 1/4 10mm. Bend the metal heat shield back with a pry-bar, and you got it. 3/8in drive with 3/8in 10mm socket on some others.
2.Just as our seals harden and becomes useless, so does the plastic valve covers. Black rtv is definitely your friend.
2.Just as our seals harden and becomes useless, so does the plastic valve covers. Black rtv is definitely your friend.

Veteran Member
Joined: Feb 2011
Posts: 9,733
Likes: 2,203
From: on-the-edge
Provided that the valvecover face is straight, the secret to a leak free result is to lightly lubricate the mating surfaces with motor oil. Dipping your finger in the oil from the dipstick is enough.
The lubrication lets the gasket creep and settle during tightening.
The lubrication lets the gasket creep and settle during tightening.
Trending Topics
Thread Starter
|
Senior Member
Joined: Sep 2013
Posts: 729
Likes: 257
From: Cincinnati,Ohio USA
Success ! 45 miles no more of that pesky white smoke/smell or leak lol.
The secret was using that bolt pattern sequence and not overtightening the bolts.YOU HAVE TO MAKE 3 PASSES, the bolts will be loose in each pass, and the third, all will be firm when you re-check them.
I did use a smear of black rtv on the face of the head, I just like seeing a little ooze out to let me know, nothing is going to leak again, for many years, same for the spark plug tube seals.
The engine loves the new timing tensioners, cleaned coil packs,cleaned maf and the new spark plugs.Purs like a kitten, power is awesome.
Now the pesky abs problem after my radio instal shall be tackled.

Thread
Thread Starter
Forum
Replies
Last Post
FS[Western US]: FREE- 99 XJR ECM and TCM
XJsc-guy
PRIVATE For Sale / Trade or Buy Classifieds
6
Sep 25, 2015 11:09 AM
al_roethlisberger
XJ XJ6 / XJR6 ( X300 )
7
Sep 11, 2015 10:04 PM
philwarner
XJ6 & XJ12 Series I, II & III
16
Sep 5, 2015 10:05 AM
Currently Active Users Viewing This Thread: 1 (0 members and 1 guests)