
XKR 100 Air Bag - Seat Occupancy Sensor Fault


Thread Starter
|
Member
Joined: Feb 2019
Posts: 46
Likes: 2
From: Whitton Twickenham
Hi fmertz, Once again your comments gratefully appreciated, many thanks
But on this occasion, I have to admit I don't understand what this means, please help where do I go to check this possibility?
But on this occasion, I have to admit I don't understand what this means, please help where do I go to check this possibility?
Veteran Member


Joined: Oct 2010
Posts: 2,064
Likes: 1,025
From: Spain
Its much simpler than it seems - the codes in the snippet that fmertz posted are the connector code numbers. Compare the ones in the snippet to the wiring diagram I posted:-
SP021 - connector on the PASSENGER SEAT WEIGHT SENSING MODULE
SP001 - connector between these two
FC010 - connector on the Occupancy Sensor Module
The wiring diagram shows the pin numbers of the connectors for each wire and the colour of each wire, eg FC10-12 is connector FC10, pin number 12 and the wire colour is shown as O (orange). The connector types are also shown in the electrical guide to help identify them.
You need a multimeter to check for continuity - disconnect the battery, unplug the harness you are testing at each end, then check each pin in turn (from end to end) using the ohm function on the meter. You should also wiggle the cable around as you do it to look for intermittent connections.
Any competent auto electrician can test this for you if you tell them what harnesses you need testing and work out which pin goes to which pin. Eg FC10-12 goes to SP21-E via SP1-9. This is an orange wire and it should show a low ohm reading from end to end.
Good luck!
Veteran Member
Joined: Oct 2010
Posts: 2,064
Likes: 1,025
From: Spain
BTW if you haven't got it, you can download the electrical guide here from Gus' site:-
JagRepair.com - Jaguar Repair Information Resource
JagRepair.com - Jaguar Repair Information Resource
Thread Starter
|
Member
Joined: Feb 2019
Posts: 46
Likes: 2
From: Whitton Twickenham
Hi, dibbit,
Thank you, again your explanation has inspired me and given me some confidence to soldier on.
I had indeed looked at the wiring diagram you provided and realised the codes/pin numbers referenced were on the diagram and your comments have clarified this further, many thanks
I presume the multimeter on ohm function will be on open circuit and buzz when on a good circuit but nothing if no/short circuit?
Sorry to question but what exactly do you mean when you say "from end to end" testing from the harness plug/pin to where?
Please treat me as a novice as I need to be told?
Veteran Member
Joined: Oct 2010
Posts: 2,064
Likes: 1,025
From: Spain
Here is a good article on how to check continuity in a wiring harness:-
https://www.2carpros.com/articles/how-to-check-wiring
Ignore the bit about checking for a voltage, you are going to have the battery disconnected so all you are going to be doing is checking for continuity (step 3 in the article). You will need to unplug the connector at the Passenger Seat Weight Sensing Module and at the other end on the Occupancy Sensor Module (connectors SP021 and FC010) and test continuity from end to end (ie from SP021 at one end and FC010 at the other like it shows in the picture below). Use your meter on the Ohms range - it will show infinity when not connected and a low ohms reading when connected - all the wires you test should show approx the same ohms value. You may have to use a length of wire as an extension on your meter to get to both ends at once. You can also test for shorts between pins on the connector - adjacent pins should show infinity on your meter.
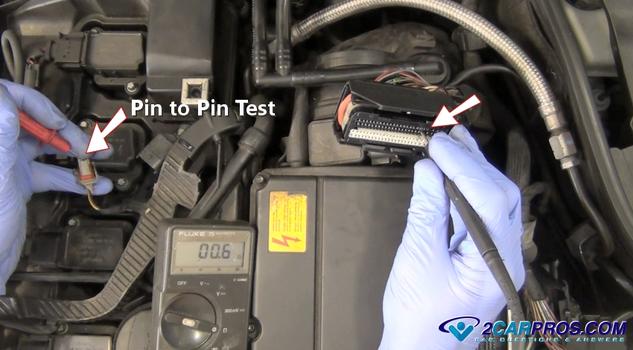
This is simple, but painstaking stuff, that costs nothing to do and will either eliminate the wiring or confirm it is the culprit.
https://www.2carpros.com/articles/how-to-check-wiring
Ignore the bit about checking for a voltage, you are going to have the battery disconnected so all you are going to be doing is checking for continuity (step 3 in the article). You will need to unplug the connector at the Passenger Seat Weight Sensing Module and at the other end on the Occupancy Sensor Module (connectors SP021 and FC010) and test continuity from end to end (ie from SP021 at one end and FC010 at the other like it shows in the picture below). Use your meter on the Ohms range - it will show infinity when not connected and a low ohms reading when connected - all the wires you test should show approx the same ohms value. You may have to use a length of wire as an extension on your meter to get to both ends at once. You can also test for shorts between pins on the connector - adjacent pins should show infinity on your meter.
This is simple, but painstaking stuff, that costs nothing to do and will either eliminate the wiring or confirm it is the culprit.

Senior Member
Joined: Oct 2012
Posts: 216
Likes: 73
From: Hampshire, united kingdom.
Came in late on this one sorry....yes i've had the pleasure of Code 17 air bag fault and it is a "pain in the ...." to correctly diagnose and fix.
Like most on here allready have....is a good code reader (that reads air bag modules), or better still SDD is an absolute must if your nursing one of these sick cats back to health. Like a member reported earlier in the thread GGG experience is a good place to start but PLEASE be warned that air bag modules DO NOT take kindly to digital multi meters being probed in their cicuitry, so heed the warning about disconnecting the battery and wait at least 10mins for residual voltage to drop out the system. A false trigger on the air bag module will be a costly mistake !!
From the help of this forum and the mass of knowledge we share with each other you will have it fixed in no time....keep us posted on your progress.
TS
Thread Starter
|
Member
Joined: Feb 2019
Posts: 46
Likes: 2
From: Whitton Twickenham
Hi, dibbit,
Thank you again for the layman discussion this I can comprehend and have the confidence to check this sequence out as you say it may be painstaking stuff but costs nothing to do and will either eliminate the wiring or confirm if this is indeed the fault. Plus it would cost a fortune to take to the main dealer! Also, the article is very useful, many thanks
Thank you again for the layman discussion this I can comprehend and have the confidence to check this sequence out as you say it may be painstaking stuff but costs nothing to do and will either eliminate the wiring or confirm if this is indeed the fault. Plus it would cost a fortune to take to the main dealer! Also, the article is very useful, many thanks
Thread Starter
|
Member
Joined: Feb 2019
Posts: 46
Likes: 2
From: Whitton Twickenham
Hi smithtrevor,
Good to hear from you, its never to late, many thanks for the advice and support specifically regarding the battery, gratefully appreciated.
As you will appreciate I have had great comments and attachments from both dibbit and fmertz with advice which I can comprehend and has instilled confidence for me going forward.
As you say with help of this forum and the mass of shared knowledge I could have it fixed in no time?
I will as requested keep you all posted via this forum, many thanks
Senior Member
Joined: Oct 2012
Posts: 216
Likes: 73
From: Hampshire, united kingdom.
No problem we are here to help...difficult now to keep going back over all the replies to see what you have done...looking at my drawings for pre 2004MY the Passenger seat weight sensing module also takes a +ve supply from drivers side fusebox D6-F10 its a 10A fuse supplying SP021/G
to the Passenger seat weight sensor ECU without this +ve you will get a reply on the "can" bus as "no comms" or code 16, with no +ve to this module it will be "dead" hence the occuupency sensing ECU that SDD talks to cannot see any further into the system.
to the Passenger seat weight sensor ECU without this +ve you will get a reply on the "can" bus as "no comms" or code 16, with no +ve to this module it will be "dead" hence the occuupency sensing ECU that SDD talks to cannot see any further into the system.
Thread Starter
|
Member
Joined: Feb 2019
Posts: 46
Likes: 2
From: Whitton Twickenham
Hi smithtrevor,
Grateful for your prompt response and diligence with past comments.
If I'm reading this correctly then fmertz provided a link to flash code 16 with reference B2290 (26) and driverside fuse box specifically fuse 14 (10A) which I've checked with a multimeter and for correct seating (plus all the fuses in this box) and sadly all good, I would have been elated if this had been the cause
I am coming round to the possibility its a chaffed wire or bad connection under the passenger seat which I've already checked but intend to check more closely now
Senior Member
Joined: Oct 2012
Posts: 216
Likes: 73
From: Hampshire, united kingdom.
Yes i would Agree with your thoughts...the seat module located under the seat is way to close to the floor when the seat position is on its lowest setting....my drivers seat module had been smashed off its fixings and was dragging up & down the carpet when i had my code 17 fault.
Fuse 10 deffo feeds that module along with fuse 14, it looks your planning to remove the passeger seat anyway (4bolts), you will need to leave the power on to get all 4 bolts out but remember to disconnet the battery BEFORE you unplug the 2 connectors under the seat. if all looks good under there (i hope it does) then your into checking continuity to the Passenger seat weight sensor ECU as code B2290 is all about no comms (SDD cannot read it). My code 17 fault (and GGG) was a Suplementry restraints module failure "NO COMMS" as SDD couldn't see it).
Fuse 10 deffo feeds that module along with fuse 14, it looks your planning to remove the passeger seat anyway (4bolts), you will need to leave the power on to get all 4 bolts out but remember to disconnet the battery BEFORE you unplug the 2 connectors under the seat. if all looks good under there (i hope it does) then your into checking continuity to the Passenger seat weight sensor ECU as code B2290 is all about no comms (SDD cannot read it). My code 17 fault (and GGG) was a Suplementry restraints module failure "NO COMMS" as SDD couldn't see it).
Thread Starter
|
Member
Joined: Feb 2019
Posts: 46
Likes: 2
From: Whitton Twickenham
Yes i would Agree with your thoughts...the seat module located under the seat is way to close to the floor when the seat position is on its lowest setting....my drivers seat module had been smashed off its fixings and was dragging up & down the carpet when i had my code 17 fault.
Fuse 10 deffo feeds that module along with fuse 14, it looks your planning to remove the passeger seat anyway (4bolts), you will need to leave the power on to get all 4 bolts out but remember to disconnet the battery BEFORE you unplug the 2 connectors under the seat. if all looks good under there (i hope it does) then your into checking continuity to the Passenger seat weight sensor ECU as code B2290 is all about no comms (SDD cannot read it). My code 17 fault (and GGG) was a Suplementry restraints module failure "NO COMMS" as SDD couldn't see it).
Fuse 10 deffo feeds that module along with fuse 14, it looks your planning to remove the passeger seat anyway (4bolts), you will need to leave the power on to get all 4 bolts out but remember to disconnet the battery BEFORE you unplug the 2 connectors under the seat. if all looks good under there (i hope it does) then your into checking continuity to the Passenger seat weight sensor ECU as code B2290 is all about no comms (SDD cannot read it). My code 17 fault (and GGG) was a Suplementry restraints module failure "NO COMMS" as SDD couldn't see it).
Can you tell me where the driver's seat module is located under the passenger seat? Is it under the front of the seat as if your hand was searching for the manual adjustment lever on most average cars? As I have noticed a unit/module in this location which has the plastic molding of one of the two securing bolts broken/snapped rendering it loose? Has the driver's seat got a similar/same module that can I substitute it with to check if its good?. Also, what amp is fuse 10 (fuse 14 is 10amp) and I will double check this as well plus what is the relevance of disconnecting the battery before unplugging the two seat connectors as I did not do this first time of removal? What have I inadvertently done?
Veteran Member
Joined: Oct 2010
Posts: 2,064
Likes: 1,025
From: Spain
BTW the electrical guide shows which fuses supply what - its well worth checking all the fuses are in fact intact.
Senior Member
Joined: Oct 2012
Posts: 216
Likes: 73
From: Hampshire, united kingdom.
Yes the module is located towards the front of the seat....The seat bolster has an air bag in it and a supply to it (yellow plug), you might disconect this 100 times and nothing will happen but....if it does then expensive mistake, so personally anything to do with the air bag system... i disconnect.
Fuse 10 is a 10A and it suppies the module your diagnostic reader cannot see so the reply is B2290.
Fuse 10 is a 10A and it suppies the module your diagnostic reader cannot see so the reply is B2290.
Thread Starter
|
Member
Joined: Feb 2019
Posts: 46
Likes: 2
From: Whitton Twickenham
dibbiot & smithtrevor,
Thank you guys, Appreciated, this gives a couple of things to double check plus where do you suggest I look for the electrical guide please, on this forum?
So my next move is to remove the seat, disconnect the battery and double check condition of all the wiring under the seat and multimeter associated floor connectors and wiring and check out the seat module for damage, check out fuse 10 (10amp) drivers side fuse box and all the fuses are in fact intact.
Sadly I have to be away from the Jag for a couple of days each at the beginning of each week but will let you know how I get on, many thanks
Senior Member
Joined: Oct 2012
Posts: 216
Likes: 73
From: Hampshire, united kingdom.
At the start of the X100 FORUM list there are "Sticky's" in here you will find info for your model and other usefull info...like
https://www.jaguarforums.com/forum/x...repair-196634/
and...
JagRepair.com - Jaguar Repair Information Resource
This could be usefull...
http://www.jagrepair.com/images/TSB/...S%20System.pdf
I think these are your elec drawings ? see section 18.1 should cover your issue....
http://www.jagrepair.com/images/Auto.../jagxk2002.pdf
Thread Starter
|
Member
Joined: Feb 2019
Posts: 46
Likes: 2
From: Whitton Twickenham
At the start of the X100 FORUM list there are "Sticky's" in here you will find info for your model and other usefull info...like
https://www.jaguarforums.com/forum/x...repair-196634/
and...
JagRepair.com - Jaguar Repair Information Resource
This could be usefull...
http://www.jagrepair.com/images/TSB/...S%20System.pdf
I think these are your elec drawings ? see section 18.1 should cover your issue....
http://www.jagrepair.com/images/Auto.../jagxk2002.pdf
https://www.jaguarforums.com/forum/x...repair-196634/
and...
JagRepair.com - Jaguar Repair Information Resource
This could be usefull...
http://www.jagrepair.com/images/TSB/...S%20System.pdf
I think these are your elec drawings ? see section 18.1 should cover your issue....
http://www.jagrepair.com/images/Auto.../jagxk2002.pdf
Senior Member
Joined: Oct 2012
Posts: 216
Likes: 73
From: Hampshire, united kingdom.
No problem...as i said we all share our knowledge on here.....this guy had a similar issue..
https://www.jaguarforums.com/forum/x...0-code-102827/
https://www.jaguarforums.com/forum/x...0-code-102827/
Senior Member
Joined: Oct 2012
Posts: 216
Likes: 73
From: Hampshire, united kingdom.
Thread Starter
|
Member
Joined: Feb 2019
Posts: 46
Likes: 2
From: Whitton Twickenham
dibbiot & smithtrevor,
Thank you guys, Appreciated, this gives a couple of things to double check plus where do you suggest I look for the electrical guide please, on this forum?
So my next move is to remove the seat, disconnect the battery and double check condition of all the wiring under the seat and multimeter associated floor connectors and wiring and check out the seat module for damage, check out fuse 10 (10amp) drivers side fuse box and all the fuses are in fact intact.
Sadly I have to be away from the Jag for a couple of days each at the beginning of each week but will let you know how I get on, many thanks
Thank you guys, Appreciated, this gives a couple of things to double check plus where do you suggest I look for the electrical guide please, on this forum?
So my next move is to remove the seat, disconnect the battery and double check condition of all the wiring under the seat and multimeter associated floor connectors and wiring and check out the seat module for damage, check out fuse 10 (10amp) drivers side fuse box and all the fuses are in fact intact.
Sadly I have to be away from the Jag for a couple of days each at the beginning of each week but will let you know how I get on, many thanks
As promised an update, I've spoken to another Jaguar specialist and he suggested the battery default (connecting the battery leads together/to earth) exercise needed to be for more than an hour, not 10 minutes as I had previously been advised. I left connected for over 24 hours but unfortunately, this did not solve the problem either. Plus I've checked fuse 10 which equally proved to be sound/good so no luck there either.
The new Jaguar specialists is prepared to review the issue and put it on a diagnostic machine and go from there which I have agreed and will pass on your good comments. Unfortunately, he is not available until the 28 of this month which I hope will not take to long and will let you all know what he finds out in due course.
In the meantime, I will continue with the multimeter as your recent comments, I might get lucky, many thanks