
Seat switchpack mount repair

Floppy Switch
A repair solution for Jaguar XK8 power seat switch module retention
1997 – 2003 and maybe later models
Ken P. Chalfant
I bought my 1997 XK8 in 2013, the year I turned 60. I guess, at least in part, I was trying to recapture my youth. I owned a 1966 E-Type in the mid seventies and loved driving mountain roads in between the times I was working on it.In fairness, the car hadn’t been treated the best and I wasn’t a very good mechanic back then.
I had rather forgotten the “working on it” part and mostly remembered the romance. In many ways the XK8 is better, but in many ways it seems nearly the same. Of course, I don’t think any car is more beautiful than a series II E-Type.
While it was in reasonably good shape when I bought it, I have mostly worked on restoration efforts. Heck, in four and a half years I have only driven it about 600 miles.
While the list of what I have done is long, my most recent repair focused on the driver and passenger seats. Both required re-upholstery and my first step was buying the premade leather kits from AutoBerry and having a local upholstery shop do the work.
The driver side seat switch assembly retainer bracket, part of the plastic housing into which the switch assembly is fitted, was broken when I bought the car. I managed to break the passenger side trying to remove the switches for the upholstery shop.
As many of you have probably discovered the plastic housing shown in the below photo borrowed from “Jaguar Forums” is not available for purchase.

Figure 1- Seat switch plastic mounting housing
The arrow in figure 1 points to the retainer clip element of the switch housing which breaks causing the switch assembly to be loose in its position.
No doubt that twenty years ago, new on the assembly line, this retainer clip moved easily as the switch assembly was installed and then securely held it in place. Twenty years later it is as brittle as sugar candy.
My solution, much like the original clip, relies on backpressure from the cushion foam under the upholstery to provide a “spring” force to push against the clip to keep the switch assembly secure. Therefore, the height dimension of my bracket may require some adjustment depending on the thickness and resiliency of your foam and upholstery.
I must also mention that to implement this solution, it necessary to remove the seats from the car and detach the sub-frames from the seats.

Figure 2- Photo of retainer bracket
Figure 2 shows the hand fashioned bracket. Given better tools a nicer version can certainly be fabricated, but this was created with tin snips, a drill press vise, adjustable wrench (used as a finger brake), belt sander and a small hammer.
The rounded end allows for easier installation between the plastic housing and the metal bracket welded to the seat frame. The retainer bracket is secured by one of the screws that hold the plastic housing in place on the seat sub frame as indicated in figures 3 and 4.
Taking useful photographs of the bracket installation process was difficult but hopefully the photos and text will make installation reasonably clear.
The following photographs indicate which screw will be used to secure the retaining bracket. Remove this screw prior to installing the new retaining bracket.
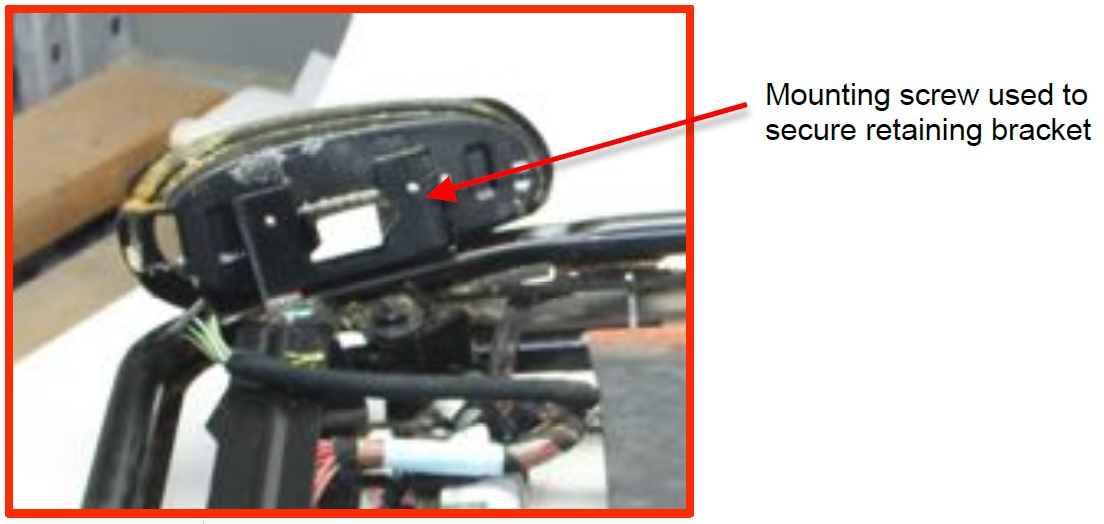
Figure 3 - Image of the plastic housing mounted to the metal sub-frame
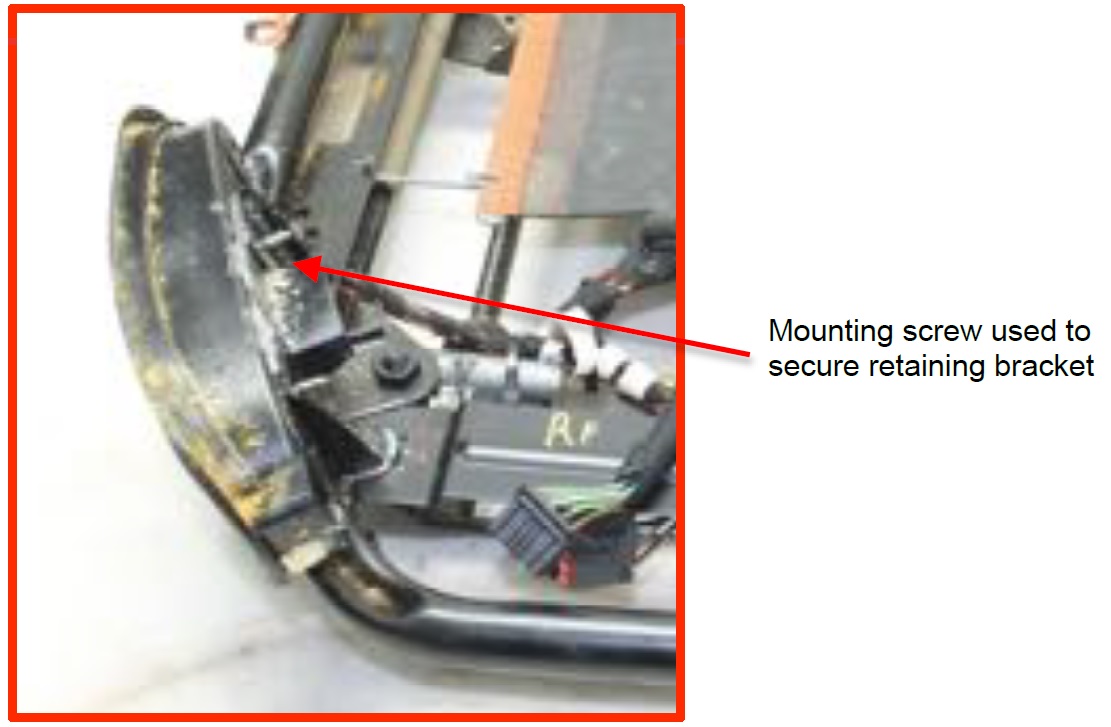
Figure 4 - Top view of plastic housing mounted to the metal sub-frame
Of course, it is unlikely that your seats will be disassembled to the degree shown in figures -3- and -4- but these images help clarify that the plastic housing is affixed to the metal frame bracket by two screws.

Figure 5 - Bracket fabrication drawing
(click on the image to enlarge it)
Bracket fabrication notes:
The “Clearance hole for possible switch protrusion” is not in the sample bracket of Figure 2. This bracket was made using the passenger seat and the clearance hole was not necessary. When I created the bracket for the driver side I discovered the need for the clearance hole. Inspection of your plastic housings and switch assemblies will determine if this clearance hole is necessary.
The distance between the first and second bend lines (2.605 and 3.345 inches) are approximate regardless of the precision contained in the drawing. The distance of the vertical rise (0.772 inch reference) may require some experimentation and adjustment based on the thickness and resiliency of your foam and upholstery.
The final bend to form the retaining lip may also require experimentation. Clearly, the greater the bend angle, within limits, causes the installation of the switch assembly to be easier as the sloped faces of the containment tabs slide along the face of the retaining lip.
The bracket material is blue spring steel banding used for strapping shipping crates. Most shipping and receiving departments have some on hand. Otherwise you can stop at a moving and storage company and some nice person will probably give you a couple of feet. The point for using the steel banding, also called metal strapping, is that it will flex a little and then return to its formed shape.
The exact shape of the curved leading edge is not critical. The important aspect is to eliminate sharp leading corners so that the bracket is less likely to catch on the seat’s foam padding.
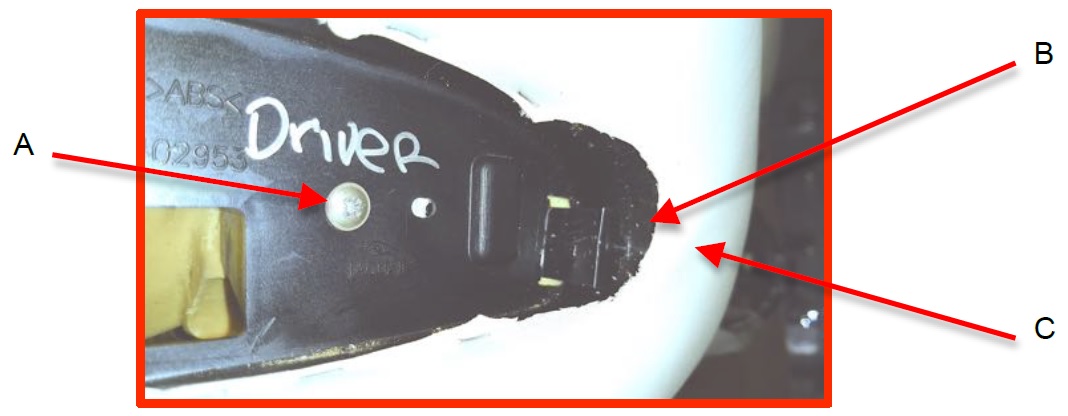
Figure 6 - Image showing installed bracket
Notes for Figure 6 above:
A: Plastic housing mounting screw used to secure bracket.
B: Black on black is difficult to see, but this arrow points to the bracket in position.
C: With the AutoBerry upholstery installed it was necessary to trim away some of the material to allow the switch assembly to seat into position. This may or may not be necessary.
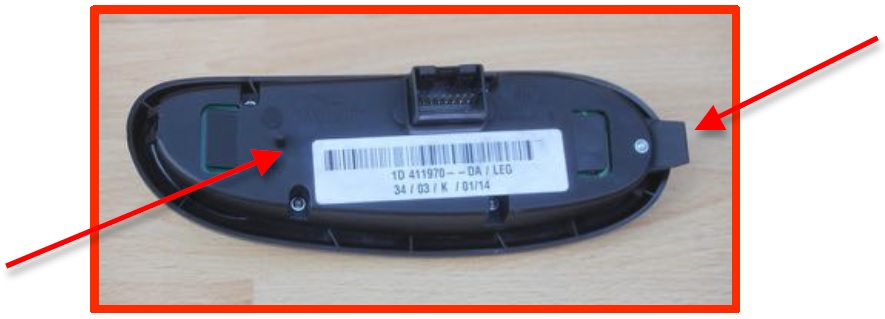
Figure 7 - Back of switch assembly showing protrusion
The left arrow of Figure 7 points to the switch assembly protrusion, which if it is there, requires the clearance hole in the bracket.
The right arrow of Figure 7 points to the switch assembly mounting tongue.
I fabricated several prototypes to get a design that worked with my seats. From my experience, I believe that the three attributes you may choose to adjust are the vertical rise (0.772 inch), the length of the retaining lip (0.155 inch) and the bend angle of the lip.
Installing the bracket takes some patience.
The first step is to clear any remnants of the old plastic clip from the housing. It is ABS plastic so it will easily cut with small diagonal wire cutters.
Remove the identified housing retaining screw.
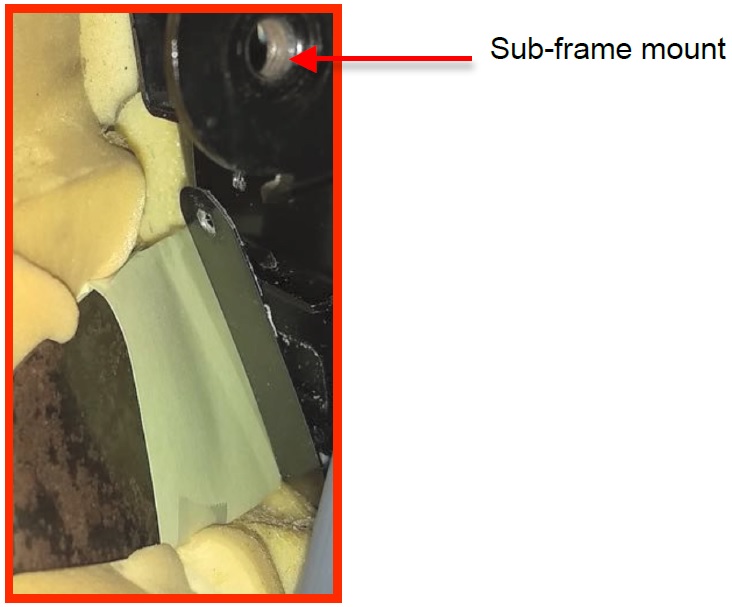
Figure 8 - Bracket installation
The bracket must be installed from the underside of the seat. It is necessary to remove the sub frame to gain suitable access. One of the threaded mounting holes to which the sub frame is secured is visible in Figure 8.
The long base of the retaining bracket can be seen in Figure -8- as well as the hole in the steel flange to which the plastic housing is secured. To aid in displacing the seat padding, I employed a very rigid spackling (putty) knife.
The retaining bracket must be in proper orientation with the vertical rise past the cleared opening in the plastic housing so that the curved leading edge can be slid between the plastic housing and the metal attachment bracket.
Once the bracket is between the plastic housing and the metal attachment bracket, bring the vertical rise into the cleared hole and align the 0.188 inch mounting hole with the hole in the plastic housing and metal attachment bracket and then install the screw.
Mate the wiring harness connector to the switch assembly.
Install the switch assembly by first inserting the tongue of the switch assembly into the opening on the forward edge of the housing
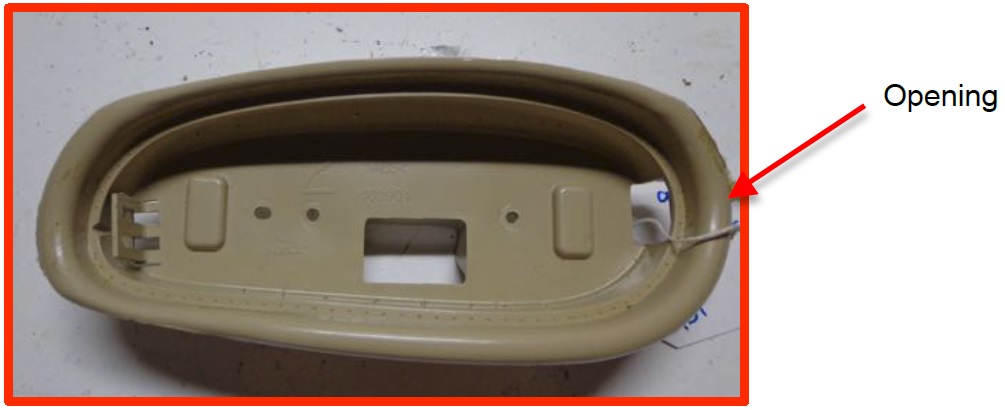
Figure 9 - Detail highlighting the opening for the switch assembly tongue
Next, depress the opposite end of the switch assembly into the plastic housing hoping to engage the retaining edge of the new bracket. This will reveal one of three possible conditions about the vertical rise of your bracket.
If it is not possible to capture the tabs on the switch assembly, the combination of seat cushion padding and upholstery is sufficiently thick and resilient to prevent engagement.
In the event that the tabs engage the bracket but the switch assembly seems loose, then the vertical rise of the bracket is too long for the combination of seat cushion padding and upholstery.
Hopefully, you will experience reasonable resistance from the padding and upholstery just as the tabs engage the bracket.
Once the switch assembly is properly secured by the bracket reassemble the sub-frame to the seat. Install the seat back in the Jag and drive away happy.
_____________
Ken
1997 XK8 Coupe
Last edited by GGG; Feb 11, 2018 at 06:26 AM.


Joined: Dec 2011
Posts: 120,439
Likes: 17,014
From: Durham, UK
Ken,
This will be a welcome solution to a regular issue for many XK8/XKR owners.
A worthy addition to the HOW TO thread in the FAQ's at the top of the threads (see Seat Switchpack - broken housing repair in https://www.jaguarforums.com/forum/x...ts-data-29800/ thread.
Graham
This will be a welcome solution to a regular issue for many XK8/XKR owners.
A worthy addition to the HOW TO thread in the FAQ's at the top of the threads (see Seat Switchpack - broken housing repair in https://www.jaguarforums.com/forum/x...ts-data-29800/ thread.
Graham
Last edited by GGG; Feb 11, 2018 at 08:06 AM.

Member
Joined: Dec 2011
Posts: 84
Likes: 3
From: London/France
Hi,
I know I'm coming into this post late. I have sourced a replacement housing and switch from a breaker in California much cheaper than anything in the UK. My question is this, can the repair be done without removing the seat? It is the drivers seat on my LHD XK and the handbrake is an absolute pain to work round!!!! If I have to remove the seat, how do I go about?
Many thanks in advance>
Regards
M

Thread
Thread Starter
Forum
Replies
Last Post
Currently Active Users Viewing This Thread: 1 (0 members and 1 guests)