Jaguar Forums - Jaguar Enthusiasts Forum
  • LOG IN
  • REGISTER
  • Forums
    • General Jaguar Forums
      • New Member Area - Intro a MUST
      • Jaguar Forums Feedback & Suggestion Center
      • General Tech Help
    • Jaguar Models ( Current )
      • XF (X260)
      • F-Type ( X152 )
      • XE ( X760 )
      • E-Pace
      • F-Pace (X761) / C-X17
      • I-Pace EV
    • Jaguar Models ( Modern )
      • XF and XFR ( X250 )
      • XJ ( X351 )
      • X-Type ( X400 )
      • S-Type / S type R Supercharged V8 ( X200 )
      • XJ XJ6 / XJ8 / XJR ( X350 & X358 )
      • XJ XJ8 / XJR ( X308 )
      • XJ XJ12 ( X305 )
      • XJ XJ6 / XJR6 ( X300 )
      • XK8 / XKR ( X100 )
      • XK / XKR ( X150 )
    • Jaguar Models ( Classics )
      • Mark V - X 420G
      • MKI / MKII S type 240 340 & Daimler
      • XK120 XK140 XK150
      • E type ( XK-E )
      • XJ6 & XJ12 Series I, II & III
      • XJS ( X27 )
      • XJ40 ( XJ81 )
      • XKSS
      • XJ220
    • Other Jaguars
      • Other Jaguar Models / Concepts / Replicas
    • Diesel variants
      • Diesel variants - All models
    • Non Jaguar vehicles
      • Non-Jaguar Vehicles
    • Brand Review
      • Jaguar Press release
      • Jaguar Customer Relationship Centre
      • Jaguar Engines & transmissions
      • Wheels / Tires, Suspension & handling
      • Interior
      • Exterior
      • Audio/Visual Electronics
      • Detailing / Car care
      • Motorsports
    • Jaguar Classifieds
      • Marketplace
      • PRIVATE For Sale / Trade or Buy Classifieds
      • VENDOR 'For Sale' Classifieds
    • Regional
      • US Northeast
      • US Central
      • US Southwest
      • US Western
      • US Northwest
      • US Midwest
      • US Mid Atlantic
      • US Lower Atlantic
      • US Southern Midwest
      • Canada
      • Mexico, South America
      • UK & Eire
      • Europe
      • Australia - Queensland
      • Australia - New South Wales / ACT
      • Australia - Victoria / Tasmania
      • Australia - Western
      • Australia - South / NT
      • New Zealand
      • Other Areas
    • Official Site Sponsors
      • VENDOR Threads
    • General Interest / History
      • Sights N Sounds
      • Photography
      • Forum announcement archives / Forum History
      • Jaguarforums Merchandise
      • Memorial Section
  • News
  • Marketplace
    • Vendor Directory
    • Become a Vendor
    • Member Marketplace
    • Vendor Marketplace
    • Site Store
  • New Posts
  • Tools
    • Car Payment Calculator
    • Tire Rim Calculator
    • Vin Decoder
    • Recalls
    • Technical Service Bulletins (TSBs)
    • Members List
    • Live Feed
  • Gallery
  • View Dark Mode
    • Please register or login to enable Dark Mode.
  • Log In
  • Register
Jaguar Forums - Jaguar Enthusiasts Forum
    • Threads
      • Advanced
Dark Mode

Please register or login to enable Dark Mode.

Log In

Forgot your Password?

By logging into your account, you agree to our Terms of Use and Privacy Policy, and to the use of cookies as described therein.
or
 
  • Recent
  • Commented
  • Albums
  • My Pictures

My Post Pictures

Peter_of_Australia
August 13, 2022
 965
 0
Sort:
Most Recent
  • Default
  • Most Recent
Then turn it around carefully and prepare the overlap around the outer outline with cutter-knife and scissors. The idea is to spray adh. spray onto the overlap and fold it over in a way so that it does not fold over in two layers (makes the cuts accordingly).
0 2023/08/25 05:13:56 Peter_of_A
I have also done that second half in two steps. Looked really good.
0 2023/08/25 05:13:54 Peter_of_A
And when you are finidshed with THAT complete half, fold the unattached half back over the finished half. protect the newly attached fabric from accidentally being hit with  adh. spray with e.g. cardboard (but just in case: turpentine will remove the adh. spray again, if you act quickly) and start now again from the middle one that second half (adh. spray onto both sides).
And when you are finidshed with THAT complete half, fold the unattached half back over the finished half. protect the newly attached fabric from accidentally being hit with adh. spray with e.g. cardboard (but just in case: turpentine will remove the adh. spray again, if you act quickly) and start now again from the middle one that second half (adh. spray onto both sides).
0 2023/08/25 05:13:51 Peter_of_A
Then I cut the haedliner fabric to size (a bit of overlap) and positioned it as seen above - no adhesive spray applied YET. I protected the ground underneath (from the to be applied adh. spray) with cardboard and even the underside of the rear-seat. Make sure the headliner is positioned correctly (fold it over to test this). Fold it back and start applying adh. spray starting from the middle onto both sides (headliner and fabric). Maybe cover only half of that exposed half, then attach it (after
0 2023/08/25 05:13:49 Peter_of_A
I bought new foam and put in into place with "liquid nails" and extra strong roofing tape.
0 2023/08/25 05:13:47 Peter_of_A
That's the foam centre removed.
0 2023/08/25 05:13:45 Peter_of_A
Rejuvenated A-pillar cover - new fabric already applied.
0 2023/08/25 05:13:42 Peter_of_A
The A- and C-Pillar covers also looked quite poorly. I pulled off whatever I could.
0 2023/08/25 05:13:40 Peter_of_A
I just could not believe such an inadequate design and tried pulling out the domelamp first - I could not remove it, but I broke it while trying, but - no worries: I fixed it before re-installing it.
0 2023/08/25 05:13:37 Peter_of_A
That big centre was also foam - and also needed to be removed.
0 2023/08/25 05:13:35 Peter_of_A
That's the roof seen from inside without the headliner covering it.
0 2023/08/25 05:13:32 Peter_of_A
That is the previously mentioned "foam-dust" in the floor (Carpet removed for another reason).
0 2023/08/25 05:13:30 Peter_of_A
I hope you can see here the horrible design, which makes it impossible to pull the domelamp out from under the headliner WITHOUT removing the headliner first. With the headliner out, you can remove all the screws, etc., from above, and then remove the domelamp.
0 2023/08/25 05:13:27 Peter_of_A
That's the headliner removed at the front and back. Still needs to get detached around the sunroof opening.
0 2023/08/25 05:13:25 Peter_of_A
This and the next picture show the problem with the front dome lamp: It is not possible to pull the dome lamp out of the headliner (without removing the headliner first). Also, the lense cannot be pulled out from underneath - hence no way to change the bulb (horrible design). Here (red circle) you see the massive clip of the domelamp, which is wedge into the roof, holding the headliner up. Very hard to pull out of the roof.
0 2023/08/25 05:13:23 Peter_of_A
There are three plastic "clips" incorporated into the rear section of the headliner. Try your best to pull them out, but I am afraid, you will rip them off (break them) ion the process and you'll have to think of something new for installation later.
0 2023/08/25 05:13:19 Peter_of_A
If you pull long enough, you'll finally get to the connector of the cable to the sunvisor (cable for the vanity light) - disconnect.
0 2023/08/25 05:13:17 Peter_of_A
3 bolts are hidden under that cover.
0 2023/08/25 05:13:15 Peter_of_A
The bolts of the sunvisors are hidden under a cover, which needs to be removed first - remove.
0 2023/08/25 05:13:12 Peter_of_A
The bolts holding the handles are hidden under lids - remove.
0 2023/08/25 05:13:10 Peter_of_A
Old dirty and sagging headliner. Understand the following: If a headliner is sagging, it is not the thin fabric, which is visible, which detached itself, but that fabric was attached to a layer of foam, which disintegrated into foam-dust over time.
0 2023/08/25 05:13:06 Peter_of_A
0 2023/08/22 14:59:13 Peter_of_A
0 2023/08/22 14:59:09 Peter_of_A
My 2.5L X-Type has the ABS control module, where the connector is oriented as seen above.
0 2023/08/22 14:53:26 Peter_of_A
With that connector removed that side of the ABS control module, which attaches to the ABS pump, looks like the picture above.
0 2023/08/22 14:53:22 Peter_of_A
Finished. As new and US$200 plus postage saved...
0 2023/08/22 04:18:02 Peter_of_A
...and that's them installed.
0 2023/08/22 04:18:00 Peter_of_A
I did hand-trim those OUTER strips. As I mentioned: That part is a lot of work - the INNER lips however are a walk in the park.
0 2023/08/22 04:17:57 Peter_of_A
Those are my restored "   " before reinstallation.
Those are my restored " " before reinstallation.
0 2023/08/22 04:17:54 Peter_of_A
Now I would say leave the OUTER edge of the plastic-strip bare of rubber (if you had to remove the old remains. It looks good and there is not really a functional reason for this OUTER lip. If you like an extra challenge, you may do what I did: Cut for each side a length of 6mm wide (12mm at the bottom) rubber strips (I have a roll of 1mm rubber) and fix it to the plastic strip with black silicone (unless you have a better idea. This is very laborious and I would not re-do those OUTER lips again
0 2023/08/22 04:17:51 Peter_of_A
With scissors and cutter knife I remove the OUTER little lip completely (what is left of it anyway), and on the INNER lip I leave just sufficient rubber to attach the new strip on. You can really feel - when you cut the old rubber edge off, that this is utterly dry and brittle rubber, which the inner remainder is still soft rubber. Obviously the old rubber remains need to be cleaned (with isopropanol alcohol or wax & grease remover) before attaching the new strips. Cutting the old rubber is actu
0 2023/08/22 04:17:49 Peter_of_A
To remove them, you pull them towards you. It's a lot easier with this cheap tool. Starting from the top, then down from there is the way to go.
0 2023/08/22 04:17:47 Peter_of_A
Here you see that strip removed, turned over and placed next to where it was mounted. Plenty of dirt to be marveled at.
0 2023/08/22 04:17:44 Peter_of_A
This is what the old strips looked like.
0 2023/08/22 04:17:40 Peter_of_A
That picture is of the Aliexpress listing, where I bought this "car windshield seal strip", which comes in 14 and 19mm width - I bought 8m of 14mm strip for just short of AU$20 incl. Australian tax and free postage.
0 2023/08/22 04:17:36 Peter_of_A
And the shiny exhaust pipe bit gets back into it's designated home as well.
0 2023/08/17 06:42:02 Peter_of_A
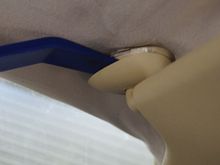
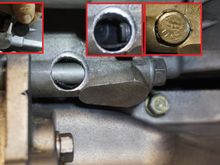
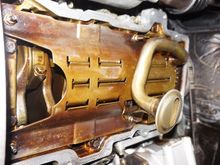
And now something, which I think no one thought of before: To prevent dirt, water and even salt water (from salt on the streets) (not that we have that issue in Australia) from entering at that newly trilled hole, I thought of something: After thightening all sump bolts (25Nm), I squashed black slicone thru that hole to cover it from the top and pressed a thin round bit of rubber underneath, pushed the big bolt back in, and then reused the now rounded and sprayed with clear coat head of the bold
0 2023/08/17 06:42:00 Peter_of_A
RTV as well (just, where the engine block meet the timing cover).
0 2023/08/17 06:41:57 Peter_of_A
New gasket and high temp RTV silicone
0 2023/08/17 06:41:54 Peter_of_A
Btw: This ant-eater's nose, which comes down there prevents you from swapping the gasket without fully removing then sump - just in case you had that in mind when you could not get the sump come out fully...
0 2023/08/17 06:41:52 Peter_of_A
First
Page
9 of 25
Last
Go To
Page
  • 1
  • ...
  • 7
  • 8
  • 9
  • 10
  • 11
  • ...
  • 25
9 of 25
Go To GO
Go to page of 25 pages
  • 1
  • ...
  • 7
  • 8
  • 9
  • 10
  • 11
  • ...
  • 25

Top
Jaguar Forums - Jaguar Enthusiasts Forum
  • Contact Us
  • FAQ
  • Archive
  • Advertising
  • Cookie Policy
  • Privacy Statement
  • Terms of Service
  • Your Privacy Choices
  • Manage Preferences

© 2026 MH Sub I, LLC dba Internet Brands

Follow Us        


When you click on links to various merchants on this site and make a purchase, this can result in this site earning a commission. Affiliate programs and affiliations include, but are not limited to, the eBay Partner Network.