Jaguar Forums - Jaguar Enthusiasts Forum
  • LOG IN
  • REGISTER
  • Forums
    • General Jaguar Forums
      • New Member Area - Intro a MUST
      • Jaguar Forums Feedback & Suggestion Center
      • General Tech Help
    • Jaguar Models ( Current )
      • XF (X260)
      • F-Type ( X152 )
      • XE ( X760 )
      • E-Pace
      • F-Pace (X761) / C-X17
      • I-Pace EV
    • Jaguar Models ( Modern )
      • XF and XFR ( X250 )
      • XJ ( X351 )
      • X-Type ( X400 )
      • S-Type / S type R Supercharged V8 ( X200 )
      • XJ XJ6 / XJ8 / XJR ( X350 & X358 )
      • XJ XJ8 / XJR ( X308 )
      • XJ XJ12 ( X305 )
      • XJ XJ6 / XJR6 ( X300 )
      • XK8 / XKR ( X100 )
      • XK / XKR ( X150 )
    • Jaguar Models ( Classics )
      • Mark V - X 420G
      • MKI / MKII S type 240 340 & Daimler
      • XK120 XK140 XK150
      • E type ( XK-E )
      • XJ6 & XJ12 Series I, II & III
      • XJS ( X27 )
      • XJ40 ( XJ81 )
      • XKSS
      • XJ220
    • Other Jaguars
      • Other Jaguar Models / Concepts / Replicas
    • Diesel variants
      • Diesel variants - All models
    • Non Jaguar vehicles
      • Non-Jaguar Vehicles
    • Brand Review
      • Jaguar Press release
      • Jaguar Customer Relationship Centre
      • Jaguar Engines & transmissions
      • Wheels / Tires, Suspension & handling
      • Interior
      • Exterior
      • Audio/Visual Electronics
      • Detailing / Car care
      • Motorsports
    • Jaguar Classifieds
      • Marketplace
      • PRIVATE For Sale / Trade or Buy Classifieds
      • VENDOR 'For Sale' Classifieds
    • Regional
      • US Northeast
      • US Central
      • US Southwest
      • US Western
      • US Northwest
      • US Midwest
      • US Mid Atlantic
      • US Lower Atlantic
      • US Southern Midwest
      • Canada
      • Mexico, South America
      • UK & Eire
      • Europe
      • Australia - Queensland
      • Australia - New South Wales / ACT
      • Australia - Victoria / Tasmania
      • Australia - Western
      • Australia - South / NT
      • New Zealand
      • Other Areas
    • Official Site Sponsors
      • VENDOR Threads
    • General Interest / History
      • Sights N Sounds
      • Photography
      • Forum announcement archives / Forum History
      • Jaguarforums Merchandise
      • Memorial Section
  • News
  • Marketplace
    • Vendor Directory
    • Become a Vendor
    • Member Marketplace
    • Vendor Marketplace
    • Site Store
  • New Posts
  • Tools
    • Car Payment Calculator
    • Tire Rim Calculator
    • Vin Decoder
    • Recalls
    • Technical Service Bulletins (TSBs)
    • Members List
    • Live Feed
  • Gallery
  • View Dark Mode
    • Please register or login to enable Dark Mode.
  • Log In
  • Register
Jaguar Forums - Jaguar Enthusiasts Forum
    • Threads
      • Advanced
Dark Mode

Please register or login to enable Dark Mode.

Log In

Forgot your Password?

By logging into your account, you agree to our Terms of Use and Privacy Policy, and to the use of cookies as described therein.
or
 
  • Recent
  • Commented
  • Albums
  • My Pictures

My Post Pictures

Peter_of_Australia
August 13, 2022
 965
 0
Sort:
Default
  • Default
  • Most Recent
That's part of my collection: Identical S-Type in front and back, plus Sovereign XJ8 (left) and X-Type (right), and a '97 Ford Fairlane (red)
0 2022/08/13 06:00:08 Peter_of_A
0 2022/08/13 06:21:00 Peter_of_A
cam cover right S-Type V6 3L extreme corrosion
0 2022/08/18 01:54:08 Peter_of_A
same on the left cam cover
0 2022/08/18 01:58:08 Peter_of_A
So this is how bad it was: Oil leaking left, right and centre. Spark plugs and ignition coils drowning.
0 2022/10/02 03:46:38 Peter_of_A
The the engine block looked really sad.
0 2022/10/02 03:46:41 Peter_of_A
This shows the worst of the galvanic corrosion self-destruction
0 2022/10/02 03:50:21 Peter_of_A
Old and new right cam cover: the breather hose needs to be "re-planted"...
0 2022/10/02 03:50:24 Peter_of_A
...and this is how to replant this breather hose: Carefully from underneath (after unscrewing a metal cover) you need to carefully press all 4 clips in simulaneoulsly to avoid damaging the breather.
0 2022/10/02 03:50:28 Peter_of_A
And another challenge on the left cam-cover as well: This breather hose also needs to be re-planted to the new cover: Carfully lift that little latch with a screwdriver and turn the whole thing anti-clockwise...
0 2022/10/02 03:54:10 Peter_of_A
...here you see the thread.
0 2022/10/02 03:54:12 Peter_of_A
Engine block after cleaning. I had to rub off a lot of "magnesium-paste" off the cams: All that "liquified" magnesium, which came off the cam covers.
0 2022/10/02 03:54:15 Peter_of_A
New upper & lower seals in injector-unit. New cam covers fitted.
0 2022/10/02 03:54:17 Peter_of_A
And a shiny air-intake to crown it all. I cleaned the part with wire-brushes of all kind and covered it with clear-coat (=better then new).
0 2022/10/02 03:54:20 Peter_of_A
hose JLM21497 at bottom of expansion tank - now with 2 of those green seals (see next picture)
0 2022/10/04 04:28:34 Peter_of_A
The old seals: black. The replacement I found: green.
0 2022/10/04 04:28:39 Peter_of_A
The water-pump... Not the most pretty sight....
0 2022/10/04 04:52:32 Peter_of_A
That flange for the hose was actually corroded thru at one point: A complete hole thru the material.
0 2022/10/04 04:52:37 Peter_of_A
The old rotten back-plate, and the new one, which is kind of not purchasable anywhere - I was just lucky.
0 2022/10/04 04:52:41 Peter_of_A
New water pump with new back-plate assembled already.
0 2022/10/04 04:52:43 Peter_of_A
After removing a whole lot of parts (incl. air-intake and fuel-injection-unit) you get access to that upper hose-flange-bit, which is screwed onto the engine block...
0 2022/10/04 05:08:55 Peter_of_A
This is the part I am talking about and it has 2 bad gaskets.
0 2022/10/04 05:08:59 Peter_of_A
And a similar part sits right under this previous part... I guess normally you would be expected to remove the upper left engine block down to the head-gasket, just to be able to remove the second bolt there...!But I just managed to use a standard spanner - painful and time-consuming, but it beats the alternative.
0 2022/10/04 05:09:02 Peter_of_A
Thus I got the second part off as well, but it was not possible to pull this part out of the engine block, nor could I turn it.
0 2022/10/04 05:09:05 Peter_of_A
The round thing is a mirror, which I used to see the rotten gasket in there.
0 2022/10/04 05:09:08 Peter_of_A
I used the mirror and this special tool to pick that gasket (XR85431) out of there and replaced it with a new one. Btw.: see that big oval hole, which is revealed after removing the cover-plate - I replaced that gasket as well: It was very hard to find that P/N. A nice guy from Jagdaim helped me on the phone. The P/N is AJ88279.
0 2022/10/04 05:09:11 Peter_of_A
And you see the P/Ns of the other 2 gaskets in the picture here.
0 2022/10/04 05:09:16 Peter_of_A
Looks much better than before: Cleaned with rotary wire brushed on drill, and then spray-pained with clear-coat.
0 2022/10/04 05:09:19 Peter_of_A
And after very laboriously putting that inaccessible bold of the lower part back in again and all the other part, it looked a whole lot better...
0 2022/10/04 05:09:22 Peter_of_A
I bought this 2004 S-Type 4 month ago - it looked great... - but the deeper I dug... After basically working on it for 4 month full time, I have pretty much fixed it now and restored it back to "new condition"
0 2022/10/10 05:38:36 Peter_of_A
The S-Type came with a very obvious fault: Dull plastic headlights, but I already knew how to fix that: "Turtle Wax - Headlight lens restorer". It's not cheap, but it does wonders, if used correctly. My headlights were actually that far gone that I had to start with wet sandpaper, which was more corse than the sanding pads provided: I started with 2000 grid wet paper & then worked my way thru provided pads. To apply the lens clarifying compound I used a drill with a rotation cloth - carefully!!!
0 2022/10/10 05:38:39 Peter_of_A
Here you see that the lenses are pretty clear again (after applying the lens sealing wipe. And here you also already see in the bottom right corner one of the 3 adjustments to end nowhere, as all the plastic-parts have basically pulverised over time. There are 2 adjustment screws and one adjustment motor (leveling) in the middle.
0 2022/10/10 05:38:41 Peter_of_A
This is the headlamp leveling motor... adjusting nothing, as everything is broken away.
0 2022/10/10 05:38:43 Peter_of_A
Here you see at the bottom some of the "pulverised plastic", which once held the reflector in place. Without them, you cannot adjust your headlamps any more and you have no control of where your light shines to. This should be a clear fail at the rego-check / MOT.
0 2022/10/10 05:38:47 Peter_of_A
It looks scary, but this is the way to do it: Best choose a warm day. After removing the black rubber from around the head lamps, carefully go around the circumfence of the headlightsand warm it up with a heat gun to soften the kind of black rubber-glue, which holds the head light together, Simulaneously you obviously have to open those clips, while prying open the housing with one of those cunning tools normally used to remove the inner trim from the doors of a Jag (see blue tool).
0 2022/10/10 05:38:51 Peter_of_A
With the clear plastic removed you now need to remove the reflector. Avoid touching the reflector - especially protect it from grease. Here you also see that there was really nothing left of those parts, which were supposed to fixate the reflector. Note the white parts on the grass.
0 2022/10/10 05:38:54 Peter_of_A
Gently push the soft rubber thru the opening.
0 2022/10/10 05:39:04 Peter_of_A
Sad picture of broken plastic parts. Unpack the repair kit with the parts you need. I found it on ebay under "Jaguar S-Type headlight adjuster 1999-2007". It contains 10 little parts. Most of those parts will be broken on your headlight. However, I did not use those 4 "sprockets: in the kit, as my old ones were not broken and I could not see how to replace them anyway. But those other 6 parts where utterly broken on my headlight, while other white plastic parts were perfectly OK.
0 2022/10/10 05:39:17 Peter_of_A
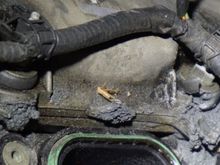
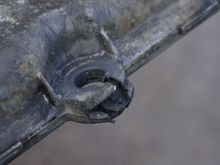
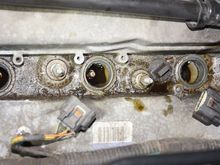
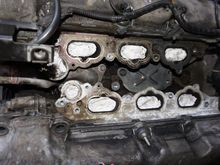
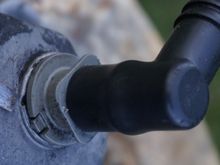
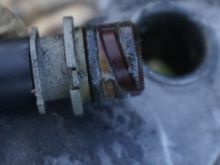
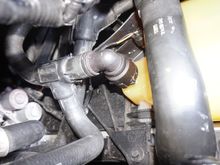
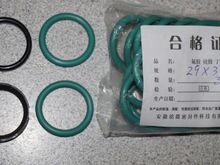
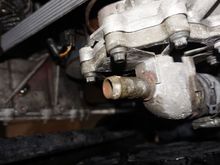
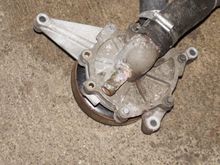
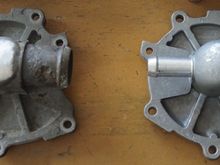
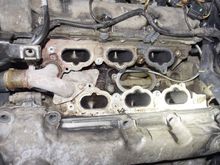
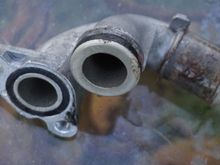
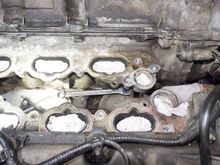
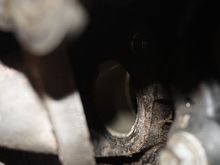
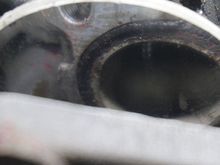
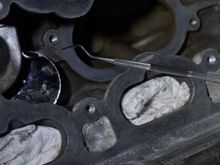
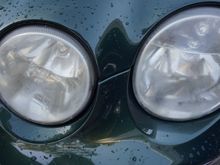
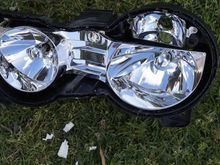
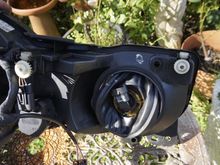
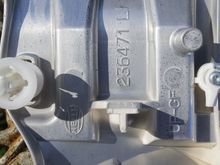
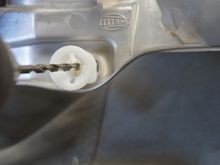
Those parts, which were broken, however, were that brittle that it was very easy to remove the sad remainders of them. Now, if some parts were that brittle after 18 years, and the other white parts where still OK, it clearly shows that Jaguar did something horribly wrong there...
0 2022/10/10 05:39:19 Peter_of_A
0 2022/10/10 05:39:21 Peter_of_A
First
Page
1 of 25
Last
Go To
Page
  • 1
  • 2
  • 3
  • 4
  • 5
  • 6
  • 7
  • ...
  • 25
1 of 25
Go To GO
Go to page of 25 pages
  • 1
  • 2
  • 3
  • 4
  • 5
  • 6
  • 7
  • ...
  • 25

Top
Jaguar Forums - Jaguar Enthusiasts Forum
  • Contact Us
  • FAQ
  • Archive
  • Advertising
  • Cookie Policy
  • Privacy Statement
  • Terms of Service
  • Your Privacy Choices
  • Manage Preferences

© 2026 MH Sub I, LLC dba Internet Brands

Follow Us        


When you click on links to various merchants on this site and make a purchase, this can result in this site earning a commission. Affiliate programs and affiliations include, but are not limited to, the eBay Partner Network.