Jaguar Forums - Jaguar Enthusiasts Forum
  • LOG IN
  • REGISTER
  • Forums
    • General Jaguar Forums
      • New Member Area - Intro a MUST
      • Jaguar Forums Feedback & Suggestion Center
      • General Tech Help
    • Jaguar Models ( Current )
      • XF (X260)
      • F-Type ( X152 )
      • XE ( X760 )
      • E-Pace
      • F-Pace (X761) / C-X17
      • I-Pace EV
    • Jaguar Models ( Modern )
      • XF and XFR ( X250 )
      • XJ ( X351 )
      • X-Type ( X400 )
      • S-Type / S type R Supercharged V8 ( X200 )
      • XJ XJ6 / XJ8 / XJR ( X350 & X358 )
      • XJ XJ8 / XJR ( X308 )
      • XJ XJ12 ( X305 )
      • XJ XJ6 / XJR6 ( X300 )
      • XK8 / XKR ( X100 )
      • XK / XKR ( X150 )
    • Jaguar Models ( Classics )
      • Mark V - X 420G
      • MKI / MKII S type 240 340 & Daimler
      • XK120 XK140 XK150
      • E type ( XK-E )
      • XJ6 & XJ12 Series I, II & III
      • XJS ( X27 )
      • XJ40 ( XJ81 )
      • XKSS
      • XJ220
    • Other Jaguars
      • Other Jaguar Models / Concepts / Replicas
    • Diesel variants
      • Diesel variants - All models
    • Non Jaguar vehicles
      • Non-Jaguar Vehicles
    • Brand Review
      • Jaguar Press release
      • Jaguar Customer Relationship Centre
      • Jaguar Engines & transmissions
      • Wheels / Tires, Suspension & handling
      • Interior
      • Exterior
      • Audio/Visual Electronics
      • Detailing / Car care
      • Motorsports
    • Jaguar Classifieds
      • Marketplace
      • PRIVATE For Sale / Trade or Buy Classifieds
      • VENDOR 'For Sale' Classifieds
    • Regional
      • US Northeast
      • US Central
      • US Southwest
      • US Western
      • US Northwest
      • US Midwest
      • US Mid Atlantic
      • US Lower Atlantic
      • US Southern Midwest
      • Canada
      • Mexico, South America
      • UK & Eire
      • Europe
      • Australia - Queensland
      • Australia - New South Wales / ACT
      • Australia - Victoria / Tasmania
      • Australia - Western
      • Australia - South / NT
      • New Zealand
      • Other Areas
    • Official Site Sponsors
      • VENDOR Threads
    • General Interest / History
      • Sights N Sounds
      • Photography
      • Forum announcement archives / Forum History
      • Jaguarforums Merchandise
      • Memorial Section
  • News
  • Marketplace
    • Vendor Directory
    • Become a Vendor
    • Member Marketplace
    • Vendor Marketplace
    • Site Store
  • New Posts
  • Tools
    • Car Payment Calculator
    • Tire Rim Calculator
    • Vin Decoder
    • Recalls
    • Technical Service Bulletins (TSBs)
    • Members List
    • Live Feed
  • Gallery
  • View Dark Mode
    • Please register or login to enable Dark Mode.
  • Log In
  • Register
Jaguar Forums - Jaguar Enthusiasts Forum
    • Threads
      • Advanced
Dark Mode

Please register or login to enable Dark Mode.

Log In

Forgot your Password?

By logging into your account, you agree to our Terms of Use and Privacy Policy, and to the use of cookies as described therein.
or
 
  • Recent
  • Commented
  • Albums
  • My Pictures

My Post Pictures

Peter_of_Australia
August 13, 2022
 965
 0
Sort:
Default
  • Default
  • Most Recent
I used over 100 year old red gum plank salvaged from a left-over board of an old house. Tined it a bit darker and applied real bee wax with a heat gun.
0 2022/11/21 15:34:52 Peter_of_A
Those are the backsides (which will not be seen in the car).
0 2022/11/21 15:34:54 Peter_of_A
This is the questionable beauty after removing the useless space-grabbing old mobile.
0 2022/11/21 15:34:58 Peter_of_A
As you may see, I used 6 little bits of wood more than originally planned to make it perfect. I also created those 2 tiny wodd inserts in the front of it, replacing the original plastic there
0 2022/11/21 15:34:59 Peter_of_A
With the remaining parts installed, it looks like it had always been that way - plus it is a coloour-match to the rest of the wood-veneer in the XJ8.
0 2022/11/21 15:35:01 Peter_of_A
Thus, out with the bransnew (but unsuitable) Nulon SYNATF
0 2022/11/26 03:45:34 Peter_of_A
And in with the expensive, but suitable Lifeguard 6
0 2022/11/26 03:45:37 Peter_of_A
When I did the ATF full flush last time, I did have the headlights removed anyway. But now, which the headlights installed, it made things easier to remove that black bracket (one of the two brackets holding the radiator in position.)
0 2022/11/26 04:00:02 Peter_of_A
When I did the ATF full flush last time, I did have the headlights removed anyway. But now, which the headlights installed, it made things easier to remove that bracket (one of the two brackets holding the radiator in position.)
0 2022/11/26 04:08:07 Peter_of_A
There is a groove at the expansion tank outflow. Somehow, this was damaged on one side (no longer wide enough for the clip (of the connection tube) to latch in. This fault  is very hard to spot, but the picture above makes the issue clear.
There is a groove at the expansion tank outflow. Somehow, this was damaged on one side (no longer wide enough for the clip (of the connection tube) to latch in. This fault is very hard to spot, but the picture above makes the issue clear.
0 2022/11/28 04:35:15 Peter_of_A
Also, initially I inserted 2 x seal
0 2022/11/28 04:35:17 Peter_of_A
I tried to use a little file to fix the damaged groove on the expansion tank - and sooner or later I would have succeeded, but since I had a new tank anyway, I used that instead. On the bottom you see the tube connected with that clip. It sits firm now.
0 2022/11/28 04:35:19 Peter_of_A
The rubber of my tibbe key (Fairlane) dissolved and I could not turn the key anymore. Thus I created a new "grip" for it: beer-bottle-lids (from both sides) and lead poured into the centre.
0 2022/11/30 00:18:50 Peter_of_A
0 2022/11/30 03:34:16 Peter_of_A
0 2022/11/30 03:34:18 Peter_of_A
0 2022/11/30 03:38:16 Peter_of_A
I just ordered 2 of these kits (for 2 S-Type). I already have the sleeve, but the kit comes with that sleeve. I need the adapter valve body and those 4 tubes.
0 2022/11/30 21:10:43 Peter_of_A
This special bolt - as you can see - broke off. I was definitely NOT applying excessive force - just normal force via ratchet to get it out. This special bolt can be found behind the timing front cover and it was holding one of the broken guides of the timing chain. This bolt should not have broken!
0 2022/12/10 03:04:51 Peter_of_A
This is the remaining, broken off, part of that bolt. I reckon the bolt is mild steel - and the engine block is aluminium. That is quite a challenge!
0 2022/12/10 03:04:54 Peter_of_A
In preparation of the drilling ahead I protected the engine from the upcoming shower of metal filings (when drilling) with soft cardboard and a huge magnet (to catch the mild steel filings).
0 2022/12/10 03:04:56 Peter_of_A
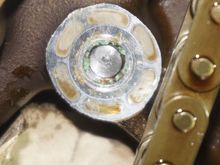
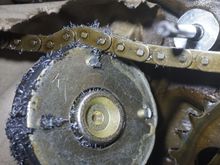
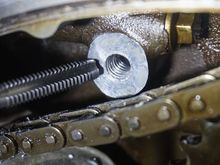
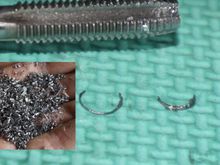
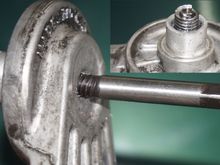
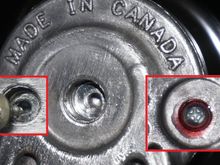
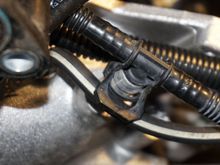
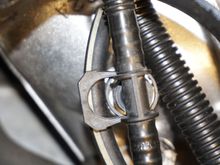
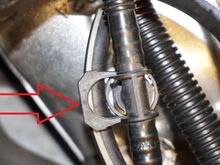
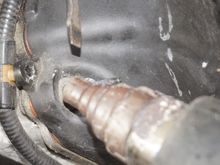
Below: I caught quite a few filings. Above: Hole drilled already and screw extractor inserted...: I drilled into the broken off screw extremely carefully: I used new HSS Co drill bits. Starting with 2mm, then 3.2mm, 4mm, 4.5, 5. Since I knew the length of the bit stuck in there (by comparing with the bolt from the other side (which I got out), I used a marker on my drill bit to that I knew, when I would get to the end of the bolt (making sure I would not continue on drilling into the engine behi
0 2022/12/10 03:04:59 Peter_of_A
But it was unbelievable: The extractors of all sizes starting from very small and getting bigger (with the bigger hole sizes) all had a very good grip, but the bolt-remains would not budge. I did not want to break the extractor in that hole. Initially I thought I would not drill bigger than 5mm, but it was not use: I had to go on to 5.5mm, 6mm, 6.5mm and even 7mm. It is obviously very important (and difficult at the same time) to hold the drill ABSOLUTELY straight. Else, I would drill into the t
0 2022/12/10 03:05:03 Peter_of_A
So at the end of the day, that bolt-remainder would not come out in the shape of the bolt, but I prevailed anyway, as I removed it in the shape of 1.000-10.000 particles without damaging the threaded part of the engine block. Those 2 half-rings were the biggest parts left form that bolt-remainder: It was the outer thread of the bolt.
0 2022/12/10 03:05:05 Peter_of_A
With my tab (thread cutter) size 8mm pitch 1.25 I cut a beautiful & useable thread into the engine block.
0 2022/12/10 03:05:07 Peter_of_A
Next problem: Without paying an arm and a leg (and waiting for ages for it to arrive in the mail), such a bolt cannot be procured. But see what I did: I "reused" the broken off old bolt by drilling all the way thru (using a drill in a stand and HSS Co drill bits, starting with small drill bits and using bigger ones thereafter. The result was perfect.
0 2022/12/10 03:05:09 Peter_of_A
I bought a 8mm x 40mm shouldered hex bolt. I then reduced the thickness of the old hex-head to precisely get the same length of thread lurking out. On the right: I put those 2 parts together and glued them together with high temperature silicone.
0 2022/12/10 03:05:11 Peter_of_A
On the next day I figured that I could actually make a special bolt instead, which is BETTER THAN ORIGINAL, because the hole it goes into in the engine happens to allow for a bit of extra length: I checked: 5mm longer is good. That way I can use even part of the old unused thread, which is utterly intact even after removing the stuck bit. So I removed the 8mm x 40mm bolt from the "sleeve" and replaced it with a 8mm x 45mm bolt - i.e. now I have a special bolt, which is 5mm longer than original.
0 2022/12/10 03:05:13 Peter_of_A
And this is the other broken off bolt I had to deal with: The belt tensioner is marketed as non fixable replacement part. Obviously the bearing of the idler puller on it needs to be replaced. The cost for that tensioner are horrendous. I was "hammering" that bolt of the pulley with an air-ratchet... - until it broke off - and only then I saw the trap Jaguar planted there: That was a left-handed bolt!!! What the ...!? The things they do to sell the complete tensioner! Anyway, as you can see above
0 2022/12/10 03:05:14 Peter_of_A
I was soooo lucky to find a left handed bolt! They did not have and left handed bolds in our local shop, where they sell bolts, screws and nuts only. But: the lawn-mower shop did have one. About 5mm shorter, though, and I also had to place a properly sized washer there as well to fixate the inner part of the bearing.
0 2022/12/10 03:05:16 Peter_of_A
But not to worry: 5mm shorter sounds a lot, but it is not that bad, because even the new bolt used nearly all the thread available (further out there was no more thread). Plus, I used the red loctite). Nevertheless, I went over the top, and I drilled a little hole into the new bolt and added another little screw from the other side. And used loctite again.
0 2022/12/10 03:05:19 Peter_of_A
All good again. I found a new metal idler pulley with bearing, replacin the crappy original plastic pulley (where bearings cannot be swapped). And funny: Hard to see, but the new black pulley is made in Canada (hard to see, printed on the right)...: Which is a perfect match with the rest of the tesioner (see picture above...).
0 2022/12/10 03:05:21 Peter_of_A
Circled in red: That clip fixes a T-piece (of a passing tube) to the lower throttle body.
0 2022/12/13 03:08:11 Peter_of_A
I already pulled that plastic-clip, which is an integral part of the clip, which I can't get off.
0 2022/12/13 03:08:13 Peter_of_A
And this is the top view of that mysterious clip design.
0 2022/12/13 03:08:15 Peter_of_A
So push that clip INTO the clip and then pull?
0 2022/12/13 03:25:04 Peter_of_A
0 2022/12/18 03:53:02 Peter_of_A
In those blue circles you can just spot the red pins from the new secondary tensioners. I am sure they need to be pulled, once everything else is fitted properly.  In those green circles are the primary tensioners. They also have red pins. Are they also supposed to be pulled? I did, but I am not sure, if that was correct - at least I just found a YT-video, where those were also pulled. But is that correct?
In those blue circles you can just spot the red pins from the new secondary tensioners. I am sure they need to be pulled, once everything else is fitted properly. In those green circles are the primary tensioners. They also have red pins. Are they also supposed to be pulled? I did, but I am not sure, if that was correct - at least I just found a YT-video, where those were also pulled. But is that correct?
0 2022/12/18 03:57:14 Peter_of_A
And once, that red pin of the primary tensioner is pulled: Am I supposed to move that black thing, which look like a bit of a chain (where the red arrow points at) into any direction?
0 2022/12/18 04:05:05 Peter_of_A
That little white "clip" on the wiring loom is just one example of a X-mas tree. I heated it up a bit to get it out, and then again I headed it up to get it back in again later.
0 2022/12/26 15:48:50 Peter_of_A
0 2022/12/27 01:57:51 Peter_of_A
First
Page
5 of 25
Last
Go To
Page
  • 1
  • 2
  • 3
  • 4
  • 5
  • 6
  • 7
  • ...
  • 25
5 of 25
Go To GO
Go to page of 25 pages
  • 1
  • 2
  • 3
  • 4
  • 5
  • 6
  • 7
  • ...
  • 25

Top
Jaguar Forums - Jaguar Enthusiasts Forum
  • Contact Us
  • FAQ
  • Archive
  • Advertising
  • Cookie Policy
  • Privacy Statement
  • Terms of Service
  • Your Privacy Choices
  • Manage Preferences

© 2026 MH Sub I, LLC dba Internet Brands

Follow Us        


When you click on links to various merchants on this site and make a purchase, this can result in this site earning a commission. Affiliate programs and affiliations include, but are not limited to, the eBay Partner Network.