Jaguar Forums - Jaguar Enthusiasts Forum
  • LOG IN
  • REGISTER
  • Forums
    • General Jaguar Forums
      • New Member Area - Intro a MUST
      • Jaguar Forums Feedback & Suggestion Center
      • General Tech Help
    • Jaguar Models ( Current )
      • XF (X260)
      • F-Type ( X152 )
      • XE ( X760 )
      • E-Pace
      • F-Pace (X761) / C-X17
      • I-Pace EV
    • Jaguar Models ( Modern )
      • XF and XFR ( X250 )
      • XJ ( X351 )
      • X-Type ( X400 )
      • S-Type / S type R Supercharged V8 ( X200 )
      • XJ XJ6 / XJ8 / XJR ( X350 & X358 )
      • XJ XJ8 / XJR ( X308 )
      • XJ XJ12 ( X305 )
      • XJ XJ6 / XJR6 ( X300 )
      • XK8 / XKR ( X100 )
      • XK / XKR ( X150 )
    • Jaguar Models ( Classics )
      • Mark V - X 420G
      • MKI / MKII S type 240 340 & Daimler
      • XK120 XK140 XK150
      • E type ( XK-E )
      • XJ6 & XJ12 Series I, II & III
      • XJS ( X27 )
      • XJ40 ( XJ81 )
      • XKSS
      • XJ220
    • Other Jaguars
      • Other Jaguar Models / Concepts / Replicas
    • Diesel variants
      • Diesel variants - All models
    • Non Jaguar vehicles
      • Non-Jaguar Vehicles
    • Brand Review
      • Jaguar Press release
      • Jaguar Customer Relationship Centre
      • Jaguar Engines & transmissions
      • Wheels / Tires, Suspension & handling
      • Interior
      • Exterior
      • Audio/Visual Electronics
      • Detailing / Car care
      • Motorsports
    • Jaguar Classifieds
      • Marketplace
      • PRIVATE For Sale / Trade or Buy Classifieds
      • VENDOR 'For Sale' Classifieds
    • Regional
      • US Northeast
      • US Central
      • US Southwest
      • US Western
      • US Northwest
      • US Midwest
      • US Mid Atlantic
      • US Lower Atlantic
      • US Southern Midwest
      • Canada
      • Mexico, South America
      • UK & Eire
      • Europe
      • Australia - Queensland
      • Australia - New South Wales / ACT
      • Australia - Victoria / Tasmania
      • Australia - Western
      • Australia - South / NT
      • New Zealand
      • Other Areas
    • Official Site Sponsors
      • VENDOR Threads
    • General Interest / History
      • Sights N Sounds
      • Photography
      • Forum announcement archives / Forum History
      • Jaguarforums Merchandise
      • Memorial Section
  • News
  • Marketplace
    • Vendor Directory
    • Become a Vendor
    • Member Marketplace
    • Vendor Marketplace
    • Site Store
  • New Posts
  • Tools
    • Car Payment Calculator
    • Tire Rim Calculator
    • Vin Decoder
    • Recalls
    • Technical Service Bulletins (TSBs)
    • Members List
    • Live Feed
  • Gallery
  • View Dark Mode
    • Please register or login to enable Dark Mode.
  • Log In
  • Register
Jaguar Forums - Jaguar Enthusiasts Forum
    • Threads
      • Advanced
Dark Mode

Please register or login to enable Dark Mode.

Log In

Forgot your Password?

By logging into your account, you agree to our Terms of Use and Privacy Policy, and to the use of cookies as described therein.
or
 
  • Recent
  • Commented
  • Albums
  • My Pictures

Peter_of_Australia's Photos

View Profile
Sort:
Commented
  • Most Recent
  • Most Comments
  • Albums
  • Photos
First you need to get a section of the exhaust out of the way: The short bit which attaches to the front catalyst - open the nut on that clamp.
0 2023/08/17 06:41:04 Peter_of_A
The rubber in the bigger bush is broken... I need to fix this somehow....
0 2023/08/14 22:12:49 Peter_of_A
0 2023/08/14 15:54:10 Peter_of_A
This is what you find, if you search for a "valve core remover", e.g. in ebay. It costs less than AU$2.
0 2023/08/12 15:58:41 Peter_of_A
0 2023/08/12 03:22:12 Peter_of_A
0 2023/08/12 03:22:08 Peter_of_A
Thus spoiler alert: This is what the kit for the rear calipers looks like (I will write a DIY guide about it).
0 2023/08/11 16:35:14 Peter_of_A
And right again.
And right again.
0 2023/08/11 06:22:02 Peter_of_A
...thus this would be the one one the right.
0 2023/08/11 06:21:59 Peter_of_A
I think this was the caliper on the left.
0 2023/08/11 06:21:56 Peter_of_A
That's what the actual ELV/ESL looks like on a Jaguar S-Type.
0 2023/08/08 15:50:20 Peter_of_A
That's where the ELV/ESL is located on a Jaguar S-Type.
0 2023/08/08 15:50:17 Peter_of_A
That's what a ELV/ESL looks like on a Mercedes.
0 2023/08/08 15:50:15 Peter_of_A
Thus, if I cannot make the pin on the wire narrower, I have to make pin 15 of the octopus a bit bigger in diameter. I heated up a soldering ion and each time before I used it to apply a tiny bit of solder onto that pin 15
0 2023/08/06 05:10:12 Peter_of_A
With that connector-pin pushed out, I could connect it now one its own to its opposing pin in the black connector-base of the ABS-unit (octopus). Purpose of that was, to get a feeling for how it sits on that pin - and it was very loose. Trying to bend that pin on the wire was a no go.
0 2023/08/06 05:10:08 Peter_of_A
I use here the needle on my multimeter-"feeler" to push back the blue tiny latch that holds the hollow connector-pin in position 15 and I press with a tiny screwdriver against that connector-pin to push it out.
0 2023/08/06 05:10:06 Peter_of_A
The black back cover also comes off very easy after pushing in the two latches with a very small screwdriver.
0 2023/08/06 05:10:04 Peter_of_A
Having traveled now that deep into CRAZY-LAND, I just proceeded one step further: Taking the big blue connector apart: That purple cover lifts off quite easily when poking with a very small screwdriver into those 3 latches with the black clips. The front right speed sensor connects to pin 15 and pin 16.
0 2023/08/06 05:10:01 Peter_of_A
Perfect contact, as you can see...
0 2023/08/06 05:09:58 Peter_of_A
To be able to measure and confirm, where the wire goes, I taped a needle to the red measuring end of the multimeter, which stuck nicely in the connector. Hence, questionable red-brown wire replaced... AND ABS PARTY LOIGHT Again after 2k's....
0 2023/08/06 05:09:54 Peter_of_A
Next drastic measure: bypassing red/brown wire from where the connector was before to just before the big blue connector (I measured and I confirmed in the electric diagram, that red brown wire goes to pin 15 in the big blue connector)
0 2023/08/06 05:09:52 Peter_of_A
I gave that connector the boot, i.e. I kicked it out and I soldered in 2 bits of wire of the same length to replace it... Guess what: Good for another 2k's until the ABS light went into party-mode again... BTW: Whenever I fixed it, I confirmed that there are those 600-700 Ohms on the connector to the speed-sensor / and whenever the ABS light was back in party-mode, there was again unlimited resistance on that same connector. So I knew I was digging at the right spot, but somehow I was missing th
0 2023/08/06 05:09:49 Peter_of_A
I added a picture of the box with NBR seals, as I am sure that that link above will not works anymore after a few month or years.
0 2023/08/05 17:21:00 Peter_of_A
In the front you see the old cam cover - note how the material dissolved itself - it just "melted away - that is electro-corrosion: Magnesium loosing the fight against aluminium and steel. Behind it the new cam cover, which I sourced myself in China directly - while they did not know exactly the material, they thought it may also be part magnesium, but it is supposed to be an alloy with only a small percentage of magnesium...
0 2023/07/30 04:08:05 Peter_of_A
0 2023/07/29 06:11:48 Peter_of_A
0 2023/07/29 06:11:46 Peter_of_A
Also note that the front cam cover is already shiny - the back one not yet... I also "shined up" the air-intake (using wire brushes on various power tools).
0 2023/07/29 06:11:41 Peter_of_A
This is how I removed the nuts. There is not too much you can do to fix that failure-design, I guess - I think I used liquid nails to "fix" those failed insert-bolts in their plastic-base again.
0 2023/07/29 05:03:00 Peter_of_A
As you can see: On my 2.5L X-Type the right 2 bolts were actually not normal bolts like the rest, but insert-bolts with nuts on top.
0 2023/07/29 05:02:55 Peter_of_A
0 2023/07/29 03:58:38 Peter_of_A
0 2023/07/28 06:28:29 Peter_of_A
And this is the reward...
0 2023/07/28 05:46:42 Peter_of_A
Next connect the airbag connectors again and push the yellow slider again away from the end with the cables to lock the connectors into position.
0 2023/07/28 05:46:40 Peter_of_A
Centre bolt back on. Tighten.
0 2023/07/28 05:46:38 Peter_of_A
Those 2 halves are already back on Next  push the 2 airbag connectors thru their opening in the SW, and then push that little black 6 pin connector thru that same hole coming from the other direction and push it into its proper position. Mount the steering wheel in the same orientation, in which you removed the other one before..
Those 2 halves are already back on Next push the 2 airbag connectors thru their opening in the SW, and then push that little black 6 pin connector thru that same hole coming from the other direction and push it into its proper position. Mount the steering wheel in the same orientation, in which you removed the other one before..
0 2023/07/28 05:46:35 Peter_of_A
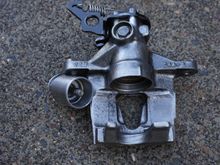
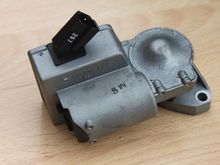
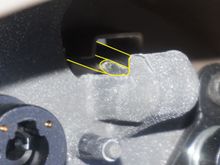
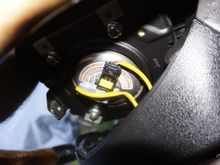
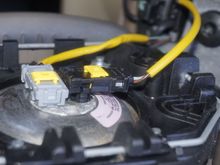
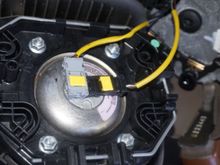
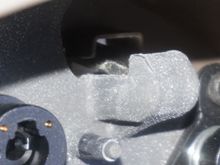
I should start with showing the SW, which I removed, after it had been removed, cause here you can see, what you can't see, properly, when the SW is mounted: Look at the housing (top of picture): 4 round holes (that is where you need to painfully harvest 4 torx screws from) and 3 square holes: There are no screws in those square holes. Instead you need to poke into those square holes with a fairly big flathead screwdriver (mid sized). I poked in and turned it again and again at 3, 6 and 9 o'cloc
0 2023/07/28 05:46:33 Peter_of_A
After removing the T50 torx centre bolt, the SW can be pulled off. Your are facing the clockspring now. Better leave that one alone and remember in which position you pulled of the SW. Note that I also removed here the upper and lower plastic cover behind the SW, just to clean them off (3 little torx to be removed from underneath, and then take those 2 halves apart carefully.
0 2023/07/28 05:46:30 Peter_of_A
Here is a picture of the black connector on its way out.
0 2023/07/28 05:46:27 Peter_of_A
This is the "spring wire" on the backside of the airbag - that silver "frame" - at 3, 6, and 9 o'clock the spring need to be pushed outwards of the hook....  Move the yellow slides towards the cable, then press the 2 little clips (exposed after sliding the yellow part away) and pull the whole connector out - black connector first, then gray.
This is the "spring wire" on the backside of the airbag - that silver "frame" - at 3, 6, and 9 o'clock the spring need to be pushed outwards of the hook.... Move the yellow slides towards the cable, then press the 2 little clips (exposed after sliding the yellow part away) and pull the whole connector out - black connector first, then gray.
0 2023/07/28 05:46:25 Peter_of_A
Here you see that metal hook, which clips on to the spring-wire, which the screwdriver (the tip of which is visible under the hook) need to force outwards over the hook
0 2023/07/28 05:46:23 Peter_of_A
First
Page
10 of 24
Last
Go To
Page
  • 1
  • ...
  • 8
  • 9
  • 10
  • 11
  • 12
  • ...
  • 24
10 of 24
Go To GO
Go to page of 24 pages
  • 1
  • ...
  • 8
  • 9
  • 10
  • 11
  • 12
  • ...
  • 24

Top
Jaguar Forums - Jaguar Enthusiasts Forum
  • Contact Us
  • FAQ
  • Archive
  • Advertising
  • Cookie Policy
  • Privacy Statement
  • Terms of Service
  • Your Privacy Choices
  • Manage Preferences

© 2026 MH Sub I, LLC dba Internet Brands

Follow Us        


When you click on links to various merchants on this site and make a purchase, this can result in this site earning a commission. Affiliate programs and affiliations include, but are not limited to, the eBay Partner Network.