Jaguar Forums - Jaguar Enthusiasts Forum
  • LOG IN
  • REGISTER
  • Forums
    • General Jaguar Forums
      • New Member Area - Intro a MUST
      • Jaguar Forums Feedback & Suggestion Center
      • General Tech Help
    • Jaguar Models ( Current )
      • XF (X260)
      • F-Type ( X152 )
      • XE ( X760 )
      • E-Pace
      • F-Pace (X761) / C-X17
      • I-Pace EV
    • Jaguar Models ( Modern )
      • XF and XFR ( X250 )
      • XJ ( X351 )
      • X-Type ( X400 )
      • S-Type / S type R Supercharged V8 ( X200 )
      • XJ XJ6 / XJ8 / XJR ( X350 & X358 )
      • XJ XJ8 / XJR ( X308 )
      • XJ XJ12 ( X305 )
      • XJ XJ6 / XJR6 ( X300 )
      • XK8 / XKR ( X100 )
      • XK / XKR ( X150 )
    • Jaguar Models ( Classics )
      • Mark V - X 420G
      • MKI / MKII S type 240 340 & Daimler
      • XK120 XK140 XK150
      • E type ( XK-E )
      • XJ6 & XJ12 Series I, II & III
      • XJS ( X27 )
      • XJ40 ( XJ81 )
      • XKSS
      • XJ220
    • Other Jaguars
      • Other Jaguar Models / Concepts / Replicas
    • Diesel variants
      • Diesel variants - All models
    • Non Jaguar vehicles
      • Non-Jaguar Vehicles
    • Brand Review
      • Jaguar Press release
      • Jaguar Customer Relationship Centre
      • Jaguar Engines & transmissions
      • Wheels / Tires, Suspension & handling
      • Interior
      • Exterior
      • Audio/Visual Electronics
      • Detailing / Car care
      • Motorsports
    • Jaguar Classifieds
      • Marketplace
      • PRIVATE For Sale / Trade or Buy Classifieds
      • VENDOR 'For Sale' Classifieds
    • Regional
      • US Northeast
      • US Central
      • US Southwest
      • US Western
      • US Northwest
      • US Midwest
      • US Mid Atlantic
      • US Lower Atlantic
      • US Southern Midwest
      • Canada
      • Mexico, South America
      • UK & Eire
      • Europe
      • Australia - Queensland
      • Australia - New South Wales / ACT
      • Australia - Victoria / Tasmania
      • Australia - Western
      • Australia - South / NT
      • New Zealand
      • Other Areas
    • Official Site Sponsors
      • VENDOR Threads
    • General Interest / History
      • Sights N Sounds
      • Photography
      • Forum announcement archives / Forum History
      • Jaguarforums Merchandise
      • Memorial Section
  • News
  • Marketplace
    • Vendor Directory
    • Become a Vendor
    • Member Marketplace
    • Vendor Marketplace
    • Site Store
  • New Posts
  • Tools
    • Car Payment Calculator
    • Tire Rim Calculator
    • Vin Decoder
    • Recalls
    • Technical Service Bulletins (TSBs)
    • Members List
    • Live Feed
  • Gallery
  • View Dark Mode
    • Please register or login to enable Dark Mode.
  • Log In
  • Register
Jaguar Forums - Jaguar Enthusiasts Forum
    • Threads
      • Advanced
Dark Mode

Please register or login to enable Dark Mode.

Log In

Forgot your Password?

By logging into your account, you agree to our Terms of Use and Privacy Policy, and to the use of cookies as described therein.
or
 
  • Recent
  • Commented
  • Albums
  • My Pictures

Peter_of_Australia's Photos

View Profile
Sort:
Commented
  • Most Recent
  • Most Comments
  • Albums
  • Photos
But I still need the lower section, which has its home under the oval. A cutting disc is your friend.
0 2023/09/27 06:04:13 Peter_of_A
That's the OE plastic insert. Normally it is not made possible to remove that part - but I found a way to remove those 4 rivets with a heat gun without causing much damage, which did not matter anyway, as it was fixed to the upper lip (above the oval), which I had to cut off anyway.
0 2023/09/27 06:04:11 Peter_of_A
...made sure that the wire bits all poke nicely thru the mesh, which I had cut to size, and then I laboriously bend over all the ends.
0 2023/09/27 06:04:09 Peter_of_A
I cut off small bits of the stainless steel mesh inserted them into the cable ties and...
0 2023/09/27 06:04:06 Peter_of_A
What is red here is the protective film on the double sided 3M clear sticky tape.
0 2023/09/27 06:04:04 Peter_of_A
I removed a bit of plastic above the oval aperture with a cutting disc and I brought cable zip tie mounts, attached them with liquid nails and later another layer of black roof and gutter silicone, which I should have taken to start with.
0 2023/09/27 06:04:02 Peter_of_A
HGZ Jaguar metallic racing green & clear coat
0 2023/09/27 06:04:00 Peter_of_A
The front bumper looked might poor, when I bought the 2.5L X-Type 6 month ago - it definitely needed new paint (just like the right frt. fender, the roof, the trunk-lid, the left sill and the left mirror. I started on the bumper properly with primer.
0 2023/09/27 06:03:57 Peter_of_A
0 2023/09/27 06:03:53 Peter_of_A
0 2023/09/27 05:59:41 Peter_of_A
0 2023/09/12 00:31:14 Peter_of_A
0 2023/09/12 00:31:13 Peter_of_A
Like that - better than ripped apart...
0 2023/09/11 23:58:44 Peter_of_A
Step 3: Revisiting the side with the black heat glue and melt it again to make it look nicer - more evenly looking.
0 2023/09/11 23:58:41 Peter_of_A
Step 1: Reconnection of the ripped pieces on the side facing the tyre with black heat-glue.
0 2023/09/11 23:58:37 Peter_of_A
Step 2: Smearing a layer of black roof silicone onto the other side and let it dry over night at least.
0 2023/09/11 23:58:34 Peter_of_A
0 2023/09/11 03:33:20 Peter_of_A
And this is the replacement for the ugly orange S-Type side indicator. Don't worry about the "blue" - that is just a protective foil.
0 2023/09/11 00:30:38 Peter_of_A
Action. Obviously, I did the same on the other side (you see it in the reflection in the X-Type).
0 2023/09/11 00:30:36 Peter_of_A
Done. And I checked, which two cables connect to the indicator bulb in the rear light. I spliced those 2 cables and connected them to the thin cable that goes to the side indicator. Polarity does not matter as there is obviously a rectifier incorporated into the LED side indicator,
0 2023/09/11 00:30:34 Peter_of_A
The moulding strip was guided into the correct position over night with a bit of duct tape
0 2023/09/11 00:30:32 Peter_of_A
I used a short strip of chrome moulding (30mm wide) and black silicone to cover the gap.
0 2023/09/11 00:30:30 Peter_of_A
Side indicator positioned
0 2023/09/11 00:30:28 Peter_of_A
Due to the extremely restricted space behind the bumper on my left rear (this is because of the CD changer), I had to come up with an idea of how to hold the nut in position while I insert the bolt: See above: As there is not enough space to hold the nut with 2 fingers, I taped the nut to ONE finger. That worked out alright. ON the right rear there is more space.
0 2023/09/11 00:30:26 Peter_of_A
Matching bolt & nut for the 5mm hole.
0 2023/09/11 00:30:24 Peter_of_A
SO this is the thin cable fed thru the dust flaps. I soldered the cable into the "T10" connector of the side indicators and then  covered this with shrink tube.
SO this is the thin cable fed thru the dust flaps. I soldered the cable into the "T10" connector of the side indicators and then covered this with shrink tube.
0 2023/09/11 00:30:22 Peter_of_A
The CD-Changer in my S-Type is in the boot on the left. It is blocking proper access to the "dust flaps" (seen here behind the aperture). Hence, I used a bit of wire (the arrow points at it) to guide a thin bit of electric cable past those dust flaps. A fairly thin cable does not disturb those dust flaps too much. If the cable is too thick, it holds the flaps open and you'd get more dust into the boot.
0 2023/09/11 00:30:20 Peter_of_A
That metal part is used to extend the length of the side indicator to match the aperture in the S-Type, where the reflector was. Black roofing silicone is doing the trick. Next I need to mark very precisely the 5mm hole, which needs to be drilled (see part with hole 3 pictures below).
0 2023/09/11 00:30:18 Peter_of_A
I cut a bit of cardboard to size to produce a template which then let me cut off the right size of a bit of sheet metal (it was roofing sheet metal)
0 2023/09/11 00:30:15 Peter_of_A
Using a little file and a cutter knife to reduce the thickness of the black bit of plastic behind the bumper in position, where the shortened clip (see picture right above) will latch in. As is, the thickness of bumper plus black plastic behind bumper is a tad too much.
0 2023/09/11 00:30:11 Peter_of_A
In detail: a bit of the plastic clip removed
0 2023/09/11 00:30:09 Peter_of_A
That's a side indicator from a Jaguar X-Type. Modifications: Where the arrow points at I removed the front bit of a plastic clip, plus I removed that stud in the red circle.
0 2023/09/11 00:30:06 Peter_of_A
That's a reflector removed - this will give you a good idea, where to squeeze to get them out.
0 2023/09/11 00:30:04 Peter_of_A
If you squeeze the plastic-clips of the reflectors from behind the bumper as bit (it is not difficult to get there with your arm from underneath the car), it is quite easy to remove them.
0 2023/09/11 00:30:01 Peter_of_A
Orange side-reflectors... - ugly as!
0 2023/09/11 00:29:57 Peter_of_A
0 2023/09/06 23:07:03 Peter_of_A
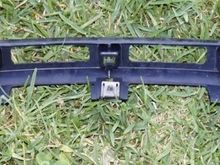
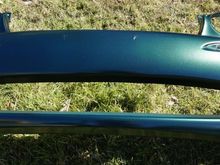
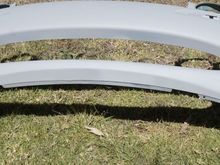
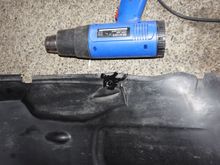
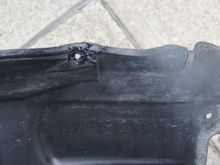
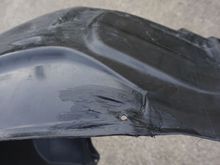
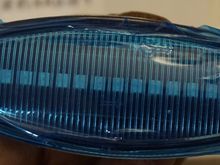
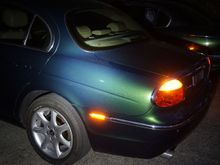
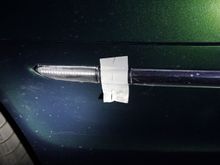
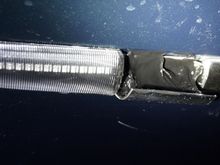
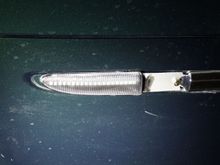
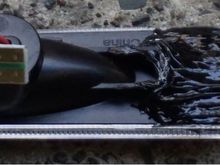
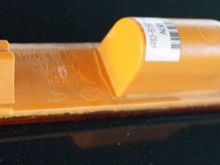
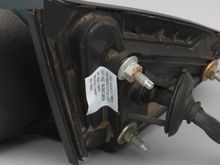
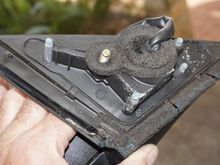
...and this is the fixing mechanism of the S-Type ext. mirror (2004). While the mirror look the same from outside, the fixing mechanisms differs, which make them non-interchangeable. Maybe, if you apply some drastic measures, it would be possible to interchange them, but I would not want to try that. I also cannot se a way to re-use the "base" with fixing points and attach it to the mirror of the other model. Sadly. (I took the picture above from the internet).
0 2023/09/01 04:22:55 Peter_of_A
And as you can see, I placed a bit of rubber seal over the torn section. It is the same rubber seal I used already to fix the weather-strips to the left and right of the windscreen.
0 2023/09/01 04:19:13 Peter_of_A
Back to the torn rubber seal: I removed 50% of that torn lip - the remainder was still pretty damaged.
0 2023/09/01 04:19:08 Peter_of_A
I noticed that the lower part of the rubber seal was utterly porous, dry, ripped apart into pieces and in dire need of attention. - But for now a little comparison so this is the fixing mechanism of the X-Type ext. mirror (2004), and...
0 2023/09/01 04:19:04 Peter_of_A
First
Page
7 of 24
Last
Go To
Page
  • 1
  • ...
  • 5
  • 6
  • 7
  • 8
  • 9
  • ...
  • 24
7 of 24
Go To GO
Go to page of 24 pages
  • 1
  • ...
  • 5
  • 6
  • 7
  • 8
  • 9
  • ...
  • 24

Top
Jaguar Forums - Jaguar Enthusiasts Forum
  • Contact Us
  • FAQ
  • Archive
  • Advertising
  • Cookie Policy
  • Privacy Statement
  • Terms of Service
  • Your Privacy Choices
  • Manage Preferences

© 2026 MH Sub I, LLC dba Internet Brands

Follow Us        


When you click on links to various merchants on this site and make a purchase, this can result in this site earning a commission. Affiliate programs and affiliations include, but are not limited to, the eBay Partner Network.