LOG IN
REGISTER
Forums
General Jaguar Forums
New Member Area - Intro a MUST
Jaguar Forums Feedback & Suggestion Center
General Tech Help
Jaguar Models ( Current )
XF (X260)
F-Type ( X152 )
XE ( X760 )
E-Pace
F-Pace (X761) / C-X17
I-Pace EV
Jaguar Models ( Modern )
XF and XFR ( X250 )
XJ ( X351 )
X-Type ( X400 )
S-Type / S type R Supercharged V8 ( X200 )
XJ XJ6 / XJ8 / XJR ( X350 & X358 )
XJ XJ8 / XJR ( X308 )
XJ XJ12 ( X305 )
XJ XJ6 / XJR6 ( X300 )
XK8 / XKR ( X100 )
XK / XKR ( X150 )
Jaguar Models ( Classics )
Mark V - X 420G
MKI / MKII S type 240 340 & Daimler
XK120 XK140 XK150
E type ( XK-E )
XJ6 & XJ12 Series I, II & III
XJS ( X27 )
XJ40 ( XJ81 )
XKSS
XJ220
Other Jaguars
Other Jaguar Models / Concepts / Replicas
Diesel variants
Diesel variants - All models
Non Jaguar vehicles
Non-Jaguar Vehicles
Brand Review
Jaguar Press release
Jaguar Customer Relationship Centre
Jaguar Engines & transmissions
Wheels / Tires, Suspension & handling
Interior
Exterior
Audio/Visual Electronics
Detailing / Car care
Motorsports
Jaguar Classifieds
Marketplace
PRIVATE For Sale / Trade or Buy Classifieds
VENDOR 'For Sale' Classifieds
Regional
US Northeast
US Central
US Southwest
US Western
US Northwest
US Midwest
US Mid Atlantic
US Lower Atlantic
US Southern Midwest
Canada
Mexico, South America
UK & Eire
Europe
Australia - Queensland
Australia - New South Wales / ACT
Australia - Victoria / Tasmania
Australia - Western
Australia - South / NT
New Zealand
Other Areas
Official Site Sponsors
VENDOR Threads
General Interest / History
Sights N Sounds
Photography
Forum announcement archives / Forum History
Jaguarforums Merchandise
Memorial Section
News
Marketplace
Vendor Directory
Become a Vendor
Member Marketplace
Vendor Marketplace
Site Store
New Posts
Tools
Car Payment Calculator
Tire Rim Calculator
Vin Decoder
Recalls
Technical Service Bulletins (TSBs)
Members List
Live Feed
Gallery
View Dark Mode
Please register or login to enable Dark Mode.
Log In
Register
Threads
Google
Threads
Posts
Advanced
Dark Mode
Please register or login to enable Dark Mode.
Log In
Forgot your Password?
By logging into your account, you agree to our
Terms of Use
and
Privacy Policy
, and to the use of cookies as described therein.
or
Login with Google
Login with Facebook
Recent
Commented
Albums
My Pictures
Thermo's Photos
View Profile
Sort:
Commented
Most Recent
Most Comments
Albums
Photos
IMG 4884 (1024x683)
0
2014/09/08 16:21:56
Thermo
IMG 4883 (1024x683)
0
2014/09/08 16:21:21
Thermo
IMG 4882 (1024x683)
0
2014/09/08 16:21:21
Thermo
IMG 4879 (1024x683)
0
2014/09/08 16:21:21
Thermo
IMG 4878 (1024x683)
0
2014/09/08 16:20:54
Thermo
IMG 4876 (1024x683)
0
2014/09/08 16:20:54
Thermo
IMG 4873 (1024x683)
0
2014/09/08 16:20:54
Thermo
IMG 4872 (1024x683)
0
2014/09/08 16:20:25
Thermo
IMG 4864 (1024x683)
0
2014/09/08 16:20:25
Thermo
IMG 4860 (1024x683)
0
2014/09/08 16:20:25
Thermo
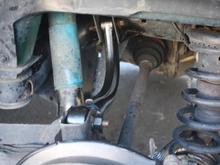
Side view of what the adjuster end looks like once installed in the car. The allen bolt on the bottom of the arm is what locks the adjuster in place. Make sure this is tight. You can also see that the modification has been performed to allow the tire to sit correctly.
0
2013/01/20 14:58:15
Thermo
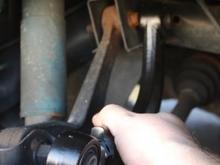
What the arms look like after the required modification. The modification is nothing more than removing the locking nut and then screwing the adjustable mount in as far as it will go along with the adjuster. The nut that I removed is sitting below and to the right of the new arm, near where it was removed from.
0
2013/01/20 14:55:51
Thermo
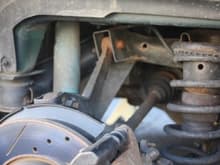
Top down view of what the new arm looks like. This arms comes much closer to the CV axle than the old one did, but it misses and is no issue.
0
2013/01/20 14:55:51
Thermo
From this angle, it looks like the arm might touch the CV axle. Trust me, it clears. Not a lot of extra space, but there is enough.
0
2013/01/20 14:55:51
Thermo
Side by side comparison in the car.
0
2013/01/20 14:50:32
Thermo
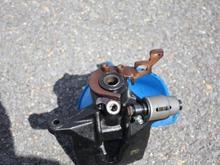
What the old one looks like.
0
2013/01/20 14:50:32
Thermo
switchablerelay
0
2012/11/14 17:21:43
Thermo
The mating surfaces cleaned. You can see the dramatic difference between before and after. At this point, put the caliper back together and you are golden. Just don't poke a hole in the weather seal for the piston
0
2012/05/12 13:08:19
Thermo
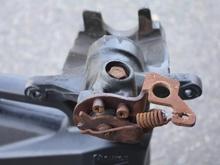
If you look at the collar of the actuator and the matching surface of the caliper body, you can see all the rust that is the issue. All if this needs to be removed. You should be able to put the two pieces back together and move them with your hand when you are done. Do not forget to lube them to prevent future problems.
0
2012/05/12 13:08:19
Thermo
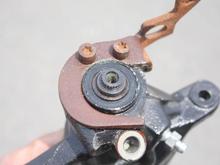
Shot of the Pentabolt removed. Look inside the hole. Make special note of how the inside piece is positioned. You will need to return it to this position. It fits many ways, but can only be installed 1 way for everything to work properly.
0
2012/05/12 13:08:19
Thermo
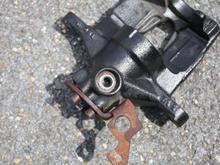
If you look closely, you can see a brown ring between the shaft and the body of the caliper. That is rust. The shaft has rusted to the body, resulting in the e-brake not being able to move. You need to remove this rust.
0
2012/05/12 13:05:26
Thermo
The e-brake lever has been removed. You can see the weather seal there. You will need to remove this. A small screw driver will allow you to slide under this seal and it will pop right off.
0
2012/05/12 13:05:26
Thermo
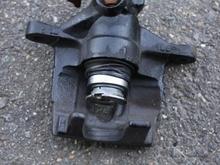
Inside shot of the caliper. The rubber weather gasket for the piston has been removed. But the inside piston seal is still there (black ring).
0
2012/05/12 13:05:26
Thermo
Starting to remove the piston. Rotate till the piston will not come out any more. Then pull the piston straight out. If you are even at a slight angle, it will fight you the whole way. You see that the boot will stretch to fit over the piston.
0
2012/05/12 13:02:07
Thermo
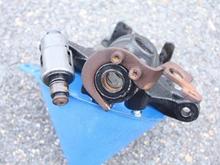
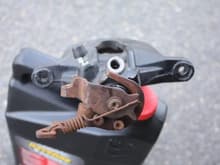
The start of the rebuild. Underneath shot. Notice the 5 point (14mm) bolt. You will need to remove this later. Requires a special (pentasocket) socket.
0
2012/05/12 13:02:07
Thermo
Top shot of the caliper. Notice how the e-brake arm is nice and rusty. You will see later where this rust has caused this to bind up. If you see the post at the 4 o'clock position on the lever, that should be up against the bolt at the 6 o'clock position. Obviously frozen.
0
2012/05/12 13:02:07
Thermo
My new caps next to the old cap.
0
2012/02/01 11:58:48
Thermo
What the old cap looked like.
0
2012/02/01 11:58:48
Thermo
The new cap installed
0
2012/02/01 11:58:48
Thermo
ssbn731 16
0
2011/10/10 13:36:42
Thermo
nitto tire add (800x500)
0
2011/10/03 15:23:54
Thermo
IMG 1028 (800x533)
0
2011/07/16 17:46:08
Thermo
IMG 1025 (800x533)
0
2011/07/16 17:46:08
Thermo
IMG 1024 (800x533)
0
2011/07/16 17:46:08
Thermo
Under the tree at sunset
0
2011/06/01 17:39:06
Thermo
LED DRLs, home crafted from nine 285K MCD 10mm LEDs (per side) and then embedded in a water clear resin.
0
2010/10/23 20:13:32
Thermo
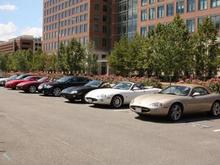
Mine and Nav's X-Types side by side. Nav is looking to get the wheel well gap like I have once he gets his drop springs installed.
0
2010/10/23 20:11:56
Thermo
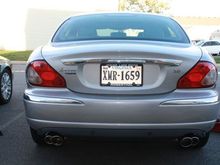
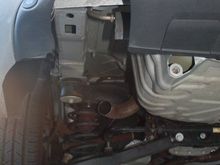
All done. The finished product with the exhaust system properly aligned.
0
2010/10/23 20:11:56
Thermo
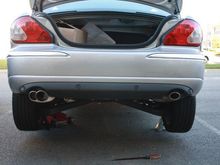
IN process. Driver's side done, moving on to the passenger side.
0
2010/10/23 20:11:56
Thermo
The empty hole left from the removed muffler
0
2010/10/23 20:10:59
Thermo
First
Page
3 of 5
Last
Go To
Page
1
2
3
4
5
3 of 5
Go To
GO
Go to page
of 5
pages
1
2
3
4
5