
Rear Door Lock Actuator Fix W/Pics FAQ
#1
 12-29-2011, 10:14 AM

Problem, rear door will not lock/unlock except manually. I can hear the actuator motor run but lock does not engage or disengage.
First off I am going to say that this is a mechanically intensive repair. Out of all my DIYs, this one was the most difficult. May be not so much as just replacing the actuator motor/lock mechanism but I repaired the broken plastic gear, (we will see how long it holds up). There are many parts to the repair side of things, which there are no parts break down and I had to figure what went where.
It is very possible that you will break somethings that are important and somethings not so important. Also may end up scratching some parts. Proceed with caution!
I would reccomend that you have JTIS or alldatadiy available. There are a few smaller steps that I do not cover.
Drivers side (US) rear door actuator locking mechanism part # XR853056 $292.00. I did not try to cross reference.
Difficulty level: Difficult (see above)
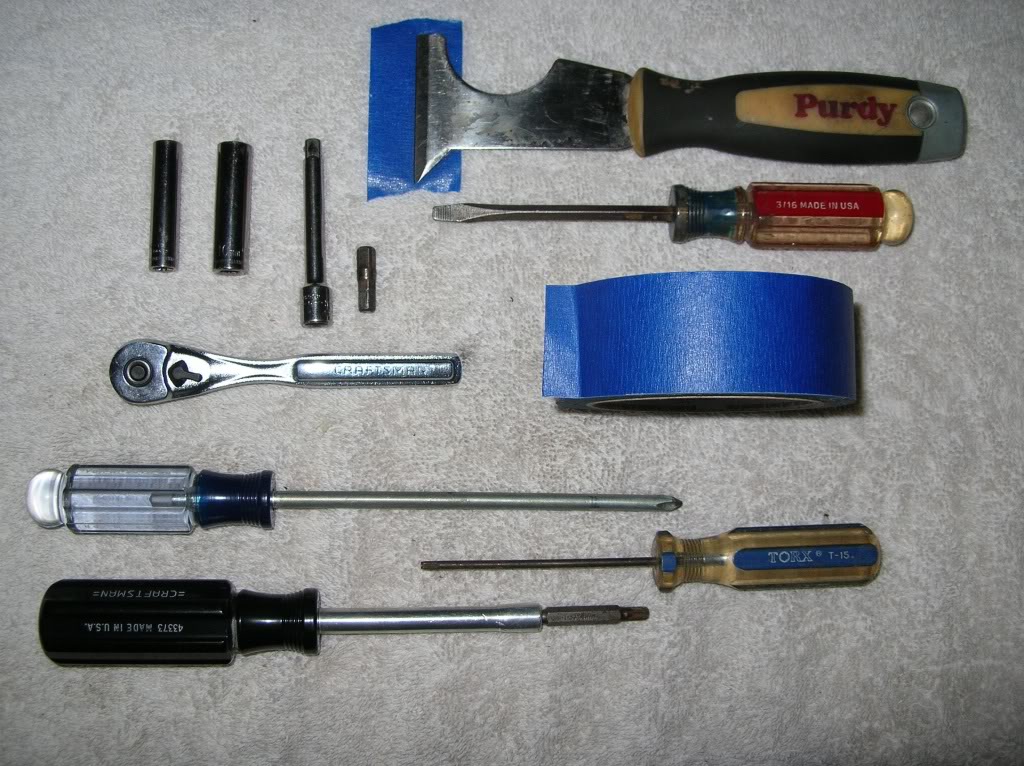
Tools needed: T30 and T15 Torx drivers, regular & phillips screw driver, ratchet with 8mm and 10mm sockets, (extention optional), trim panel removal tool (I use a painters 6 in 1), masking tape, flashlite. Better have some Band Aids close by (optional but needed) .
.
Time: 3 hours if replacing with new actuator locking mechanism, 4 hours if repairing actuator gear.
Lets start off:
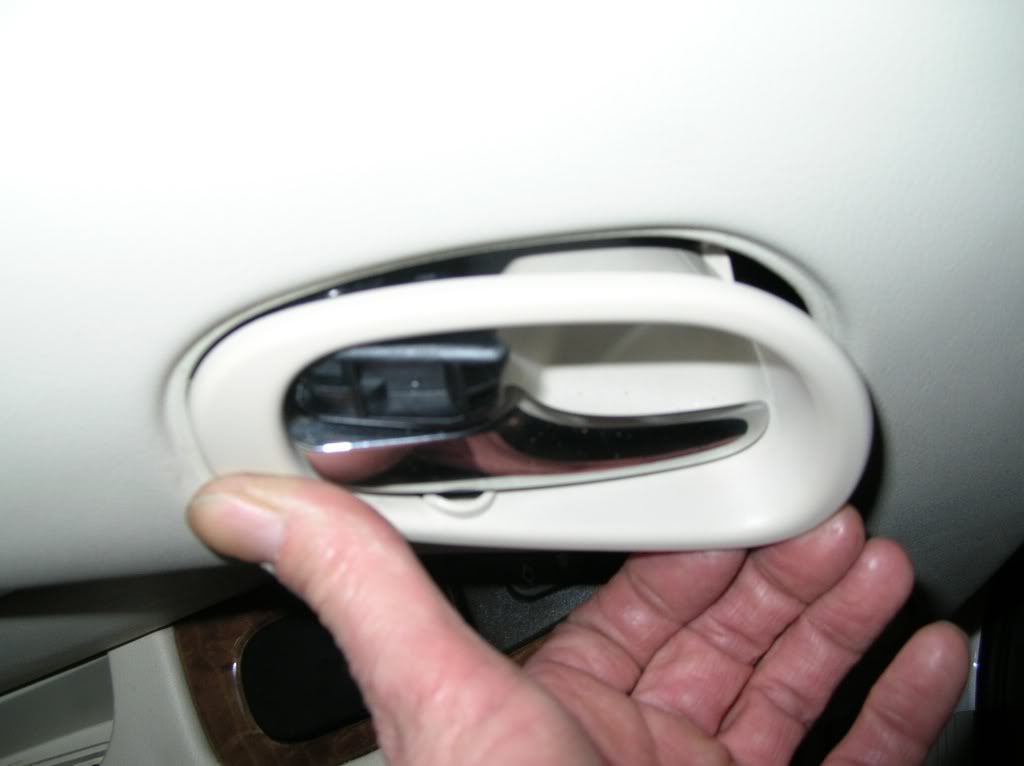
Remove the interior door handle trim (cup). Gently prying from front to back. Remove T30 screw that holds interior handle assembly to door skin.
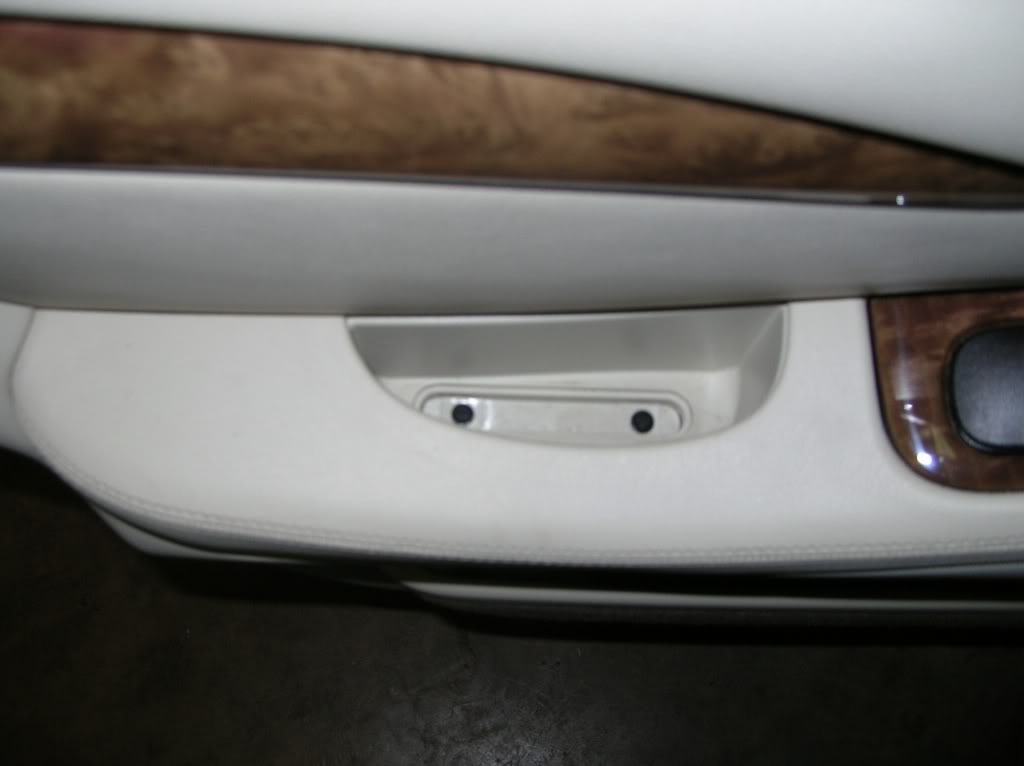
Remove the 2 phillips screws located in the armrest.
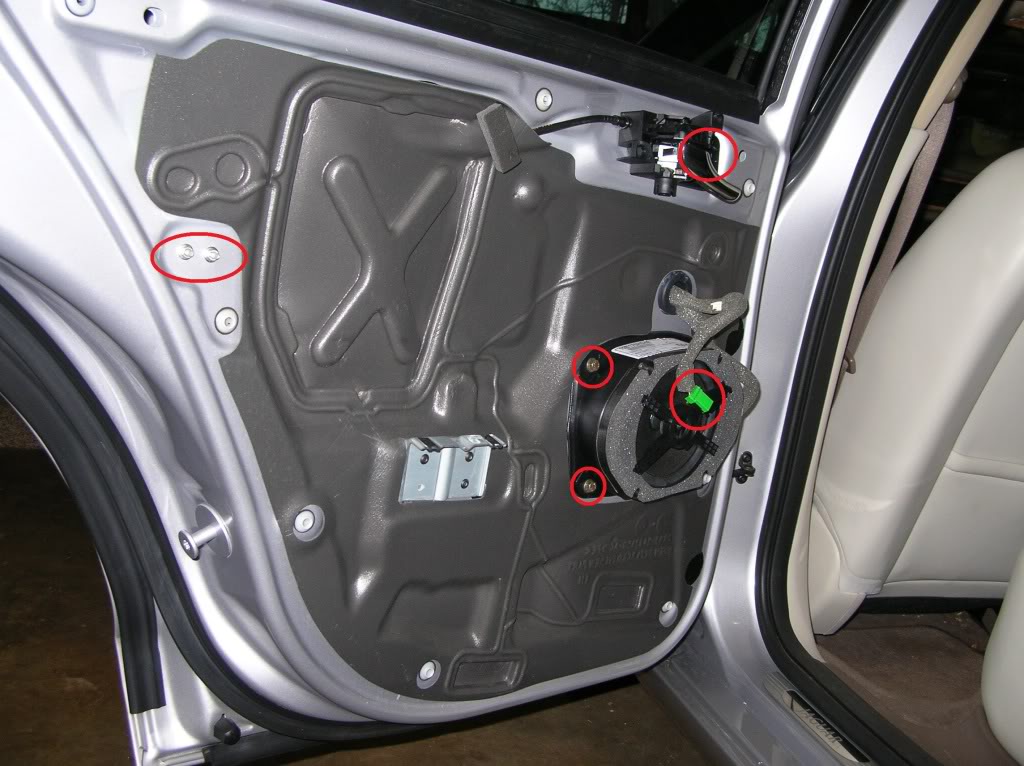
Remove interior door trim panel using panel removal tool of choice. Disconnect 2 wiring harnesses. Remove the 4 speaker 10mm bolts, remove speaker. This gives you more work room.
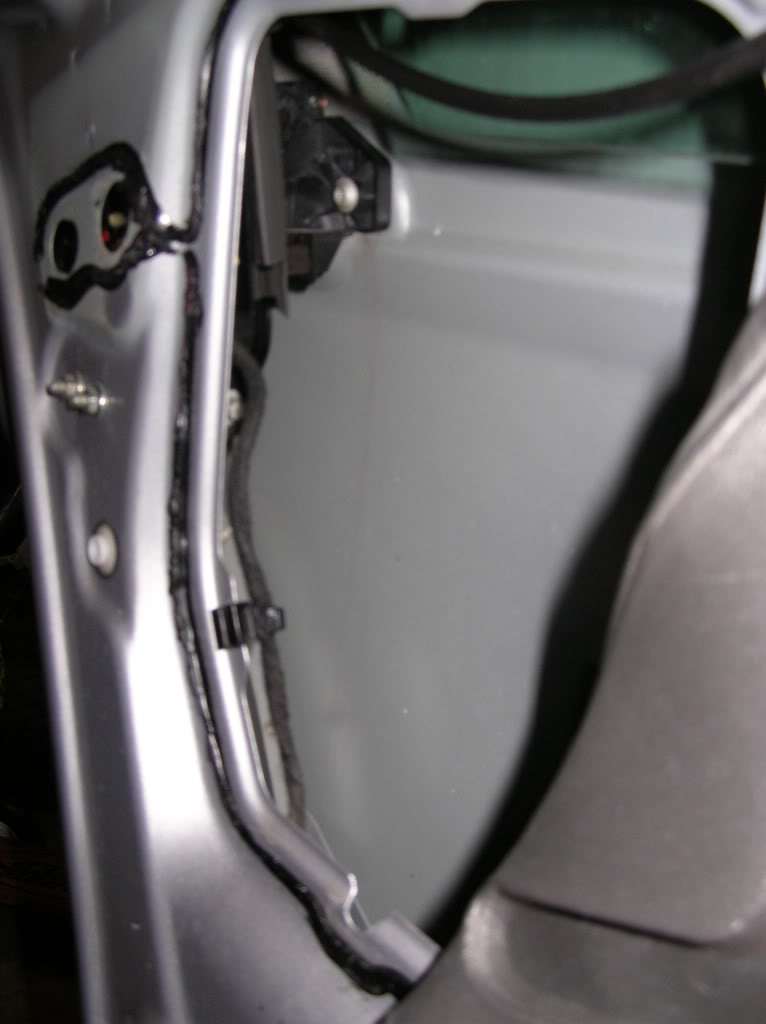
Carefully peel sound proofing from door skin, working from top left diagonally down to expose cut out. It is not necessary to remove entire sound proofing.
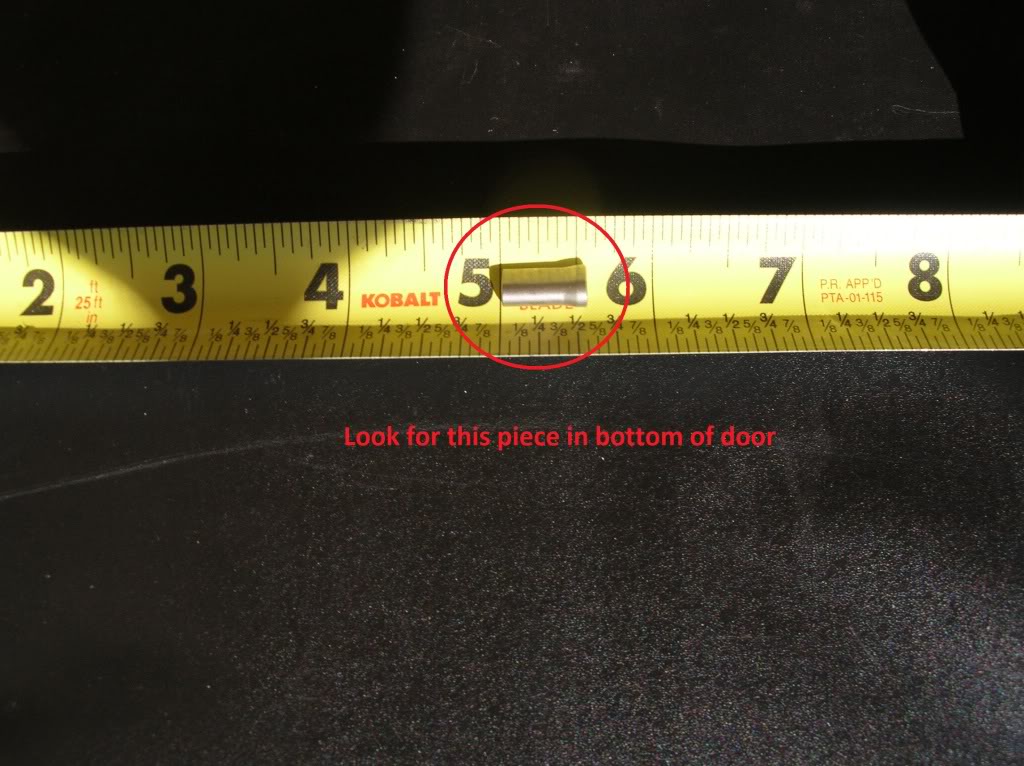
Now look for this piece somewhere in the bottom of the door. If you cannot find it, time to purchase a new actuator locking mechanism. STOP NOW!!
Assuming you have found the part, let the fun begin!!
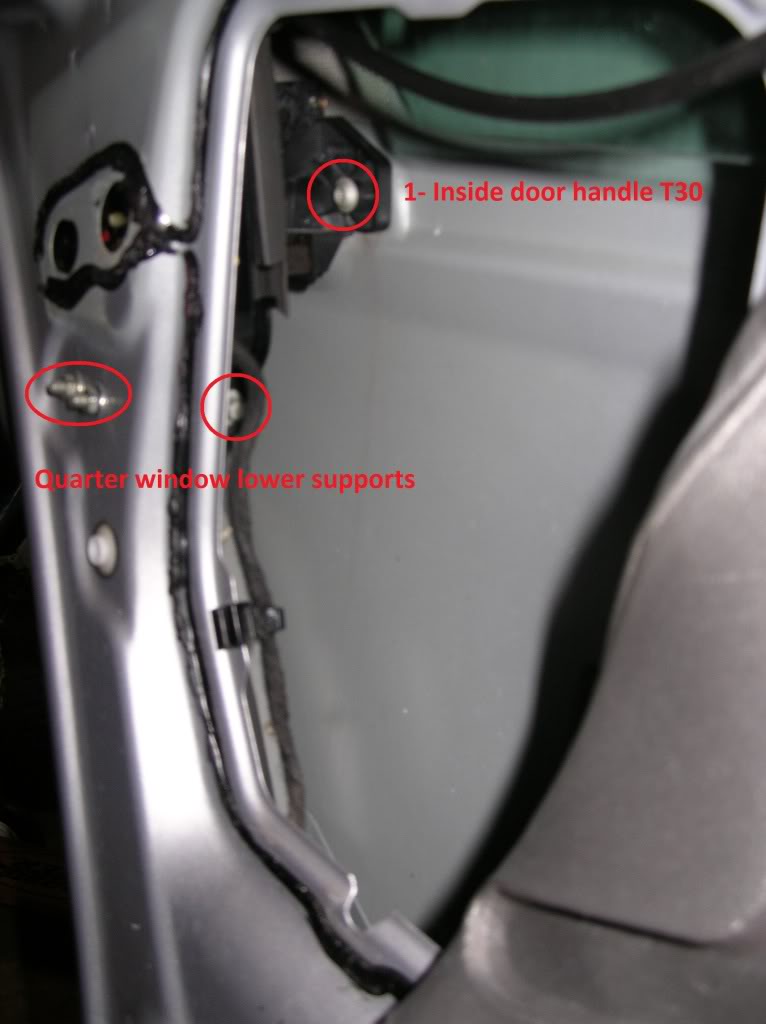
The quater window and track will have to be removed (not fun). Remove the lower track 10mm bolt from support. Remove 2- 10mm support nuts. Remove support.
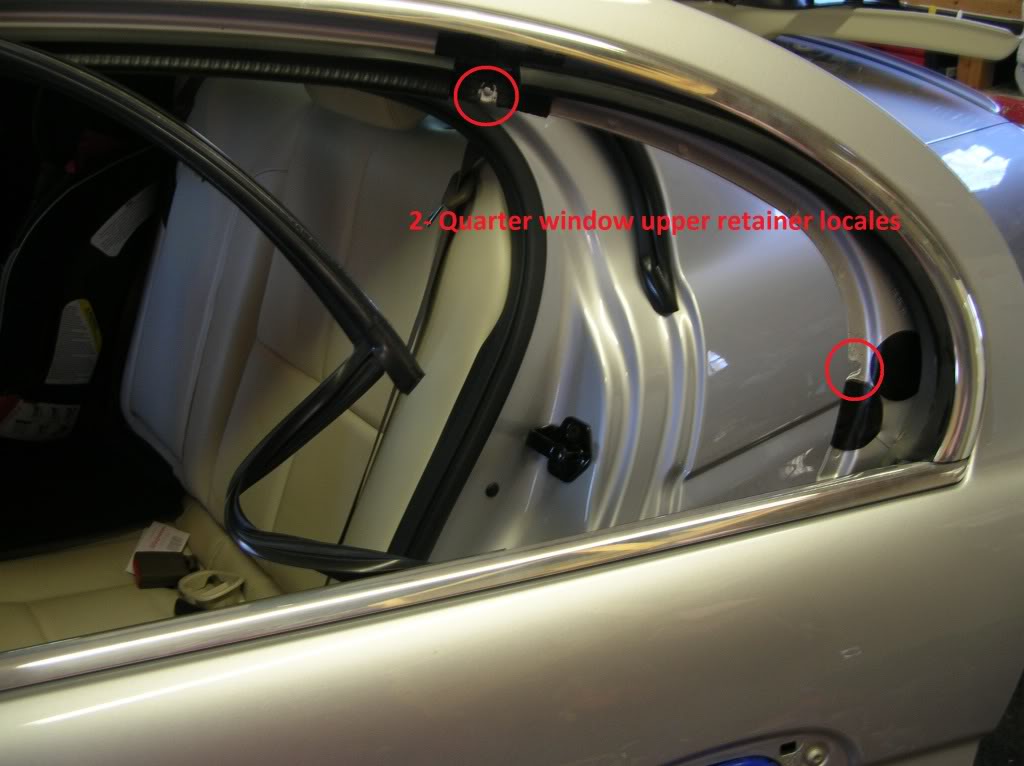
Remove 2- 8mm nuts from upper quarter window. CAREFULLY remove quarter window and track.
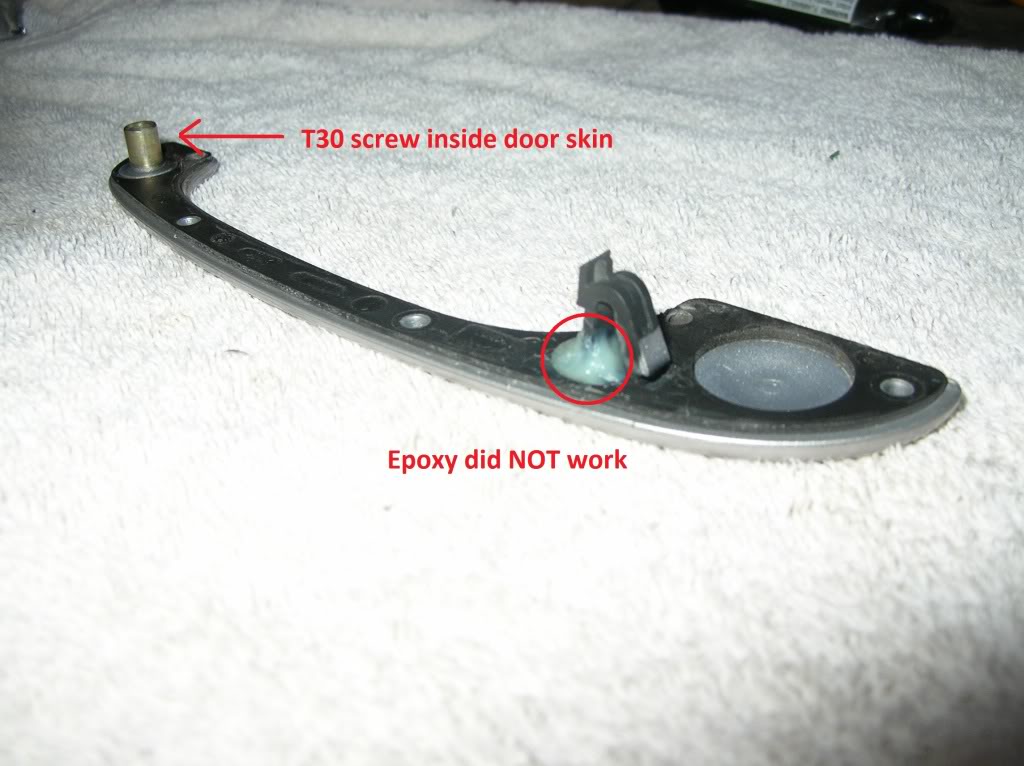
Remove 1- T30 screw inside door skin.
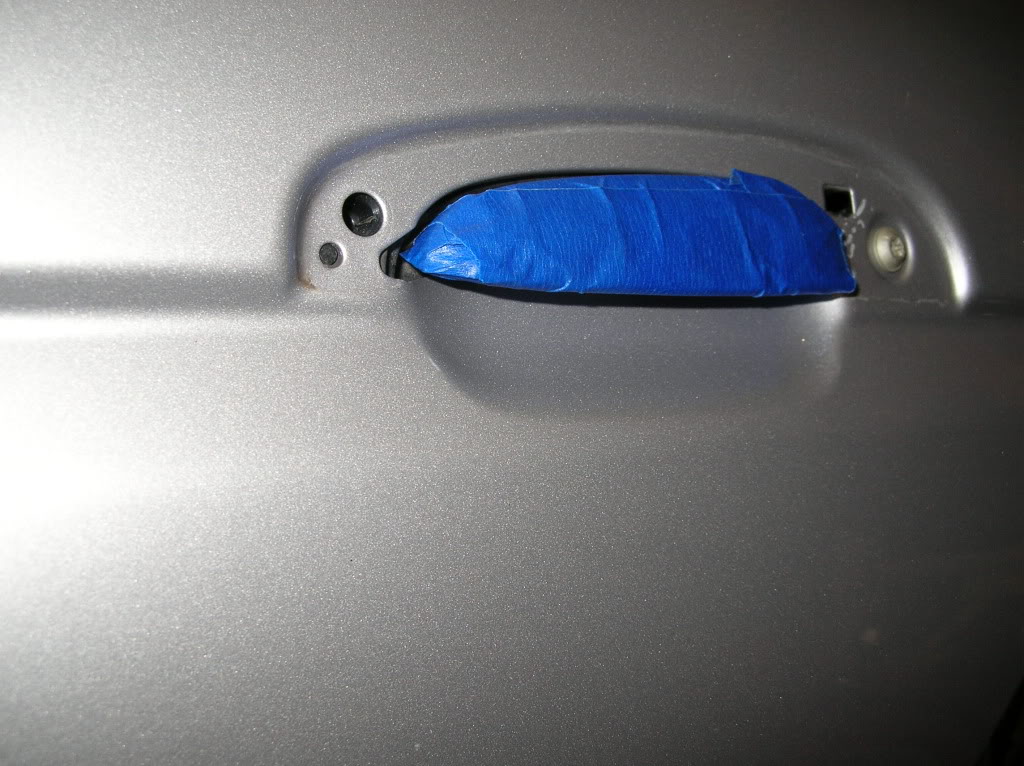
Time to remove exterior door handle trim. There is a tab that MUST be pushed forward to unlock the trim from the door! I BROKE THIS TAB. In the following pictures I tried to expoxy tab back on but it did not work. I ended up using 3M tape to resecure trim piece, remember there is a front T30 secrew that holds it firmly in place.
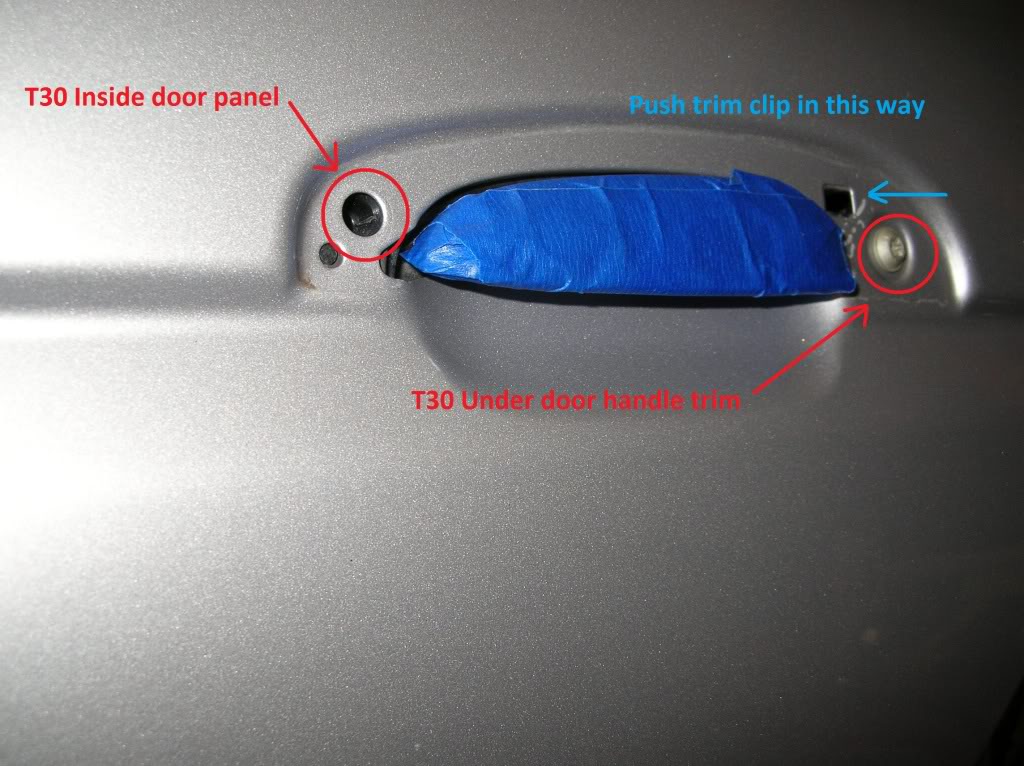
Using masking tape protect exterior door handle, 2 to 3 layers works best. Remove the exterior T30 screw.
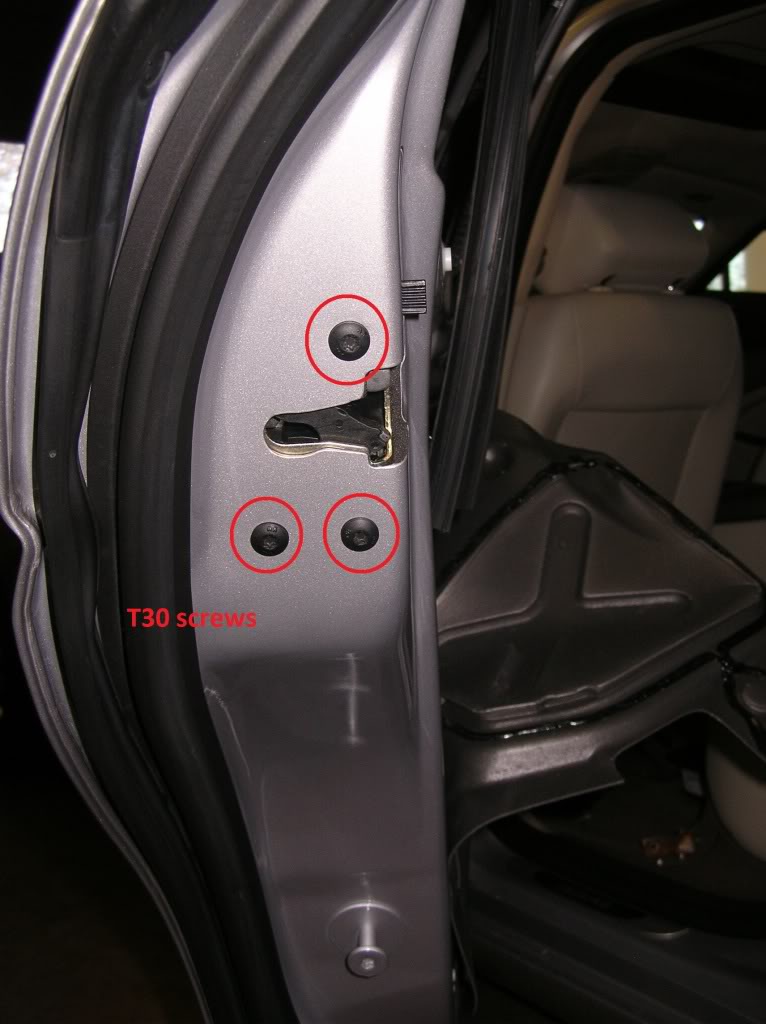
Remove the 3 T30 jam screws.
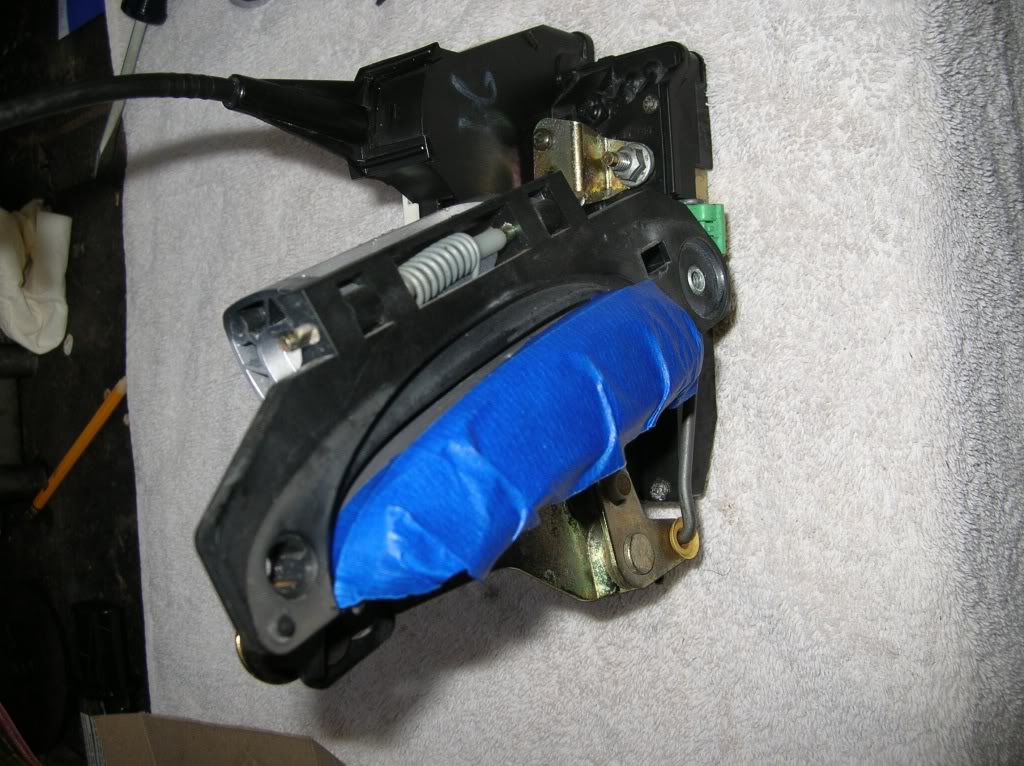
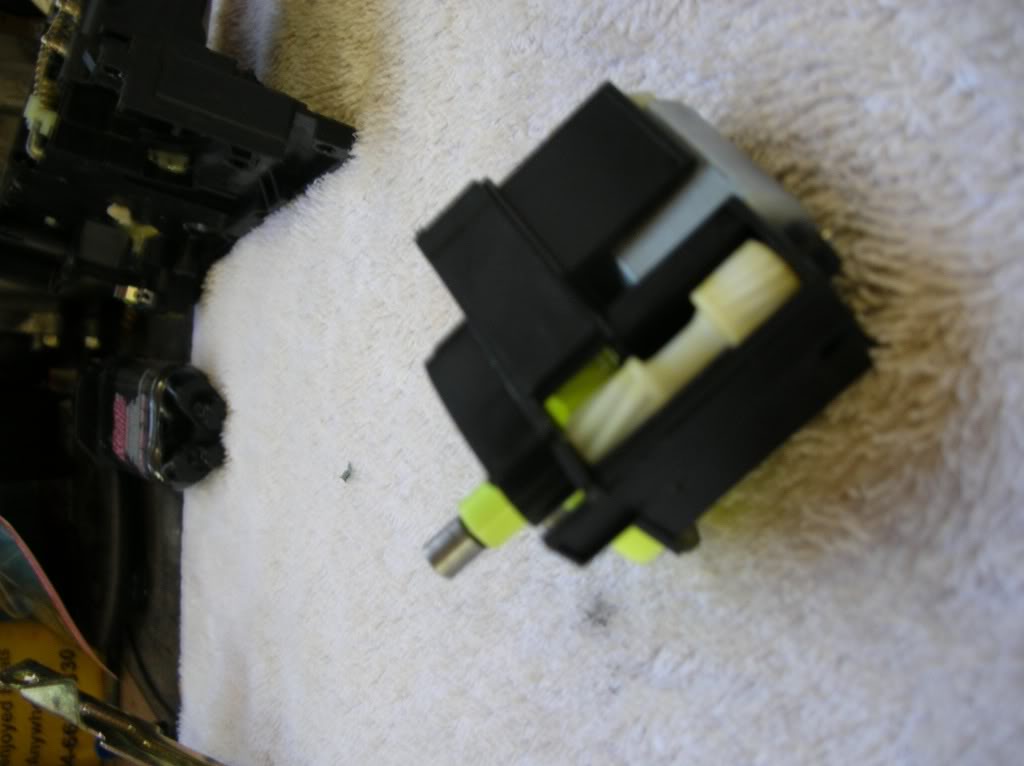
CAREFULLY remove exterior door handle, actuator locking assembly as 1 piece. I DO MEAN CAREFULLY! Slide red electric harness lock back push tab to release electric connection (not pictured).
If replacing actuator lock mechanism, reverse above proceedure, your done. Easy it is not.
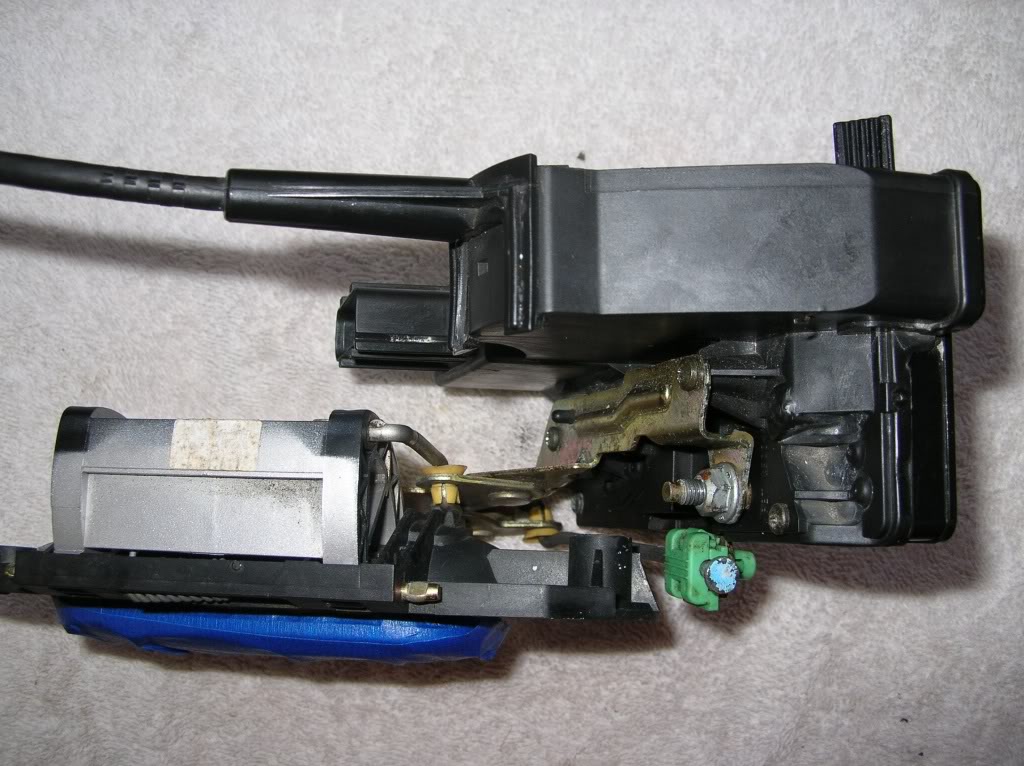
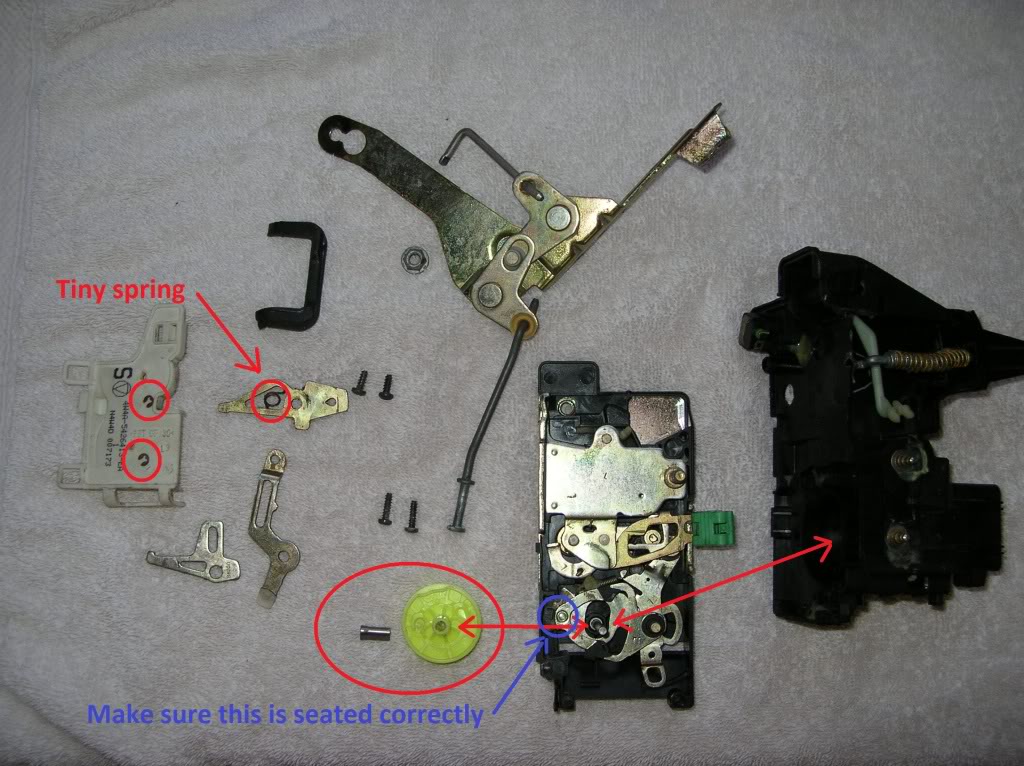
The following pictures are provided for entertainment. As you will see there are many small pieces that are crucial to be replaced correctly and in order! I used a "plastic welder" expoxy with a holding strength of 3500 psi, the most I could buy locally (holding power that is).
Onto repairing the acutator. This is wear there Band Aids will come in handy.
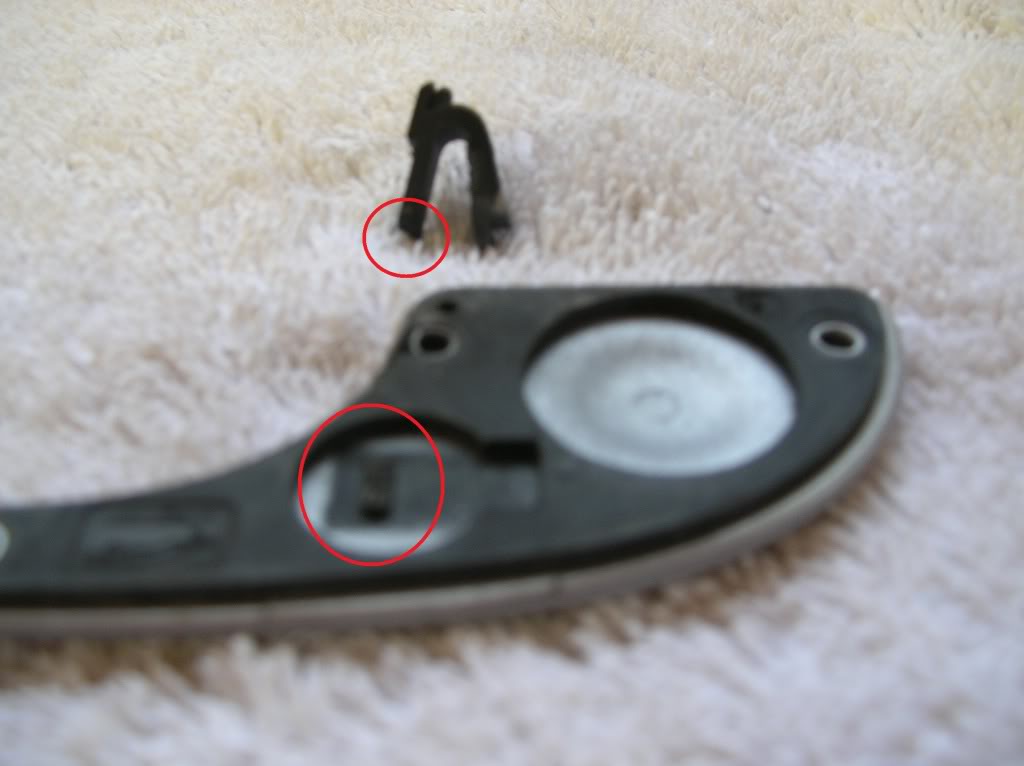
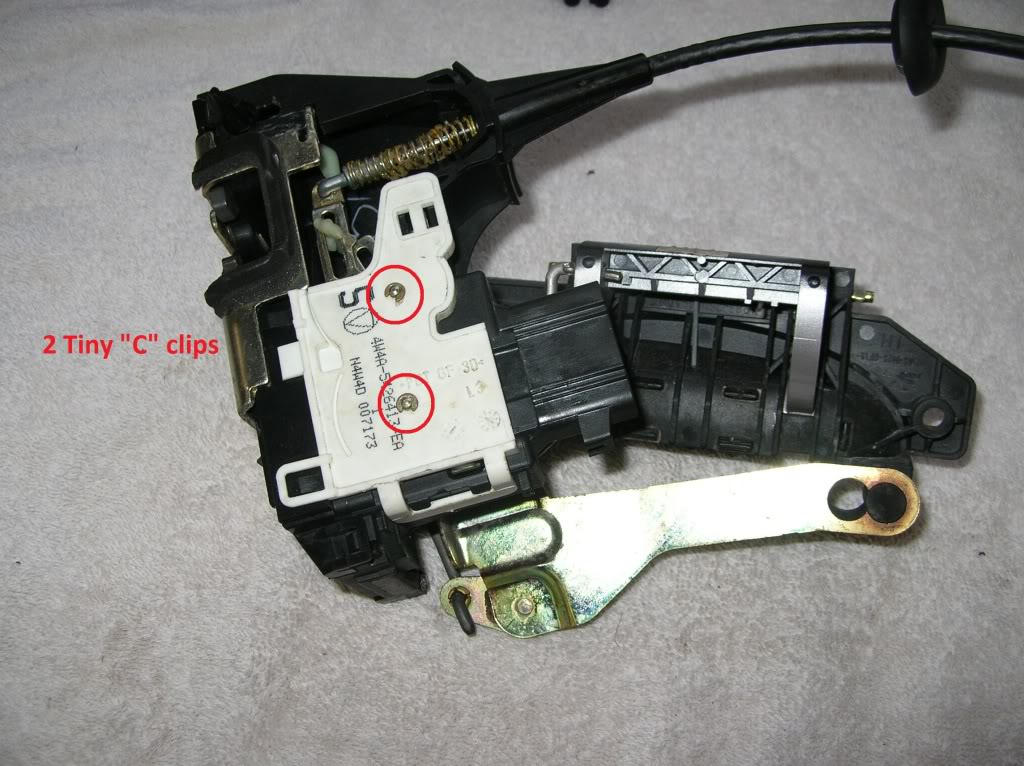
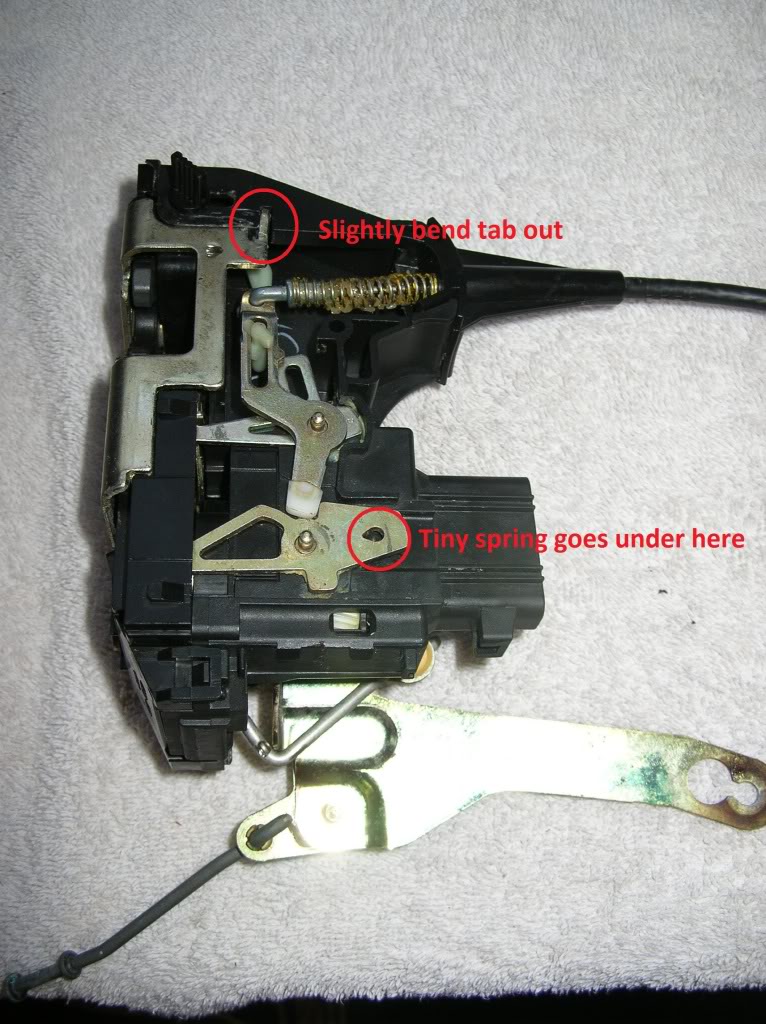
I broke a couple of retaining tabs off, but there are no worries, the 2 "C" clips hold assembly to gether tightly.
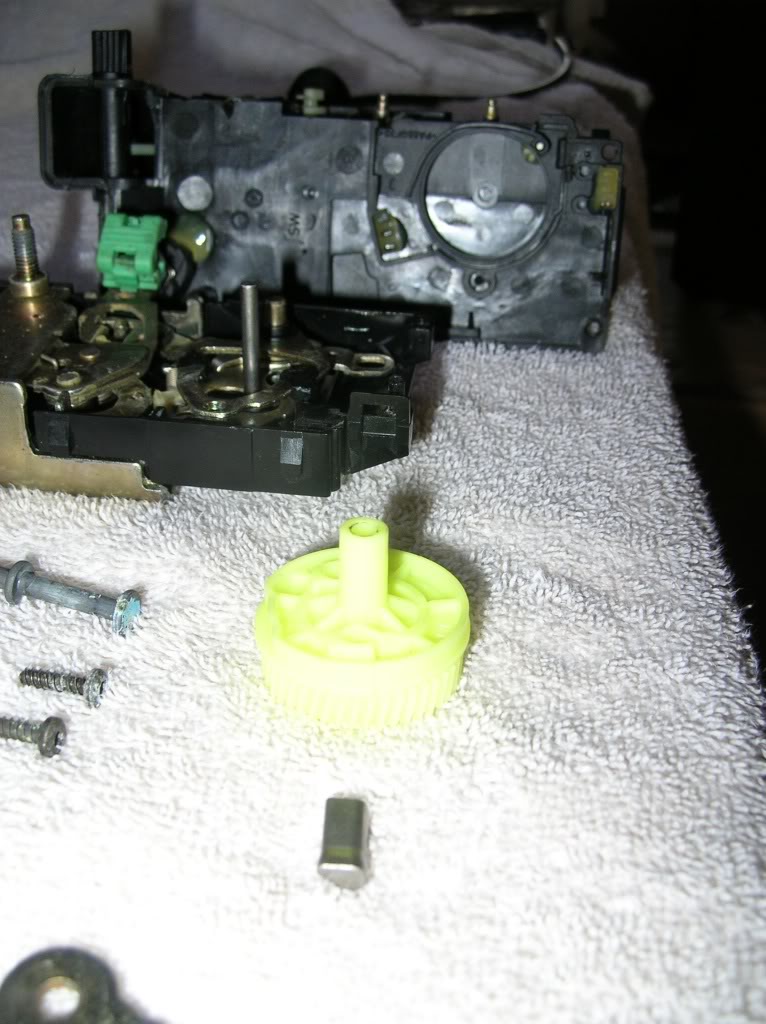

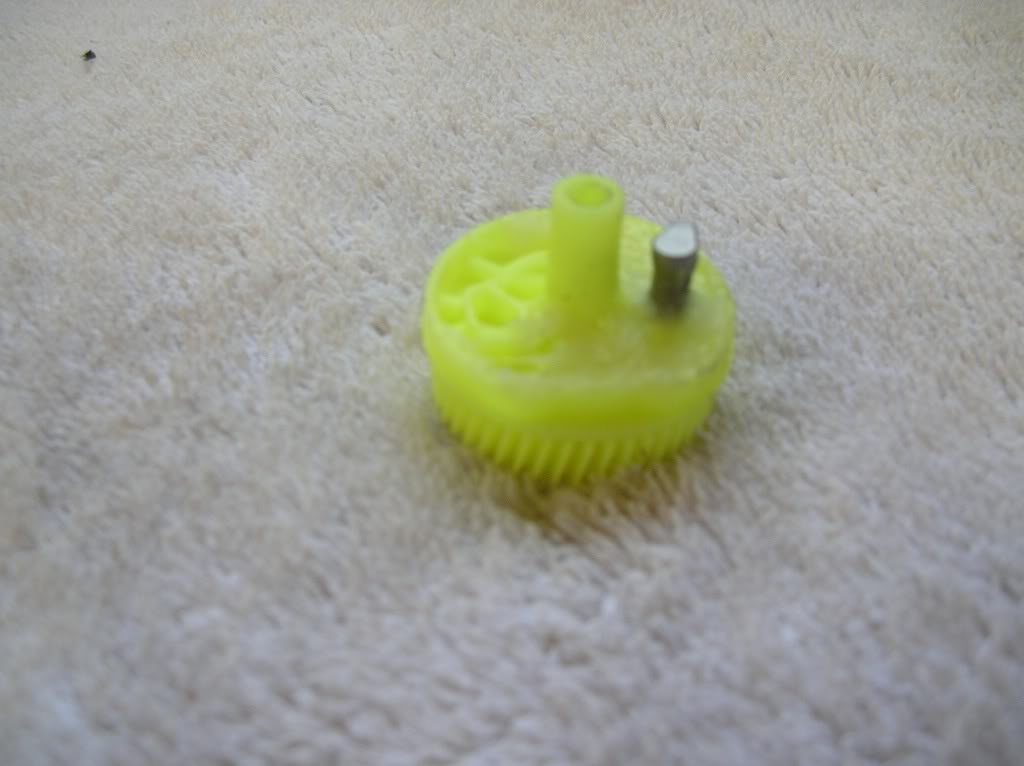
The culprit:
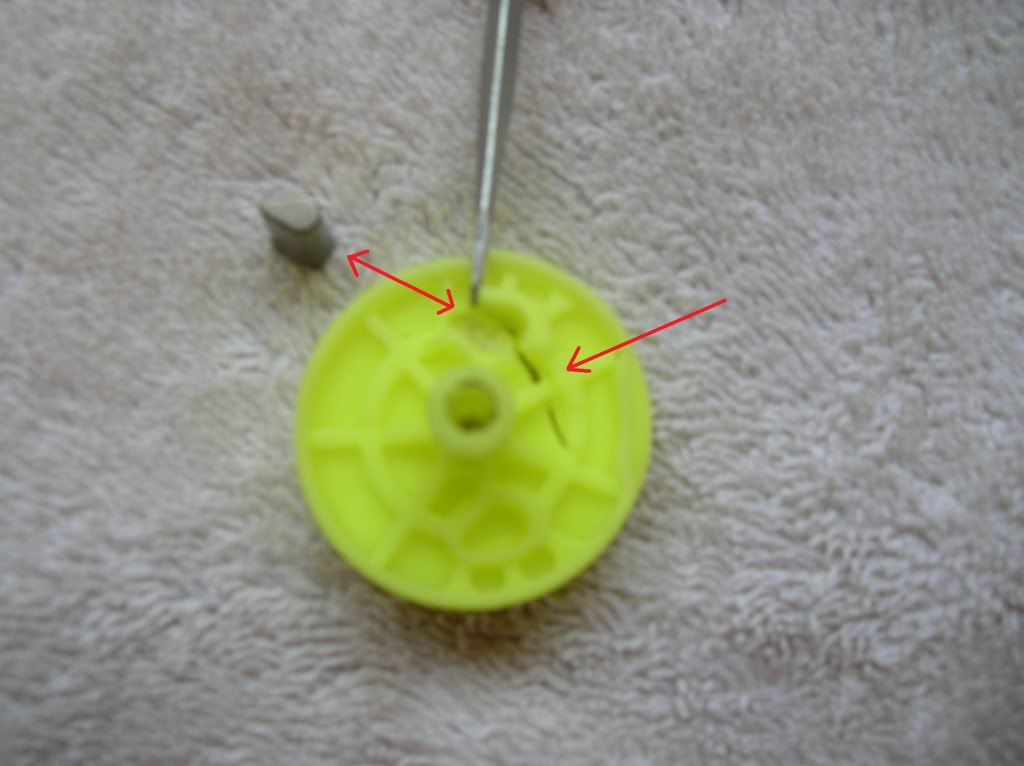
Expoxied piece(s)
Reassmble......
I will report back on the repair side of this procedure if it does not last. IMO the expoxy is holding tight and may last a long time.
First off I am going to say that this is a mechanically intensive repair. Out of all my DIYs, this one was the most difficult. May be not so much as just replacing the actuator motor/lock mechanism but I repaired the broken plastic gear, (we will see how long it holds up). There are many parts to the repair side of things, which there are no parts break down and I had to figure what went where.
It is very possible that you will break somethings that are important and somethings not so important. Also may end up scratching some parts. Proceed with caution!
I would reccomend that you have JTIS or alldatadiy available. There are a few smaller steps that I do not cover.
Drivers side (US) rear door actuator locking mechanism part # XR853056 $292.00. I did not try to cross reference.
Difficulty level: Difficult (see above)
Tools needed: T30 and T15 Torx drivers, regular & phillips screw driver, ratchet with 8mm and 10mm sockets, (extention optional), trim panel removal tool (I use a painters 6 in 1), masking tape, flashlite. Better have some Band Aids close by (optional but needed)
.Time: 3 hours if replacing with new actuator locking mechanism, 4 hours if repairing actuator gear.
Lets start off:
Remove the interior door handle trim (cup). Gently prying from front to back. Remove T30 screw that holds interior handle assembly to door skin.
Remove the 2 phillips screws located in the armrest.
Remove interior door trim panel using panel removal tool of choice. Disconnect 2 wiring harnesses. Remove the 4 speaker 10mm bolts, remove speaker. This gives you more work room.
Carefully peel sound proofing from door skin, working from top left diagonally down to expose cut out. It is not necessary to remove entire sound proofing.
Now look for this piece somewhere in the bottom of the door. If you cannot find it, time to purchase a new actuator locking mechanism. STOP NOW!!
Assuming you have found the part, let the fun begin!!
The quater window and track will have to be removed (not fun). Remove the lower track 10mm bolt from support. Remove 2- 10mm support nuts. Remove support.
Remove 2- 8mm nuts from upper quarter window. CAREFULLY remove quarter window and track.
Remove 1- T30 screw inside door skin.
Time to remove exterior door handle trim. There is a tab that MUST be pushed forward to unlock the trim from the door! I BROKE THIS TAB. In the following pictures I tried to expoxy tab back on but it did not work. I ended up using 3M tape to resecure trim piece, remember there is a front T30 secrew that holds it firmly in place.
Using masking tape protect exterior door handle, 2 to 3 layers works best. Remove the exterior T30 screw.
Remove the 3 T30 jam screws.
CAREFULLY remove exterior door handle, actuator locking assembly as 1 piece. I DO MEAN CAREFULLY! Slide red electric harness lock back push tab to release electric connection (not pictured).
If replacing actuator lock mechanism, reverse above proceedure, your done. Easy it is not.
The following pictures are provided for entertainment. As you will see there are many small pieces that are crucial to be replaced correctly and in order! I used a "plastic welder" expoxy with a holding strength of 3500 psi, the most I could buy locally (holding power that is).
Onto repairing the acutator. This is wear there Band Aids will come in handy.
I broke a couple of retaining tabs off, but there are no worries, the 2 "C" clips hold assembly to gether tightly.
The culprit:
Expoxied piece(s)
Reassmble......
I will report back on the repair side of this procedure if it does not last. IMO the expoxy is holding tight and may last a long time.
The following 16 users liked this post by joycesjag:
1320racer (10-30-2016),
aholbro1 (10-13-2014),
beulahjag (05-17-2019),
bricklingto (02-23-2014),
Datsports (05-18-2017),
and 11 others liked this post.
#2
12-29-2011, 11:36 AM


Veteran Member
Meticulous and impressive as always, Rick. Plastic gears should be banned across the automotive industry. All that time, labor, and expense because of a cheap plastic part....
Next week I will be helping one of my hiking buddies replace the left rear exterior door handle on his 1999 Honda Accord. I will not be surprised if some of the tips you offer here will also apply to his Honda....
Next week I will be helping one of my hiking buddies replace the left rear exterior door handle on his 1999 Honda Accord. I will not be surprised if some of the tips you offer here will also apply to his Honda....
#3
12-29-2011, 11:38 AM

Join Date: Sep 2008
Location: Damon /Houston, Texas
Posts: 7,254
Received 2,183 Likes
on
1,355 Posts
The following users liked this post:
joycesjag (12-29-2011)
#4
12-29-2011, 11:56 AM
Veteran Member
#5
12-29-2011, 09:34 PM
Zane (), actually this time I started early on a weekday morning, 12 cups of "joe" and a few Pepsi's. When I started to button things up I cracked a couple of cold ones, only because Joyce took the week off (very unusual) and I still don't think I would tackle this one again (it was a bitch). I guess I just gave up my mod title
REMINDER to everyone be patient.
BTW heres why you need the Band Aid when dismantling the actuator and not replacing! I did not typo the "wear" above, OUCH!
), actually this time I started early on a weekday morning, 12 cups of "joe" and a few Pepsi's. When I started to button things up I cracked a couple of cold ones, only because Joyce took the week off (very unusual) and I still don't think I would tackle this one again (it was a bitch). I guess I just gave up my mod title REMINDER to everyone be patient.
BTW heres why you need the Band Aid when dismantling the actuator and not replacing! I did not typo the "wear" above, OUCH!
Last edited by joycesjag; 12-29-2011 at 09:39 PM.
The following users liked this post:
merlin2 (12-30-2020)
#6
12-30-2011, 10:26 AM

Join Date: Oct 2007
Location: PHX some of the time
Posts: 116,746
Received 6,253 Likes
on
5,453 Posts
#7
12-30-2011, 10:29 AM
Veteran Member
Trending Topics
#8
12-31-2011, 11:51 AM
Great write up as always! A couple of days ago my trunk (or boot if you will) would not latch close. As I live 3 hours or so from the dealership I thought I try to fix it myself (and I've started to enjoy this process).
I originally thought the emergency handle inside had been pulled somehow as when I pushed its releasing part in the whole thing reset. So I put everything back together and off I go only to find the same problem after only opening and closing the trunk twice. (This time I was out and about and had to tie the boot close to get home) I took the whole thing apart again and looked a bit closer. Inside the latching device are plastic wheels or gears. One of the teeth had broken off so after 2 cycles the broken tooth comes around and jams the device up. I tried superglue as temp fix but that didn't work and was going for something stronger but now I've lost the missing tooth. The good news is the replacement is cheap and the install is much easier than what you had to go through.
I originally thought the emergency handle inside had been pulled somehow as when I pushed its releasing part in the whole thing reset. So I put everything back together and off I go only to find the same problem after only opening and closing the trunk twice. (This time I was out and about and had to tie the boot close to get home) I took the whole thing apart again and looked a bit closer. Inside the latching device are plastic wheels or gears. One of the teeth had broken off so after 2 cycles the broken tooth comes around and jams the device up. I tried superglue as temp fix but that didn't work and was going for something stronger but now I've lost the missing tooth. The good news is the replacement is cheap and the install is much easier than what you had to go through.
#9
12-31-2011, 12:07 PM

Veteran Member

#12
01-04-2012, 09:19 AM
Veteran Member
Join Date: Nov 2006
Location: Glasgow, Scotland UK
Posts: 47,303
Received 9,005 Likes
on
4,113 Posts

The following 2 users liked this post by JimC64:
Eclectic (07-20-2016),
Vamp of Chicago (01-06-2015)
#13
01-24-2012, 01:11 PM

Junior Member
Join Date: Jan 2012
Location: Roseburg OR
Posts: 2
Likes: 0
Received 0 Likes
on
0 Posts
Hi Rick, I wish I had this article a few months ago.....oh well. I had a similar issue with the rear passenger door, it wouldn't lock, and I could hear the motor run through the cycle. The little pin had stuck in the works when it broke out of the gear keeping the mechanism from locking. I too removed it, and epoxied the pin back in, but it only lasted 5 cycles before the pin popped out. I just put in a junkyard replacement, which works for now but I'm not certain it will last since this looks like a design defect rather than a random problem.
I was able to remove the lock and handle though without removing the rear glass. I had to remove the lower support bracket, but I was able to squeeze it through, under the window channel. It takes a while to finagle it, but much less than removing that glass, I got almost there but backed off when I would have had to raise the window with the rear channel removed....which you need to do to get the door lock out......
Is your latch still working? and which epoxy did you use? was it specifically made to glue the type of plastic that the gear is made of? I'm curious as I hope to repair my old one and put it on the shelf in case the junkyard one fails too. Also, I was thinking that perhaps putting an aluminum sleeve around the broken portion would strengthen the gear enough to manage the loading? make it about .020 in. thick, and glue it in place?
jerry rude
03 S-type
#14
01-26-2012, 07:33 PM
Jerry,
As I mentioned in the OP, the epoxy I used was designed for plastics. It had the most "holding power" that I could find locally, the epoxy was purchased at "The Zone" and called "Plastic Welder". Good stuff so far!
A thin band of aluminum might work, but the outer portion of the plastic piece that the gear goes into has a pretty tight clearance.
#15
01-27-2012, 11:26 PM
Junior Member
Join Date: Jan 2012
Location: Roseburg OR
Posts: 2
Likes: 0
Received 0 Likes
on
0 Posts
Thanks Rick, I'll go see if they have some of that locally. I've been searching on the net for HDPE adhesive, and there seems to be very few available.....or maybe I'm off on the composition of the gear material? anyways, my gear is white in color...I hope that doesn't mean its a different material. I checked on the clearance for the aluminum band, and I have room.
Thanks again for the great article.
Jerry Rude
Thanks again for the great article.
Jerry Rude
#16
03-19-2012, 09:12 AM
#17
03-19-2012, 09:26 AM
Veteran Member
#18
11-17-2012, 02:34 PM

Junior Member
Join Date: May 2012
Location: Midwest
Posts: 16
Likes: 0
Received 0 Likes
on
0 Posts
This is a very nice write up and has been a big help along with the factory manual, but I now need some urgent HELP! I am come to the step of removing the rear driver size exterior door handle bezel but have been trying different ways for an hour to get it off without breaking the tab thingy. I've tried pushing the bezel rearward to bend the tab, trying inserting a plastic spatula and pushing the tab forward to release it, have used a screwdriver from inside and tried bending the tab and nothing has worked. The tab must be some now hard plastic as it doesn't want to bend and I don't want to break it.
Anyone got any tips??
Dave
'06 S-type 3.0
Anyone got any tips??
Dave
'06 S-type 3.0
#19
11-17-2012, 05:45 PM
Junior Member
Join Date: May 2012
Location: Midwest
Posts: 16
Likes: 0
Received 0 Likes
on
0 Posts
#20
11-17-2012, 06:04 PM
The following 2 users liked this post by joycesjag:
goonergord (04-09-2014),
koolmanpete (03-04-2014)