
The Final Headlight Replacement - HID and Accent Bulb
#1
 03-16-2012, 09:32 PM


I have been digging through thread after thread, and noone actually answers that questions that everyone want to know:
How do I change or replace my Headlight Bulbs?
Do I need to take off Bumper?
Is there anything special about the wiring that I need to worry about?
I bought HID 5000k's from HID Kit Headlight Conversions - Xenon Bulb HIDs for Halogen Lights and I received them today.
The Instructions from them is very simple: http://www.simplyhidkits.com/pdfs/SH...anual_Main.pdf.
Now I want to do these in the next few days and I need to know if I have to remove bumper or if there is a more effective way to do this. If I have to remove bumper I will replace the "Accent" Bulbs with LED's at the same time.
I plan on Documenting entire process, and will post photos and Tips as needed. This is a project for all of us and I will try what the forum comes up with.
Please either point me in the right direction.
Thank you in advance and I hope you all will help me out with this.
Spyderman
2004 X-Type 3.0
#2
03-18-2012, 09:21 AM
Hello All,
Well I decided not to wait for the forum to give any advice.
I took photos of this 2.5 hr project.
Yes you have to take off bumper, here are a few reasons why:
Here we go:
Spyderman
Well I decided not to wait for the forum to give any advice.
I took photos of this 2.5 hr project.
Yes you have to take off bumper, here are a few reasons why:
- there really is not enough room to efficiently get your hands and eyes to the back of the light unit.
- There are bolts behind the bumper to get the Unit out.
Here we go:
- Here is a forum thread that has complete Bumper removal. Removing-front-bumper
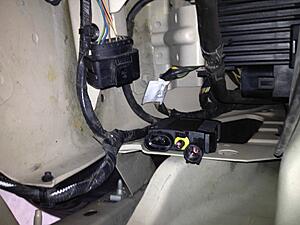
- Unplug Fog Light Connector
- Unbolt the 2 additional 10mm bolts under the Light Unit
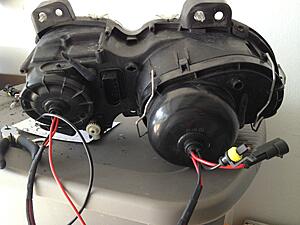
- Take off back covers to exposing the bulbs
- Install New HID Bulbs H1 Style
- The Metal clips will hold the bulb in place... the Low Beam is manufactured with less tolerance so I place a small zip tie around the metal clips once installed to ensure not to accidentally pop off.
- The Brown wire is the Negative - This is very helpful

- In the back of housings you will need to drill 7/8-1" diameter hole to allow wires to fit through. With the Kit I got it came with a nice weatherproof grommet. ** NOTE don't go any bigger the grommet will be too loose. if you need any extra room dremel out a relief for the connector to pass through
- Once this complete connect ballasts for both Lights.
- There is very little good spots to secure the ballasts behind the Unit go this is something that is a pain
- Reassemble in reverse order
- Time Spent: 2.5 hours, that included testing so now that I have done this you can save that time.
Spyderman
The following 4 users liked this post by spyderman:
#3
03-18-2012, 12:11 PM
Senior Member
Great job! You did it the "right" way. That looks a lot more professionally done and much more efficient. I just kept the bumper and everything on and just have the dust over half on now. The drilled hole is a much better way to do it and im sure it was much easier to intall without sticking your hand in that little area
#4
03-20-2012, 12:43 PM

Junior Member
Join Date: Jan 2012
Location: Ohio
Posts: 8
Likes: 0
Received 0 Likes
on
0 Posts
#5
03-20-2012, 02:41 PM
I want to add one thing.
I did not cut OEM connector off & splice wires together... This is something that you will have to decide if this is a permanent job or not.
Also I would order LED for Accent Bulbs before you start and Turn Signals if you so choose... I will be taking this all off again and replacing sometime soon.
I would also inspect your adjusters while in there, I found that one of my Adjusters was broke after I was ready to put it together.
Spyderman
2004 Jaguar X-Type 3.0 Auto
#6
04-13-2012, 06:17 PM

#7
04-13-2012, 11:00 PM

Trending Topics
#8
04-14-2012, 04:57 AM
Veteran member
Join Date: May 2008
Location: Great Mills, MD
Posts: 14,222
Likes: 0
Received 3,825 Likes
on
3,144 Posts
I have done this conversion on a few X-Types. yes, dropping the bumper is really the only way to go. If you do cut the plugs off, make sure to cut the wiring inside the headlight housing, do not do it out in the engine bay. The general purpose for this is that by keeping it inside the headlight housing, the junction will be exposed to less environmental stuff, therefore leading to a longer life of the joint. Unless you are **** about making up a water tight connection, by cutting the wire, you are opening up the wiring to problems. If you want to prevent future problems, you need to find a product like "Raychem heat shrink" (specifically WCSF-070 which will handle most automotive wiring). The difference between the Raychem stuff and normal heat shrink is the Raychem has a glue on the inside of the heatshrink and as long as you get it shrunk down properly, the glue will adhere to the wiring insulation, making a water tight seal. If you are worried about this stuff not being able to withstand the underhood temps, I use it at work to survive a nuclear disaster. It will survive under the hood of your car.
Ar15fonsi, I have mounted the ballasts under the headlight itself. Most ballasts these days are a slim line design and they fit nicely under the headlight. You will find a nice flat surface there. You can use the supplied double sided tape and it will hold the ballast in place. For the fog lights, I ended up tie strapping mine to the side of the frame rail. Just make sure to use some hefty tie straps and all will be good.
Jason, yes, the headlight assemblies can be easily broken if you are not careful. All of the wiring work and drilling of the back covers to allow routing of the wiring is all done away from the parts that you can break. Just don't drop the headlight assembly and you will be golden. I haven't had any issues. You will stress the headlight assemblies more by trying to replace the running lights or turn signal bulbs with the headlights still mounted to the car than doing this project.
The following users liked this post:
Ar15fonsi (04-14-2012)
#9
04-14-2012, 05:29 AM
Sweet thanks men, I saw the picture of your work, and I saw a picture of a flat spot right where the headlights go, I assume thats where you tell me you put them.
Anyway, yes I order them, but I ordered all of them except for the fogs, and I opted for the slim ballast, can't wait to start this project next weekend.
Thanks a lot
Anyway, yes I order them, but I ordered all of them except for the fogs, and I opted for the slim ballast, can't wait to start this project next weekend.
Thanks a lot
#10
04-14-2012, 07:49 PM
Veteran member
Join Date: May 2008
Location: Great Mills, MD
Posts: 14,222
Likes: 0
Received 3,825 Likes
on
3,144 Posts
Ar15fonsi, I wish you lived closer to me. I would tell you to stop by and we could get you done in an afternoon easy. Once you get into it, you will see how easy of a modification it is. The "hard" part for me is always getting the clip undone for the headlight plug. I can never seem to remember how that comes apart.
#11
04-15-2012, 05:59 AM
Ar15fonsi, I wish you lived closer to me. I would tell you to stop by and we could get you done in an afternoon easy. Once you get into it, you will see how easy of a modification it is. The "hard" part for me is always getting the clip undone for the headlight plug. I can never seem to remember how that comes apart.
And also I just noticed yesterday for the first time, that my headlights are "sweating" now I have to find that leak and seal it on that day also.
#12
04-20-2012, 06:19 PM
Well, just an Update I started doing the HID project and I just took my first headlight out and notice that both of the white parts (the ones that adjust the headlights) are broken, no wonder I had a feeling that when I passed a bump the headlights moved, Im sure the other headlight has the same problem
#13
04-21-2012, 07:25 AM
#14
04-21-2012, 07:39 AM

#15
04-21-2012, 07:40 AM
Veteran member
Join Date: May 2008
Location: Great Mills, MD
Posts: 14,222
Likes: 0
Received 3,825 Likes
on
3,144 Posts
Ar15fonsi, the first thing that I would check is to make sure you have the polarity correct going to the HID ballast. If it is backwards, it WILL NOT work (don't ask how I know, LMAO). After that, I would be checking to make sure that you have voltage at the ballast. From there, it is possible you have a bad ballast/bulb. I would take the ballast/bulb from the side that is working and see if it works on the failed side. That will tell you if it is a HID bulb issue or a car wiring issue.
The following users liked this post:
Ar15fonsi (04-21-2012)
#16
04-21-2012, 07:44 AM
Veteran member
Join Date: May 2008
Location: Great Mills, MD
Posts: 14,222
Likes: 0
Received 3,825 Likes
on
3,144 Posts
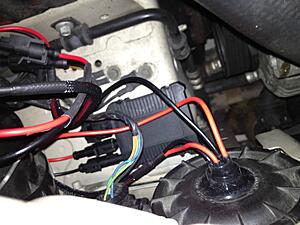
Ar15fonsi, see the spade connectors on the red and black wires. Those will plug right into the brown and yellow wire connectors. tada. All done. I would recommend wrapping the newly made connections with some electrical tape just to ensure they do not come apart and to help in preventing water from getting in and leading to other issues. If jaguar followed conventional wiring, you should put the red wire with the yellow wire and the black wire with the brown wire. But, I would also confirm that by turning on your headlights and seeing which one of those two wires has 12 VDC going to it. The wire with 12 VDC is the one that the red wire needs to plug into.
The following users liked this post:
Ar15fonsi (04-21-2012)
#17
04-21-2012, 08:08 AM
Ar15fonsi, see the spade connectors on the red and black wires. Those will plug right into the brown and yellow wire connectors. tada. All done. I would recommend wrapping the newly made connections with some electrical tape just to ensure they do not come apart and to help in preventing water from getting in and leading to other issues. If jaguar followed conventional wiring, you should put the red wire with the yellow wire and the black wire with the brown wire. But, I would also confirm that by turning on your headlights and seeing which one of those two wires has 12 VDC going to it. The wire with 12 VDC is the one that the red wire needs to plug into.
and I also only have one of t1he headlights in.
thanks
#18
04-21-2012, 02:09 PM
Veteran member
Join Date: May 2008
Location: Great Mills, MD
Posts: 14,222
Likes: 0
Received 3,825 Likes
on
3,144 Posts
The following users liked this post:
Ar15fonsi (04-21-2012)
#19
04-23-2012, 05:30 PM
i managed to just file them down a little bit with my dremel tool, the spades that came with the HID kit now they fit on the oem connectors
#20
04-23-2012, 05:36 PM
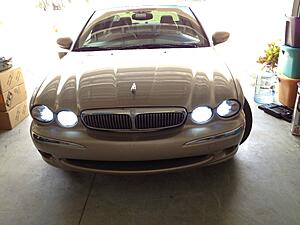
Well here's my work done, Im pretty proud if it it came out pretty clean thanks to all the help from everyone here and the OP instructions. I do have to still do the Fogs (I have the HID kit for them here) but I have to take down the bumper and he headlights out again to be able to fix the adjusters (Im buying the fix from Ebay), So i figured I'll do the Fogs when I do that since the fogs are not so much of a plug an play thing.
Well anyway here it is .
The Low Beams are 8K and the High 6K But as you can see when the LB heat up they look almost exactly the same as 6K, But i think I might change the bulbs to 6K 55W when I take down everything again.
Well anyway here it is .
The Low Beams are 8K and the High 6K But as you can see when the LB heat up they look almost exactly the same as 6K, But i think I might change the bulbs to 6K 55W when I take down everything again.


