When you click on links to various merchants on this site and make a purchase, this can result in this site earning a commission. Affiliate programs and affiliations include, but are not limited to, the eBay Partner Network.
My son bought a MK2 on my behalf, thinking that it was largely rust-free.
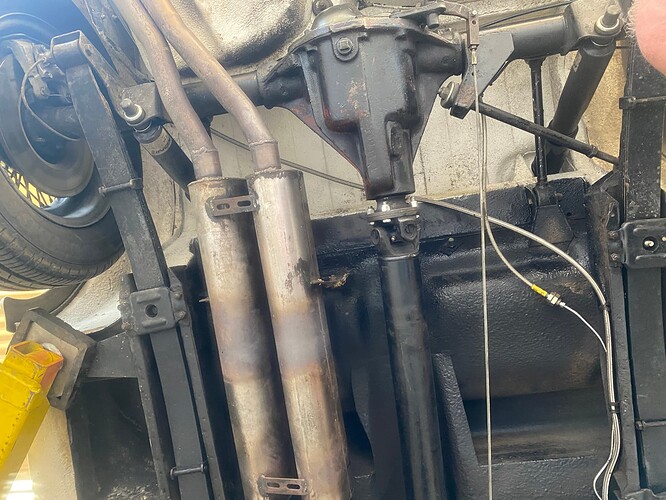
It was anything but � although the rust was largely localized to the spring hangers (the left much more so than the right).
I have taught myself to be a passable iron monger and am close to finally fitting the left spring hanger.
However, the measurements that I took prior to cutting out the rot are, in retrospect, highly unreliable: the tail-end of the left-hand frame rail almost completely rotted out with the corresponding hanger collapsing into the seat pan to such an extent that the panhard rod broke off.
Thus, many of my measurements are� rotten <g>.
I have built a set of jigs that I believe will position the hanger correctly � with one glaring exception:
I do not know, nor can I find on-line or otherwise, the distance between the front, engine-end of the left and right spring hangers.
Hopefully, somebody out there has a measurement.
I have cross-posted in two threads at Jag-Lovers. I will update all threads with answers given in any.
Have you cut off the inverted top hat channel just forward of the hanger? If not the fore-aft location is set by the attachment of the bracket that supports the front end of the leaf spring. It is bolted to both parts and makes the positioning a matter of getting the bolt holes to line up.
If you don't have a copy, it's worth searching for the Practical Classics book on Mk2 restoration. It's 40 years old now, but has a lot of good advice for home restorers. The work was done by Geoff Maycock. He knew more about Mk2 bodies than those who did the 340 restoration in the same magazine a couple of decades later.
According to the Service book pages N30 and N31, the horizontal distance (measured parallel to the centre line of the car) from the front of the front cross-member to the rearmost outside hole in the hanger (that's at the centre spring mounting) is 291.60 cm. And the distance from that hole to the centre of the hole in the bracket that carries the torque tube (rear axle trailing arm) bushes is 8.75 cm. That, of course, assumes the holes in the replacement spring hangers are drilled in the right place - I wouldn't depend on it.
My approach is to (1) Check the inner and outer spring hangers fit together. (2) With the inner hanger inserted in the outer, check that holes at the front line up with the front spring support bracket and that the whole lot look as though they will line up on the car. (The flange at the front of the inner hanger will need a piece cut out (if it's not already done) to fit on the car. You can do it now or later.) (3) Still with the inner hanger inserted in the outer, check the distance between the bolt holes for the front spring bracket and those at the rear of the hangers for the bracket that holds the centre of the spring. Re-drill as necessary to bring into agreement with the spacing on an existing hanger or the one you have already fitted to the other side of the car. If the holes are getting big, you can weld washers on to bring the size down. (4) Check the fit of the strengthener that holds the Panhard rod and sits above the centre of the leaf spring. Check also the alignment of the plate that sits under the spring. The holes may well not line up. Re-drill and bend as required. (5) When you reach the point of welding the hangers onto the car, first bolt the hangers to the front spring bracket and the spring bracket to the car top hat channel, then add self-tappers and tack welds and keep checking positions.
The top priority is to make sure both sides of the car are the same.
I bought my replacement hangers 40 years ago. They were approximately the right shape. The hole positions were give or take half a centimetre - I don't know why they wasted their time drilling them. No doubt, those supplied today are much better.
The beast is currently on the lift so glad to take measurements. My spring hangers are long gone but the boxes are original along with brackets and mounting holes. Let me know if any dimensions from here will help.
Regretfully, the section of the frame rail to which the the front of the spring reaction bracket rotted out (I still have the little, rectangular, tapped fitting -- the surrounding frame was gone). What I will call and index or jig hole about 1.5" forward (towards the engine) was half-rotted. In the course of letting in new metal, that reference was lost as well.
I bought a copy of that excellent book over 30 years ago with my first MK2 restoration (which had to be abandoned due to a family member's ill health) and bought another last year. It is, indeed, excellent, but I could find no measurements therein..
Sorry, I'd misunderstood what dimension you wanted. Side to side, it should be OK if you keep the hangers on the same CL as the chassis rail (if it's still there). For the tail end, there's a flange on the attachment to the back of the seat pan that locates side to side (again, if it's still there).
Taking the things off is a trial of patience, drilling out endless randomly placed spot welds. I replaced the hanger on the right side of my car more than 30 years ago, I'm now doing the left side (in between a load of other stuff ... ).
Side to side, it should be OK if you keep the hangers on the same CL as the chassis rail (if it's still there)..
The end of the chassis rail rotted out about 2 1/2" from where it joins the spring channel. Additionally, the frame "flares" at that point. While I did my best to keep everything aligned, I ended up being off by about 1/4".
I was able to preserve many of the locating points you mentioned.
Would that 1/4" have made a difference? Dunno. I'm a mildly dyslexic lawyer, was an English major in college, and did not do well at all in geometry in high school (40+ years ago).
Regarding "tolerable variance", the pic posted on the other forum of the stock suspension suggests it probably doesn't matter.
With the Mark 2's axle suspended from the end of the leaf springs, the only force locating it laterally comes from the panhard rod. Since the axle is moving in a arc with suspension travel, there is constant lateral movement of the axle. I've shared this story a few times here, but it's a great description of the Mark 2's handling characteristics. A former coworker in England raced a Mini Cooper S and a Coombs Mark 2 in vintage competitions. When comparing the precision of the Mini's handling to the Mark 2 (affectionately called The Pig), he'd explain when entering a corner in the Jag - you point it where you want to go, put your foot to the floor and hope for the best:0) These are wonderful cars - notwithstanding the rear suspension design. I'm guessing your spring boxes are fine where they are. Good luck with the build.
Just measured mine as 722 mm � 1 mm. That's close enough to Doug's 28 1/2 inches. The left side box is original, but the right side is Robey repro from the 1980s, when they were a bit approximate in their dimensions. I'm fairly certain that I made every effort to correct the errors, but it remains that the right box is not original.
I'd not worry as leaf springs are not precision devices by any means. I'd make the priority symmetry, both sides equidistant from the centre plane of the car, and equal positioning in the fore-aft direction.
Take a couple of measurements between the chassis rails where they are intact, straight and original parts. Half the measurement which will give you the centre line. Do this at least three times towards the front, in the middle and towards the back. Once you have the centre points run a piece of string or perhaps some electrical wire if you are welding through the three points attaching the wire as far forwards and as far rearwards as you can to the body work of the car. Make sure the wire is secure and tight. If using electrical wire use a bright colour that you can see easily. As long as the wire runs through all three points it should be straight and give you a datum centre line that you can work from.
Agree with Cass. I might add a check on the position relative to the torque (rear axle trailing arm) mounts and the front subframe mounts. Don't rely on anything that's not 'chassis' or close to the perimeter of the car. That's due to possible damage repairs and the Pressed Steel Company being less precise about superficial bodywork.