

Busted screw (AJ86865 grommet) in RH Valve Cover - 2000 S Type

Project: Replace Valve Cover Gaskets, Plugs & Packs. (Due to oil in the wells, Misfires, Etc.)
Everything was going good, very good. I had all of my new parts, did plenty of homework, mentally prepared....lol. I was taking my sweet time, being careful and was finally ready to put it all back together. So, I'm tightening the valve cover and..... SNAP! There goes #7 (AJ86865 GROMMET).
I'm contemplating on not fixing it and just keeping an eye on it to see if it leaks (Would it leak with 13 other properly torqued screws?) or to deal with this now? What to do?
I would like to somehow get that broken screw out, but it's not looking so easy. I have no freaking idea how to extract the screw, it's too tight down there to get a drill or extractor bit in there. It just had to be one of the lower ones that snapped..... figures.
Has anyone had his happen before? I'm sure, but haven't seen any threads. Any feedback/advice/suggestions would be appreciated. Thank you in advance!


Last edited by jjohns26; Mar 7, 2014 at 02:11 PM. Reason: Adding a picture
Senior Member
Joined: Nov 2013
Posts: 122
Likes: 38
From: Budapest, Hungary
I do not know how much homework you have done but are you aware that the torque for these screws is 10 Nm? To break one takes much much more torque and the problem is that if the other screws are overtightened the seal will perish all around.
Yes, I'm aware of the torque. I'm thinking the screw may have had a small crack, it was brittle or something... it is a 14 year old car. All of the other screws are torqued properly.
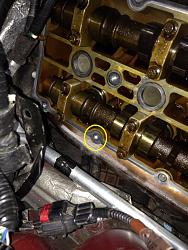
I just took the valve cover back off and have no clue how to get this out! (added a picture to the first post). I cant get a hold of it with the needle nose, I've laid on my back under the car to see if I could reach it from the back side but I cant seem to get to it.
I wish I had more room so I could try to extract it. Stumped!
I wish I had more room so I could try to extract it. Stumped!
Got It! Thankfully. I was able to get my drill in there at a very odd angle, but just enough to drill a small notch in the center. Used a tiny flathead to get some movement, and then the needle nose once it was exposed enough. Now to find a replacement.
*patting myself on the back*
*patting myself on the back*


Senior Member
Joined: Mar 2011
Posts: 186
Likes: 15
From: Calgary
I did the exact same thing and was using a Torque wrench as well, luckily it came out for me quick and easier than I expected.
Trending Topics
It's tough to get a torque wrench on the lower ones next to the firewall! I had to try a few different attachments until I found a fit, even then it's not as easy as some of the others. Now I have to do the driver's side. I've never worked on that side before and I'm hoping I don't have any issues.


Joined: Mar 2012
Posts: 4,759
Likes: 1,435
From: Hazlet Township, NJ
Got It! Thankfully. I was able to get my drill in there at a very odd angle, but just enough to drill a small notch in the center. Used a tiny flathead to get some movement, and then the needle nose once it was exposed enough. Now to find a replacement.
*patting myself on the back*
*patting myself on the back*
Just to confirm - replacement bolt is: AJ84085 (I believe)
Joined: Mar 2012
Posts: 4,759
Likes: 1,435
From: Hazlet Township, NJ
Personally, what I do with the lower rear side of the cam gasket is place a small dab of Black RTV sealant before buttoning everything up.
Regarding the driver's side - it's a PITA if you have the long oil filler tube. To make the job go smoother. Release fuel pressure and disconnect spring clamp where the plastic fuel line goes across the cam cover (unless you can get the oil filler tube disconnected from cam cover) - mine was literally stuck - resulting in a hot mess in fishing out the old gasket and getting the new one on....
If I venture to do this job again - the fuel line will be disconnected....
Last edited by abonano; Mar 9, 2014 at 12:36 PM.

The screw/grommet I found on JEPC is AJ86865 GROMMET, but I looked up your part # and it looks exactly like the replacement I picked up from Champion Bolt & Supply. It works, just doesn't stay attached in the eyelet. No biggie though, it wouldn't be the first replacement, as it looks like this has happened to the last person who owned the car, or their mechanic.
Last edited by jjohns26; Mar 9, 2014 at 12:59 PM. Reason: Typo
Regarding the driver's side - it's a PITA if you have the long oil filler tube. To make the job go smoother. Release fuel pressure and disconnect spring clamp where the plastic fuel line goes across the cam cover (unless you can get the oil filler tube disconnected from cam cover) - mine was literally stuck - resulting in a hot mess in fishing out the old gasket and getting the new one on....
If I venture to do this job again - the fuel line will be disconnected....
Joined: Mar 2012
Posts: 4,759
Likes: 1,435
From: Hazlet Township, NJ
Regarding the driver's side - it's a PITA if you have the long oil filler tube. To make the job go smoother. Release fuel pressure and disconnect spring clamp where the plastic fuel line goes across the cam cover (unless you can get the oil filler tube disconnected from cam cover) - mine was literally stuck - resulting in a hot mess in fishing out the old gasket and getting the new one on....
If I venture to do this job again - the fuel line will be disconnected....
if anyone knows the part number for the fuel line O rings that connects to the fuel rail please share them. (I disconnected and didn't like the look of the inner o-ring) No leaks but would like to replace it as a precautionary measure.
Of course one of the cam cover bolts decided to disconnect itself from the holder as I was removing the cover from the Jag and wound up somewhere in the depths of the suspension.
In a pinch I replaced with a M6 X 1.0 bolt (30mm long)
Don't put a dab of RTV on the lower edge of the cam gasket. Does nothing and I think made things worse over time.
With the cover off finally I was able to clean the head mating surface and the cam cover and resolve the oil leak from the oil filler tube. (o-ring was shot)
Joined: Mar 2012
Posts: 4,759
Likes: 1,435
From: Hazlet Township, NJ
I know that step is not in the JTIS. Do you know if there is a write up on here for doing the driver's side? I might not even replace the valve cover gasket if there is no oil in the wells..... I want to, but don't want any issues to 'pop up' either. The only oil I see on that side is coming from VVT Sensor up front. Already have the gasket for that and don't need to pull the cover to replace.
Here is how i accomplished the driver's side today:
* Disconnect neg battery terminal
* Relieve fuel pressure at schrader valve.
* Disconnect fuel line connector at fuel rail. (Use 5/8" fuel disconnect size) - after inserting the tool, push in then pull apart, slowly.
* Remove air tube and air cleaner.
* Remove bolt from oil dipstick tube.
* Remove power steering reservoir and set aside towards area where air cleaner sits in car.
* Disconnect EVAP valve and lines, and dynamic stability bracket that's connected to the EVAP valve.
* Remove bolt that holds fuel line bracket to frame opposite cam cover. (This will give you working space)
* bracket holding harness on top of cam cover.
* You need 7, 8, 10mm size, short and long sockets both 1/4 and 3/8 sizes, swivels and extensions (13mm socket only used for 2 strut bolts holding EVAP unit bracket) and self ratcheting wrenches, 7, 8 and 10mm
* Remove COP Cover and COP's.
* Remove all cam cover bolts (make sure all are loose) they don't come out they will spin on the shaft when loose.
* Pull cover off (Pull bolts off cover and notate where they go) I should've done that to alleviate running to the auto store to get a replacement M6 X 1.0 bolt.
Check secondary tensioner (Mine was changed years ago so i wasn't worried) and chain. (any missing parts of tensioner or chain is loose - stop and thank me after replacing your secondary tensioner) tell tale sign is cracking and orange color.
Clean off old RTV at front 2 areas where timing cover meets the cylinder head and place RTV in those 2 spots before affixing cam cover. A dab is fine.
Clean off all mating surfaces on cam cover and install new gaskets. Push bolts through bottom of cam cover gasket and affix cam cover carefully in place.
If you have oil leaks at your oil filler tube change the o-ring or seal up with RTV.
Put everything back together in reverse, take your time and don't over tighten cam cover bolts. Start by tightening rear ones by hand before moving to the front bolts.
Last edited by abonano; Sep 21, 2016 at 08:25 PM.

Thread
Thread Starter
Forum
Replies
Last Post
xjrjag
XJ XJ8 / XJR ( X308 )
86
Nov 27, 2025 09:16 AM
stanjag
S-Type / S type R Supercharged V8 ( X200 )
4
Dec 29, 2024 08:26 PM
Currently Active Users Viewing This Thread: 1 (0 members and 1 guests)