
My analog clock stopped working??!!

Just today my analog clock stopped moving. Any idea what the problem is? When I press the + or - buttons it seems like it wants to move, but doesn't.
If there a fuse for this? Also the light on the clock still works.... please help.
If there a fuse for this? Also the light on the clock still works.... please help.
Last edited by Hustle Hyde; Jul 31, 2014 at 11:08 PM.

Popular Reply
Jul 31, 2014, 11:07 PM
OK... I fixed both problems. The clock is now working and the bulb to it lights up again!
I appreciate any help I get from this forum so I always trying to give back good advice too so you can troubleshoot your Jaguar issues! So....
First I checked all the fuses and they were all good.
Next I knew I had to take apart the dash to get to the clock. I carefully snapped out the main piece of wood and unscrewed the piece holding the a/c vents with the clock. I didn't have to pull the vents completely out, just enough to disconnect the clock tabs and push it out.
Then I took apart the clock. The problem with it was the hands felt stuck. I literally had to wind up the clock with my finger, going counterclockwise... once with the hour hand and once with the minute hand. This loosened it up enough to work again and keep the time!
Now it was time to fix the bulb... the original one was fried.
I had to peel off the green film from the old bulb to use on the new one.
2721MF is the type of bulb you need to fix your clock light! I picked it up at the local auto store. It fits perfectly. Put it all back together and it should be working.
The hardest part of the job was putting the wood panel back on. It was difficult for me to snap on the right side of the panel that is next to the air bag piece. I hit it hard with my palm and it finally snapped on! Try not to break anything, lol. Start with the bottom of the panel and then the top and sides... until everything it sitting flush again. You will need to pull the leather trim surrounding the navigation to slide the wood in place FIRST!

Hope this thread helps yall out! I will be happy to answer any questions you may have!
I appreciate any help I get from this forum so I always trying to give back good advice too so you can troubleshoot your Jaguar issues! So....
First I checked all the fuses and they were all good.
Next I knew I had to take apart the dash to get to the clock. I carefully snapped out the main piece of wood and unscrewed the piece holding the a/c vents with the clock. I didn't have to pull the vents completely out, just enough to disconnect the clock tabs and push it out.

Then I took apart the clock. The problem with it was the hands felt stuck. I literally had to wind up the clock with my finger, going counterclockwise... once with the hour hand and once with the minute hand. This loosened it up enough to work again and keep the time!

Now it was time to fix the bulb... the original one was fried.

I had to peel off the green film from the old bulb to use on the new one.

2721MF is the type of bulb you need to fix your clock light! I picked it up at the local auto store. It fits perfectly. Put it all back together and it should be working.
The hardest part of the job was putting the wood panel back on. It was difficult for me to snap on the right side of the panel that is next to the air bag piece. I hit it hard with my palm and it finally snapped on! Try not to break anything, lol. Start with the bottom of the panel and then the top and sides... until everything it sitting flush again. You will need to pull the leather trim surrounding the navigation to slide the wood in place FIRST!

Hope this thread helps yall out! I will be happy to answer any questions you may have!
Last edited by Hustle Hyde; Jul 31, 2014 at 11:13 PM.
Veteran Member
Joined: Apr 2012
Posts: 1,495
Likes: 220
From: Bairnsdale,Victoria Australia
other way round for me.the clock works but the light doesn't. guess everything has an expiry date (ironic for a clock)
no separate fuse for the clock that I know of but they are cheap on ebay uk if second hand (sorry) doesn't worry you.
no separate fuse for the clock that I know of but they are cheap on ebay uk if second hand (sorry) doesn't worry you.
Veteran Member


Joined: Jan 2009
Posts: 3,327
Likes: 168
From: Fairfax, VA
I found this site that has the fuse locations and descriptions. It's for a 2005 XJ but the 2007 should be about the same. I did not find one that addresses the analog clock specifically. There were some that were instrument clusters or packs though. You may want to inspect those to see if the fuses are OK.
jaghelp.com: 2005 XJ Fuse location and id
jaghelp.com: 2005 XJ Fuse location and id
OK... I fixed both problems. The clock is now working and the bulb to it lights up again!
I appreciate any help I get from this forum so I always trying to give back good advice too so you can troubleshoot your Jaguar issues! So....
First I checked all the fuses and they were all good.
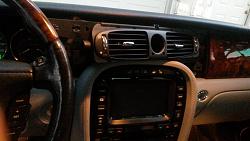
Next I knew I had to take apart the dash to get to the clock. I carefully snapped out the main piece of wood and unscrewed the piece holding the a/c vents with the clock. I didn't have to pull the vents completely out, just enough to disconnect the clock tabs and push it out.
Attachment 92007
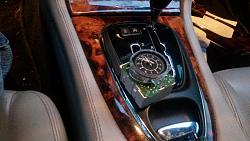
Then I took apart the clock. The problem with it was the hands felt stuck. I literally had to wind up the clock with my finger, going counterclockwise... once with the hour hand and once with the minute hand. This loosened it up enough to work again and keep the time!
Attachment 92008
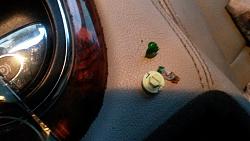
Now it was time to fix the bulb... the original one was fried.
Attachment 92009
I had to peel off the green film from the old bulb to use on the new one.
Attachment 92010
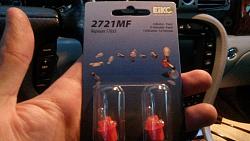
2721MF is the type of bulb you need to fix your clock light! I picked it up at the local auto store. It fits perfectly. Put it all back together and it should be working.
The hardest part of the job was putting the wood panel back on. It was difficult for me to snap on the right side of the panel that is next to the air bag piece. I hit it hard with my palm and it finally snapped on! Try not to break anything, lol. Start with the bottom of the panel and then the top and sides... until everything it sitting flush again. You will need to pull the leather trim surrounding the navigation to slide the wood in place FIRST!
Attachment 92011
Hope this thread helps yall out! I will be happy to answer any questions you may have!
I appreciate any help I get from this forum so I always trying to give back good advice too so you can troubleshoot your Jaguar issues! So....
First I checked all the fuses and they were all good.
Next I knew I had to take apart the dash to get to the clock. I carefully snapped out the main piece of wood and unscrewed the piece holding the a/c vents with the clock. I didn't have to pull the vents completely out, just enough to disconnect the clock tabs and push it out.
Attachment 92007
Then I took apart the clock. The problem with it was the hands felt stuck. I literally had to wind up the clock with my finger, going counterclockwise... once with the hour hand and once with the minute hand. This loosened it up enough to work again and keep the time!
Attachment 92008
Now it was time to fix the bulb... the original one was fried.
Attachment 92009
I had to peel off the green film from the old bulb to use on the new one.
Attachment 92010
2721MF is the type of bulb you need to fix your clock light! I picked it up at the local auto store. It fits perfectly. Put it all back together and it should be working.
The hardest part of the job was putting the wood panel back on. It was difficult for me to snap on the right side of the panel that is next to the air bag piece. I hit it hard with my palm and it finally snapped on! Try not to break anything, lol. Start with the bottom of the panel and then the top and sides... until everything it sitting flush again. You will need to pull the leather trim surrounding the navigation to slide the wood in place FIRST!
Attachment 92011
Hope this thread helps yall out! I will be happy to answer any questions you may have!
Last edited by Hustle Hyde; Jul 31, 2014 at 11:13 PM.
Trending Topics

Junior Member
Joined: Jan 2012
Posts: 27
Likes: 3
From: Wakefield, MA
How did you get the wood fascia panel off without removing the leather around the console? I have all the points loose but it's stuck behind the leather and I don't want to force it to hard. Thanks in advance!

Member
Joined: Jun 2016
Posts: 73
Likes: 1
OK... I fixed both problems. The clock is now working and the bulb to it lights up again!
I appreciate any help I get from this forum so I always trying to give back good advice too so you can troubleshoot your Jaguar issues! So....
First I checked all the fuses and they were all good.
Next I knew I had to take apart the dash to get to the clock. I carefully snapped out the main piece of wood and unscrewed the piece holding the a/c vents with the clock. I didn't have to pull the vents completely out, just enough to disconnect the clock tabs and push it out.
Attachment 92007
Then I took apart the clock. The problem with it was the hands felt stuck. I literally had to wind up the clock with my finger, going counterclockwise... once with the hour hand and once with the minute hand. This loosened it up enough to work again and keep the time!
Attachment 92008
Now it was time to fix the bulb... the original one was fried.
Attachment 92009
I had to peel off the green film from the old bulb to use on the new one.
Attachment 92010
2721MF is the type of bulb you need to fix your clock light! I picked it up at the local auto store. It fits perfectly. Put it all back together and it should be working.
The hardest part of the job was putting the wood panel back on. It was difficult for me to snap on the right side of the panel that is next to the air bag piece. I hit it hard with my palm and it finally snapped on! Try not to break anything, lol. Start with the bottom of the panel and then the top and sides... until everything it sitting flush again. You will need to pull the leather trim surrounding the navigation to slide the wood in place FIRST!
Attachment 92011
Hope this thread helps yall out! I will be happy to answer any questions you may have!
Thanks!
Veteran Member
Joined: Feb 2011
Posts: 9,733
Likes: 2,201
From: on-the-edge
No he doesn't. Read it again.


Veteran Member


Joined: Jun 2010
Posts: 2,328
Likes: 544
From: Spring, TX
You don't need to fully remove the center console. Just nudge it back about an inch or so to give the wood trim some extra clearance. Also, no need need to remove the instrument cluster surround. Just lift the upper right hand tab a bit and slide the air vent unit out after unbolting. No need to even touch the air bag wood cover either.
Last edited by XJ8JR; Jun 29, 2016 at 01:48 PM.
Member
Joined: Jun 2016
Posts: 73
Likes: 1
well to move the center console back an inch you still have to essentially "remove" it as you've completely unmounted it from the vehicle (1" or 1' = same amount of work). also I found theres a lot of forcing required of the center vent side tabs due to the raised cross shaped plastic blocks on them designed to keep them locked in under the gauge shroud and airbag facia, so as it's a handful of screws, I found it easier to just free the gauge cover and airbag panel. I spent some time trying without removing those, and judged it was taking longer than removing 5 screws...
but it all ended up great thanks to the forum - thanks!
but it all ended up great thanks to the forum - thanks!
Last edited by Goatride; Jun 29, 2016 at 02:04 PM.

Junior Member
Joined: May 2017
Posts: 18
Likes: 2
From: Auckland. 0632
all these solutions are for the three gauge systems clock. My problem concerns the analogue clock displayed on the nav screen which isn't a real clock it's in the nav screen software but looks and operates like an analogue clock.
The problem is the hands have disappeared !! so no time is shown, although all the marker digits (ie the numbers) are still showing.
So has my software suffered a stroke? and some part of the software has given up?
confused. Cottonwood.
The problem is the hands have disappeared !! so no time is shown, although all the marker digits (ie the numbers) are still showing.
So has my software suffered a stroke? and some part of the software has given up?
confused. Cottonwood.