When you click on links to various merchants on this site and make a purchase, this can result in this site earning a commission. Affiliate programs and affiliations include, but are not limited to, the eBay Partner Network.
Hello! I�ve recently purchased and got running a 1984 Jaguar XJ6. It�s the American model with the 4.2L inline 6 cylinder engine, 3 speed transmission.
The car sat for some time and because of that the engine leaks oil. The driver side fuel tank also seems to be leaking at over half a tank of gasoline. So those are the two huge issues I�m currently focused on fixing. So currently I�d like to build a list of parts I need so I can replace them. Going onto YouTube I�m able to find some general info on removing the bumper to get to the fuel tanks, but I�m left confused on whether or not my car has internal fuel pumps (or the external in the trunk), does my car have a fuel sediment bowl (the YouTube vid I watched was on a 70 something xj6 and so I am aware that mine could be different, etc). So yeah, any help would be appreciated. I�d love to restore this thing.
I t looks like your car has good bones and with some cleaning and tidying up and remedial work you will have a really nice car.
I don't think that you will need to remove the rear bmper to get the fuel tank out and from your pic the area looks pretty much rust free which is a real bonus. If you remove the tail light you will be able to look into the fuel tank cavity to get a better idea of what you are up against.
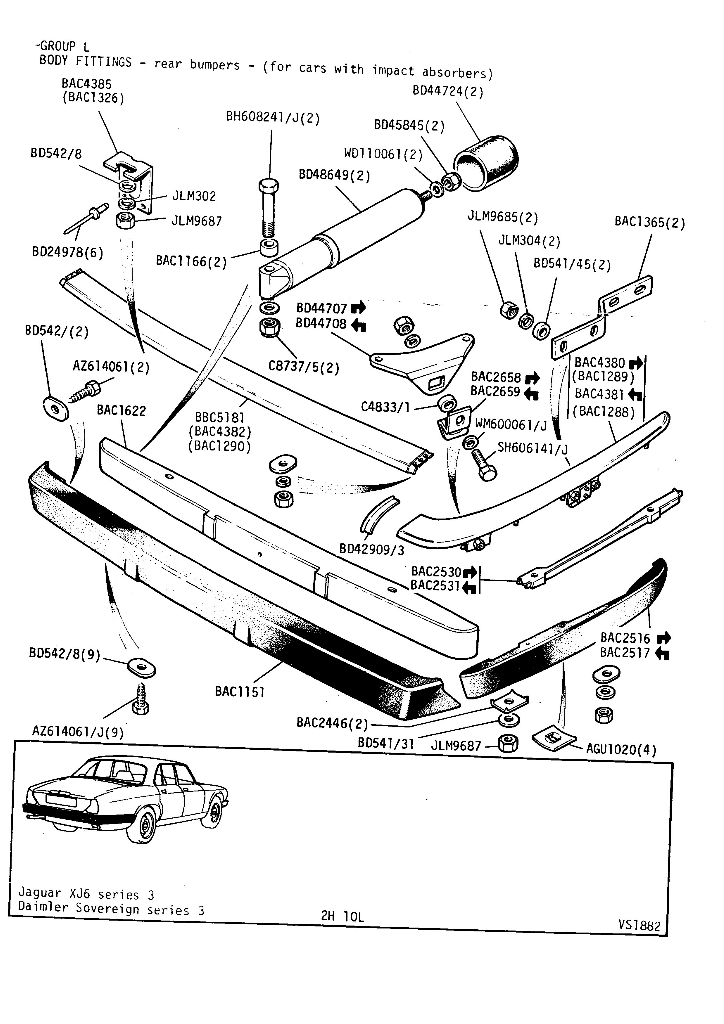
The attached document will be helpful, Parts Manual for Series 3. I'll also attach the Service Manual, but it exceeds the attachment limit so it will have in a couple of posts.
Have fun.
The only North American XJ6 sedan that had INTERNAL fuel pumps was the 1977MY. (last year of carbs)
The pump we used as replacement was the Chevy VEGA pump.
The fuel injected used Bosch pumps
Hi, mine is a 1984 too. You need to remove the CORNERS of the bumper for each tank, not the entire rear bumper. Then you remove the Quarter Panel, then the rear resonator must come off too. Not an easy job, take your time. **Replace the quarter panel screws with better stainless steel hex screws and washers, ACE Hardware has them. Follow the steps exactly as the Service Manual describes, AND you must DEPRESSURIZE The fuel system before disconnecting any fuel lines connected to the tank. FOLLOW the Service Manual steps. I also have the Service Manual sections in my XJ-6 website: https://jagupgrades.webstarts.com
I'll mention again, you can get to the inner lower fuel tank bolts without removing the resonators, I've done it several times. loosen the heat shield at the bottom and wedge it and the resonator back for clearance at the front bolt. Enough room for a socket and ratchet. In the rear, a 1/4" drive socket and long extension beside the exhaust pipe through the valence opening, you can peek in and see the bolt head. Neither are very hard to do.
Now getting the right rear fuel line bung not to leak ...that's another matter!
tonight after work I took the corner of the bumper off on the driver side of the vehicle. Longest part was getting out the 1 million screws, none of which snapped or broke, but I definitely want to get nicer replacements from ace hardware like the gentleman above suggested. It looks like I need lots of new gaskets as the rubber is pretty hard where the hole is in the metal covering, which hides the fuel tank. I can�t tell where the tank would leak from over half a tank of gas, which I�ll admit was frustrating. It also needs some new lines as the line (its cord weaved together) at the top connecting to the gas cap, is breaking apart badly. Also, how would I connect that line back to the gas cap before inserting the cap? Would I have to get access to above the fender well?
I also saw rust in the tank, checked the other tank as well and saw rust in there too. So either way both tanks are getting replaced, the left one will be first though. Anyway. I�ll be posting some photos I got tonight. It was nice as I didnt need to remove the rear resonator to get that shield off. Just used some vice like pliers on the bolt and it turned right out. The tank didn�t get removed tonight, my goal was to simply look at everything and figure out if the tank was a definite need, which it is. So the rear resonator could still need to come out for tank removal, I do not know.
Thankfully it’s the left side tank that is having issues. Not sure if that would still leak via this approach
No, I mention that with humor. Not related to your car and not really a common jag thing, just happens to be a nagging problem with my tank. Not to worry on yours.
In your pic above, the large filter bung rubber seal is cracked and seeping fuel, the odor in the car will be apparent. Pull the brass plug using the larger size hex there, it's made of brass so make sure you have good purchase on the hex when loosening. There is a plastic filter behind it fitted to the bottom of the fuel pipe and it may slip right off or may have to be persuaded with pliers etc... have new ones and new rubber seals for the plug ready when you start putting things back together. You're gonna need to pull those filter plugs anyway to facilitate cleaning out the tanks. Also, pull a tail light (as prev mentioned) and then pull the exposed fuel level sender to get a good look at the inside of the tank and assess condition.