
2002 X Type 2.5L Starter Removal
#1
 02-17-2018, 12:35 PM

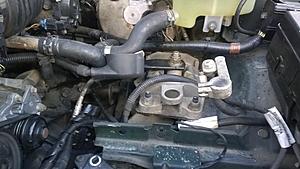
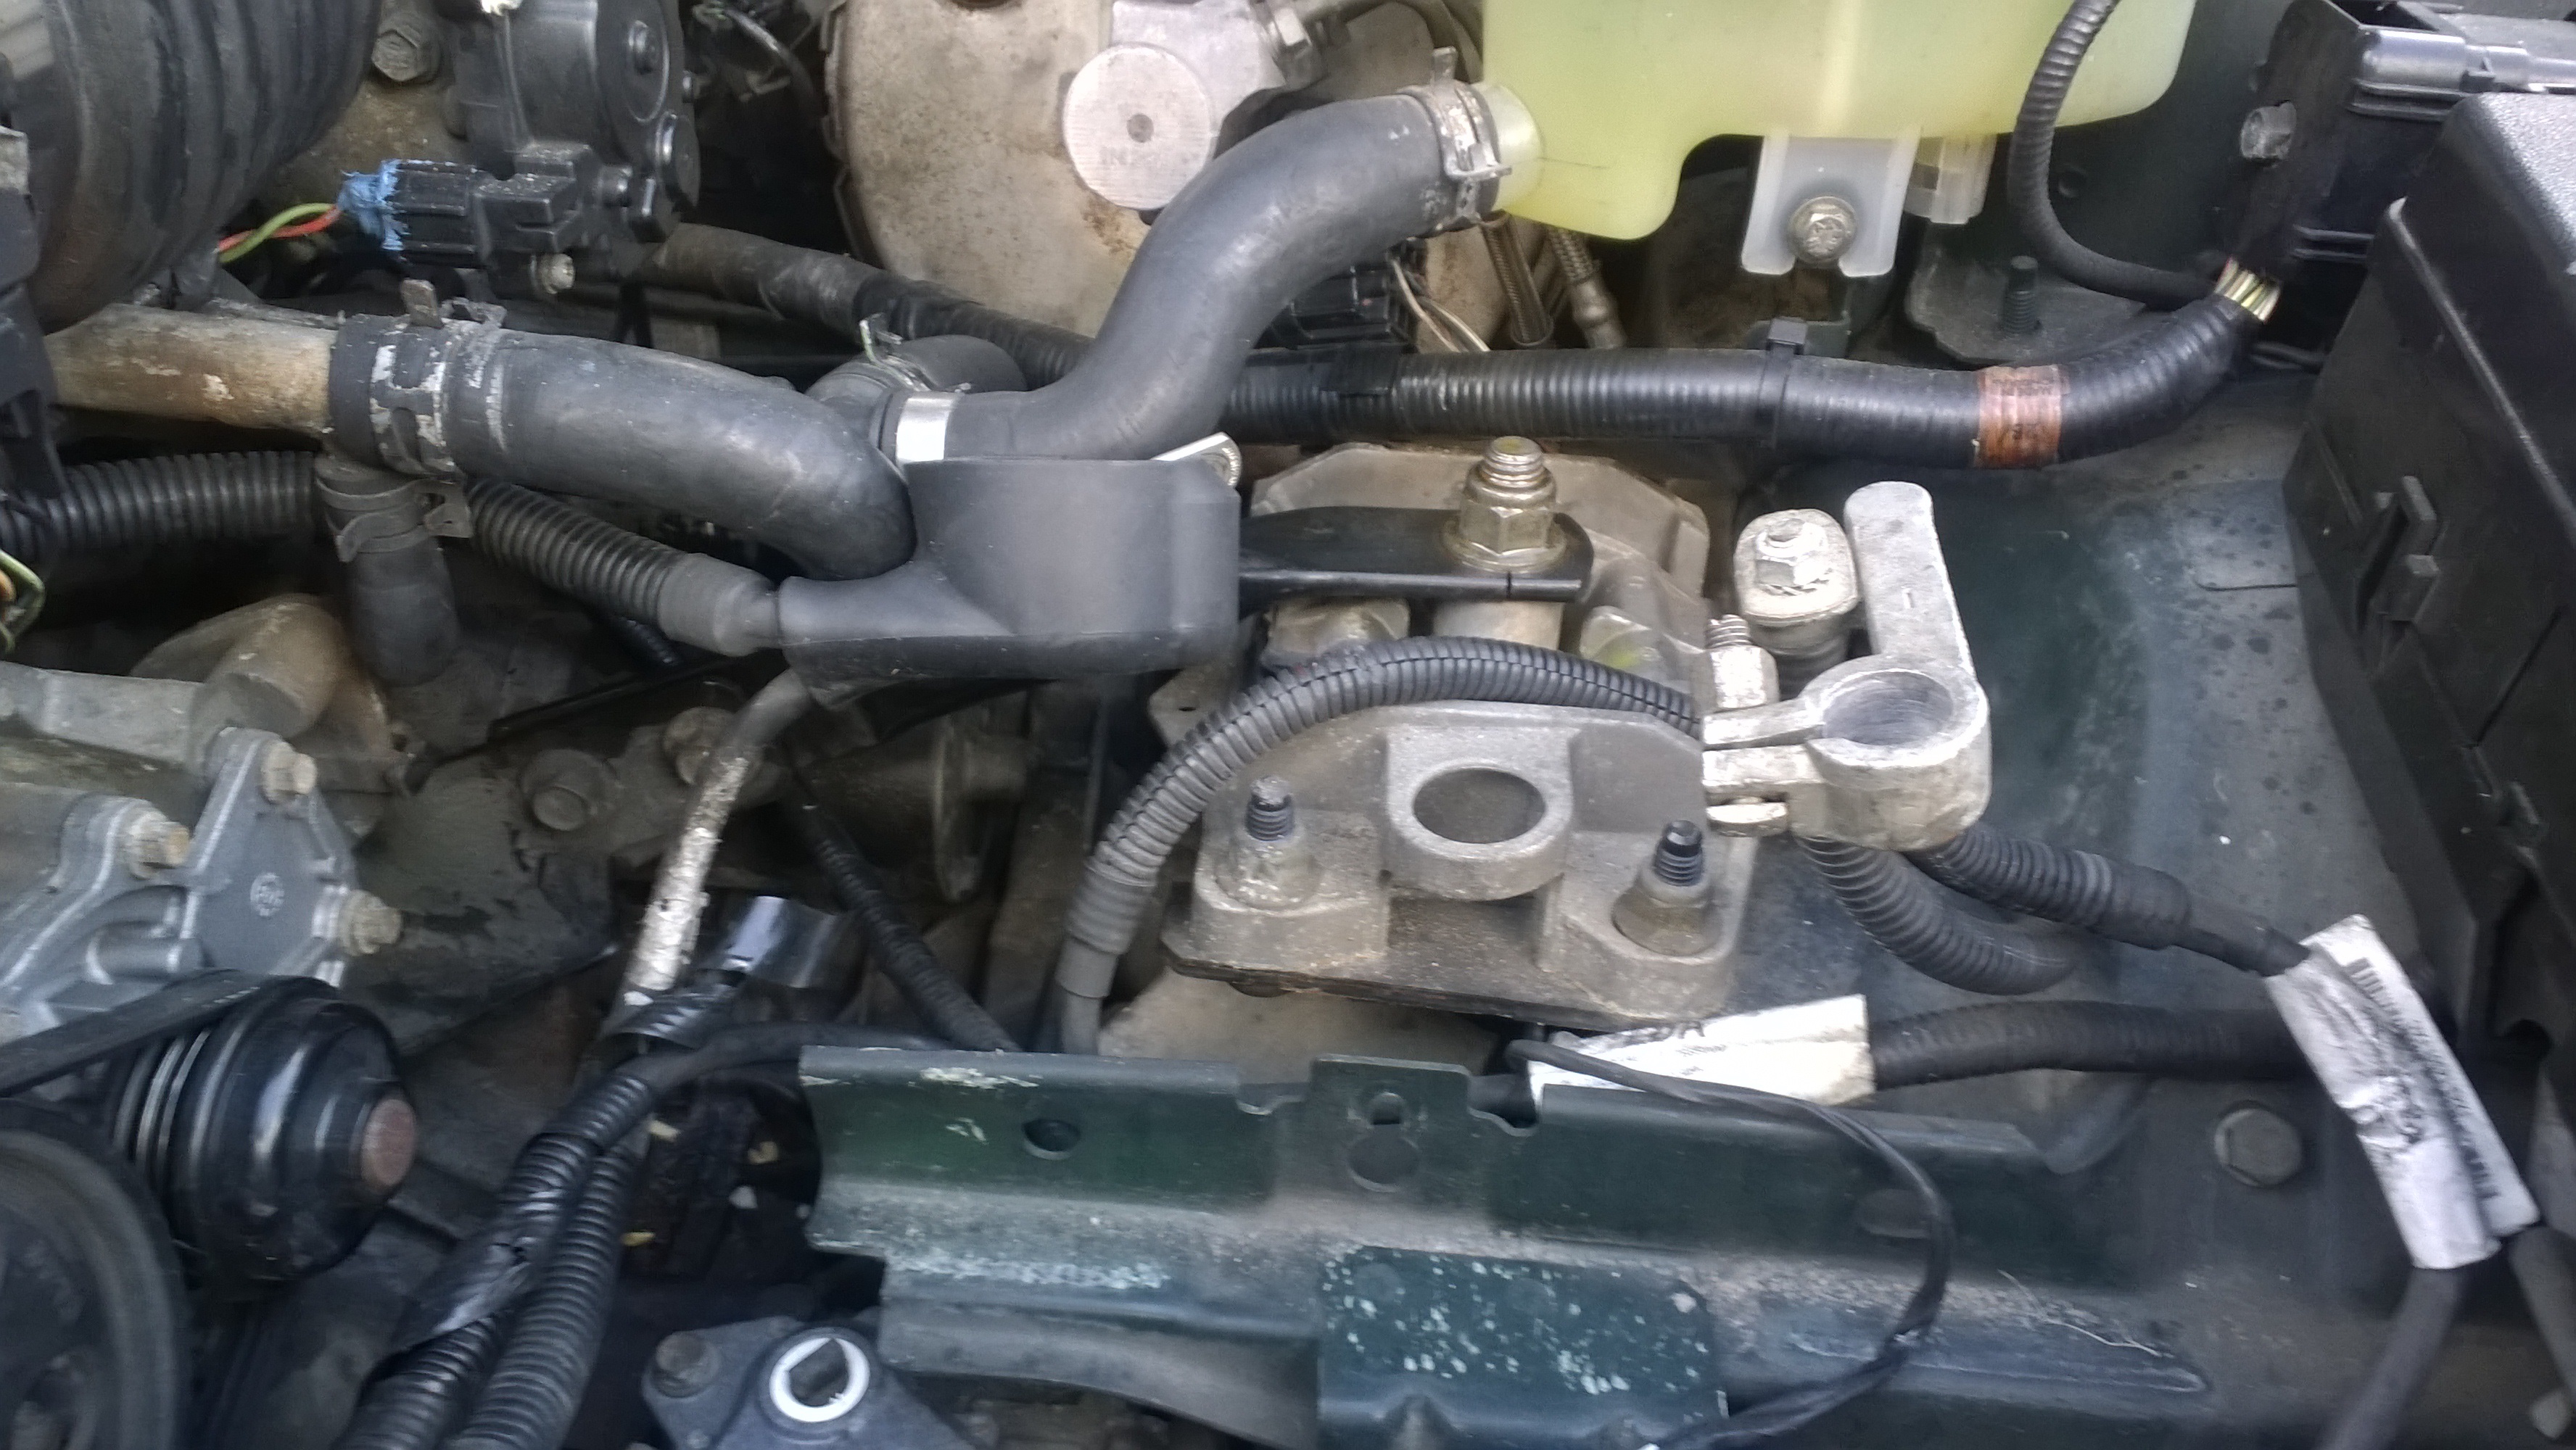
I removed the Upper Motor Support Arm that attaches to the driver side of the engine compartment (after supporting the engine with a floor jack from below), all bolts and wires from the starter I.A.W. the workshop manual but I cannot get the radiator side of the starter free from under the remaining Upper Motor Support Arm Plate (where the starter attachment plate is welded to the support arm and the now removed part of the support arm was originally bolted.)
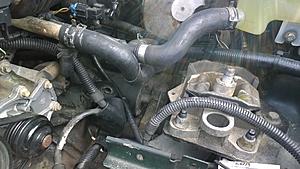
The starter attachment plate is welded to the remainder of the support arm I could not remove and the starter alignment pin is flush under the attachment plate. (Click on photo to get a better view - click on it again once opened to get a REALLY big view)

I was wondering if it would be safe to pry/bend/break the attachment plate off the upper support arm. The workshop manual does not address the clearance issue nor has anyone else mentioned this problem. Everyone said that they just pulled the starter free once they got the bolts out.
What am I not seeing or doing?
Last edited by PanamaJag; 02-17-2018 at 05:00 PM. Reason: Update Status
#2
02-17-2018, 03:20 PM


I never remove the steel tube, I just loosen the bolt on the mount and rotate 90 degrees.
It has been a decade or more since I replaced a starter but I don't remember it being that difficult to 'thread' the part from the opening.
I just move it around until it comes out.
I do remember that Jaguar warranty replacement time is .6 hours
bob
It has been a decade or more since I replaced a starter but I don't remember it being that difficult to 'thread' the part from the opening.
I just move it around until it comes out.
I do remember that Jaguar warranty replacement time is .6 hours
bob
#3
02-17-2018, 04:07 PM

Veteran Member
A lot ofof members have stated they remove the starter from the top. Not having done this personally, I searched many forum posts and distilled them basically down to the following =
On the X type Jag everything comes out from the top.
Remove battery and battery box
Pull back rubber cover at end of starter solenoid and undo wires
Un bolt 2 bolts that attach the starter to the bell housing/ Transmission. - these are vertical bolts, you can see them looking straight down from above. One of them has a ground wire on it.
Then lift starter and wiggle its way out of there.
FYI = some posters have said the bolts/nuts are reverse threaded, while others have said they are standard threaded.
Good luck.
#4
02-17-2018, 04:58 PM
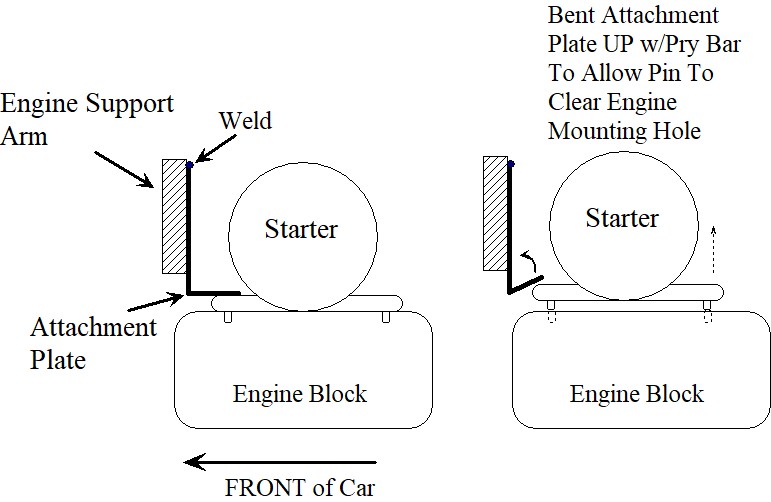
Thanks Motor & Dell for your responses. The problem I had was that the radiator side attachment plate for the starter was sitting flush on top of the mounting of the starter itself (the one with the alignment pin and hole through the starter base. The attachment plate is welded to the engine support arm. This prevented me from getting the alignment pin out of the top of the engine/transmission where it was seated to allow me to removed the starter.
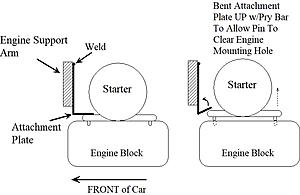
I ended up having to bend the attachment plate up enough so the alignment pin would clear its mounting hole on the engine and then was able to wiggle the starter through the maze of hoses/wires/brake booster/coolant reservoir and out the top.

I ended up having to bend the attachment plate up enough so the alignment pin would clear its mounting hole on the engine and then was able to wiggle the starter through the maze of hoses/wires/brake booster/coolant reservoir and out the top.
#6
02-17-2018, 07:24 PM
I thought I would take a few minutes to share how I determined that the starter/solenoid had gone bad what I learned while replacing the them.
A few days ago, when I went to start the car in the morning to go to work, the starter hesitated for a second (it "lugged" like when your battery is low) and then started the car. Later that day after work, it did the same thing - hesitated and then started the car. The following morning, it hesitated and then did nothing. Thinking I had a low battery, I tried to jump the car from my truck - but no dice - no crank, no start.
I took the battery to the "Battery Source" store that I purchased it from and had it load tested - tested fine, no issues. So I put it back in the car and tried to start the car again, but this time I happened to have the door open. When the starter did not engage, I noticed that the interior lights did not dim at all when I went to START on the ignition.
I got out and checked fuses F28, F29 and F92 along with relay R10. All fuses appeared fine. To test R10, I placed it into the spot for relay R1 and tried the windshield wipers - they worked fine so I knew that R10 was okay. (BTW - it is nice to know that there are two installed "spares" for R10, located at R1 - Windshield Wiper Motor Relay and R9 - Dip Beam Relay). I am guessing that if R10 does go bad, you can simply insert one of the other 2 "spares" in its place and after the car starts, put the "spare" back where you got it from....
Next I checked the voltage in the R10 base pin 1 while my wife had the ignition in START - got 12.3V. Then checked pin 5 of the base and got 12.3V.
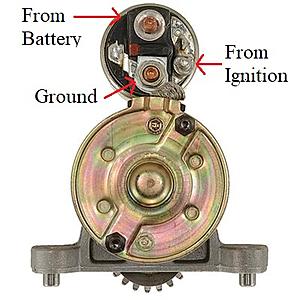
The next step was to check the voltage at ST2 (Batt to Starter) on the starter. I measured 12.3V between ST2 and ground.
I then checked the voltage on the starter solenoid at ST3 (the terminal with the smaller yellow wire from the ignition circuit) while my wife put the ignition to START. I had 12.3V at S3.
It sounded like the starter motor was turning, but was not engaging with the engine flywheel. I had read in another post that if you gave the starter a good "thumping" it may free up the solenoid and allow it to engage the starter with the motor. So I gave it a shot and the solenoid did free up, a little, but I got a grinding noise from the starter, like it had only engaged a portion of the way, not enough to fully catch the flywheel. I stopped and decided it was time to replace the starter.
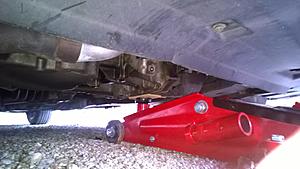
I got out the Workshop manual and saw that you need to support the engine & transmission before removing the upper support arm. I placed my floor jack under the driver side of the engine and after placing a small patch of wood between the jack and engine, raised the jack just until it tried to raise the car a little.
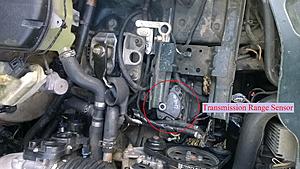
I removed the battery and battery box (10mm socket for all nuts) also - just to get some working room. Notice the Transmission Range Selector is located on the top of the transmission, below the battery box.
I then removed the Upper Support Arm. I used a 13mm socket for the bolts on the support plate and a 13/16in socket for the large nut on the bar. Some folks have written that you do not have to remove the Upper Engine Support arm and they are obviously correct, seeing how they changed the starter without removing the support. I would HIGHLY recommend that you do so, you will thank yourself as the job progresses.
Upper Support Arm In Place:
Upper Support Arm Removed:
I next pulled back the splash protector from the starter solenoid and removed the terminal lug from ST2 (Battery to Starter). I attempted to removed the terminal lug from ST3 (Ignition to Starter), but was unable to get a wrench on the nut, so I waited until I got the starter free from the motor before I removed it.
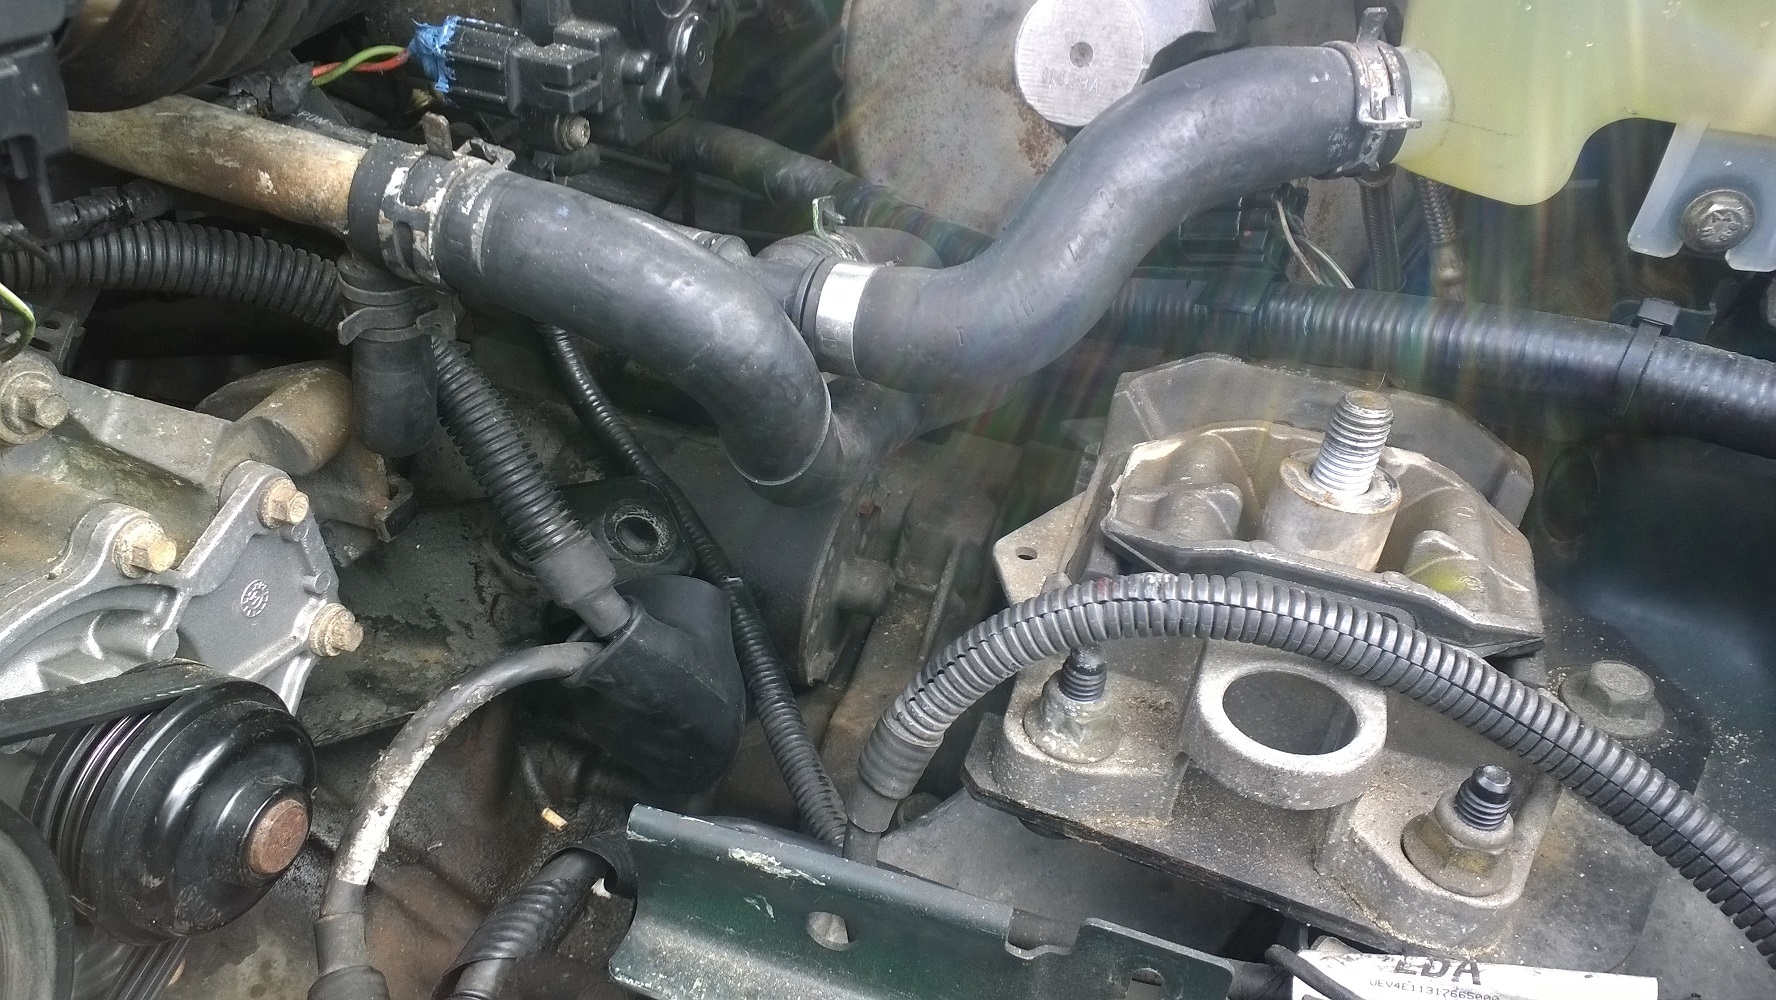
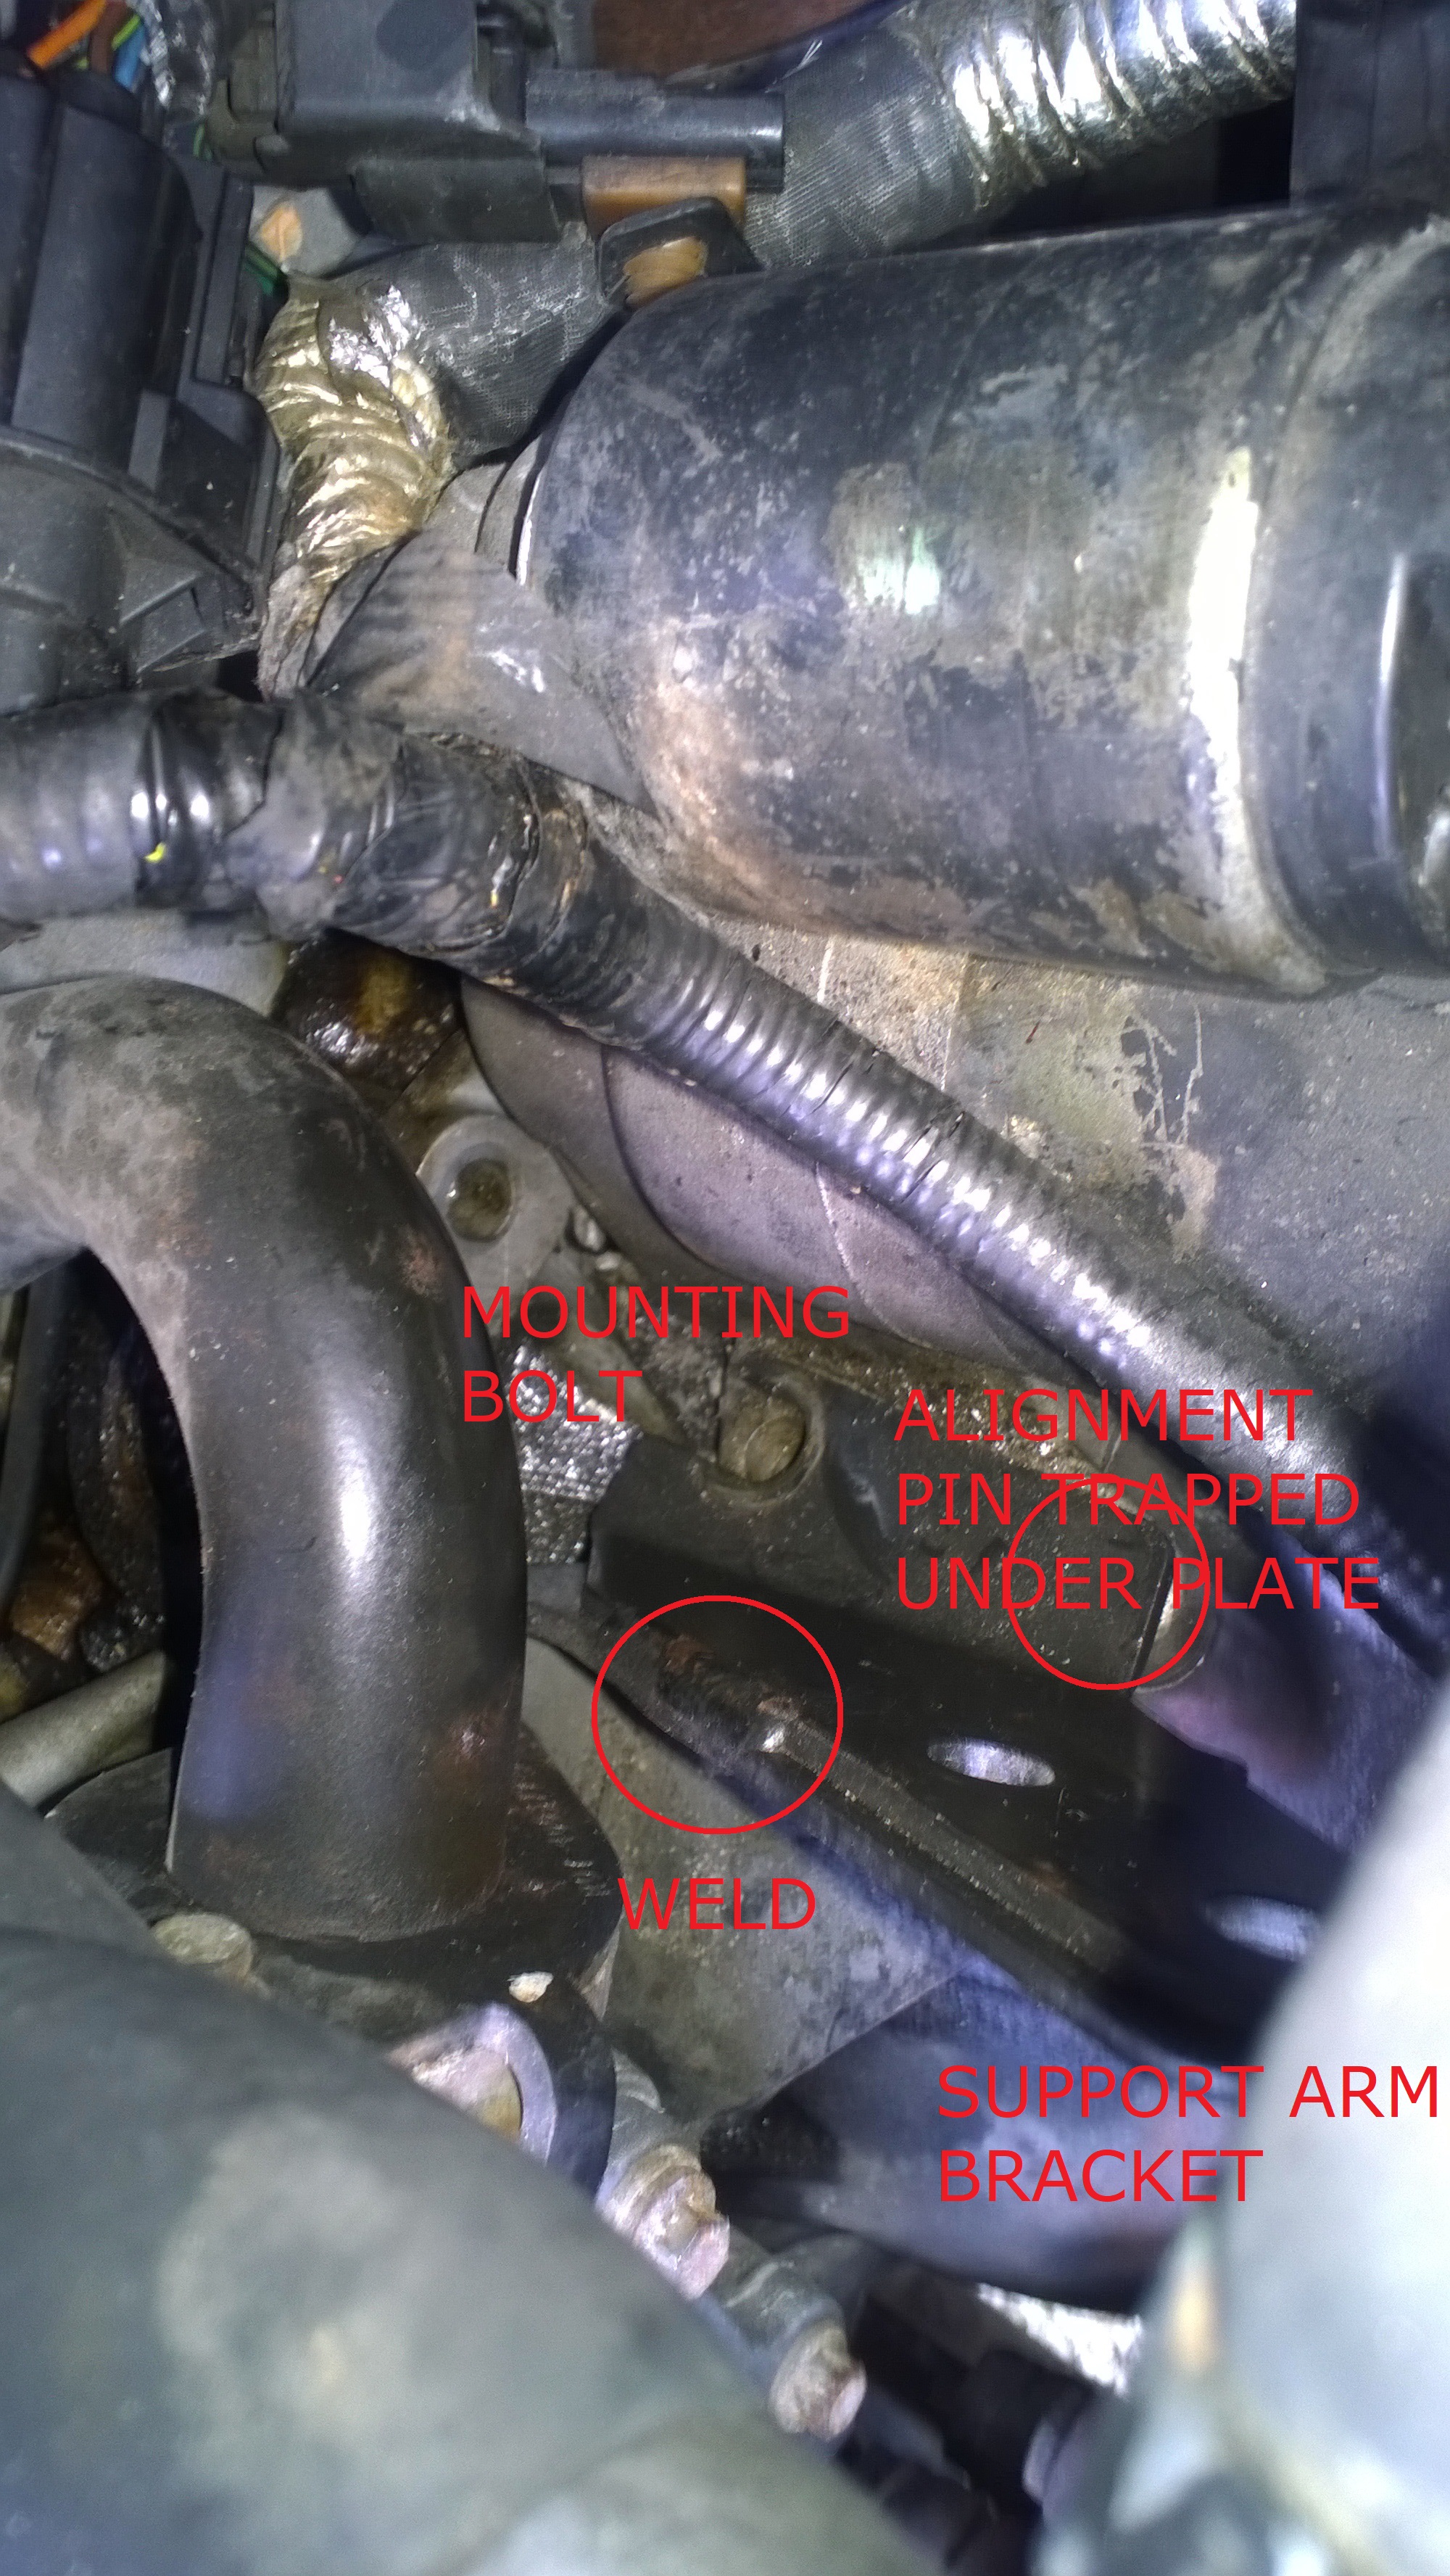
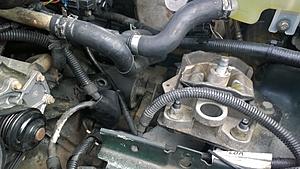
The next step was to removed the starter mounting bolts (1 on each side of the starter) using a 13mm socket and 24" extension. For the bolt on the radiator side of the starter I had to use a swivel socket adapter, since there were a few engine control sensors preventing direct access to the bolt.
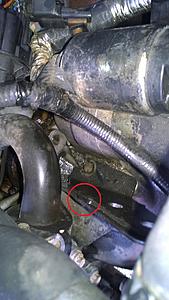
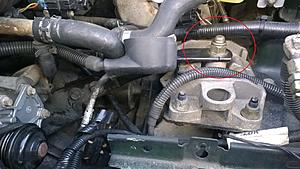
After I got both bolts out and tried to remove the starter, I realized that the radiator side starter attachment plate was sitting flush on top of the starter mounting area and this prevented the alignment pin on the starter mount from coming out of the engine alignment hole. To make things worse, the attachment plate was welded to the upper engine support plate, so it could not be easily removed. I had to bend the attachment plate up far enough to allow the alignment pin on the starter mount to clear its matching hole in the engine block.

Once the starter was free, I removed the terminal lug on ST3 and wiggled the starter out between the brake booster and radiator reservoir. There is JUST enough room to get it all out, if you have patience and are careful. I did not take any photos of this evolution because I was too occupied with cursing the Jaguar design engineers...
I wiggled the new starter back into its hole, reattached ST3, aligned the starter to the motor, bent the attachment plate back in place with a hammer and 24" socket extension and rebolted the starter to the motor. I then reattached ST2 to its connector on the starter solenoid.
I placed the Upper Engine Support Arm back in place hand tightening the larger nut and then noticed that the holes in the arm plate I removed no longer matched up with the holes in the support plate which had not been removed. I also noticed that the hole in the portion of the support arm that attaches directly to the car is split, thus allowing for some stretching of the hole for alignment of the plates on the other end of the arm.
I simply placed a screw driver through the holes on the arm attachment plates furthest from the intake manifold and while holding tension to align the holes in both the fixed plate and arm plate, I placed a bolt in the hole nearest the intake manifold and threaded it in until hand tight. I then took the screw driver out and placed the other bolt into the hole I had used to align the plates and tightened both bolts fully.
I tightened the larger nut to finish support arm replacement. I reinstalled the battery box & battery, removed the floor jack from under the engine and started the car!!

There are many other, more exotic reasons, that an X Type will not crank, understanding that the Passive Anti-Theft System (PATS) has to give an "Okay to Start", the General Electronics Module (GEM) has to give an "Okay to Start", the Inertia Safety Switch has to be okay, the Transmission Range Sensor (TRS) has to be working, the transmission selector cable has to be good, Fuses F2, F7, F28, F29, F74, F84, F92 have to be good. Relays R10 & R18 have to be good along with a host of other things that may give problems. Luckily - my problem was straight by the book.
I hope this helps someone else who may experience the "JOY" of a No Crank - No Start problem in the future.
A few days ago, when I went to start the car in the morning to go to work, the starter hesitated for a second (it "lugged" like when your battery is low) and then started the car. Later that day after work, it did the same thing - hesitated and then started the car. The following morning, it hesitated and then did nothing. Thinking I had a low battery, I tried to jump the car from my truck - but no dice - no crank, no start.
I took the battery to the "Battery Source" store that I purchased it from and had it load tested - tested fine, no issues. So I put it back in the car and tried to start the car again, but this time I happened to have the door open. When the starter did not engage, I noticed that the interior lights did not dim at all when I went to START on the ignition.
I got out and checked fuses F28, F29 and F92 along with relay R10. All fuses appeared fine. To test R10, I placed it into the spot for relay R1 and tried the windshield wipers - they worked fine so I knew that R10 was okay. (BTW - it is nice to know that there are two installed "spares" for R10, located at R1 - Windshield Wiper Motor Relay and R9 - Dip Beam Relay). I am guessing that if R10 does go bad, you can simply insert one of the other 2 "spares" in its place and after the car starts, put the "spare" back where you got it from....
Next I checked the voltage in the R10 base pin 1 while my wife had the ignition in START - got 12.3V. Then checked pin 5 of the base and got 12.3V.
The next step was to check the voltage at ST2 (Batt to Starter) on the starter. I measured 12.3V between ST2 and ground.
I then checked the voltage on the starter solenoid at ST3 (the terminal with the smaller yellow wire from the ignition circuit) while my wife put the ignition to START. I had 12.3V at S3.

It sounded like the starter motor was turning, but was not engaging with the engine flywheel. I had read in another post that if you gave the starter a good "thumping" it may free up the solenoid and allow it to engage the starter with the motor. So I gave it a shot and the solenoid did free up, a little, but I got a grinding noise from the starter, like it had only engaged a portion of the way, not enough to fully catch the flywheel. I stopped and decided it was time to replace the starter.
I got out the Workshop manual and saw that you need to support the engine & transmission before removing the upper support arm. I placed my floor jack under the driver side of the engine and after placing a small patch of wood between the jack and engine, raised the jack just until it tried to raise the car a little.

I removed the battery and battery box (10mm socket for all nuts) also - just to get some working room. Notice the Transmission Range Selector is located on the top of the transmission, below the battery box.

I then removed the Upper Support Arm. I used a 13mm socket for the bolts on the support plate and a 13/16in socket for the large nut on the bar. Some folks have written that you do not have to remove the Upper Engine Support arm and they are obviously correct, seeing how they changed the starter without removing the support. I would HIGHLY recommend that you do so, you will thank yourself as the job progresses.
Upper Support Arm In Place:
Upper Support Arm Removed:

I next pulled back the splash protector from the starter solenoid and removed the terminal lug from ST2 (Battery to Starter). I attempted to removed the terminal lug from ST3 (Ignition to Starter), but was unable to get a wrench on the nut, so I waited until I got the starter free from the motor before I removed it.
The next step was to removed the starter mounting bolts (1 on each side of the starter) using a 13mm socket and 24" extension. For the bolt on the radiator side of the starter I had to use a swivel socket adapter, since there were a few engine control sensors preventing direct access to the bolt.
After I got both bolts out and tried to remove the starter, I realized that the radiator side starter attachment plate was sitting flush on top of the starter mounting area and this prevented the alignment pin on the starter mount from coming out of the engine alignment hole. To make things worse, the attachment plate was welded to the upper engine support plate, so it could not be easily removed. I had to bend the attachment plate up far enough to allow the alignment pin on the starter mount to clear its matching hole in the engine block.

Once the starter was free, I removed the terminal lug on ST3 and wiggled the starter out between the brake booster and radiator reservoir. There is JUST enough room to get it all out, if you have patience and are careful. I did not take any photos of this evolution because I was too occupied with cursing the Jaguar design engineers...
I wiggled the new starter back into its hole, reattached ST3, aligned the starter to the motor, bent the attachment plate back in place with a hammer and 24" socket extension and rebolted the starter to the motor. I then reattached ST2 to its connector on the starter solenoid.
I placed the Upper Engine Support Arm back in place hand tightening the larger nut and then noticed that the holes in the arm plate I removed no longer matched up with the holes in the support plate which had not been removed. I also noticed that the hole in the portion of the support arm that attaches directly to the car is split, thus allowing for some stretching of the hole for alignment of the plates on the other end of the arm.

I simply placed a screw driver through the holes on the arm attachment plates furthest from the intake manifold and while holding tension to align the holes in both the fixed plate and arm plate, I placed a bolt in the hole nearest the intake manifold and threaded it in until hand tight. I then took the screw driver out and placed the other bolt into the hole I had used to align the plates and tightened both bolts fully.
I tightened the larger nut to finish support arm replacement. I reinstalled the battery box & battery, removed the floor jack from under the engine and started the car!!
There are many other, more exotic reasons, that an X Type will not crank, understanding that the Passive Anti-Theft System (PATS) has to give an "Okay to Start", the General Electronics Module (GEM) has to give an "Okay to Start", the Inertia Safety Switch has to be okay, the Transmission Range Sensor (TRS) has to be working, the transmission selector cable has to be good, Fuses F2, F7, F28, F29, F74, F84, F92 have to be good. Relays R10 & R18 have to be good along with a host of other things that may give problems. Luckily - my problem was straight by the book.
I hope this helps someone else who may experience the "JOY" of a No Crank - No Start problem in the future.
Last edited by PanamaJag; 02-17-2018 at 09:16 PM.

Thread
Thread Starter
Forum
Replies
Last Post
Currently Active Users Viewing This Thread: 1 (0 members and 1 guests)