When you click on links to various merchants on this site and make a purchase, this can result in this site earning a commission. Affiliate programs and affiliations include, but are not limited to, the eBay Partner Network.
hi i want to fit electric seats from a 2003 x type estate into my camper . i have read the threads and advice from a previous thread but couldnt link the advice to my wiring . i have removed the unwanted wires from the loom connector and left the wires going only to the seat control module . i connected the OY wire to positive and connected the black to neg with no luck i have i have two pairs RB / U and WU /W and a single GB still not connected i assume these are from sensors / brake or something to allow the module to function im not sure if i should connect all on these wires and what side of the power to connect to . any ideas please or am i totally wrong. i have put a pic of the loom plug with the wires still not connected and an ID pic of the module numbers
assuming you dont have memory seats (buttons 1-4 on side) then you only need 12v and eth. the eth is the black wire and on the plug unit for the seats 12 goes on the orange green wire. if you dont have the plug unit and only the seat socket the 12 goes on pin 6 .
pm me if you want the plug unit that connects to the seat.
MIke, of note, there are 2 orange/yellow wires in the connector. One powers the seat, the other powers the seat heater. So, I would venture to guess that you connected to the seat heater, not the seat motors. You specifically want to connect to Pins 6 and 1 on the switch panel on the side of the seat. There are multiple plugs associated with the seats. So, you don't say which one you are showing.
Also of note, there are a few different styles of seats that have different functions. I would have to guess that you have the 8 way seats.
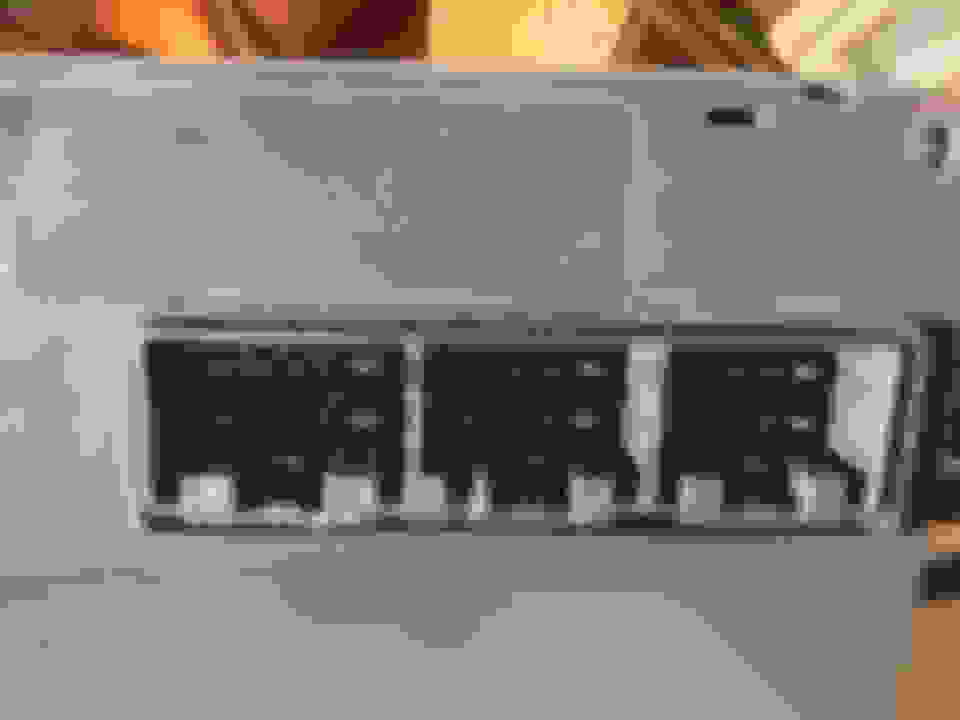
hi chris i read your answer in a previous thread about the same issue so was hoping you might be able to help me. thanks for the swift reply. the multiple plug shown is the loom plug where the loom plugs into the seat . it is the first plug to the seat and carries all of the wires to the seat. i an pretty confident that i have removed all of the wires except for the wires going directly from the input master plug to the seat input socket. . looking at the wiring diagram i downlooaded i am pretty sure i have the eight way seat . i am assuming from the diagram i have the the live and the earth to the seat control is correct. but nothing works and the wiring is quite vague and doesnt show any of the other connections into the control module . i am guessing the the small green / black is a sensor which has to be switched on but not sure whether to put a live or neg feed to it to get the controls working. i am also guessing the 2 pairs of smaller wires are possibly from the facia seat control switches which mirror the switches on the seat mounted control. i had the module control apart to figure it out but was full of electronics so left well alone. all of the motors work when powered up separately. i am thinking that i should put neg connection to the green / black as logically the stripe is black but dont want to burn up the module . i have inserted a pic of the loom multi plug, with the non seat control wires removed. then the pic of the power input multiplug into the seat control and pics of the seat module in the hope it makes it clear.
also not sure about socket numbering . any help greatly appreciated mike
multiplug to main loom input plug into seat control seat module sockets front of seat control module
Mike, if you look at the second pic you have in the above post, you will see a large orange wire (with a green stripe) in one corner of the plug and then in the opposite corner, a black wire. Those are the 2 wires that you need to focus on. The black wire is your ground wire and the orange one is your power. The same will be true for the other seat other than your orange wire will have a yellow stripe on it. This will get all the seat motion active for you. If you are wanting the seat heat to be active, then you have a lot more wiring ahead of you since the timing circuit is in the dash of the car, not in the seat. If you are wanting the lumbar portion of the seat to work, this will also require some other wiring.
Of note, you will need a 20 amp source for the seats. So, you will want to run say a 12 gauge wire from the fuse box to a spot near the seats with a fuse somewhere in that line (preferably as close to the spot of obtaining power as possible or in the fuse box itself). If you wire up the seat heaters, then they will need their own source of power as they will need a 30 amp fuse and 10 gauge wiring to power them.
I am a believer in using a slightly larger than needed gauge wire for my projects. Most automotive companies use the minimum gauge wire they can get away with to save those few extra pounds. So, never go smaller in gauge than what the factory has. using my method, you may find that the seat will move faster than it did in the car and the seat heater will result in "chestnuts roasting on an open fire". LMAO.
hi chris thanks for you answer again .. i already have the orange pos wire and the black opposite wire connected but no luck . i am not going to use the heated seats or the lumbar pump. im wondering if the green wire with black stripe is crucial as it appears to go into the control module and is not one of a pair. the wiring diagram i have is very simplified and does not include the whole wiring which is very frustrating . maybe ill bite the bullet and connect to earth first to see if it triggers something and get it going . i suppose the module might be faulty as a got the seats from a breakers . as a last resort i will have to rig up something direct to the motors to get it to the right position for me . thanks very much for your time mike
hi ! i have finally solved it ... the Green / black wire attached to the positive triggers the control and off it goes .. must have been attached to a live sensor somewhere in the car .. thanks for all your help chris ..
Hi chris i have the passenger seat working fine but cant get the drivers memory seat to move . i notice there is a couple more plugs into the control module and im guessing that the numerous small wires go the the memory control which must be in the car chassis somewhere .. i have tried attaching various wires to power and earth with no luck . also the seat motors have numerous wires going to them . i suspect the thicker wires are for power then the are two thinner wires one black and the other red on one motor .. any suggestions much appreciated
Idk if any of this will help. Shot pics of my 2006 (8 way) power seat from front shooting towards rear. Shots are from driver's side moving to passenger side.
Mike, Jaguar pulled a fast one with the seats and they went against convention. My drawings for the seats are for a 2002 model and they don't show the memory seats. So, I had to use the drawings for a 2004.25 (updated electrical) X-Type. But, the seats should be the same between 2003 and 2004.25. So, this is what you will need to do:
-ON the main plug that should have some heavy gauge wires on it (10 pin connector?), you need to connect all 3 of the black wires (go to pins 3, 5 and 10)
-On the same plug, you should see 3 wires (2 that are Green wires with black stripes and an orange wire with a green stripe, these are attached to pins 1, 4, and 6). All 3 of these will need to be tied together and attached to power. Of note, if you want the seat to operate like it does in the X-Type where it will only move when the car is powered on, then you will need to take the green wire with a black stripe attached to pin 4 will need to be attached to a switchable 12VDC source.
Now, for what bit you. if you look on the seat module, you will see a bunch of plugs that are going into the seat that will power the various motors. You will then see a large plug (22 pin at least, the others are 10 pin at most). If you look at the plug, you should see a red wire coming off of Pin 22. This needs to be tied to ground. This wire is the interlock wire for the seat. This 22 pin connector goes to the instrument panel harness, so, I am not sure what else that may be needed as my diagrams do not show anything, but I am assuming that there will be some other things going through that 22 pin connector. This connector seems to run up to the instrument cluster from what I can tell.
Your difficulties with the wiring diagram that you're using would seem to be because they're for a 2003 Model Year and your seats have come from a 2004 Model Year (That starts in mid 2003!!). That was the model year that introduced the estate version and also memory seats that you mention in Post 8. The wiring diagrams for your seats are in this link.
hi .. thanks for all your suggestions .. i have been wrestling with the wiring diagram for a 2003 x type where none of the colours appear to match .. the seats i have came from an estate so that clinches it . spent a week attempting to use a variety of connections . hope i have not damaged anything . will use your suggestions chris and double check using the 2004 diagram supplied by astromorg .. thanks to you all for your help .. i will try again .. and let you know how i get on in due course
mike
hi ! i have finally solved it ... the Green / black wire attached to the positive triggers the control and off it goes .. must have been attached to a live sensor somewhere in the car .. thanks for all your help chris ..
This worked for me too. The only issue I have now is working out how to move the seat back and forth? There are two levers on this passenger seat, up and down of the base , and tilt of the back. I can't see how to power the motor to drive it forwards and backwards ☺️
This worked for me too. The only issue I have now is working out how to move the seat back and forth? There are two levers on this passenger seat, up and down of the base , and tilt of the back. I can't see how to power the motor to drive it forwards and backwards ☺️
Scrub that , just realized that the front lever slides as well as tilts. Woo hoo, I'm so happy. Thanks all .