When you click on links to various merchants on this site and make a purchase, this can result in this site earning a commission. Affiliate programs and affiliations include, but are not limited to, the eBay Partner Network.
My Jaguar X-type 2002 V6 3.0 won't start after i replaced the timing chains and tensioners.
I realy could use some good advice here, i will tell you what i did to the engine and why. i bought the car with an tick/tap in it when revving @ 3000-4000 rpm.
when it idles you cannot hear any weird noises, it runs great. we decided to buy it. my Colleague/friend said it would be the hydraulic valve lifters that made the noise. We decide to give it a better look and opened the valve covers and we noticed that the chain closest to the fan/front of the vehicle was a little loose, the other chain closest to the wipers was tight.
we decided to replace the timing chains and tensioners and tensionerchainguides. we decided to let the engine in the vehicle. well it is possible but very tight to work there. but we managed to get it done.
we folowed the instructions from this site How to Replace timing chain on Jaguar X-Type 3.0 AWD 2001-2009
we did not use timing tools. but we checked and doublechecked everytime.
my new chains had coloured yellow markings on them, we marked the old chains as they were in the car, (without the coloured links) and compared them to the new chains. they are identical. the first chain to come of is the one closest to the wipers- i will call this chain the wiper chain from now on. and the chain closest to te front of the vehicle i will call the front chain.
so we took it all out; 2 chains, 2 tensioner and 2 chain guides.
we installed all new OEM parts. if you clicked on the link i mentioned earlier you can see what we did. we followed each step but we did not remove the camshaft bearing caps. because it was not nescesary.
after the installation we turned the crankshaft by hand, we followed a yellow marking on the chain and i manualy turned it twice yes twice around, not 2 crankshaft turns. no signs of any valves and pistons colliding on the way, no resistance was felt.
BECAUSE, after installing the news chains, filling her up with oil, coolant, new plugs, new crankshaft rod bearings and double checking everything. especially the timing marks. IT WONT START! i am sorry for caps but i am sad/frustrated.
we question ourselves, is this the right procedure? we are realy in doubt.
is this manual the right one for installing new chainkit?
ofcourse, it is possible we did something wrong following these steps, but is it the right guide? if this is not the right manual, and we followed the steps precisely it is probably the reason it wont start.
here som more information
the car cranks, but it wont fire.
the feul pump works, we checked by pressing in the button on the fuel gallery. the fuel squirted out.
the sparkplugs tested for sparks, they give a spark.
The battery is a 12v 68a, we jumped it just in case while trying to start it.
The small fuses, not the square/cubical ones are all ok
The fuel reset button by the passenger side leg compartiment cannot be pressed in so i would say that is okay.
the dashboard lights come on.
the red ligt next to the coinholder is turning for a second and then turning off.
the oil pressure light goes off while trying to start. so oil pressure seems ok.
the rod bearings before instalation were oiled with manual gearbox oil. GL5.
the water pump is replaced OEM
the gaskets were all replaced.
all replaced items are OEM.
the chain markings were alligned on the crankshaft.
when we were cranking it, we noticed that the cathalytic converter got very hot, i could not put my hand on it. the exhaust stayed cold/cool
i was thinking when we dissasembled the exhaust from the cathalytic converter, we had to hit it wit a hammer or it would not come off. maybe that was not good for the chatalytic converter and it collapsed.
So would it be possible that the exhaust was blocked? and that's why the engine wont start?
we read out the system with OBD-reader but there are no fault codes. only P1000.
i know the story is realy long, but thank you for reading all this.
please let me know what i should look for.
greetings bastiaan.
Last edited by B. Marcelis; Aug 13, 2017 at 06:50 AM.
bastiaan, soemthing is not right. i know it is an obvious statement, but we can eliminate some things. I would first start by spraying a litlte bit of starter fluid into the intake and then cranking the car to see if the car will catch that way. If yes, then you know the problem lies with the fuel system. If the car will not start, then the next thing I would do is a compression check of all 6 cylinders. This will tell you if the valve timing is good and if any damage may have happened to the valves (I know you said there was no resistance, but stranger things can happen). All 6 cylinders should have roughly the same compression pressure and it should be up around 150 psi. If you are down around 10-20 psi (or less), then you have either bad timing or damaged valves. If your compression is good, then this only leaves a problem with the plugs and you will have to investigate why the coils are not sparking at the correct time.
If you have low compression, the next step would be to find a cylinder that is in the top dead position (ie, piston all the way up, both valves closed. At this point, you will need to make an adapter that will allow you to use an air compressor to fill the cylinder with 90 psi air. At this point, you are blowing air into the cylinder and listening to 4 spots:
1) exhaust tailpipe for sounds of air escaping
2) removing the brake booster tube and listening for air escaping
3) oil fill cap removed to listen for air
4) coolant overflow bottle for sounds of air and/or bubbles forming in the tank.
Where you hear air is the part of the cylinder that is having an issue.
taking a step back, when it came to the timing of the engine, did you align all 3 timing marks? There is 1 on the crank shaft and then 1 on each of the camshafts. Because the catalytic converter is getting warm, this is making me think that you have a timing issue. In short, as you crank the engine, the fuel is getting pushed out of the cylinder via the exhaust valve before it gets compressed and ignited.
well, i have the tendency to look over the obvious. You are right about eliminating some things because pulling them chaines off is something i don't want to do anymore.
But i will do it if i have to ofcourse.
To anwser your question about the timing of the engine;
Yes, i did align all 3 timing marks per chain. each camshaft does have a coloured, marked spot/round dent on them. so we took notice of all the markings. 5 in total.
1 on the crank, 4 on the different camshafts.
When we completely assembled the engine. we gave it a few tries but it did not start.
We did try it with brake cleaner as starter fluid, we first sprayed it in the air intake manfold where the vacuum line goes in. that didn't work. wo we took off the air intake manifold and sprayed directly in the cylinders. just a puff. that did not work either.
when the engine was still running(before we replaced the chains) we took the air intake manifold off and fired it up. you would now and then hear and see explosions coming out of the holes where the injectors are, does that mean anything? all cilinders did that.
we didn't think much of it then but what does that tell you?
also you mention about coolant.
when we filled the coolant tank up, we did notice that the coolant did hesitate to go in the system. we actualy had to lift the coolant tank a few inches up; then we saw some bubbles indicating the system was fillling up. could that be of any influence on the system and if the engine will start? that it will not start because of the coolant system is not filled up yet?
Also, i used 5w40 synthetic oil instead of 5w30, could that be the reason it wont start?
on advice of my suppliers, the oil didn't make much of a difference.
i will follow your instructions and perform compression tests.
greetings bastiaan
Last edited by B. Marcelis; Aug 13, 2017 at 09:38 AM.
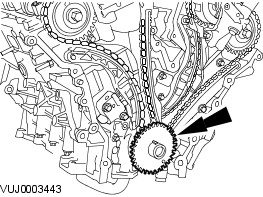
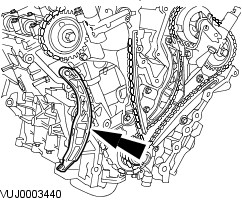
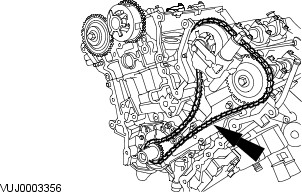
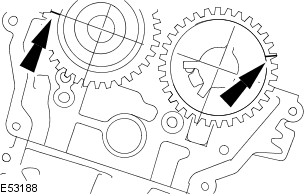
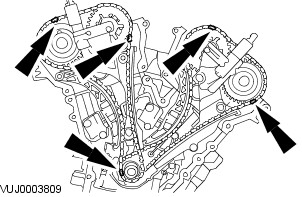
I tend to agree with Thermo,, timing is most likely your problem. Below is a diagram of the timing marks and the correct locations for them when installing the chains. Even though the chains have marked links there orientation is not important to correct timing. The location and orientation of the timing marks is the important factor.
the pictures, do they come from a manual? please send me the link. or are the pictures from the 2810 pages workshop manual?
i clearly see where the timing marks should be.
Please correct me if i am wrong.
let's say i use picture 1 (with step 13 written on it) my timing marks should be in that positions.
crankshaft keyway at 11 oclock
LH intake camshaft at 9 oclock
LH exhaust camshaft at 2 oclock
so that's done, they are in the correct positions.
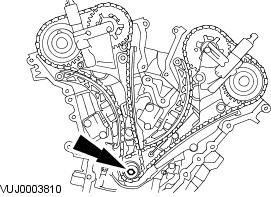
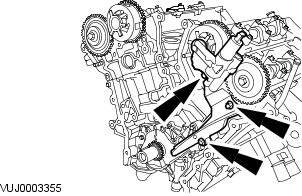
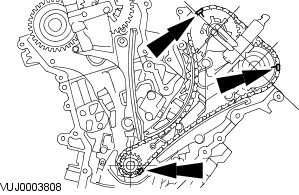
THEN, should i proceed by TURNING the crankshaft keyway to the position as mentioned in the second picture (with step 5 written on it) - from 11 oclock to 7 oclock?
BECAUSE, in that case, in the second picture (with step 5 written on it)
i will start with the;
crankshaft keyway at: 7 oclock
RH intake camshaft at 1 oclock
RH exhaust camshaft at 8 oclock.
is this how i should install the chains? in this order of movements?
Please correct me if i am wrong, i am here to learn.
again, please send me the link of the chain instalation guide you used. if you did.
NOTE:
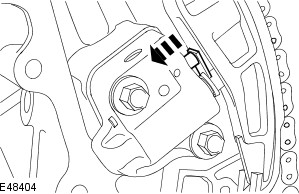
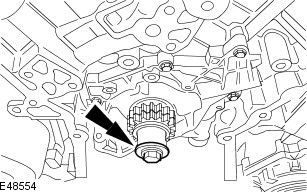
Note the position of the crankshaft position (CKP) sensor pulse wheel during removal. It must be returned to its original position during installation.
Remove the crankshaft position (CKP) sensor pulse wheel.
CAUTION:
Do not rotate the crankshaft counterclockwise. The timing chains may bind causing engine damage.
Install the crankshaft pulley retaining bolt and washer.
CAUTION:
Do not rotate the crankshaft counterclockwise. The timing chains may bind causing engine damage.
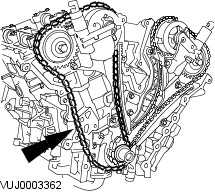
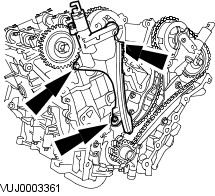
Rotate the crankshaft clockwise until the crankshaft keyway is at the 7 O'clock position, the alignment mark on the right-hand intake camshaft sprocket is at the 1 O'clock position and the alignment mark on the right-hand exhaust camshaft sprocket is at the 8 O'clock position.
Release the timing chain tensioner ratchet.
NOTE:
Keep the timing chain tensioner ratchet released.
Reposition the timing chain tensioner plunger.
Retain the timing chain tensioner plunger.
Remove the right-hand timing chain tensioner.
Remove the right-hand timing chain outer guide.
Remove the right-hand timing chain.
CAUTION:
Inspect and replace the O-ring seal if necessary.
Remove the right-hand timing chain inner guide.
CAUTION:
Do not rotate the crankshaft counterclockwise. The timing chains may bind causing engine damage.
Rotate the crankshaft clockwise until the crankshaft keyway is at the 11 O'clock position, the alignment mark on the left-hand intake camshaft sprocket is at the 9 O'clock position and the alignment mark on the left-hand exhaust camshaft sprocket is at the 2 O'clock position.
NOTE:
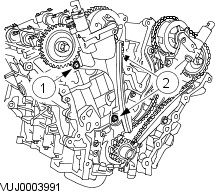
Right-hand bank shown, left-hand bank similar.
Release the timing chain tensioner ratchet.
NOTES:
Right-hand bank shown, left-hand bank similar.
Keep the timing chain tensioner ratchet released.
Reposition the timing chain tensioner plunger.
NOTE:
Right-hand bank shown, left-hand bank similar.
Retain the timing chain tensioner plunger.
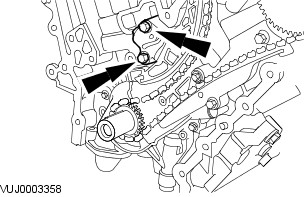
Remove the left-hand timing chain tensioner.
Remove the left-hand timing chain inner guide.
Remove the left-hand timing chain.
CAUTION:
Inspect and replace the O-ring seal if necessary.
Remove the left-hand timing chain outer guide.
CAUTION:
Make sure the crankshaft keyway is at the 9 O'clock position before any further engine repairs are carried out.
Remove the crankshaft pulley retaining bolt and washer.
Remove the crankshaft sprocket.
Installation
NOTE:
Make sure the crankshaft sprocket timing marks are facing outwards.
Install the crankshaft sprocket.
CAUTION:
Make sure the crankshaft keyway is at the 9 O'clock position before the camshaft positions are aligned.
Install the crankshaft pulley retaining bolt and washer.
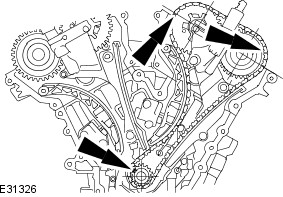
Rotate the left-hand intake camshaft clockwise until the camshaft sprocket alignment mark is at the 9 O'clock position and rotate the left-hand exhaust camshaft sprocket clockwise until the camshaft sprocket alignment mark is at the 2 O'clock position.
Rotate the right-hand intake camshaft clockwise until the camshaft sprocket alignment mark is at the 5 O'clock position and rotate the right-hand exhaust camshaft sprocket clockwise until the camshaft sprocket alignment mark is at the 12 O'clock position.
Rotate the crankshaft clockwise until the keyway is at the 11 O'clock position.
CAUTIONS:
Inspect and replace the O-ring seal if necessary.
Make sure the O-ring seal is correctly installed.
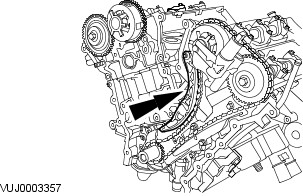
Install the left-hand timing chain outer guide.
CAUTIONS:
Make sure the crankshaft keyway is at the 11 O'clock position, the alignment mark on the left-hand intake camshaft sprocket is at the 9 O'clock position and the alignment mark on the left-hand exhaust camshaft sprocket is at the 2 O'clock position.
Make sure the timing chain alignment marks are correctly positioned to the crankshaft sprocket and camshaft sprocket alignment marks.
Make sure the timing chain slack is on the tensioned side of the timing chain.
Install the left-hand timing chain.
Install the left-hand timing chain inner guide.
CAUTION:
Do not manually adjust the timing chain tensioner.
Install the left-hand timing chain tensioner.
CAUTION:
Do not manually adjust the timing chain tensioner.
Make sure the left-hand timing chain alignment marks have remained correctly positioned to the camshaft sprocket and crankshaft sprocket alignment marks.
CAUTION:
Do not manually adjust the timing chain tensioner.
Remove the timing chain tensioner retaining pin.
CAUTION:
Do not rotate the crankshaft counterclockwise. The timing chains may bind causing engine damage.
Rotate the crankshaft clockwise until the crankshaft keyway is at the 3 O'clock position.
CAUTIONS:
Inspect and replace the O-ring seal if necessary.
Make sure the O-ring seal is correctly installed.
Install the right-hand timing chain inner guide.
CAUTIONS:
Make sure the crankshaft keyway is at the 3 O'clock position, the alignment mark on the right-hand intake camshaft sprocket is at the 5 O'clock position and the alignment mark on the right-hand exhaust camshaft sprocket is at the 12 O'clock position.
Make sure the timing chain alignment marks are correctly positioned to the crankshaft sprocket and camshaft sprocket alignment marks.
Make sure the timing chain slack is on the tensioned side of the timing chain.
Install the right-hand timing chain.
Install the right-hand timing chain outer guide.
CAUTION:
Do not manually adjust the timing chain tensioner.
Install the right-hand timing chain tensioner.
CAUTION:
Do not manually adjust the timing chain tensioner.
Remove the timing chain tensioner retaining pin.
CAUTIONS:
Make sure the right-hand timing chain alignment marks have remained correctly positioned to the camshaft sprocket and crankshaft sprocket alignment marks.
Do not manually adjust the timing chain tensioner.
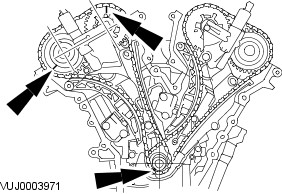
Make sure all the timing chain alignment marks are in the positions shown.
CAUTION:
Do not rotate the crankshaft counterclockwise. The timing chains may bind causing engine damage.
NOTE:
Rotate the crankshaft using hand tools only
Rotate the crankshaft two complete turns clockwise to make sure the valves and pistons do not clash.
CAUTION:
Do not rotate the crankshaft counterclockwise. The timing chains may bind causing engine damage.
Remove the crankshaft pulley retaining bolt and washer.
CAUTIONS:
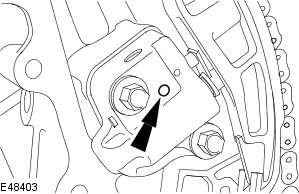
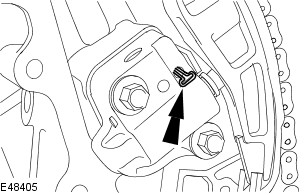
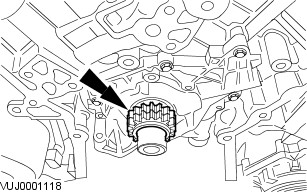
Make sure the CKP sensor pulse wheel is correctly installed with the missing tooth aligned to the crankshaft keyway.
Make sure the CKP sensor pulse wheel is correctly installed with the teeth pointing outwards.
Install the CKP sensor pulse wheel.
Install the spark plugs.
Install the engine front cover.
For additional information, refer to: Engine Front Cover (303-01 Engine, In-vehicle Repair).
Bastiaan, seeing flames come out of the intake holes is just telling me that combustion was not complete when the intake valves opened up and this allowed some of the combustion to come back. This is normal, especially at higher RPMs. This is why if you look at the intake, it has a black coating on it.
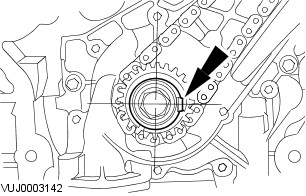
It is very possible that the crankshaft sprocket is not on correctly. I say that as that is what controls what cylinder fires at what time. If you look at that gear, you should see a missing tooth. That missing tooth should point at the crankshaft position sensor when the #1 cylinder is in the full up position. This is what tells the ECU where in the rotation the engine is so it knows when to fire each cylinder. It is possible that the plugs are sparking, but they are sparking on the intake stroke vice on the down stroke following the compression stroke. This could very easily explain what you are seeing. In short, your spark timing is 120 degrees out.
As for the coolant bottle, what you are seeing is normal. This is why they normally recommend that you start the engine and let it run for a few minutes to help push the air out of the system before you put the cap on the bottle.
As for the oil. This will not cause what you are seeing, but I cannot recommend that oil. I say that because the numbers mean a lot when it comes to oil. In the case of your oil, the higher the number, the thicker the oil is. In short, it needs a larger gap to be able to move through to get to where it needs to get to so it can provide adequate lubrication. Older engines (60's and 70's era motors) had relatively large gaps between things. So, you needed a thicker oil to fill those gaps. Modern day engines have very small gaps and therefore need a very thin oil to be able to make it into the openings and get to the proper places. Is 5W40 going to cause the engine to fail in no time flat, most likely not. But, in the long term, it is not going to be beneficial to the motor and will most likely result in a shortened life of the engine. Yes, there are physical differences between dino oil and synthetic oil and the size of the molecules and blah, blah, blah. But, unless you are an expert on oils, not knowing that difference is not something that I can say is good for the engine. There is a reason why Jaguar recommends the oils that they do. Looking in the owner's manual, it does list 5W-40 as a viable oil, but says that the preferred is 5W-30 (5W-20 if you follow the recommendation of the TSB). So, going with the 5W-40 would be something that I would only recommend if your outside temps are running in the 90's or above (35C or above). But, once the weather starts to cool off, changing out that oil would be greatly recommended.
JBzXJ40 post give a pretty good step by step.
If you want to download the tech manual go to JagRepair.com - Jaguar Repair Information Resource and then download the sections of Jaguar Spec Books and it will give you the entire tech manual in pdf.
today i checked for the correct position of the CKP sensor pulse wheel.
i had to pull out the sensor to see that the CKP sensor pulse wheel was installed correctly.
since the engine is already closed up, i had to make a picture with my phone trough the sensor hole. so i could see it.
teeth faces outward, just as it should be.
so, that is one thing i can scrape of my checklist.
THANKS! for the Step by step you posted.
you see, it is important that, when we are going to do it all over we need a good stepbystep. my coleague also thinks it went wrong with the timing. it must have gone somewhere wrong on the way.
Let's say we did something wrong while timing the engine.
somewhere we were a little bit of, misinterpretation/small **** of the camshafts on the way.
HOW is it possible i did not wreck the engine already when we tried to start the engine?
Or must the timing be very off to damage it?
At this point, assuming that we timed te engine wrong; did i have any luck?
-- AVERN1 Thanks for the link. i realy appreciate it.
-- THERMO Thanks for your information, As for the incorrect installed crankshaft sprocket; would an OBD readout not mention that it is installed wrong?
because it stays error code free after a readout.
also, the oil that is in it right now fresh 5w40 syntetic oil, probably will not be in there for too long.
because when the engine is working again, and the ticking/tapping sound is still there- we will flush it with ATF. because at first we tought that the noise came from the
hydraulic valve lifters. and flushing it with ATF would probably cure it. after the flush(if nescesary) i will fill her up with 5w30 or the oil jaguar advices to use.
there is indeed a lot said about different oils.
Thanks guys, i realy appreciate your input.
Last edited by B. Marcelis; Aug 14, 2017 at 04:35 PM.
Bastiaan, the CKP sensor would only give you an error code if it did not see the teeth of the gear going by the sensor. If the gear was somehow put on in the wrong clock position (ie, say the missing tooth should have been at the 12 o'clock position, but you got it in the 8 o'clock position for example), this would make the computer think that a cylinder would be ready to fire at its top dead center position when in reality the cylinder would be on say an exhaust or intake stroke. There would be no fuel in the cylinder and therefore result in no burning of fuel.
bastiaan, when it comes to compression, the pressure you get is subjective based on the internals of the motor. What you are really interested in is that all the cylinders have the same pressure (give or take 10%). So, if you are getting 150 psi in a cylinder, all the others should be in the 135 to 165 psi range.
With modern day engines, there really is nothing you can do for timing other than making sure that everything is put together correctly. The computer is altering when the coils will spark to fine tune things. So, as long as all the timing marks line up and things are installed with the correct orientation, there isn't much else that can be done.
so it is possible that the CKP pulse wheel can be put on in 2 different ways;
Teeth facing inward and
Teeth facing outwards.
In both ways the sensor can read the Teeth on the pulse wheel right?
because in my case, teeth facing outwards; if i look trough the sensor hole the teeth are perfectly in center of the hole, and line up perfectly right in front of the sensor.
wouldn't it be that when the sensor pulse wheel was put on in the wrong way ( teeth facing inward)
the sensor can't read the pulse wheel at all? because it seems to me that the teeth will be a little off the center of the hole/sensor.
the manual says quote: NOTE:
Note the position of the crankshaft position (CKP) sensor pulse wheel during removal. It must be returned to its original position during installation. end quote.
CAN it be, in my case; that the Original postition of the pulse wheel was facing inwards?
i did not write down the position (stupid me).. when taking it off. but i did put it on with the teeth facing outwards (as the manual says).
I do know now that i have to check the following things: according to Thermo:
the missing tooth should lign up with the crankshaft keyway. and,
cylinder 1 T.D.C the missing tooth should lign up with the sensor.
am i correct?
Also i made up from the comments that the markings on the chain are less important than the position of the allignment marks on the camshafts.
so if the timing marks on the camshafts are correct, i should not bother trying to allign them with the timing marks on the chain?
it was an OEM timing chain kit, why would they bother paint the markings then?
I tend to go with the idea that the CKP sensor pulse wheel is indeed wrong installed because of the very hot cathalytic converter. it makes sense that the fuel burns outside the cilinder. the 120 degrees off issue.
i remember when putting on the first chain, that i had to smuggle a little bit with the crankshaft position to get the Coloured chainlink on the crankshaft marking. that bothers me a lot, if i read now that the chain allignment marks seem to be not that important.
also what i want to know, they talk about "keep the slack of the chain on the tensioned
side of the chain"-- i hope that is on the side where the Chain tensioner is right?
because at first when in installed the first chain, and i tried to put the Coloured chain link on the crankshaft marking; i had some slack on the chain pointing at the most front of the engine ( where te headlights are) so i remember turning the crankshaft a little bit clockwise to get them alligned.
but then again, i read that when all the timing marks Camshafts and Crankshaft lign up with the markings on the chain, there is not much more what i can do. and that is the situation now.
coloured chainlinks on the timing marks of the camshafts an crankshaft.
We will open up the chain area of the engine again.
and probably will try to time her again. take off the chains and all that, following the piece of manual in this thread.
Last edited by B. Marcelis; Aug 27, 2017 at 10:38 AM.
So will the sensor be able to read the pulse wheel when put on in the wrong direction? because i do have compression of about 150 psi on 3 cilinders.
and the Cathalic Converter is getting so very hot. putting the Pulse wheel in the other direction, just to try it is a quick try to see if it runs then.
Last edited by B. Marcelis; Aug 27, 2017 at 10:54 AM.
bastiaan, you are correct in that the teeth should be aligned under the hole if the crankshaft gear is installed correctly. If it was put on backwards (ie, teeth not in line with the hole), the sensor may still be able to pick up the teeth, granted, the signal strength may not be sufficient until the engine RPMs come up (induced voltage is a function of the strength of the magnetic field and how fast it is changing, the sensor has a given magnetic field, but the teeth move by the sensor at different speeds, relative to the engine RPMs).
Not quite sure where you are going with the timing chain marks comments. In short, for proper timing of the engine, the marks on the timing chain MUST match the marks on the crankshaft and camshaft components. You position the engine components to get the basic timing so you can get the teeth to fall into the correct spots on the timing chain. As for keeping the tension on the timing chain, this is just something that needs to be done (which ever way it is applied) to prevent the camshafts from jumping a tooth, throwing off the timing. When I played with my truck timing chains, I found I could apply tension either way and hold stuff. So, it doesn't need to be from a specific direction. Because of the dual camshafts on each side, you may find it beneficial to get the timing set and then run a tie wrap through the chain to pull the chain together as you get the tensioner parts back on the engine. Then you can slide the tensioner into place and remove the tie wrap. This is making the assumption that you are not using the recommended tool to lock the camshafts in place. I know on my truck the timing marks were between valves and it would force the camshafts to rotate if those tools were not used (hence the tie wrap trick). Not sure how the camshafts sit with the Jaguar engine and keeping the marks in a proper location.
For me it is clear that the markings on the timing chains must match the marks on the crankshaft and the camshaft positions. If you say so. You seem to have a reputation of knowing most of it all.
but that is what we did, we put the markings all at the right spots. they matched. because we listened to the manual.
but it is something i can doublecheck, that the marked chainlinks lign up with the timing marks on the camshafts and crankshaft.
so in short, if i follow the manual above from JBzXJ40
and if the marked chain links lign up with the cam/crankshaft markings, i will be ok.
then it is an option that the CKP sensor wheel is in the wrong position.
could it go wrong if i just turned that wheel around?
and we didn't use tools to lock the cam shafts, they fell sort of into place.