
HowTo: XF Supercharged 4.2 Thermostat


Thread Starter
|
Member
Joined: Sep 2013
Posts: 47
Likes: 12
From: Texas
My computer threw a code essentially saying that the engine temperature wasn't getting hot fast enough. Research on the Internet showed that the 4.2L engine has an issue with a piece of rubber on the thermostat becoming deformed and allowing water to bypass (so not coming up to temp fast enough).
You'd think they'd fix the issue, but when they get to charge you $500 or more at the dealer to replace it, why would they?
Anyway, I didn't find much information on how to do it for the XF, much less the Supercharged, so I took some pictures:
Needed:
Flat screwdriver
7mm, 10mm sockets
8mm wrench
channel lock pliers
replacement thermostat
replacement thermostat seal
extended life coolant
shop rags
steady hands and patience
1- You'll need to remove the intake piping from the filters to the supercharger - you can get by removing just the outer most clamps by each filter, and the one from the center top. The slotted heads on the clamps take a 7mm (always prefer using sockets to screwdriver, less chance to slip and do damage).
2- If you look underneath the center where the piping from each side comes together, there's a 10mm bolt that needs to come out. Might put a magnetic pickup tool on it just to keep it from leaving.
3- PCV hose snaps into the US Driver's Side of the intake track - you won't get far without releasing it, just squeeze the ridged parts and it should pop off.
Intake removed - thermostat housing is by the rag:
Better angle of just the housing - notice three bolts and the hose clamped to the bottom.
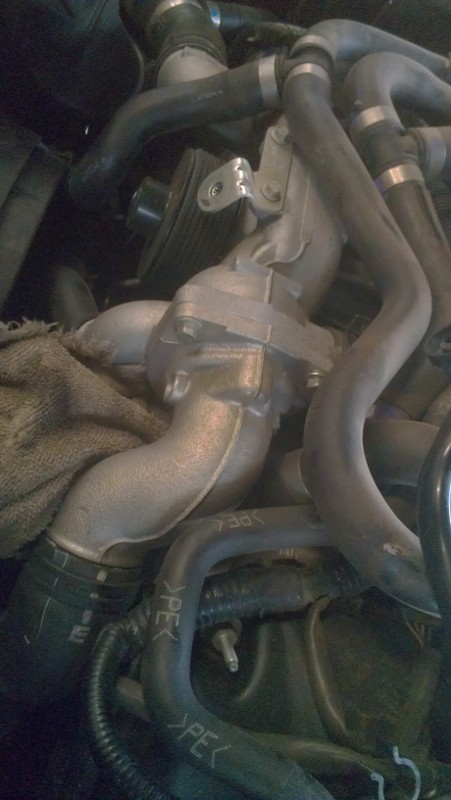
It's easier to remove the clamp if you don't loosen the bolts first, so get your pliers on there, squeeze the spring clip together and slide it down the hose a short ways so the hose is no longer clamped. An old mechanic's trick is to then grab the hose itself with the pliers where the clamp was, and give it a little twist in case it's stuck. If you don't remove the cap from the overfill tank, it should keep the coolant from leaving quite so fast. When you pull the hose free, you'll lose a few cups, I limited it by sticking a rag into the hose once I had it loose.
You'd think they'd fix the issue, but when they get to charge you $500 or more at the dealer to replace it, why would they?
Anyway, I didn't find much information on how to do it for the XF, much less the Supercharged, so I took some pictures:
Needed:
Flat screwdriver
7mm, 10mm sockets
8mm wrench
channel lock pliers
replacement thermostat
replacement thermostat seal
extended life coolant
shop rags
steady hands and patience
1- You'll need to remove the intake piping from the filters to the supercharger - you can get by removing just the outer most clamps by each filter, and the one from the center top. The slotted heads on the clamps take a 7mm (always prefer using sockets to screwdriver, less chance to slip and do damage).
2- If you look underneath the center where the piping from each side comes together, there's a 10mm bolt that needs to come out. Might put a magnetic pickup tool on it just to keep it from leaving.
3- PCV hose snaps into the US Driver's Side of the intake track - you won't get far without releasing it, just squeeze the ridged parts and it should pop off.
Intake removed - thermostat housing is by the rag:
Better angle of just the housing - notice three bolts and the hose clamped to the bottom.
It's easier to remove the clamp if you don't loosen the bolts first, so get your pliers on there, squeeze the spring clip together and slide it down the hose a short ways so the hose is no longer clamped. An old mechanic's trick is to then grab the hose itself with the pliers where the clamp was, and give it a little twist in case it's stuck. If you don't remove the cap from the overfill tank, it should keep the coolant from leaving quite so fast. When you pull the hose free, you'll lose a few cups, I limited it by sticking a rag into the hose once I had it loose.
Last edited by Richter12x2; Sep 28, 2013 at 06:17 PM.
Thread Starter
|
Member
Joined: Sep 2013
Posts: 47
Likes: 12
From: Texas
With the hose loose, use your 8mm wrench to remove the bolts from the thermostat housing - the only tough one to get to is the one on the bottom, but it's not that big a deal.
Removed thermostat housing on bench:
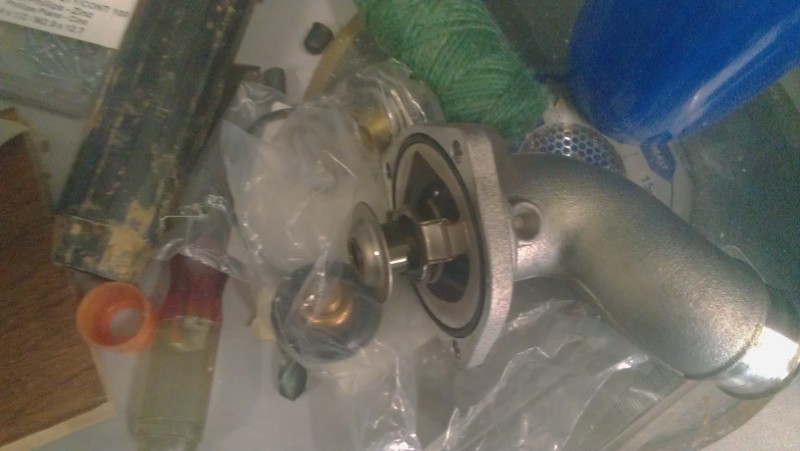
Here's a view of how the thermostat, assembled, sits in the housing, for reference, since the replacement comes in 4 pieces:

And here's the issue:

See the black rubber seal that's come loose? That allows coolant to bypass, and prevents the engine from coming up to temp as fast - not a big deal, but it effects fuel efficiency - and worst of all causes a Check Engine light that would obscure any more severe problems.
- Notice the retaining ears on the thermostat housing - you'll need to push the thermostat in, and twist to free it - it's a little tough to remove, but just tell yourself that's to prevent it coming loose while you're going down the road.
Preassembling the new thermostat pieces:
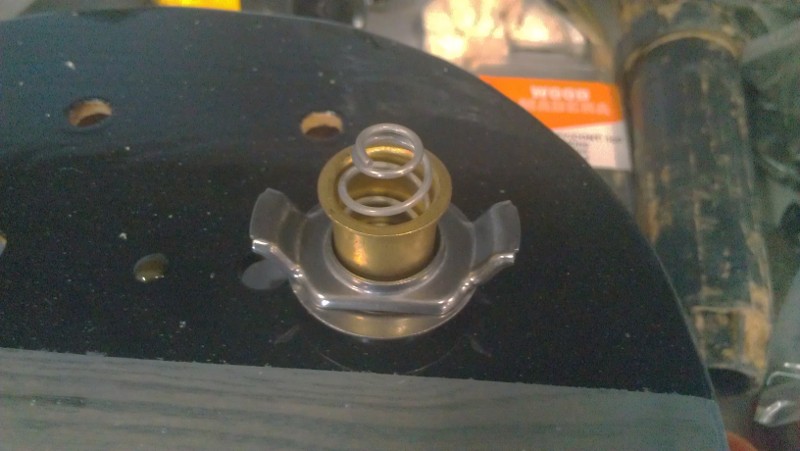

The new thermostat has a pin, just visible, that fits handily in a special made bit in the housing designed for that purpose. Then just twist the second piece on into those retaining ears we talked about before, and the job is done.
Next use a flat screwdriver (gently!!) to remove the round rubber seal from the thermostat housing, and replace with your new one - it just sits in there, and it doesn't seem possible to mess up.
I always the books that just said "installation is the reverse of removal" but it pretty much is - still, I'll include a checklist for reassembly:
- Clean all the mating surfaces
- Reinstall thermostat housing - 3 bolts (I did them finger tight first, then gradually tightened them, a couple of turns on each until they were all snug. Probably not necessary, but better safe than sorry)
- Reinstall coolant hose (remove rag, obviously) then return clamp to proper position. Grooves in hose should be a dead giveaway.
- If you moved the clip that holds the pcv hose, you might want to return that to its proper place now
- Reinstall air intake, be careful particularly where the clamps go over the boot at the filter side, I had one that wanted to fall out of place and allow a big air leak there (on the bottom), so make sure the boot is on correctly before tightening the clamp down with your 7mm. Don't forget the 10mm on the bottom. Also don't forget to snap the PCV hose back in.
- Top the coolant reservoir off with the correct coolant to the cold mark.
All done! Give it a start with the hood up and make sure nothing untoward happens. Mine had some belt squeaking for a minute or two from the coolant dripping down, but it gave that up in short order.
If you have a decent code reader, then you can use that to clear your codes and MIL light. If you don't, the MIL light should clear on its own after a few drives. Also, if you don't, it's worth getting one, since they run about $40 on eBay - the one I got is a D900, and was $38.99 with free shipping, and also allows you to view the real time inputs, like MAF voltages and Coolant Temperature. I just keep it under the passenger seat.
Removed thermostat housing on bench:
Here's a view of how the thermostat, assembled, sits in the housing, for reference, since the replacement comes in 4 pieces:
And here's the issue:
See the black rubber seal that's come loose? That allows coolant to bypass, and prevents the engine from coming up to temp as fast - not a big deal, but it effects fuel efficiency - and worst of all causes a Check Engine light that would obscure any more severe problems.
- Notice the retaining ears on the thermostat housing - you'll need to push the thermostat in, and twist to free it - it's a little tough to remove, but just tell yourself that's to prevent it coming loose while you're going down the road.
Preassembling the new thermostat pieces:
The new thermostat has a pin, just visible, that fits handily in a special made bit in the housing designed for that purpose. Then just twist the second piece on into those retaining ears we talked about before, and the job is done.
Next use a flat screwdriver (gently!!) to remove the round rubber seal from the thermostat housing, and replace with your new one - it just sits in there, and it doesn't seem possible to mess up.
I always the books that just said "installation is the reverse of removal" but it pretty much is - still, I'll include a checklist for reassembly:
- Clean all the mating surfaces
- Reinstall thermostat housing - 3 bolts (I did them finger tight first, then gradually tightened them, a couple of turns on each until they were all snug. Probably not necessary, but better safe than sorry)
- Reinstall coolant hose (remove rag, obviously) then return clamp to proper position. Grooves in hose should be a dead giveaway.
- If you moved the clip that holds the pcv hose, you might want to return that to its proper place now
- Reinstall air intake, be careful particularly where the clamps go over the boot at the filter side, I had one that wanted to fall out of place and allow a big air leak there (on the bottom), so make sure the boot is on correctly before tightening the clamp down with your 7mm. Don't forget the 10mm on the bottom. Also don't forget to snap the PCV hose back in.
- Top the coolant reservoir off with the correct coolant to the cold mark.
All done! Give it a start with the hood up and make sure nothing untoward happens. Mine had some belt squeaking for a minute or two from the coolant dripping down, but it gave that up in short order.
If you have a decent code reader, then you can use that to clear your codes and MIL light. If you don't, the MIL light should clear on its own after a few drives. Also, if you don't, it's worth getting one, since they run about $40 on eBay - the one I got is a D900, and was $38.99 with free shipping, and also allows you to view the real time inputs, like MAF voltages and Coolant Temperature. I just keep it under the passenger seat.

Veteran Member
Joined: May 2011
Posts: 1,099
Likes: 204
I'm bumping this old thread. I had a cold idle check engine light followed by a low coolant light recently. The thermostat housing appears to have a very small leak. I'm guessing it's the thermostat housing seal. I've been trying to figure out if you can use any thermostat out there or if you have to use an OE thermostat. Also it appears that the housing seal isn't included with the thermostat. I may run out to the dealer today and get bent over for the $0.50 seal so I can make sure I get the correct one. From what I can tell online it looks like it's AJ83525.
Veteran Member
Joined: May 2011
Posts: 1,099
Likes: 204
For those in the future searching for info on the Jaguar XF P050B check engine light there was a TSB 30313 that appears to relate to the issue where the dealer flashed the ECM to fix it.
In my case I was reconnecting the battery due to swapping out my dash, the idle when cold fluctuated from 500-800 non stop (surging) and eventually popped the P050B check engine light. I found this fix online that fixed my cold idle issue and the check engine light hasn't come back:
1. Make sure the A/C is off.
2. Hard reset - disconnect both battery terminals hold them together for 15-20 sec. reconnect the positive, then as cleanly and smoothly as possible connect the negative.
3. Start the car with your foot off the brake (DO NOT TOUCH ANYTHING) - at this point the car was still idling wildly, continue to let it run for 2 minutes, remakebly the idle smooths out. Again, do not touch anything!
4. When the idle stabalize at a normal rpm reset the parking brake (and windows)
5. Switch the A/C on and do not adjust anything, let it run for an additional 3 minutes.
6. Test drive - everything checked out fine. and so far so good (fingers crossed/knock wood)
Original source: https://www.jaguarforums.com/forum/xj-x350-x358-xj6-xj8-xjr-28/p050b-stall-after-acm-installation-resolved-96381
Last edited by Blackcoog; Mar 26, 2015 at 07:09 AM.


Veteran Member


Joined: May 2009
Posts: 27,540
Likes: 4,921
From: Yorkshire, England
Trending Topics
Thread Starter
|
Member
Joined: Sep 2013
Posts: 47
Likes: 12
From: Texas
I'd bet it is, because it should be the same Supercharged 4.2L. Buy me one to play with and I'll check for you. 

Senior Member
Joined: Jan 2009
Posts: 128
Likes: 21
From: Warwickshire, England
Many thanks for that. I have just finished that task on my X358 SuperV8. It really was that easy.
I spent more time cleaning the various plastic mouldings and newly exposed bits and pieces that doing the actual change.
I spent more time cleaning the various plastic mouldings and newly exposed bits and pieces that doing the actual change.
Veteran Member
Joined: May 2011
Posts: 1,099
Likes: 204
My car started throwing this code: P0128
I ended up swapping out my coolant tank, thermostat and gasket yesterday. My tank wasn't the cause of the code but it was leaking. I wanted to updated this thread with the correct part numbers for those that want to DIY.
Thermostat: AJ811788
Gasket: AJ83525
Coolant tank: C2Z11937 (Supercharged 4.2L tank only)
Stant sells a thermostat for $10 but apparently it isn't even remotely close to the correct thermostat. You need to buy an OEM thermostat as shown in the pics above.


Thread
Thread Starter
Forum
Replies
Last Post
2009, 2010, 42, assembly, hose, jaguar, location, piece, replacing, supercharged, supercharger, thermostaat, thermostat, thmostat, xf, xk8
Currently Active Users Viewing This Thread: 1 (0 members and 1 guests)

