
Spark Plug Replacement - Help


Member
Joined: Dec 2009
Posts: 63
Likes: 2
From: Prescott - Arizona
Hey, thanks so much Gus! That is a VERY handy publication; not sure why I hadn't run across it previously.
It did verify that a Spark Plug GAP between .035 and .039 is acceptable; which is comforting.
Still not sure what the effect of setting the GAP on the high side or low side is to engine operation. My hunch would be the effect is minor but couldn't tell you why.
Thank again for the publication!!!
It did verify that a Spark Plug GAP between .035 and .039 is acceptable; which is comforting.
Still not sure what the effect of setting the GAP on the high side or low side is to engine operation. My hunch would be the effect is minor but couldn't tell you why.
Thank again for the publication!!!

Senior Member
Joined: Sep 2013
Posts: 127
Likes: 57
The first six were easy. I can't get the last two out and I'm stumped. I can get the rear coil up about 1/3 of the way (COP8). That's it. Then, there's the coil in front of that (COP 6). How do I disconnect the brake booster line. or move it? To be honest, every time I'm faced with a new connector, I spend more time trying figure out how to disconnect it. Any suggestions?
The only thing that make sense is doing the steps post #1 of this thread by trosty:
https://www.jaguarforums.com/forum/x...35/#post838023
Last edited by Zazzy; Jun 27, 2015 at 11:35 PM. Reason: added the most probably answer
Veteran Member
Joined: May 2015
Posts: 1,101
Likes: 648
From: Up, Planet Earth
From Jaguar Documentation
Spark Plug Installation.
Apply 'Neverseez' to the 3-4 threads next to the spark plug electrodes. Fill to full thread depth for 180 degrees of thread circumference.
A CAUTION: Do not contaminate the spark plug electrodes.
Torque spark plugs to 25-29Nm (18.5-21Ib).
Spark Plug Installation.
Apply 'Neverseez' to the 3-4 threads next to the spark plug electrodes. Fill to full thread depth for 180 degrees of thread circumference.
A CAUTION: Do not contaminate the spark plug electrodes.
Torque spark plugs to 25-29Nm (18.5-21Ib).

Veteran Member
Joined: Aug 2014
Posts: 6,264
Likes: 1,764
The only plug thats difficult really is the rear right when looking from the front of the car as there is not enough clearance with the bulkhead. However, once the panel in the bulkhead is taken out it can be done. I have done this twice now on my 2005XJR within a few days as the 1st set of plugs, recommended by Autozone, gave me significantly worse mileage than the NGK IR plugs that were originally in there.
You can take the cover off the brake fluid reservoir area and push thru underneath the reservoir to push off the cover. That hole is where a socket etc can go thru to get at the plug.
My flash woukld not lite up the arae so I shone a flashlite at it and you can see the lite on the panel.
You can take the cover off the brake fluid reservoir area and push thru underneath the reservoir to push off the cover. That hole is where a socket etc can go thru to get at the plug.
My flash woukld not lite up the arae so I shone a flashlite at it and you can see the lite on the panel.
Last edited by jackra_1; Jun 28, 2015 at 04:13 PM.
Veteran Member
Joined: Aug 2014
Posts: 6,264
Likes: 1,764
I believe I twisted the rubber tube off carefully and maneuvered the cop off by turning it
at different angles while pulling up until it cleared. It was a year ago when I did this and I know I got it out without much trouble.
at different angles while pulling up until it cleared. It was a year ago when I did this and I know I got it out without much trouble.
Senior Member
Joined: Sep 2013
Posts: 127
Likes: 57
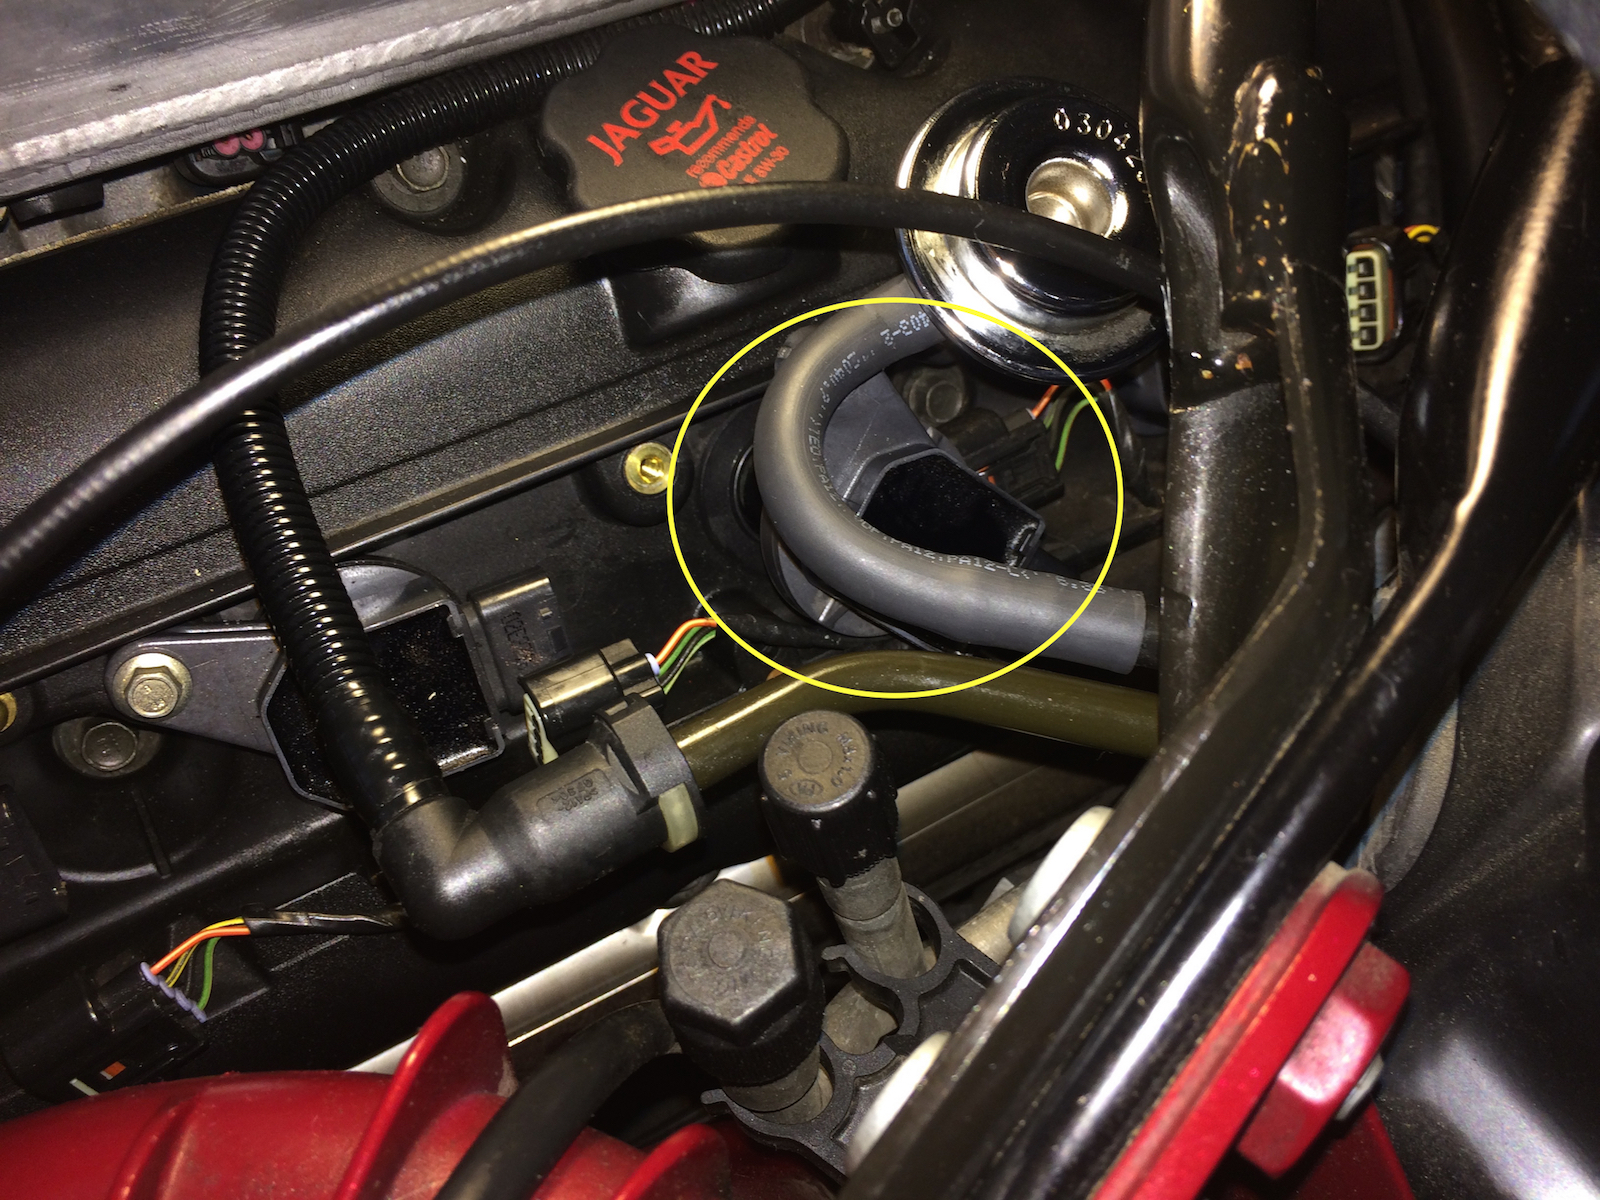
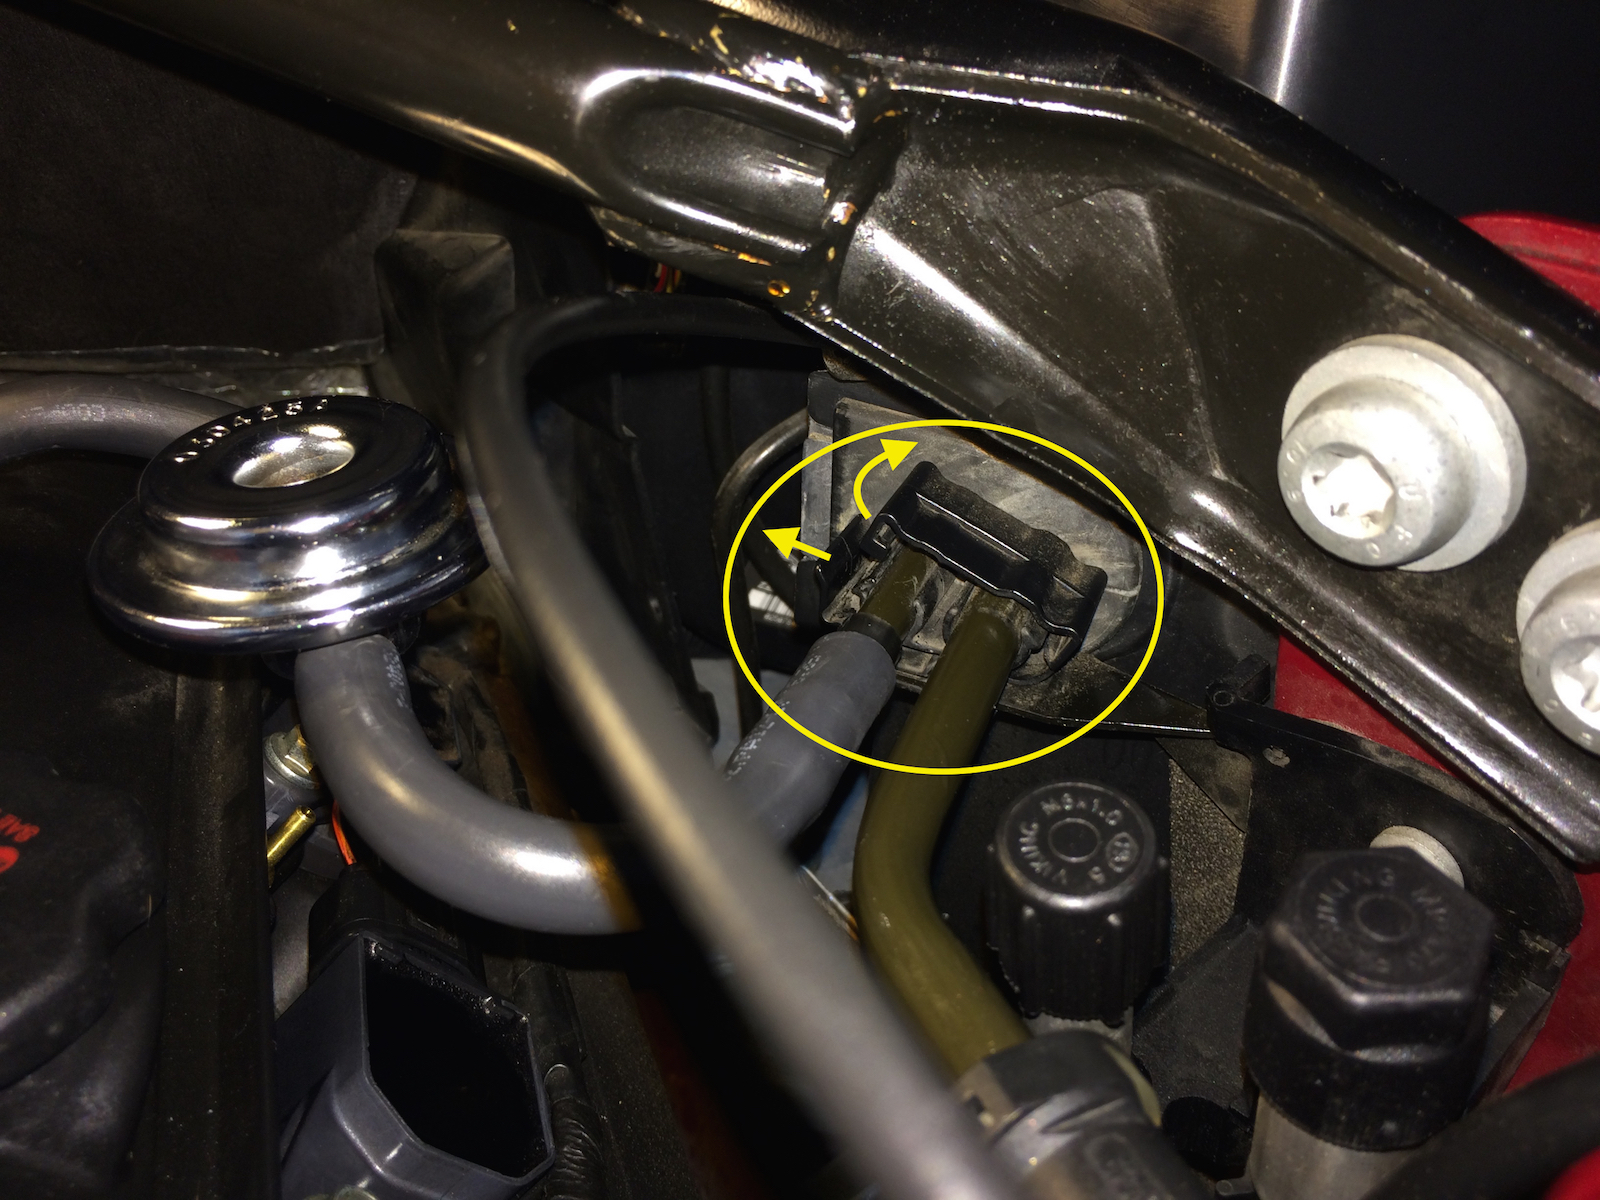
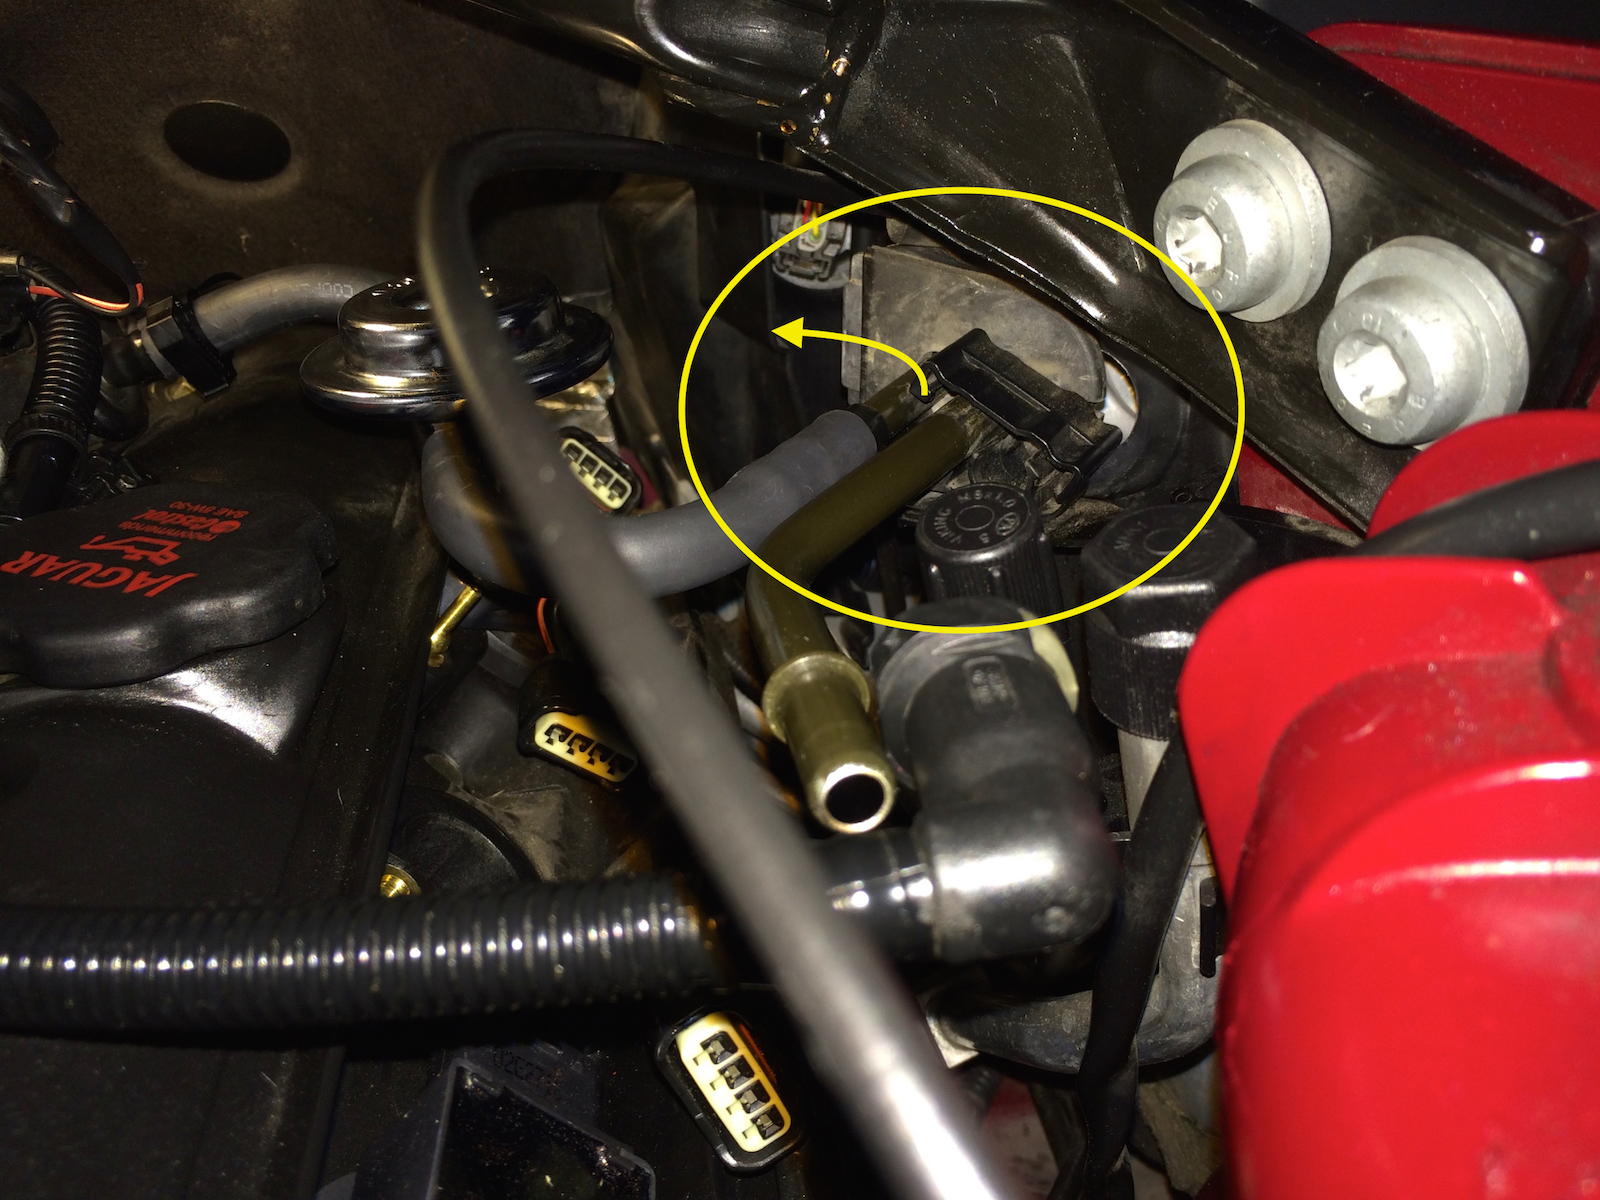
Where? At the hard line on the right (photo #3), back at the rear (photo #2), or in the center?
I've tried to pull it apart at the rear and in the center. The way it feels is that it's a simi-rigid plastic line all the way thru with a rubber sleeve on the outside.
Obviously, it's supposed to disconnect someplace.
I've tried to pull it apart at the rear and in the center. The way it feels is that it's a simi-rigid plastic line all the way thru with a rubber sleeve on the outside.
Obviously, it's supposed to disconnect someplace.
Veteran Member
Joined: Aug 2014
Posts: 6,264
Likes: 1,764
If I did it would have been in the center. My memory is not that clear. And if I did get it off I know that it was not difficult or I would remember. I also want to think that I simply bent the tube up and back a little and fenagled the cop past it with light force. Again my memory is not clear. I wish I could be of more help.
Senior Member
Joined: Sep 2013
Posts: 127
Likes: 57
I finished late afternoon.
Here's what worked:
1. I disconnected the fuel line retainer clip.
2. Lifted both the fuel line and vacuum line up and out the retainer clip and pushed them back out of the way.
Done (expect for pushing in one plastic retaining pin). It runs smoother.
Here's what worked:
1. I disconnected the fuel line retainer clip.
2. Lifted both the fuel line and vacuum line up and out the retainer clip and pushed them back out of the way.
Done (expect for pushing in one plastic retaining pin). It runs smoother.
Last edited by Zazzy; Jun 28, 2015 at 11:43 PM.
Veteran Member
Joined: Aug 2014
Posts: 6,264
Likes: 1,764
Very glad you managed to complete the job Zazzy!
I know this kind of thing can be very frustrating. The XJR has some challenges when you have not tackled them before. For me it was plug #8.
Also It took me a while to replace all front bulbs but people on this forum are very helpful.
Have you done a transmission oil change and a supercharger oil change?
Last edited by jackra_1; Jun 29, 2015 at 07:15 AM. Reason: Added questions
Senior Member
Joined: Sep 2013
Posts: 127
Likes: 57
Thanks again!
Veteran Member


Joined: Sep 2011
Posts: 1,041
Likes: 153
From: Bellevue, WA
I'm approaching the time to replace plugs on the 2004 XJR for the 1st time. I called NKR customer service. The NKR Iridiums(5464) is what I plan on using; however the rep on the phone said the 7866 is longer lasting. The 5464s are more expensive; so, I assume they are likely better. Am I correct that the rep just made a mistake?
Also, as some of you may remember, I have successfully replaced many parts including the breaks with your generous help. Do you think that plug replacement is something I should attempt? I have an excellent assortment of tools; however, I will most likely need to purchase others. Are there any that have been particularly helpful to you?
Thanks for your help.


Joined: Feb 2014
Posts: 20,542
Likes: 15,312
From: Crossroads of America
I'm approaching the time to replace plugs on the 2004 XJR for the 1st time. I called NKR customer service. The NKR Iridiums(5464) is what I plan on using; however the rep on the phone said the 7866 is longer lasting. The 5464s are more expensive; so, I assume they are likely better. Am I correct that the rep just made a mistake?
I have an excellent assortment of tools; however, I will most likely need to purchase others. Are there any that have been particularly helpful to you?
I have an excellent assortment of tools; however, I will most likely need to purchase others. Are there any that have been particularly helpful to you?
The NGK 7866 (IFR5N10) Iridium is the original equipment plug, with a 0.8mm iridium tip on the center electrode and platinum tip on the ground electrode. They are rated to last up to 100K miles, but when I removed ours at 96K, they were well past their prime and probably should have been replaced before 80K miles.
The 5464 (BKR5EIX-11) has a 0.6mm iridium tip on the center electrode and a nickel-core ground electrode without the platinum tip. NGK says it performs slightly better than the 7866, but only lasts up to 60K miles, which probably means 40K in real world use.
Rock Auto carries both plugs at affordable prices.
You can look up specs at the NGK parts finder:
https://www.ngksparkplugs.com/products/spark-plugs
I think the mileage and performance ratings came from the NGK U.K. site.
Note that NGK says the plugs are pre-gapped, but you should check them anyway to ensure they are set at Jaguar factory specification, 1.0mm or 0.039/0.040 inch. The torque spec for the plugs is 20 ft. lbs. / 27 Nm.
The only extra tools you may want are 3/8-drive 3-inch and 18-inch extensions and a universal joint, as shown in this post:
Don's X350 Cylinder 8 Ratchet Extension Setup
The rest of that thread has some additional tips that may be helpful:
https://www.jaguarforums.com/forum/x...04-xj8-173652/
Cheers,
Don
Last edited by Don B; Mar 30, 2017 at 02:05 PM.
Veteran Member
Joined: Sep 2011
Posts: 1,041
Likes: 153
From: Bellevue, WA
Thanks, Don! Definitely 5464 for me; the links are great & it looks like I'm good to go on the tools which is a good thing since my wife looks askance whenever I acquire a new tool. Perhaps rightfully so, since I have many I have yet to open & use.
Best,
Steve
Best,
Steve

Junior Member
Joined: Oct 2012
Posts: 25
Likes: 0

The remainder of these coil packs is stuck in my valve covers.Would it be possible or an advantage to remove the valve covers to get these out? Or can the valve covers be removed with out taking the spark plugs out?
