
HOW TO Radiator bushings

Thread Starter
|
Senior Member
Joined: Nov 2012
Posts: 286
Likes: 60
From: The Netherlands
Hi to everyone who read this! 
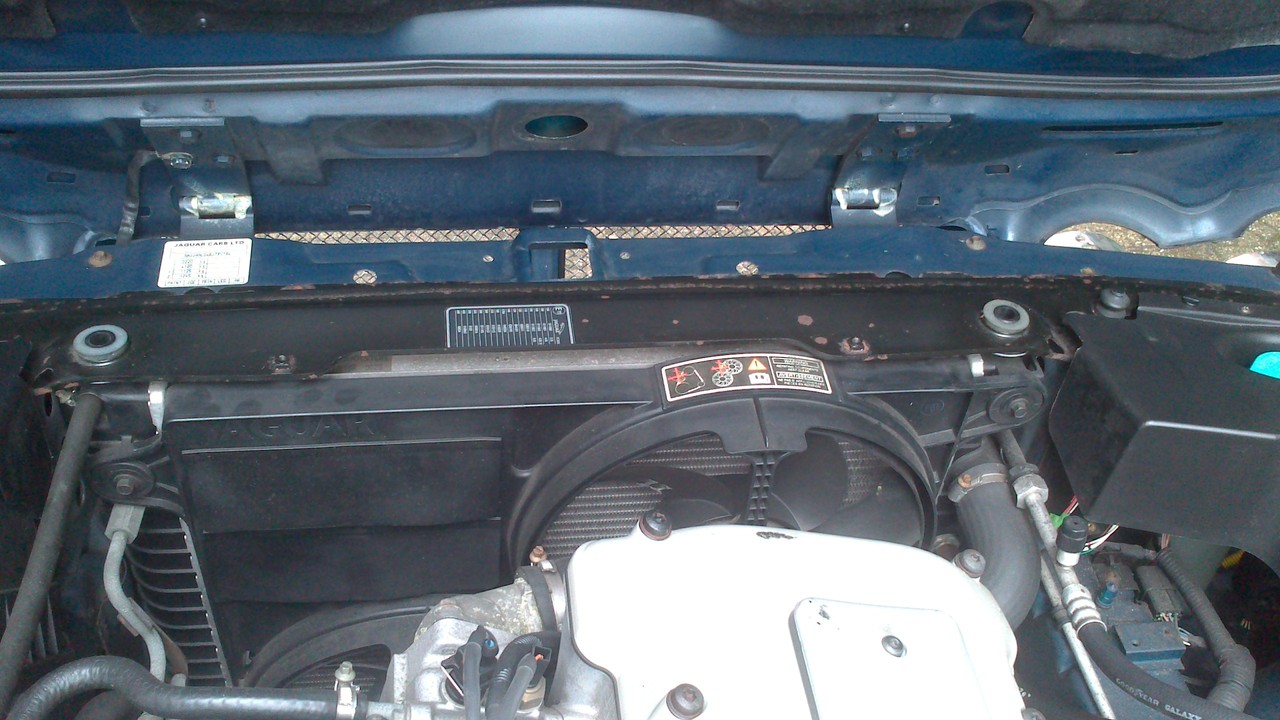
Oh dear, I noticed my radiator had a great loss! I know how it likes to have some love, but what I saw here was totally not done! The radiator bushings decided to let go of the intense 18 year old relationship they had together and were totally worn out. After a good inspection of the bushings I decide to repair only the top bushings as the bushings on the bottom were still in an a good shape.
I ordered the necessary parts at the local Jaguar dealer :
Part No.: MNA4241AB
Price: € 7,00
While at it I decide to make a small howto for others.
- Open the hood.
- Have a good look at the lovely site and engine and start having a focus on the radiator in front of the engine bay.
- Look for the round holes on top of the radiator, I made a matching photo with some colors on it, I will describe them here under.

*I had a much better photo from the total view, but by telephone circumstances I lost that one =/ Sorry!
- Look for wear on the bushings, when you can move your radiator this is NOT good and eventually will sort in different problems, worse(a lot).
- Unscrew the bolts over the total length of the car circled by RED. Don't unbolt them complete, just be sure they are lose enough to eventually flip the black plate upwards.
- Unscrew and remove the two bolts on each side of the radiator, circled by GREEN.
- Now try to lift up the black plating (BLUE)that holds the radiator and bushings in place so you can easily remove the bushings. Perhaps a little tear (BLACK) on the radiator is needed to remove them easily, don't force anything!
- Clean the entry and have it just look fresh.
- Place new bushings, left and right.
- Replace the black plating over the bushings
- Have a good look at your new bushings if they are fitted well inside the hole of the black plating!
- Screw all the bolts in place.
'Note from Aholbro ': "Don't forget about Ms. Radiator's li'l sister, Ms. A/C Condenser while you are showing all that love. She also eats bushings over time!"
- Check that the condenser upper pins/bushings have engaged the proper holes in the top panel when you re-seat it from the radiator bushing change. As far as I know, you have to pull the grill off to see that, no-biggie, 4 fasterners.
Job done!
Perhaps sweep a paper towel over it to clean something up after it!
I add some extra photos from my job to make it easier and for information purpose!
While at my last bolt I wrecked the Torx/Star bit! *sigh* Good I had a spare!
Cheers!
Oh dear, I noticed my radiator had a great loss! I know how it likes to have some love, but what I saw here was totally not done! The radiator bushings decided to let go of the intense 18 year old relationship they had together and were totally worn out. After a good inspection of the bushings I decide to repair only the top bushings as the bushings on the bottom were still in an a good shape.
I ordered the necessary parts at the local Jaguar dealer :
Part No.: MNA4241AB
Price: € 7,00
While at it I decide to make a small howto for others.
- Open the hood.
- Have a good look at the lovely site and engine and start having a focus on the radiator in front of the engine bay.
- Look for the round holes on top of the radiator, I made a matching photo with some colors on it, I will describe them here under.
*I had a much better photo from the total view, but by telephone circumstances I lost that one =/ Sorry!
- Look for wear on the bushings, when you can move your radiator this is NOT good and eventually will sort in different problems, worse(a lot).
- Unscrew the bolts over the total length of the car circled by RED. Don't unbolt them complete, just be sure they are lose enough to eventually flip the black plate upwards.
- Unscrew and remove the two bolts on each side of the radiator, circled by GREEN.
- Now try to lift up the black plating (BLUE)that holds the radiator and bushings in place so you can easily remove the bushings. Perhaps a little tear (BLACK) on the radiator is needed to remove them easily, don't force anything!
- Clean the entry and have it just look fresh.
- Place new bushings, left and right.
- Replace the black plating over the bushings
- Have a good look at your new bushings if they are fitted well inside the hole of the black plating!
- Screw all the bolts in place.
'Note from Aholbro ': "Don't forget about Ms. Radiator's li'l sister, Ms. A/C Condenser while you are showing all that love. She also eats bushings over time!"
- Check that the condenser upper pins/bushings have engaged the proper holes in the top panel when you re-seat it from the radiator bushing change. As far as I know, you have to pull the grill off to see that, no-biggie, 4 fasterners.
Job done!
Perhaps sweep a paper towel over it to clean something up after it!
I add some extra photos from my job to make it easier and for information purpose!
While at my last bolt I wrecked the Torx/Star bit! *sigh* Good I had a spare!
Cheers!
Last edited by Maraud; Sep 14, 2013 at 11:31 AM.


Thanks for the great write-up, Maraud. Don't forget about Ms. Radiator's li'l sister, Ms. A/C Condenser while you are showing all that love. She also eats bushings over time, and you may want to add a caution to check that the condenser upper pins/bushings have engaged the proper holes in the top panel when you re-seat it from the radiator bushing change. As far as I know, you have to pull the grill off to see that, no-biggie, 4 fasterners.

Senior Member


Joined: May 2012
Posts: 344
Likes: 121
From: PA
Thank you aholbro1...I replaced all 4 radiator bushings last month and didn't check the AC condensor. When I looked at it after reading your sidenote I saw that the posts weren't seated in the bushings. Just got done correcting the situation.Thanks again!
Here's your lot if you don't catch it:

This was just from my lower condenser bushings departing unbeknownst to me quite apart from any maintenance items. While it doesn't look like much, there is a hole there capable of liberating the entire refrigerant charge and enough oil to leave a small puddle!

This was just from my lower condenser bushings departing unbeknownst to me quite apart from any maintenance items. While it doesn't look like much, there is a hole there capable of liberating the entire refrigerant charge and enough oil to leave a small puddle!

Junior Member
Joined: Oct 2011
Posts: 193
Likes: 23
From: FARMINGTON, MI
Thank you for the great tech procedure. It prompted me to take a look. LOL, I don't even have upper bushings. Just a radiator that flops around. Ordered some aftermarket bushings on Ebay for half the dealer price.
They must be better than nothing.
They must be better than nothing.
Senior Member
Joined: May 2012
Posts: 344
Likes: 121
From: PA
When I fitted the pins into the bushings at the top of the AC compressor last night I never thought to check the bottom bushings of the compressor since the tops were in good shape. I just looked at the bottom tonight and was shocked to see there are NO bushings at all, the pins just go right through the holes. This is amazing to me since this car just turned 31,000 miles. It is a 96 VDP that has been in my family since new and never seen rain, never seen snow, and never spent a night outside the garage. Hopefully rockauto will have them. I would encourage everyone to take a quick glance.
Trending Topics
Thread Starter
|
Senior Member
Joined: Nov 2012
Posts: 286
Likes: 60
From: The Netherlands
The material from the bushings itself just vaporates overtime because of the warmth of the radiator and the oxygene in the air. Nothing to do with low milage, everything with high age!
Yep, my mistake. That is where I got mine, too, just checked my records, same p/n, should fix you right up.
awight...that explains it...I thought I remembered dealer involvement...but checked my acct at Rock and found I ordered 4 cond, 4 rad, and a rec/drier all at once, $33+change. Guess I have two spare uppers casting about the shop somewhere....
Veteran Member
Joined: Mar 2014
Posts: 3,750
Likes: 688
From: Sanford, NC
I just noticed this tonight while checking out some other things under the hood, as it seemed odd to me that the upper plastic "pins" for the radiator seemed free to wallow around in their holes  A little investigation into what I thought surely must be a lost bushing(s) led me to this "how to" thread.
Well, at least these bushings are very inexpensive, unlike many other things Jaguar ...and it seems a relatively easy replacement!
Anyway, what is not clear in this "how to" and the parts diagram below; along with the two MNA4241AB bushings for the top, are the same MNA4241AB bushings used for the radiator's bottom two pins? This is part 11 in the radiator illustration. The illustration doesn't seem to show any bushings for the bottom of the radiator.
And to clarify the confusion in the thread above about the condenser bushings; it appears that the upper bushings for the condenser are the CBC1448 part 2 in the condenser illustration, and the lower bushing is the MNA4250AB part 3, true?
Well, at least these bushings are very inexpensive, unlike many other things Jaguar
...and it seems a relatively easy replacement!Anyway, what is not clear in this "how to" and the parts diagram below; along with the two MNA4241AB bushings for the top, are the same MNA4241AB bushings used for the radiator's bottom two pins? This is part 11 in the radiator illustration. The illustration doesn't seem to show any bushings for the bottom of the radiator.
And to clarify the confusion in the thread above about the condenser bushings; it appears that the upper bushings for the condenser are the CBC1448 part 2 in the condenser illustration, and the lower bushing is the MNA4250AB part 3, true?
Last edited by al_roethlisberger; Sep 14, 2014 at 10:29 PM.


Joined: Feb 2014
Posts: 20,511
Likes: 15,282
From: Crossroads of America
Anyway, what is not clear in this "how to" and the parts diagram below; along with the two MNA4241AB bushings for the top, are the same MNA4241AB bushings used for the radiator's bottom two pins? This is part 11 in the radiator illustration. The illustration doesn't seem to show any bushings for the bottom of the radiator.
On our '93 XJ40, the radiator of which is very similar to the X300, the radiator mounts with four of the same bushings, two on bottom and two on top. The original XJ40 part, CCC6996, supercedes to the X300 part, MNA4241AB, so those are the parts I used on our car. In case they are helpful, below are links to photos showing the radiator replacement process on our '93:
Welcome to Jag-lovers - Members Photo Viewing Page
Welcome to Jag-lovers - Members Photo Viewing Page
Welcome to Jag-lovers - Members Photo Viewing Page
Welcome to Jag-lovers - Members Photo Viewing Page
If you are just replacing the upper and lower bushes on the radiator, you may be able to simply remove the upper radiator mounting panel, then from underneath, carefully lift the radiator up far enough to replace the lower bushings. But as aholbro1 has observed, your A/C condenser mounting bushes are no doubt also perished, so you may as well do it right. I recall that for our '93 the upper and lower bushes were a different part number and the lowers were NLA, so I had to improvise by slipping some O-rings onto the lower condenser mounting pins, which I just noticed I failed to mention in my photo album. I wonder now if the X300 part might have worked.
Hopefully aholbro1 will happen along and answer your questions about the condenser bushings.
Cheers,
Don
Yes. Upper (available from Rock -search under VDP, not XJ6) & Lower condenser mounts are different. Dealer is the only source for the lowers I am aware of.
All 4 radiator mounts are identical. You should be able to renew the lowers once you have removed the top panel as Don said by lifting the radiator a bit.
Find the "condenser maybe?" thread of recent vintage; I believe the OP mentioned he found lower condenser mounts online but I don't recall if he said where?
Veteran Member
Joined: Mar 2014
Posts: 3,750
Likes: 688
From: Sanford, NC
Got all the bushings from Rockauto and Terry's Jag, not very expensive.
Condenser
upper bushing CBC1448 Rockauto
lower bushing MNA4250AB Terry Jag
Radiator
MNA4241AB Rockauto
Had to drop the bottom bracket as well though as I didn't have enough wiggle room to get the condenser bushings in with just the top bracket off.
Interestingly my top condenser bushings were like new, but of course all the radiator and the bottom condenser bushings were completely gone.
Taking the opportunity to repaint the bottom bracket while it is out. It had a little rust starting.
Here's a question though, anyone know the torque value for the about 15 bolts that secure the top and bottom radiator brace/bracket?
.
Last edited by al_roethlisberger; Sep 28, 2014 at 04:56 AM.