
My XJ Service Life Extension Project


The old girl was getting a little tired after 3 yrs in service as a daily driver averaging ~72 mi/day. Last winter, one cold, rainy morning - I swore a solemn oath that THIS year, when it hits triple-digits in TX, I'm gonna fix the *&%$ butt-heaters...at least..and hopefully sort out the pump/valve/heater core issue that causes it to produce mildly warmish air mostly...with some occasional forays into "nearly comfortable.
Finally got the Excursion Air-conditioning sorted with a bit of help from Motorcarman one-week prior to needing it for the family vacation so I decided it would be a good idea to use it for the commute that week and make sure everything was sorted before the long trek to Charleston, SC.
The X300 had picked up a belt-squeal in the spring on cold-starts and now had over 5,000 miles on the noise with no failures nor loose, wobbly bits in the Front End Accessory Drive (FEAD). I marked the crankshaft pulley and timing gear and confirmed a failing harmonic balancer.

I wanted to renew the coolant and figured it would be a good idea to get the distilled water flush out of the way before removing the damper. My overall goal was to get the damper off, packaged and shipped to the damper-doctor so he could work his magic while I vacationed and then reinstall my refurbished damper which would probably be waiting on me upon my return. Best laid plans and all that. The distilled water flush went swimingly, and I believe I eliminated a clogged heater matrix as a concern during the warm-up phases - I was getting extremely hot air out of the heater discharge outlets, with only sporadic strikes to the water valve with a rubber mallet. Next day after everything had cooled, I pulled the fan asy and radiator so I'd have room to attack the crank pulley. Realized it required a 1 5/16" socket and my largest was 1 1/4". Local searches of Lowe's, Sears, Tractor Supply, AutoZone and O'Reilly's came up negative. Finally found via phone the good folk at Bridgeport Auto Supply had one, and, worried I'd not make it back from work in FTW by closing time, sent one of my sons down there to buy it. It was 3/4" drive, deep-well. I don't have any 3/4" drive stuff. Ahhh well...I did buy a package of drive adapters from Harbor Freight one time..found a 1/2" to 3/4" adapter in a drawer, but it was chrome, not an impact-adapter, so I was skeptical. Hooked it all up to my 1/2" drive breaker-bar, found some steel tubing from a collapsed basketball goal and rigged it all up to be braced on the floor so I could use the starter to break the fixing bolt loose. Pulled the fuel pump relay so I wouldn't get a start.....and prepared to remove the damper! (had the same son stop by AutoZone on his way home with the socket and get a puller I thought would do the trick) I thought I was "cooking with gas" as they say....3/4" drive deep well socket was kinda back-heavy so I had to rig an elaborate scheme using pipes, bungee cords and cedar chip board to keep it engaged on the bolt-head:

Bumped the starter and it tried to lift the left front corner of the car and stalled. Tried again. Same result. Decided I could turn the starter into a slow-hitting impact driver and started a bump-rise-stall-off routine. after 8-9 hits, a metallic "clang" and it spun a few revolutions. One of the lads had happened by to watch, "that didn't sound too good.."
"No...it didn't ....but hopefully that was the sound of the wrench falling off after the bolt broke-free..." as I'm climbing out of the car really not believing my own words....Here is the result of the noise:
Now I have a couple of impact wrenches...but they are 1/2" drive...and as it happens, with the adapter...neither would "quite" fit in the available space...so I burned another day or two expanding the local search for a 1/2" drive, not-deepwell 1 5/16" impact socket. Found exactly what I wanted on Amazon, but too late for it to do any good before my planned trip. (Meeting mom and dad for dad's LST-621 (WWII landing ship-tank) reunion so there was no possibility to delay the trip) So I ordered it up and resigned myself to being down an extra week or two.
Back home and short, 1/2" socket in-hand...I'll have that rascal off in a jiffy.....or not. Neither of my economically-obtained impact drivers would touch it....I let both hammer on it awhile, no joy. Disassembled, cleaned and oiled one of them hoping for a bit more torque, no joy. Came in and looked them up on the web, found they were both rated at 250 lbs-ft of loosening torque. Found an article on how to modify one of the models for greater torque using a dremel and grinding bits....researched some more and found myself a champion!

More searches and phone calls and I determined I could run down to Bedford and get one of Northern Tool's last 3 on Sat - my day of discovery...OR....I could order from Amazon, pay the $5.99 surcharge for 1 day delivery and have it Monday (have 1/2 price prime membership courtesy of having college students in the house - so 2-day free, one day is $5.99/item) and save nearly $40 + fuel to go get it (near as makes no difference, another $20) Heck...I've been down 2 wks already..what's a day or two?
So Monday evening, I slide under the car, new toy in-hand...and realize after two weeks of piddling around I'm not even READY to remove the crank pulley! Still haven't removed the drive belts!!! So I had to egress and get some more tools, on my back again and got the alternator loosened up a bit then removed the a/c idler pulley and got the belts out of the way. My new champion was slightly longer, over-all than my el-cheapo impacts, but still room enough to bring it to bear. Hooked up the air hose - moment of truth...took a deep breath, exhaled, and gave the trigger a smooth sniper-pull and voila` 5 or 6 too-quick-to-count hammer hits then ZZZZiiipppppp! Bolt in-hand!!!

The puller was a bit problematic to attach as I couldn't really get up in there to see the tapped holes for the 5/16-18 bolts but had to work by blind feel whilst simultaneously holding the puller in place. Naturally, I did that several times because after the first one, it dawned on me the center bolt had nothing to bear on and I had to remove it and re-install the fixing bolt loosely. Pulled the pulley til it was flush to the fixing bolt flange, loosened everything, backed the fixing bolt off a few turns, again. followed this until the fixing bolt fell out. Still not far enough off to separate it. I used a 3/8" drive extension. Wish I'd thought of that earlier....

Tip: The damper assembly is heavy and the timing teeth are quite sharp on the corners.
I removed the timing wheel and packaged it for shipment and got it out to the doc the next day. Had occasion to play with the ilder pulley while cleaning it up and got all childlike and started spinning it with the compressed air nozzle. It was making a little noise, but felt smooth...then more noise..not like the noise I'd been hearing on cold-start...but now it wasn't loaded with a belt or anything. "I better replace that..." Next morning, it wouldn't budge with the same air hose. Could move it by hand, but very rough and rachet-like.
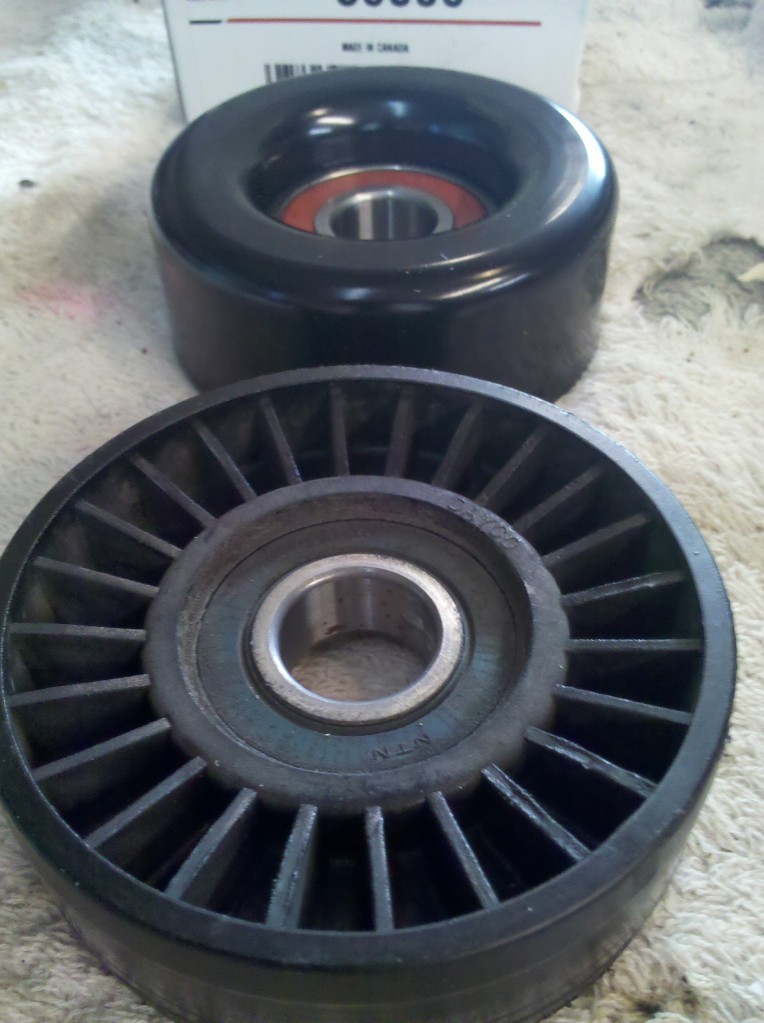
One of my sons works at O'Reilly's so I equipped him with the Jag part-number and the duralast one I found here on another thread. He sent me a pic of what he found - on the order of $20...looked ok so I told him we'd take it. He dropped it by the house on his lunch break and I checked it to the removed one when I got home. I believe it would work, but was about 3.5" dia vs. 3" on the one I removed. So I ran it back down to him to see if they had a closer match. He took my old one in the back and emerged with a metal one of the proper diameter for about the same price. The larger, 3.5" plastic was a Gates 38007. The steel, 3" pulley shown in the pics is a Gates, 38006:

I did manage to remove and package my rearview mirror and ship it out ot Scott Wheeler at Radar-Mirror.com for repair of the auto-dimming feature between damper removal and now...but really precious little progress to show for 2 wks downtime! I'm slow...
Power seat works - all functions, but not memory...last night I started the troubleshooting TSB - midpoint, memory button, then run each function to it's endpoint...all that checked good...but in the process....I broke something in the front cushion....motor whirs but cushion doesn't move...happened while I was doing the trouble shooting.
Not to worry, was pulling the seat out anyway. I bought an aftermarket seat-heater kit, planning to use the heater blankets to repair my OEM system. So part of the plan was to skin both front seats enough to replace the blankets. I'll have to go farther with the driver's seat, as I've worn a hole in the side-bolster and I want to take that skin off and take it to an upholsterer for a new panel.

So...my plan, even though I'm way behind schedule:
Renew coolant with Zerex G-05 and ensure water valve is working freely: https://www.jaguarforums.com/forum/x...winter-102192/
Renew crankshaft damper: https://www.jaguarforums.com/forum/x...74/#post802973
Renew Idler pulley: https://www.jaguarforums.com/forum/x...87/#post809926
(freshly discovered) Renew crankshaft front seal: https://www.jaguarforums.com/forum/x...enewal-101564/
Install Gonzo's Hoodliner my wife got me for Christmas: https://www.jaguarforums.com/forum/x...98/#post798739
Renew bonnet struts (complete, but nothing to see here, no pics, no thread)
Renew Headliner
Stop sunroof rattle
Repair sunroof - it reverses when 3/4 closed, unless I stop it, then re-start it to close.
Repair Seat heaters: https://www.jaguarforums.com/forum/x...s-help-101802/
Repair Driver's seat leather: https://www.jaguarforums.com/forum/x...lstery-101125/
Renew Engine Oil and filter
Renew bootlid struts
Clean and condition leather with Gliptone
I'll update later when I can claim more progress....
I should probably put the hood back on before I go broke!
Renew Upper Radiator Hose: Not much to see, here - straightforward, there's a pic in the Lower Hose Renewal link
Renew Lower Radiator Hose: https://www.jaguarforums.com/forum/x...enewal-101914/
Tinker with Heater Valve: https://www.jaguarforums.com/forum/x...winter-102192/
Renew Drive Belts: https://www.jaguarforums.com/forum/x...e-belt-102387/
Finally got the Excursion Air-conditioning sorted with a bit of help from Motorcarman one-week prior to needing it for the family vacation so I decided it would be a good idea to use it for the commute that week and make sure everything was sorted before the long trek to Charleston, SC.
The X300 had picked up a belt-squeal in the spring on cold-starts and now had over 5,000 miles on the noise with no failures nor loose, wobbly bits in the Front End Accessory Drive (FEAD). I marked the crankshaft pulley and timing gear and confirmed a failing harmonic balancer.

I wanted to renew the coolant and figured it would be a good idea to get the distilled water flush out of the way before removing the damper. My overall goal was to get the damper off, packaged and shipped to the damper-doctor so he could work his magic while I vacationed and then reinstall my refurbished damper which would probably be waiting on me upon my return. Best laid plans and all that. The distilled water flush went swimingly, and I believe I eliminated a clogged heater matrix as a concern during the warm-up phases - I was getting extremely hot air out of the heater discharge outlets, with only sporadic strikes to the water valve with a rubber mallet. Next day after everything had cooled, I pulled the fan asy and radiator so I'd have room to attack the crank pulley. Realized it required a 1 5/16" socket and my largest was 1 1/4". Local searches of Lowe's, Sears, Tractor Supply, AutoZone and O'Reilly's came up negative. Finally found via phone the good folk at Bridgeport Auto Supply had one, and, worried I'd not make it back from work in FTW by closing time, sent one of my sons down there to buy it. It was 3/4" drive, deep-well. I don't have any 3/4" drive stuff. Ahhh well...I did buy a package of drive adapters from Harbor Freight one time..found a 1/2" to 3/4" adapter in a drawer, but it was chrome, not an impact-adapter, so I was skeptical. Hooked it all up to my 1/2" drive breaker-bar, found some steel tubing from a collapsed basketball goal and rigged it all up to be braced on the floor so I could use the starter to break the fixing bolt loose. Pulled the fuel pump relay so I wouldn't get a start.....and prepared to remove the damper! (had the same son stop by AutoZone on his way home with the socket and get a puller I thought would do the trick) I thought I was "cooking with gas" as they say....3/4" drive deep well socket was kinda back-heavy so I had to rig an elaborate scheme using pipes, bungee cords and cedar chip board to keep it engaged on the bolt-head:


Bumped the starter and it tried to lift the left front corner of the car and stalled. Tried again. Same result. Decided I could turn the starter into a slow-hitting impact driver and started a bump-rise-stall-off routine. after 8-9 hits, a metallic "clang" and it spun a few revolutions. One of the lads had happened by to watch, "that didn't sound too good.."
"No...it didn't ....but hopefully that was the sound of the wrench falling off after the bolt broke-free..." as I'm climbing out of the car really not believing my own words....Here is the result of the noise:

Now I have a couple of impact wrenches...but they are 1/2" drive...and as it happens, with the adapter...neither would "quite" fit in the available space...so I burned another day or two expanding the local search for a 1/2" drive, not-deepwell 1 5/16" impact socket. Found exactly what I wanted on Amazon, but too late for it to do any good before my planned trip. (Meeting mom and dad for dad's LST-621 (WWII landing ship-tank) reunion so there was no possibility to delay the trip) So I ordered it up and resigned myself to being down an extra week or two.
Back home and short, 1/2" socket in-hand...I'll have that rascal off in a jiffy.....or not. Neither of my economically-obtained impact drivers would touch it....I let both hammer on it awhile, no joy. Disassembled, cleaned and oiled one of them hoping for a bit more torque, no joy. Came in and looked them up on the web, found they were both rated at 250 lbs-ft of loosening torque. Found an article on how to modify one of the models for greater torque using a dremel and grinding bits....researched some more and found myself a champion!

More searches and phone calls and I determined I could run down to Bedford and get one of Northern Tool's last 3 on Sat - my day of discovery...OR....I could order from Amazon, pay the $5.99 surcharge for 1 day delivery and have it Monday (have 1/2 price prime membership courtesy of having college students in the house - so 2-day free, one day is $5.99/item) and save nearly $40 + fuel to go get it (near as makes no difference, another $20) Heck...I've been down 2 wks already..what's a day or two?
So Monday evening, I slide under the car, new toy in-hand...and realize after two weeks of piddling around I'm not even READY to remove the crank pulley! Still haven't removed the drive belts!!! So I had to egress and get some more tools, on my back again and got the alternator loosened up a bit then removed the a/c idler pulley and got the belts out of the way. My new champion was slightly longer, over-all than my el-cheapo impacts, but still room enough to bring it to bear. Hooked up the air hose - moment of truth...took a deep breath, exhaled, and gave the trigger a smooth sniper-pull and voila` 5 or 6 too-quick-to-count hammer hits then ZZZZiiipppppp! Bolt in-hand!!!


The puller was a bit problematic to attach as I couldn't really get up in there to see the tapped holes for the 5/16-18 bolts but had to work by blind feel whilst simultaneously holding the puller in place. Naturally, I did that several times because after the first one, it dawned on me the center bolt had nothing to bear on and I had to remove it and re-install the fixing bolt loosely. Pulled the pulley til it was flush to the fixing bolt flange, loosened everything, backed the fixing bolt off a few turns, again. followed this until the fixing bolt fell out. Still not far enough off to separate it. I used a 3/8" drive extension. Wish I'd thought of that earlier....

Tip: The damper assembly is heavy and the timing teeth are quite sharp on the corners.
I removed the timing wheel and packaged it for shipment and got it out to the doc the next day. Had occasion to play with the ilder pulley while cleaning it up and got all childlike and started spinning it with the compressed air nozzle. It was making a little noise, but felt smooth...then more noise..not like the noise I'd been hearing on cold-start...but now it wasn't loaded with a belt or anything. "I better replace that..." Next morning, it wouldn't budge with the same air hose. Could move it by hand, but very rough and rachet-like.
One of my sons works at O'Reilly's so I equipped him with the Jag part-number and the duralast one I found here on another thread. He sent me a pic of what he found - on the order of $20...looked ok so I told him we'd take it. He dropped it by the house on his lunch break and I checked it to the removed one when I got home. I believe it would work, but was about 3.5" dia vs. 3" on the one I removed. So I ran it back down to him to see if they had a closer match. He took my old one in the back and emerged with a metal one of the proper diameter for about the same price. The larger, 3.5" plastic was a Gates 38007. The steel, 3" pulley shown in the pics is a Gates, 38006:


I did manage to remove and package my rearview mirror and ship it out ot Scott Wheeler at Radar-Mirror.com for repair of the auto-dimming feature between damper removal and now...but really precious little progress to show for 2 wks downtime! I'm slow...
Power seat works - all functions, but not memory...last night I started the troubleshooting TSB - midpoint, memory button, then run each function to it's endpoint...all that checked good...but in the process....I broke something in the front cushion....motor whirs but cushion doesn't move...happened while I was doing the trouble shooting.
Not to worry, was pulling the seat out anyway. I bought an aftermarket seat-heater kit, planning to use the heater blankets to repair my OEM system. So part of the plan was to skin both front seats enough to replace the blankets. I'll have to go farther with the driver's seat, as I've worn a hole in the side-bolster and I want to take that skin off and take it to an upholsterer for a new panel.

So...my plan, even though I'm way behind schedule:
Renew coolant with Zerex G-05 and ensure water valve is working freely: https://www.jaguarforums.com/forum/x...winter-102192/
Renew crankshaft damper: https://www.jaguarforums.com/forum/x...74/#post802973
Renew Idler pulley: https://www.jaguarforums.com/forum/x...87/#post809926
(freshly discovered) Renew crankshaft front seal: https://www.jaguarforums.com/forum/x...enewal-101564/
Install Gonzo's Hoodliner my wife got me for Christmas: https://www.jaguarforums.com/forum/x...98/#post798739
Renew bonnet struts (complete, but nothing to see here, no pics, no thread)
Renew Headliner
Stop sunroof rattle
Repair sunroof - it reverses when 3/4 closed, unless I stop it, then re-start it to close.
Repair Seat heaters: https://www.jaguarforums.com/forum/x...s-help-101802/
Repair Driver's seat leather: https://www.jaguarforums.com/forum/x...lstery-101125/
Renew Engine Oil and filter
Renew bootlid struts
Clean and condition leather with Gliptone
I'll update later when I can claim more progress....
I should probably put the hood back on before I go broke!
Renew Upper Radiator Hose: Not much to see, here - straightforward, there's a pic in the Lower Hose Renewal link
Renew Lower Radiator Hose: https://www.jaguarforums.com/forum/x...enewal-101914/
Tinker with Heater Valve: https://www.jaguarforums.com/forum/x...winter-102192/
Renew Drive Belts: https://www.jaguarforums.com/forum/x...e-belt-102387/
Last edited by aholbro1; Apr 30, 2014 at 07:40 PM.


Senior Member


Joined: Oct 2012
Posts: 310
Likes: 45
From: sydney
Im just about to do the oil seal on my 1999 x308. How are you going to remove that seal and reinstall it? Looks like a tight fit
If I can use an impact wrench to tremove th bolt I will but I plan to make a locking tool to reinstall it at 400MN or what ever the spec is.
Look forward to your posts here!
bets regards
Peter
If I can use an impact wrench to tremove th bolt I will but I plan to make a locking tool to reinstall it at 400MN or what ever the spec is.
Look forward to your posts here!
bets regards
Peter


I believe one can carefully drive a screwdriver into the seal there and pry it outward, little bit at a time, working side-to-side. But I've not done it...may watch a few youtube vids first and re-think that..I understand the timing covers are relatively easy to crack
Then again, perhaps I'll order a seal-puller tool before I have a go at it....for now, have ordered up the seal itself, EAC7954, so no disturbing the old until I have the new in-hand and am reasonably assured I've obtained the proper part.
Last edited by aholbro1; Aug 20, 2013 at 07:58 AM.

Thread
Thread Starter
Forum
Replies
Last Post
Ipc838
PRIVATE For Sale / Trade or Buy Classifieds
1
Sep 13, 2015 03:27 PM
Currently Active Users Viewing This Thread: 1 (0 members and 1 guests)