
Renewing A/C Idler Pulley and Drive Belt HOW TO
#1
 09-10-2013, 11:51 PM

It is not necessary to dismount the idler mounting plate to complete these items, but I had a leaking timing cover seal so everything needed a good cleaning.
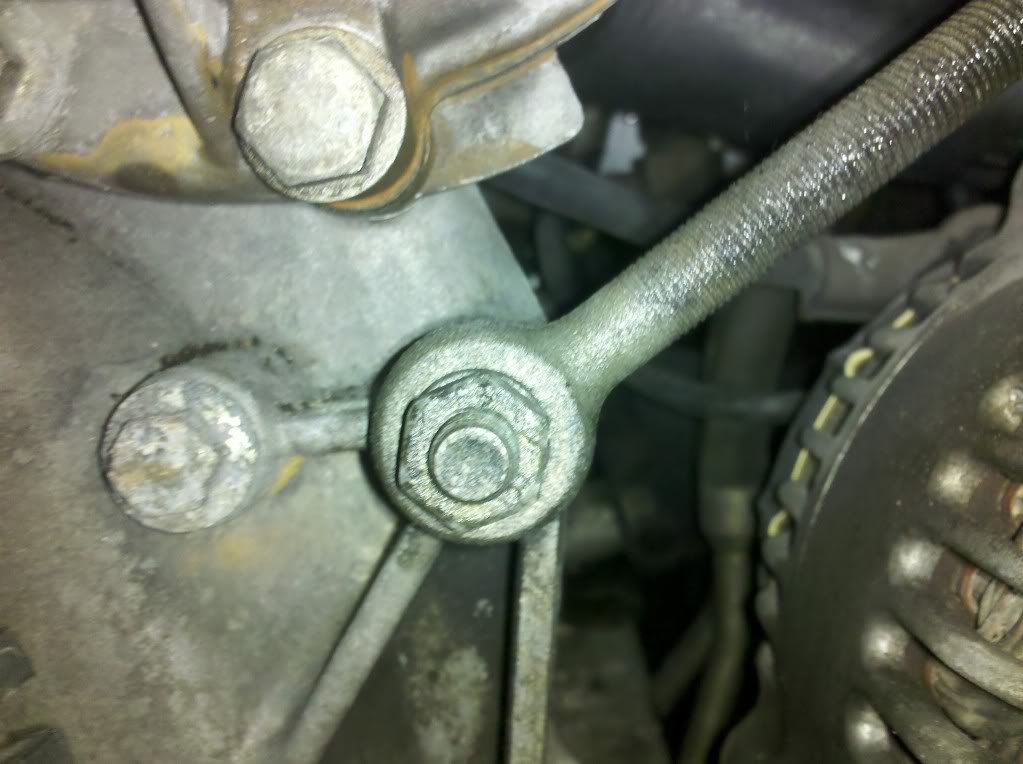
Loosen the fixing bolt on the A/C idler pulley with a 13mm socket. Underneath, turn the 1/4" square drive clockwise to relieve tension on the a/c belt. I used an open-end, 1/4" wrench (spanner) couldn't get any socket nor box-end wrench to fit it. One member reported using a 1/4" drive extension "backwards" but I didn't catch what he used to apply torque to it.
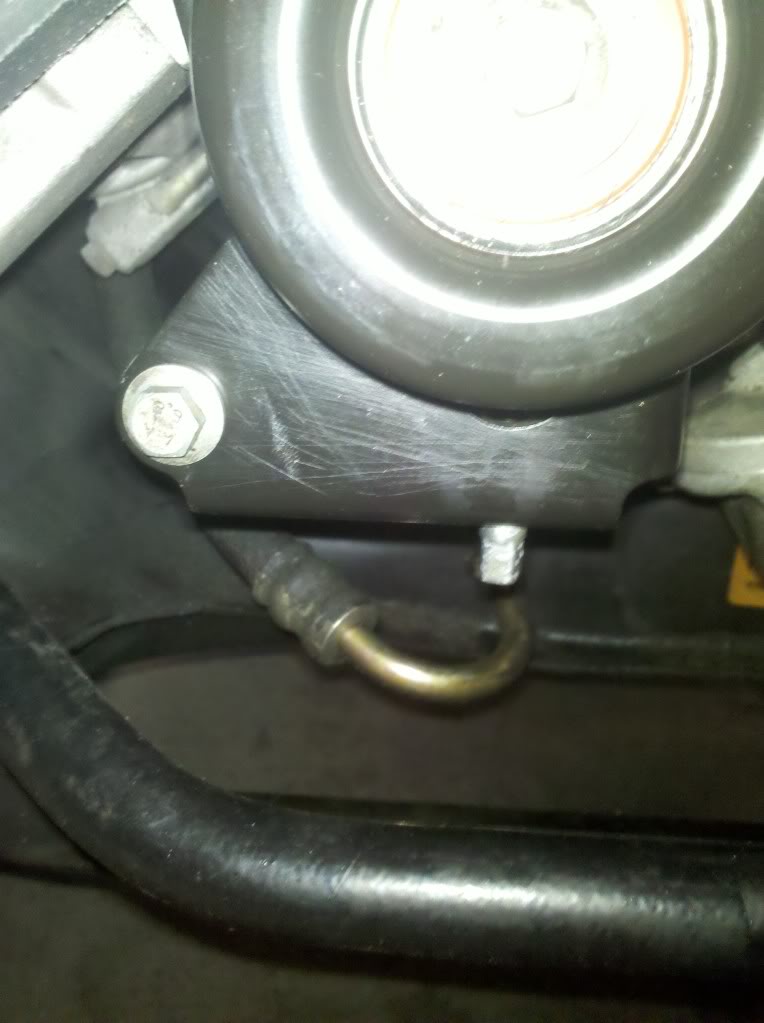
Remove the belt.
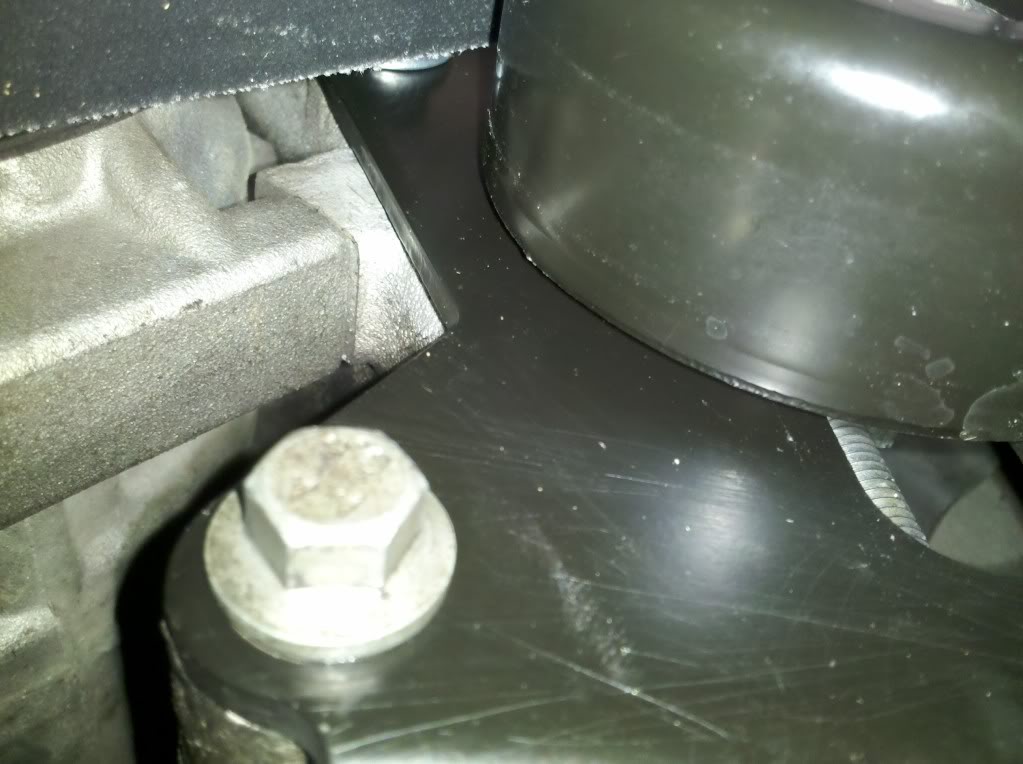
A 10mm deepwell socket (or shallow + extension) will dispatch the upper and lower mounting plate fixing bolts in short order.
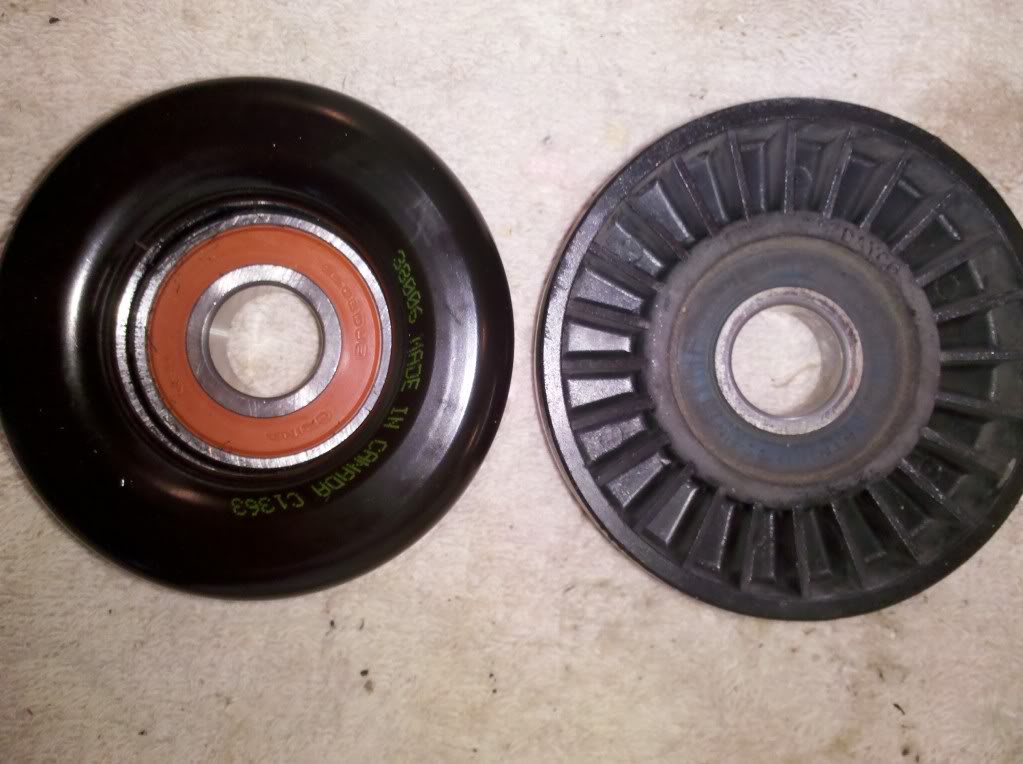
An internet search returned costs of $60+ for the genuine plastic Jaguar replacement part for the A/C Idler pulley. I opted for the Gates, 38006 3" diameter, smooth steel pulley for <$15.00.
Torque tightening specs from the manual call for 22-28 Nm for both pulley-to-bracket and bracket to comp mtng brkt.
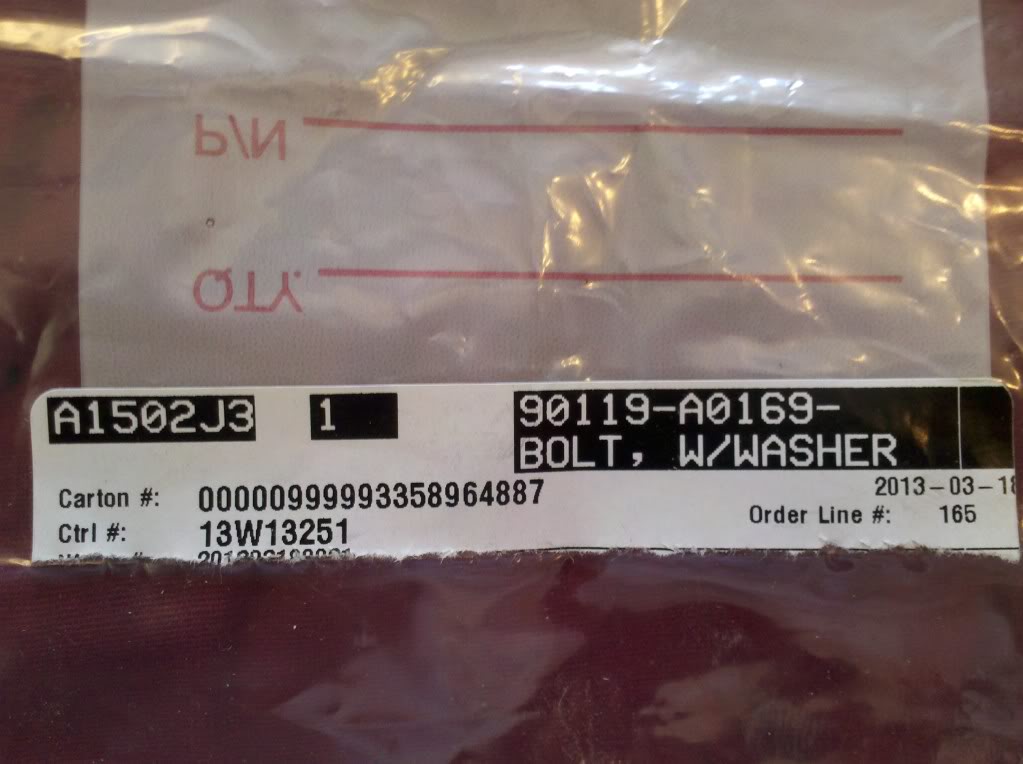
I "woke up" after several turns on the upper fixing bolt failed to produce a "click" on the torque wrench and thought, "Crikey! I may have to find a helicoil this evening!" but when I removed the bolt and took a close look, I noted the hourglass shape of an elegant lady in the threaded portion. So I began to wonder if I'd find an M8 washer-head in the "specialty automotive" drawers at the local Lowes. Then I recalled that I had started a metric "hell box" a few years ago and decided to have look. I found this one that I'd bought at the Toyota dealer for my son's Tundra before one of his schoolmates rear-ended it with a Beetle rendering it of no further use to us. No idea what it cost, but if you need a good M8 washer-hd, this one fits the bill:
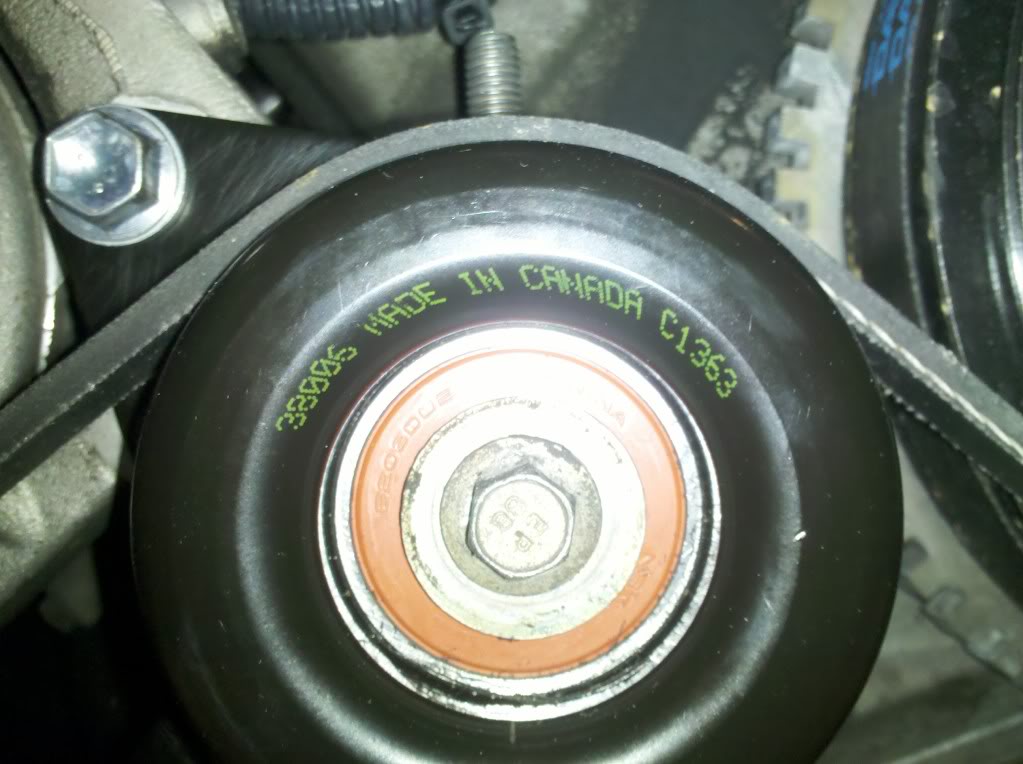
Wish I'd had 2, as it takes a 12 mm socket vs. the original 10mm, but I'll get by.
Upper:
Lower:
Overall
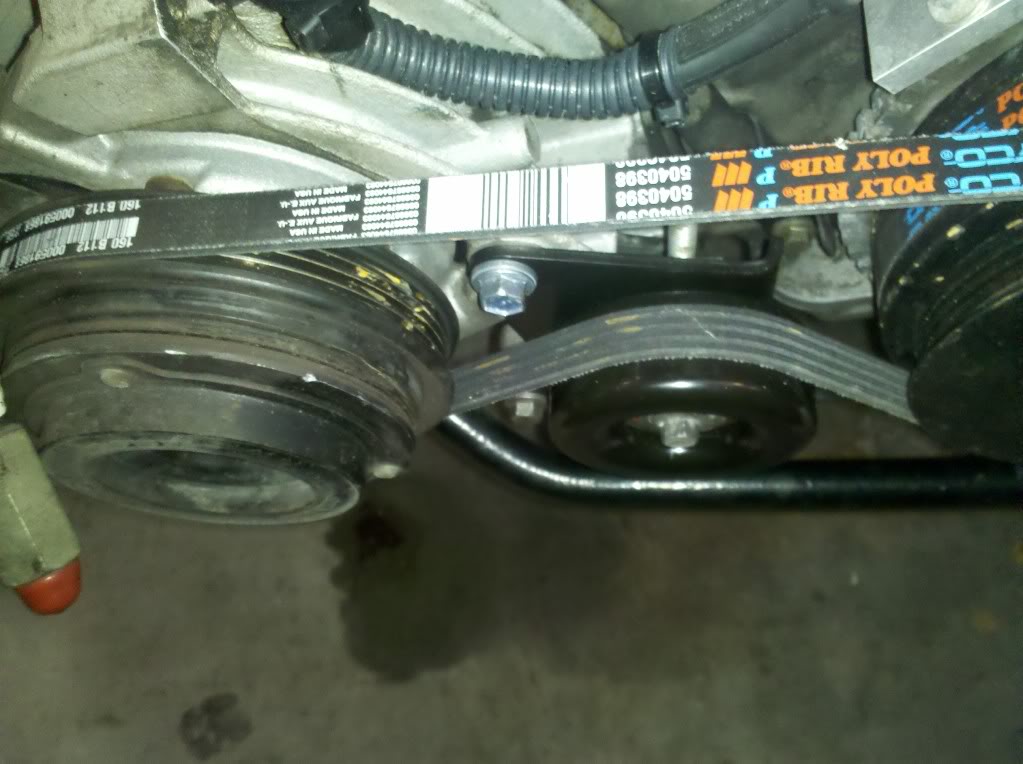
A/C belt: DAYCO5040398
A/C Idler Pulley: Gates 38006
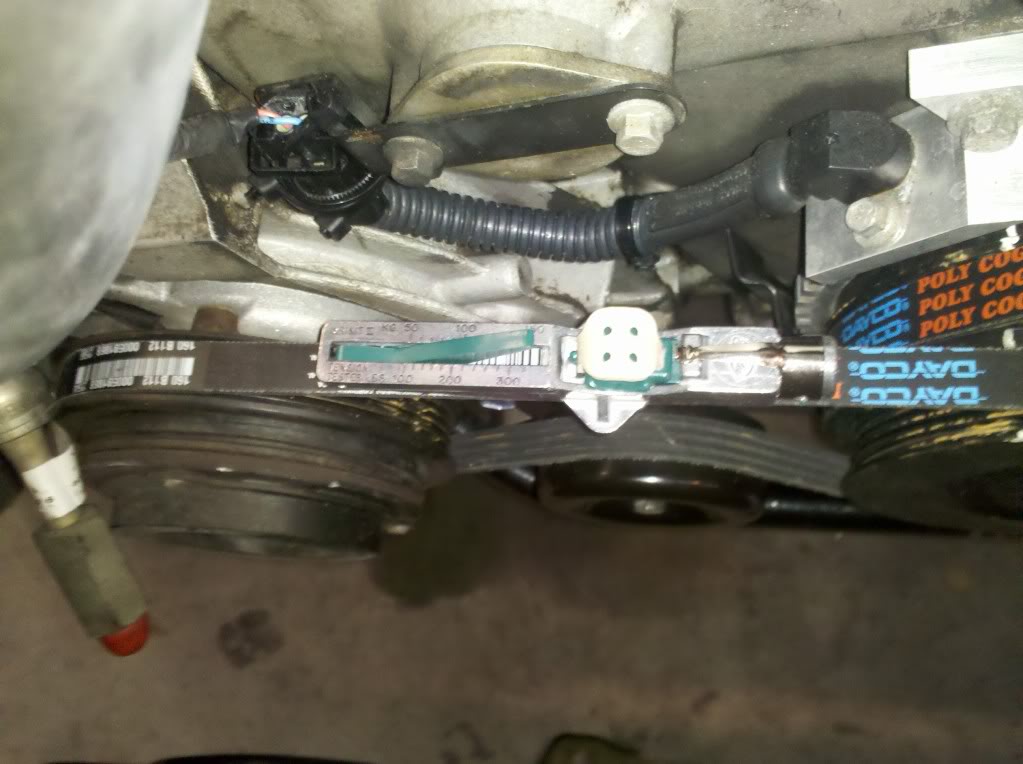
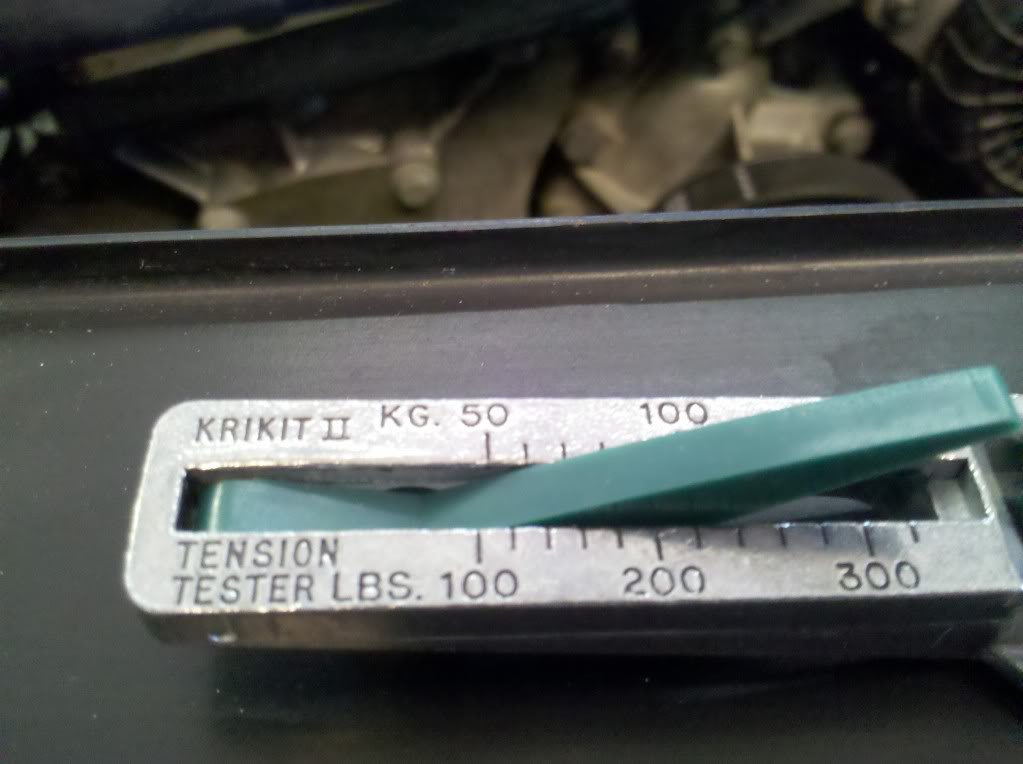
The Gates 91132 Belt Tension Tester was also <$15 and I took a risk despite spotty reviews claiming it registers 50 KG regardless of tension:
Leave the pulley slightly loosened and crank the 1/4" square drive tension adjustment counterclockwise to load the belt. I put on what "felt about right," torqued the pulley to 27.86 nm then went topside. I centered the tester between two pulleys and aligned it parallel to the belt, exercising great care to keep it there while pressing the button, in accordance with the instructions, until I heard/felt a "click." Pulled it up for a read: "50 KG!"
At the same time, I was also fitting a new alternator belt which I had also tensioned to what "felt about right." Checked it (carefully)with the tension tester: "50 KG!" Harrumph! I loosened the a/c pulley and alt pivot rod and cranked a few quick turns on each belt. Checked again and got 65 KG and 70 KG respectively. Whew! According to my conversions, the specs for both belt tension ranges work out to about 56-59.5 KG. So some fine-tuning and I was getting (near-as-makes-no-difference) 59.5 reliably and repeatedly from multiple measurements:
As an added bonus, since you'll no-doubt want to renew your alternator belt once you get the a/c belt off, just loosen this one with your 13 mm so the rod can pivot:
Use a 13mm open-end on one of these (top of the alternator) to relieve the pre-load, then crank the inboard one down the rod toward the engine until you can push the alternator far enough inboard to free the belt.
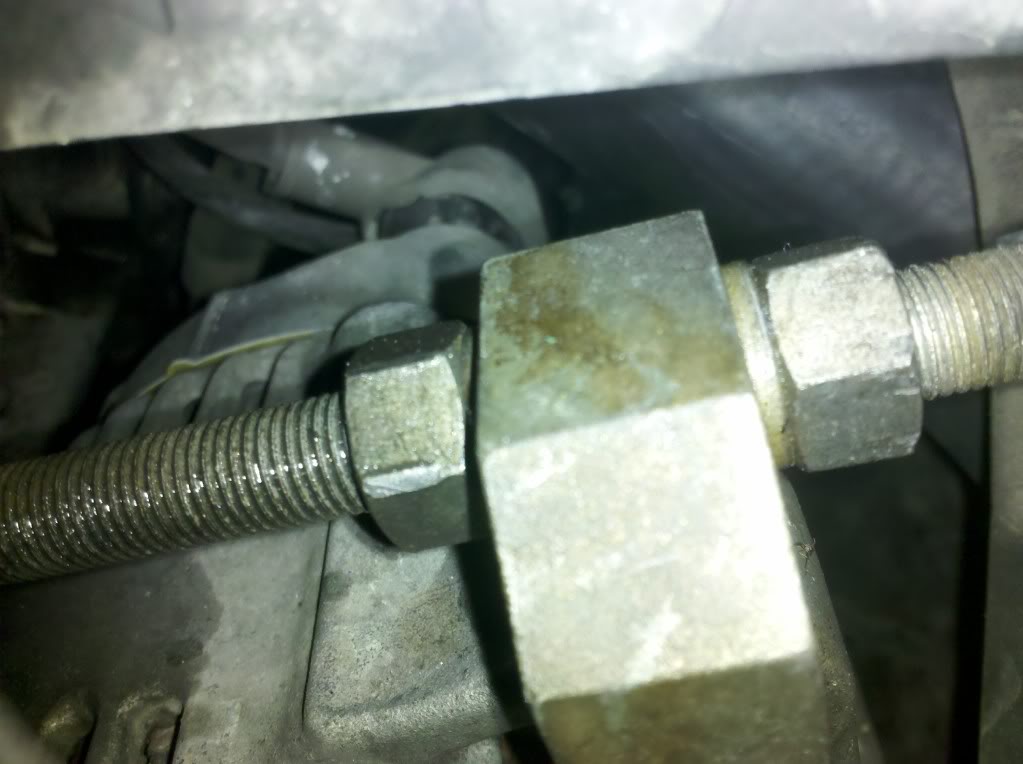
Tensioning is the reverse, but once you've set it, don't forget lock it in with the outboard nut and cinch the pivot bolt back up at 22-28 nm. Run one minute, allow to cool and re-tension. Curiously, no requirement to re-tension the A/C belt.
Alternator belt:
DAYCO5050385
Loosen the fixing bolt on the A/C idler pulley with a 13mm socket. Underneath, turn the 1/4" square drive clockwise to relieve tension on the a/c belt. I used an open-end, 1/4" wrench (spanner) couldn't get any socket nor box-end wrench to fit it. One member reported using a 1/4" drive extension "backwards" but I didn't catch what he used to apply torque to it.

Remove the belt.
A 10mm deepwell socket (or shallow + extension) will dispatch the upper and lower mounting plate fixing bolts in short order.
An internet search returned costs of $60+ for the genuine plastic Jaguar replacement part for the A/C Idler pulley. I opted for the Gates, 38006 3" diameter, smooth steel pulley for <$15.00.

Torque tightening specs from the manual call for 22-28 Nm for both pulley-to-bracket and bracket to comp mtng brkt.
I "woke up" after several turns on the upper fixing bolt failed to produce a "click" on the torque wrench and thought, "Crikey! I may have to find a helicoil this evening!" but when I removed the bolt and took a close look, I noted the hourglass shape of an elegant lady in the threaded portion. So I began to wonder if I'd find an M8 washer-head in the "specialty automotive" drawers at the local Lowes. Then I recalled that I had started a metric "hell box" a few years ago and decided to have look. I found this one that I'd bought at the Toyota dealer for my son's Tundra before one of his schoolmates rear-ended it with a Beetle rendering it of no further use to us. No idea what it cost, but if you need a good M8 washer-hd, this one fits the bill:

Wish I'd had 2, as it takes a 12 mm socket vs. the original 10mm, but I'll get by.
Upper:

Lower:

Overall

A/C belt: DAYCO5040398
A/C Idler Pulley: Gates 38006
The Gates 91132 Belt Tension Tester was also <$15 and I took a risk despite spotty reviews claiming it registers 50 KG regardless of tension:
Leave the pulley slightly loosened and crank the 1/4" square drive tension adjustment counterclockwise to load the belt. I put on what "felt about right," torqued the pulley to 27.86 nm then went topside. I centered the tester between two pulleys and aligned it parallel to the belt, exercising great care to keep it there while pressing the button, in accordance with the instructions, until I heard/felt a "click." Pulled it up for a read: "50 KG!"

At the same time, I was also fitting a new alternator belt which I had also tensioned to what "felt about right." Checked it (carefully)with the tension tester: "50 KG!" Harrumph! I loosened the a/c pulley and alt pivot rod and cranked a few quick turns on each belt. Checked again and got 65 KG and 70 KG respectively. Whew! According to my conversions, the specs for both belt tension ranges work out to about 56-59.5 KG. So some fine-tuning and I was getting (near-as-makes-no-difference) 59.5 reliably and repeatedly from multiple measurements:

As an added bonus, since you'll no-doubt want to renew your alternator belt once you get the a/c belt off, just loosen this one with your 13 mm so the rod can pivot:

Use a 13mm open-end on one of these (top of the alternator) to relieve the pre-load, then crank the inboard one down the rod toward the engine until you can push the alternator far enough inboard to free the belt.

Tensioning is the reverse, but once you've set it, don't forget lock it in with the outboard nut and cinch the pivot bolt back up at 22-28 nm. Run one minute, allow to cool and re-tension. Curiously, no requirement to re-tension the A/C belt.
Alternator belt:
DAYCO5050385
The following 9 users liked this post by aholbro1:
AllanG (11-05-2013),
al_roethlisberger (04-17-2015),
Benhur59 (09-12-2013),
BigBossRadio (04-13-2014),
Don B (04-19-2018),
and 4 others liked this post.

#4
09-15-2013, 10:17 PM
Just closing the loop on this one:
Cost:
I bought the belts from Rock Auto not too long after I bought the car, 10/3/2010:
DAYCO5040398Belt $ 7.69
DAYCO5050385Belt $12.29
The Gates 38006 pulley was just shy of $11 (employee discount) from O'Reilly with my son working there over the summer, but I found it on Rock for $13.47, I believe. Normally about $20 or a little more from O'Reilly or other local auto stores.
The Krikit II ( Gates 91132 Belt Tension Tester) was $13.96 on my doorstep from Amazon.
Timing:
I took the car down 26 July and did a quick test-drive this evening (9/15/13) and will put it back in service beginning with tomorrow's commute.
OK, you could probably do this in a half-hour(certainly less than an hour) rather than a month and a half if you are in THAT big of a hurry! I had a lot of other stuff to address at the time.
The following users liked this post:
BigBossRadio (04-13-2014)
#5
09-28-2013, 11:31 PM

#6
09-29-2013, 07:54 AM
#7
09-29-2013, 04:41 PM
i need to loosen the center 10mm bolt on the idler pulley first? i cant get it loose. i tryd loosening the botom base bolt but i turn the 1/4 screw and it wont loosen. what am i doing wrong
update: finally loosened the pulley 10mm bolt and im done changing the belts. WHAT A TEDIOUS JOB!!!! turning that square head adjusting screw for the idler pulley
update: finally loosened the pulley 10mm bolt and im done changing the belts. WHAT A TEDIOUS JOB!!!! turning that square head adjusting screw for the idler pulley
Last edited by avioni; 09-29-2013 at 05:48 PM.
Trending Topics
#8
09-29-2013, 06:20 PM
The idler pulley bolt clamps the pulley to the mounting plate, making it not want to move, so you need to crack it loose. The 1/4" drive stem is the opposite of what you would think: "Righty-Tighty" actually loosens tension on the belt.
*Don't forget to snug the idler pulley bolt back up when done*
*Don't forget to snug the idler pulley bolt back up when done*
#9
09-29-2013, 06:29 PM
Veteran Member
Join Date: Nov 2006
Location: Glasgow, Scotland UK
Posts: 47,302
Received 9,011 Likes
on
4,114 Posts

#10
07-10-2014, 07:03 PM
Senior Member
OK, 2.5 hours later and both new belts are finally in place. They were both as limp as rag dolls, and genuine Jaguar belts.
I had to take the snips to the AC belt, and remove the idle assembly to clean up the threads on the adjusting rod, then liberally lubricated it with PB'Laster.
Other belt, well, I ended up removing the threaded tension assembly to clean those threads, and had to loosen up the bottom alternator bolt. It wouldn't budge!!
I wish I had known that I needed to move the lower bolt on the tension rod almost an inch to get enough room to get the new belt on.
It all went back together rather simply, but getting the idler assembly back in place was a lesson in contortion (I'm a chubby guy and don't do well lying under the car on my back).
Having said all that, this week I've replaced the battery, both belts, and repaired the AC. It's cool, doesn't squeal, and starts when I ask it. All in all, it's a good week.
#12
03-19-2015, 04:19 PM
Thanks for the help. Couldnt get the gates pulley in uk but another alternative is a honda pulley FEBEST 0388-YD2. I used the 1/4 drive extension with an old brake adjuster spanner to move the pulley tensioning adjuster.
http://www.ebay.com/itm/261808362787
Cherrs
Steve
http://www.ebay.com/itm/261808362787
Cherrs
Steve
Last edited by 6sabre; 03-19-2015 at 04:22 PM.
#13
03-19-2015, 05:57 PM
Veteran Member
I don't know if these are made in the necessary size for the X300 applications, but I bought these for my 1995 Buick Riviera, which is also supercharged. The Riviera is known to eat belts, so these seemed like a good potential choice for extra durability.
If they are made in the sizes for the NA and SC X300, they might be a good alternative for longer service life and reliability.
FleetRunner� Heavy-Duty V-Belts | Gates Corporation
Good choice on the steel versus plastic idler wheels too. Again, citing the Riviera, the community there had found that the plastic units tended to "grenade" over time, especially if the bearing seized or dragged. And in fact many HD/Service fleets such as police cars had banned/abandoned the plastic idler/tensioner wheels altogether because of this issue. Technically the plastic wheels offered lower rotational mass and therefore better performance (how would one measure that little gain if any?) but the steel didn't fail unless the bearing itself went bad. But at least it didn't disintegrate, it just squealed or threw the belt.
Nice write up!
.
Last edited by al_roethlisberger; 03-19-2015 at 06:02 PM.
#14
05-01-2016, 10:25 PM
Just renewed drive-belts on one of the 96's and found some differences with respect to this post: 10mm vice 13mm socket on the a/c idler pulley. 14mm vice 13mm socket on the alternator tensioning rod. (Found 9/16" most useful for the inboard one as I was applying tension to the new Alt belt. Bothersome interference from the fan shroud during this part of the evolution, so if you have a shorty open end in 9/16" or 13/14 mm...use it!
Alt. pivot bolt was a 17mm socket + back up wrench. 1/4" 3/8"-drive socket worked fine on the A/c tension adjuster.
Alt. pivot bolt was a 17mm socket + back up wrench. 1/4" 3/8"-drive socket worked fine on the A/c tension adjuster.
Last edited by aholbro1; 05-01-2016 at 10:48 PM.
#15
11-25-2017, 10:44 PM
Veteran Member
About to renew all my belts with the new alternator. I replaced the idlers for the S/C about 50k miles and 3 years ago so they're likely fine, but I'm pretty sure the A/C idler pulley is quite a bit older so may just preemptively replace the A/C idler pulley with the belt.
Since the genuine Jaguar NBC5012AA A/C plastic idler pulley is a crazy $70+ (why?!), I though I'd see how the Gates 38006 steel pulley you used is holding up after three years?
Dayco sells a plastic pulley that is the OEM fit for about $20 as well, part number 89017. But I'm partial to the steel pulleys if the bearings are up to the OEM quality as well.
.
Last edited by al_roethlisberger; 11-25-2017 at 10:49 PM.
#16
11-26-2017, 10:43 AM
The following users liked this post:
al_roethlisberger (11-26-2017)
#17
11-26-2017, 10:53 AM
Veteran Member


#19
11-27-2017, 11:01 AM
Veteran Member
With respect to wanting to save the square head points on the long adjustment bolt I removed the whole assembly and put on a bench . With alot of heat and penetrating oil and the use of vice grips I was able to free up the long bolt running it though the full length several times washing it with oil to clean the crud out . Runs very free now and by using the vice grips to save the 4 points on the head of the long bolt I can now pound a socket on the head backwards with the 4 point receptical of the pounded on socket as the new tool end for in service adjustments receiving the 4 point ratchet drive . Heavy grease on the cleaned threads . Didn't bother cutting the belt off as I removed assembly . But this risked damaging the mounting holes and bolts . Safe thing is to cut the belt or roll off the pulley .
Last edited by Lady Penelope; 11-27-2017 at 11:06 AM.


Thread
Thread Starter
Forum
Replies
Last Post
rachelstr
S-Type / S type R Supercharged V8 ( X200 )
7
09-03-2015 12:59 PM
Currently Active Users Viewing This Thread: 1 (0 members and 1 guests)