
Door handle link replacement c/w pics...FAQ


Thread Starter
|
Senior Member
Joined: Jan 2010
Posts: 110
Likes: 92
From: Kansas City, MO
So my door handle link snapped... For over a week I had to roll down the driver side windows to let myself out... Talk about embarrassing....
So I ordered a new link/door handle assembly from eBay for $80...
I also went to Harbor Freight Tools to get this:
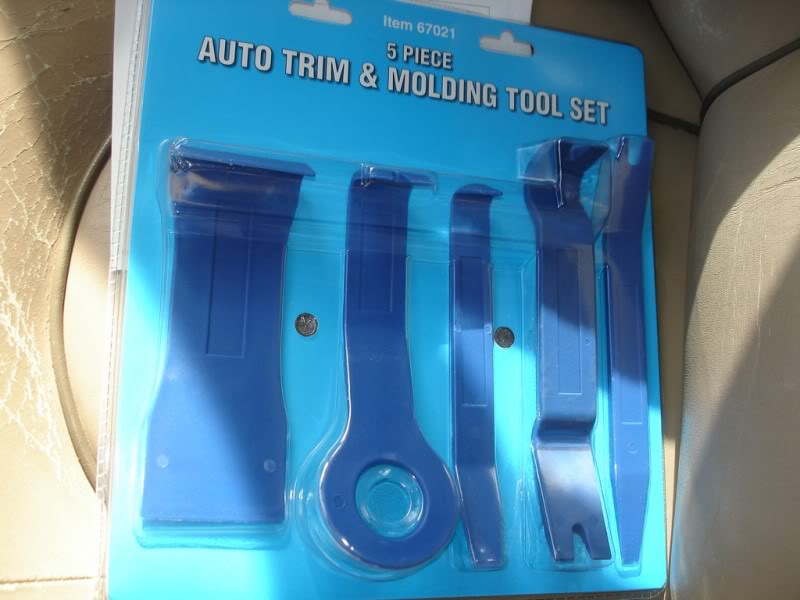
Very handy for removing trim.
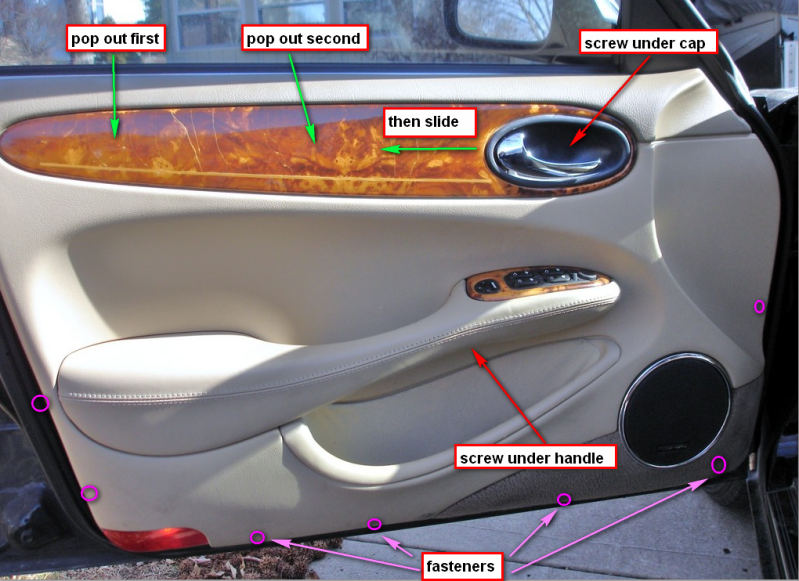
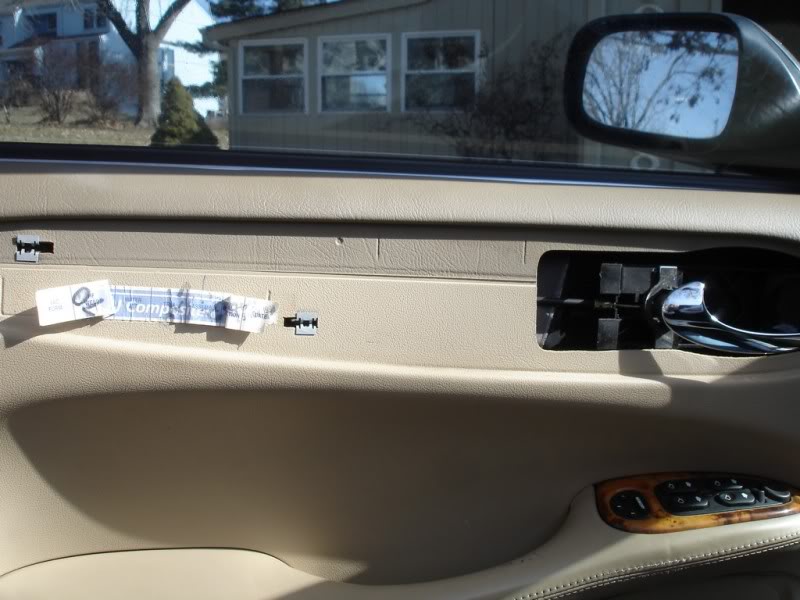
Here is what I did (pic):
RED arrows first:
- remove the screw in the door handle cup, and remove the cup by pulling on the door handle and working the cup out.
- remove the screw under the arm rest
GREEN arrows:
- use a nylon pry bar to pop out the two fasteners holding the faux-wood trim, and then SLIDE is to the LEFT. Don't try to pull towards you or it will snap.
PURPLE circles:
- use the pry bar again on the pin fasteners.
This is why you wanna slide the faux-wood insert and not pull it:
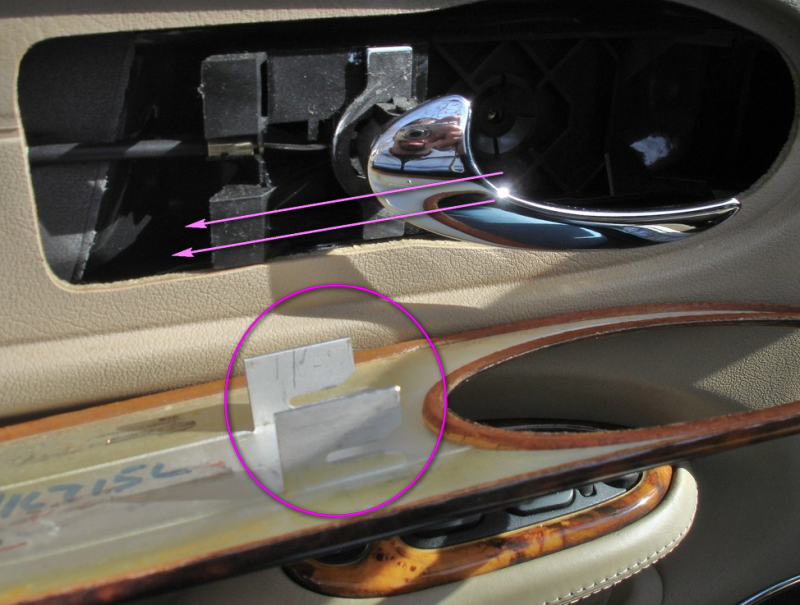
Anyways, To remove the door trim itself, first PULL the bottom part out to where you can see all the side and bottom fasteners out, and the trim itself is about 2" from the door, then LIFT the trim UP.
Here is what you'll see:
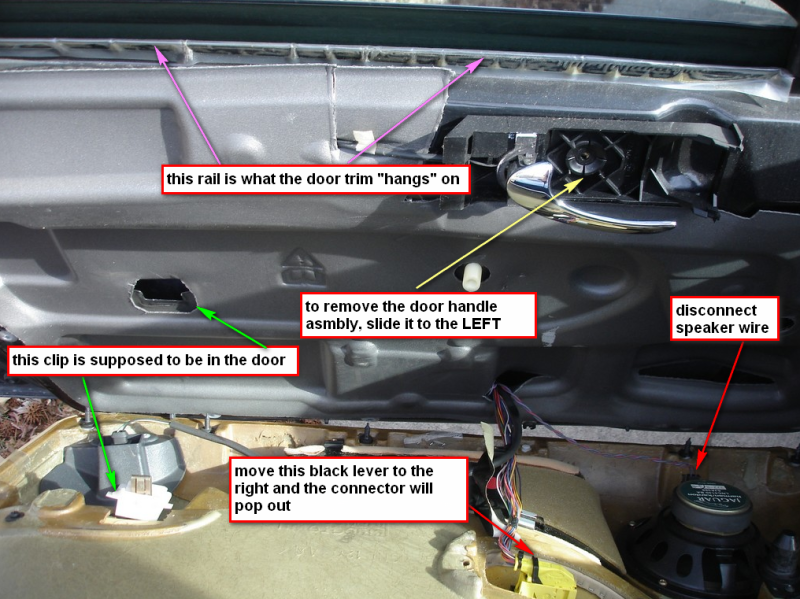
Disconnect the speaker wire, and the yellow connector for the door/windows switches. You can leave the door light wire on as it's long enough for you to put the trim on the floor without the need for disconnecting it.
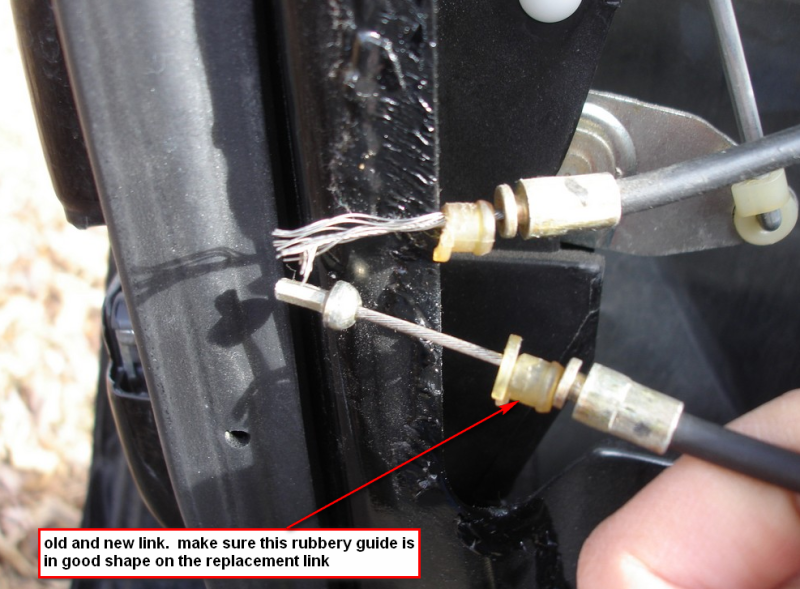
The door lock assembly and the links.
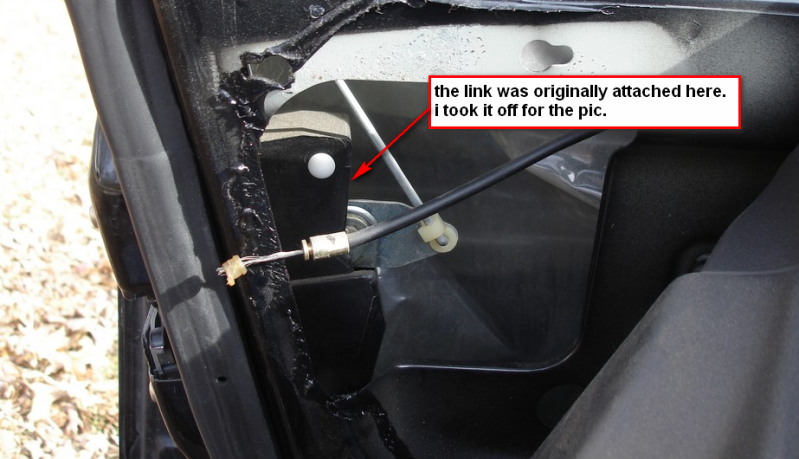
Was able to squeeze my camera in the door frame pointing towards the lever that the link connects to:
Getting ready for this project I had problems finding good (any) pics that would help me visualize what I was about to get myself into. Hopefully this will help others that may run into this issue...
Thanks
Mike
So I ordered a new link/door handle assembly from eBay for $80...
I also went to Harbor Freight Tools to get this:
Very handy for removing trim.
Here is what I did (pic):
RED arrows first:
- remove the screw in the door handle cup, and remove the cup by pulling on the door handle and working the cup out.
- remove the screw under the arm rest
GREEN arrows:
- use a nylon pry bar to pop out the two fasteners holding the faux-wood trim, and then SLIDE is to the LEFT. Don't try to pull towards you or it will snap.
PURPLE circles:
- use the pry bar again on the pin fasteners.
This is why you wanna slide the faux-wood insert and not pull it:
Anyways, To remove the door trim itself, first PULL the bottom part out to where you can see all the side and bottom fasteners out, and the trim itself is about 2" from the door, then LIFT the trim UP.
Here is what you'll see:
Disconnect the speaker wire, and the yellow connector for the door/windows switches. You can leave the door light wire on as it's long enough for you to put the trim on the floor without the need for disconnecting it.
The door lock assembly and the links.
Was able to squeeze my camera in the door frame pointing towards the lever that the link connects to:
Getting ready for this project I had problems finding good (any) pics that would help me visualize what I was about to get myself into. Hopefully this will help others that may run into this issue...
Thanks
Mike

Senior Member
Joined: Nov 2011
Posts: 242
Likes: 16
From: Denvile NJ
when your handle finally let go , was it giving you hints for a while? i have a 98 vdp with 130k , the driver handle almost comes out 90 degrees, if not pretty far, before openning the door. where about does your new handle actally unlatch the door?


Thread Starter
|
Senior Member
Joined: Jan 2010
Posts: 110
Likes: 92
From: Kansas City, MO
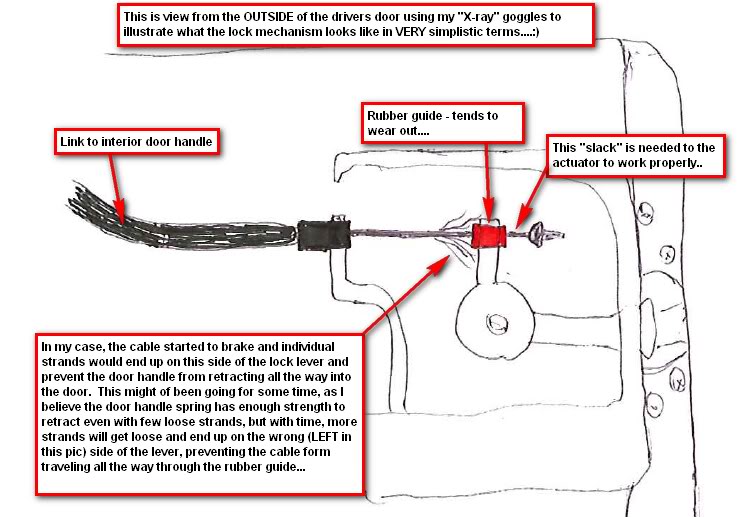
The "chicken scratch" illustration below should help explain (I think
 )...:
)...:

Senior Member
Joined: Nov 2010
Posts: 710
Likes: 87
From: West Central Mass. USA
Looking through some older threads relating to the door cable, it looks like some are saying or implying that you do NOT have to remove the wood veneer trim from the door panel, in order to remove the door panel from the door assembly. Is this so?
Trending Topics
Thread Starter
|
Senior Member
Joined: Jan 2010
Posts: 110
Likes: 92
From: Kansas City, MO
Look at this pic again... The aluminum "fins" on the back of the wood trim, slide onto the (black) door handle assembly on either side of the link.

Senior Member
Joined: Nov 2010
Posts: 710
Likes: 87
From: West Central Mass. USA
One final question: When prying out the wood veneer trim, are the two pop-out fasteners pretty much under where you show the ends of the green arrows? How did you do the prying? Top, then bottom, then top etc. or did you have two pry bars going at the same time? I would be concerned that being just a little off would risk cracking the veneer. Maybe a picture of the back of the veneer trim, showing the fasteners, would help. Thx.
Thread Starter
|
Senior Member
Joined: Jan 2010
Posts: 110
Likes: 92
From: Kansas City, MO
^^
As to the force I used to pry this out, it wasn't really that much... Just work your way slowly and the fasteners will come out. They're just flat aluminum rectangles with no ribbing, so once they're moving, they easily come out.
As to the force I used to pry this out, it wasn't really that much... Just work your way slowly and the fasteners will come out. They're just flat aluminum rectangles with no ribbing, so once they're moving, they easily come out.
Last edited by mzs_biteme; Jan 30, 2012 at 06:21 PM.


Member
Joined: Jan 2012
Posts: 44
Likes: 10
From: Florida
Fantastic job at putting this together. I have some door work to do soon and this will be a tremendous help to me. I'd already bought the same Harbor Freight trim tools so its good to know that they will work.
Many thanks for a great set of instructions.
Ian
Many thanks for a great set of instructions.
Ian

Senior Member
Joined: Jul 2010
Posts: 178
Likes: 21
From: Austin
Anyone figure out how to replace the cable using bike parts? Not sure if the cable is the same size or not. Also looking for a suitable replacement for the rubber guide.
From the dealer its $111 plus shipping to fix this.
From the dealer its $111 plus shipping to fix this.

I have my door panel off and the cable removed. Do I need to remove the latch assembly(the one connected to the exterior door handle) to replace the cable or can I do it while it's still attached to the door??
Thanks!!
Chris
Nm, you don't. I got it working thanks!!!
Thanks!!
Chris
Nm, you don't. I got it working thanks!!!
Last edited by Badbenz94; Oct 13, 2013 at 06:11 PM.
Veteran Member
Joined: Mar 2011
Posts: 1,175
Likes: 258
From: Tasmania, Australia
[QUOTE=mzs_biteme;462053]So my door handle link snapped... For over a week I had to roll down the driver side windows to let myself out... Talk about embarrassing....
So I ordered a new link/door handle assembly from eBay for $80...
I also went to Harbor Freight Tools to get this:
Very handy for removing trim.
Here is what I did (pic):......[QUOTE]
Thank you Sir!...This has to be one of the most concise and descriptive posts i have seen in a long while...very well done! ;o)
As I am about to tackle some speaker replacements and a bit of door R&R....this will be most useful.
Thanks once again.
Member
Joined: Oct 2012
Posts: 69
Likes: 48
From: Houma, LA
Here is an ebay link to the gaskets I just bought, they are the same front and rear so I ordered two sets.
New Jaguar Door Handle Gaket Kit Lt RT Pair XJ6 XJ8 XK8 | eBay
Seems i can't add my thanks to this great post in the mobile app.
THANKS!
Just completed this last night. As I did not have a replacement cable, I fashioned one up with stranded picture hanging wire. I created an end for the latch/ handle with a 4mm tube with a hole drilled in the side to pass the wire through and a crimped tube the other end against a washer. A rubber grommet on the latch side keeps it in position and allows the free play required for the correct latch operation.
This is a very tedious process.
One point missing from the OP posting is that there is a small spring clip on the catch that is used to retain the cable outer into the latch assembly. Without replacing that, it is possible that the cable could work is way out.