
Valve cover gaskets

Thread Starter
|
Senior Member
Joined: Mar 2011
Posts: 473
Likes: 17
From: Tucson
I need to replace the valve cover gaskets on my mom 98 vdp.
Do I need any special tools for this?
What is the best brand of gaskets to use.
The rebuilder used hard gaskets so a tiny oil leak exists.
Not up to fighting with the a hole.
TIA
Do I need any special tools for this?
What is the best brand of gaskets to use.
The rebuilder used hard gaskets so a tiny oil leak exists.
Not up to fighting with the a hole.
TIA

No special tools as such but you will find a 1/4 drive ratchet with a knuckle joint most necessary..... I only use Jaguar gaskets being in the UK but you better make sure you get the right ones, I am pretty sure on that year was still the AJ26 engine so you will need the orange and grey, if you fit the black they will leak

Veteran Member
Joined: Mar 2008
Posts: 5,390
Likes: 1,116
From: Ellijay
Never heard of hard gaskets for this application. The 'gaskets' are more like strange '0' rings and leaks are usually the result of tightening the bolts too much and cracking the plastic cover.
Veteran Member
Joined: Mar 2011
Posts: 1,175
Likes: 258
From: Tasmania, Australia
They are a soft neoprene type seal and no gasket goo is used at all.
make sure the cam covers are very clean....use carb cleaner and make sue all the grooves are clean with no goo in them.
The gaskets can be held in place by a blob or two of petroleum jelly.
Tighten no more than nip them up plus a half turn.
Always tighten in a cross sequence starting from the middle.
The sealing relies on compression of the gasket not any sealing compound.
make sure the head surface is clean.
You will need 1/4" ratchet and 8mm socket on a short extension.
You can recognise the different types by engine type.
Tjhe AJ26 enginew has the VVt solenoid in the front of the alloy primary cover.
The later AJ27 engine has it's VVT solenoid sticking up out of the top front of the plastic cam cover.
Give your engine number to people like Welsh Enterprises or here at Parts Geek
98 1998 Jaguar Vanden Plas Valve Cover Gasket - Engine Mechanical - Aftermarket, Eurospare, Qualiseal, Left, Right - PartsGeek
You will also need the 'figure eight' spark plug well seals,
98 1998 Jaguar Vanden Plas Spark Plug Seal - Engine Mechanical - APA/URO Parts, Eurospare, Original Equipment - PartsGeek
These should seal it all up ;o)
Last edited by xjay8; Jan 5, 2014 at 12:39 AM.

Junior Member
Joined: Dec 2013
Posts: 31
Likes: 6
From: North Carolina
Don't forget the valve cover bolt gaskets - there are 28 of them. These are in addition to the valve cover gaskets. Some were missing altogether from the Jaguar I just got, so there is an oily mess. The main gaskets will stay in place when you put the cover bolts on the cover and through the gaskets BEFORE you put the cover back on.
As xjay said, don't forget the figure 8 spark plug gaskets - those are held in place by the bolts in the center of the valve cover - and the RTV sealant on the two joints where the timing chain cover meets the cylinder head.
The torque down pattern is this:
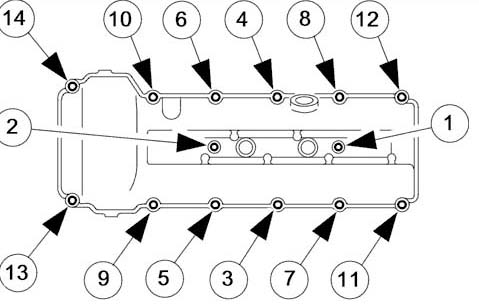
Google "blackonyx timing chain" and you should find a good post with pics of what it looks like. Scroll down to where he's doing the re-assembly.
As xjay said, don't forget the figure 8 spark plug gaskets - those are held in place by the bolts in the center of the valve cover - and the RTV sealant on the two joints where the timing chain cover meets the cylinder head.
The torque down pattern is this:
Google "blackonyx timing chain" and you should find a good post with pics of what it looks like. Scroll down to where he's doing the re-assembly.
Trending Topics
Veteran Member
Joined: Mar 2012
Posts: 1,531
Likes: 204
From: Florida
Great post, Captain K. Here's the link that you mentioned -- Tmingi chain and tensioner replacement
Some really wonderful photos in that writeup.
Some really wonderful photos in that writeup.
Veteran Member


Joined: Apr 2013
Posts: 3,794
Likes: 1,071
From: Virginia beach va
And the key is to install the bolts through the cover & gasket before turning the cover over and installing. Once the bolts are thru the cover and gasket, check carefully that the gasket is in the seams, often the old gasket is still good, it is sloppy assembly that creates vacuum and oil leaks.


Thread
Thread Starter
Forum
Replies
Last Post
xjrjag
XJ XJ8 / XJR ( X308 )
23
Oct 24, 2024 03:09 PM
1964Daimler
MKI / MKII S type 240 340 & Daimler
2
Sep 9, 2015 11:20 AM
Currently Active Users Viewing This Thread: 1 (0 members and 1 guests)