
Console-ation FAQ


Thread Starter
|
Veteran Member


Joined: Mar 2014
Posts: 26,776
Likes: 10,317
From: Tehama County, California, USA
It seemed like a good idea, as I had to have the console apart anyway, to address a few irritations that have bothered me since I got the car.
One thing I want to do was upgrade the light source in the Opticell to a much brighter LED. Also the shifter indicator light has Never worked, so I have to actually know which way I'm going as I can't see otherwise if I'm in reverse. The backup lights don't work properly (they come on, just not in Reverse) and I can't see a way to adjust the position of the switch, so I want to put them on a toggle so I can turn them on at will (if he wouldn't mind). I also want to put a cutoff switch in the AC compressor relay power wire.
As I've excavated layers of wiring and trash (numerous extra screws, washers and lengths of electrical tape, not to mention extra wire) I have made some interesting discoveries. In the picture below you might take a look at that white wire in the center. Take special notice of the left end, just beyond the splice (Yellow arrow). Do you like that inch of bare strands?
And look how it's threaded through all the other wires past the Vampire clip. The other yellow arrow points to where the tape on that bundle was cut and opened where that wire originally exited the bundle and plugged into that relay. At least they used white wire! Some of these splices they just stuck in any color they felt like.
That stubbed off bundle sticking out from under the shifter is why the cruise control doesn't work (apart from the fact there is no mechanism for it).
I had to cut the red/blue pair at the white arrow. They power the alarm LED; you know, the little red flashing one that warns others you have a car alarm and they'd better stay away? They installed the LED from the top of the panel and made no provision for unplugging it. That will be fixed.
So far then, the cruise control doesn't work (which he was quick to tell us but only when I asked) because only the switch is present. The radio doesn't work because the speakers aren't plugged and there is no power to the antenna. The power wire is broken off the shift indicator (too much flexing no doubt) and the outlet light is vampired off the Opticell.
It's been interesting to say the least.
I'll be adding to this thread too as I do things with the console.
(';')

Veteran Member
Joined: Jul 2012
Posts: 6,796
Likes: 2,403
From: Walnut Creek, California
LnrB:
Well, I can't fuss too much. I can't remember or figure out et, which of the relays on my VIN bar is the starter relay!!! It isn't the original tin can Jaguar unt, but a little black box ala Bosch!! But, I can crank it from the engine bay!! Hot wire style.
Rain tomorrow and errands to do, so it will be Friday that I get back to hunting for the WY wire from the switch and the "black" to the neutral start.
I did a lot of splicing in that cavity. But, no vampires. I weaned off those decades ago. Just solder and shrink tubing. Shrunk with a match then, I didn't have my slick HF sourced heat gun then
My conversion instructions said to cut or remove that big bundle that goes along the right side of the bundle. OH, oh, that includes the wire to the fuel pump!! Oh, weel, I splice one in.
My shift tower is from an XJS and as such has a big green switch on the left side. It is somewhat adjustable. The original Jaguar BW had s similar switch on it's left side.
My conversion kit, from Johnscars included an XJS switch to be affixed via a large nut to the XJ6 shift tower. A bit adjustable as well.
The guts of a CC is the bellows attached to the throttle. Mine is in my parts bins. Never hooked it up. there should be another cable along the throttle cable for the bellows to pull on And, an electric harness and connector for the command function. Mine lines fallow.
I'm sure that any remnant of an after market alarm will go to the junk pile.
The one from my daughter's Passat is in the recycle!!
Ain't it fun???
PS, my Jeep has the guts of a car phone!! Little mike, squiggly antennae and black box. But no hand set???.
Carl
Thread Starter
|
Veteran Member
Joined: Mar 2014
Posts: 26,776
Likes: 10,317
From: Tehama County, California, USA
Thanks, Guys,
Greg, this is neat and clean compared to when I first took the cover off! But I was on a roll at that time and didn't want to stop for a picture. There were dropped screws, crimp splices, washers, wads of tape, drill shavings, SO much Garbage!!
But so far, it's quite plane what originally went where. The only things I plan to change in there have not been fooled with at all. I'm going to route the AC compressor wire up to the window cut-off switch and that should be quite straightforward. I also need to do something about the backup lights but Carl might have the answer there.
For this nest of worms I only plan to untangle things so wires lay in a more logical, compact arrangement. I have no idea what that relay does but everything seems to work so I'm not messing with it.
Carl, try the picture again. The vampires still seem to work so I'm not messing with them. I found 3 in here, but that's Nothing compared to what's under the steering wheel! If something didn't work, or they wanted to add something, Just find a known hot wire and vampire off of it. Not only that, usually it's not like this where they at least used a white wire of similar size to go around a problem they didn't fix, some of them under the dash are Completely different in color and gauge! As I said, it it's working, I ain't fooling with it!
I have a big can thing on the shifter with 2 green wires. I'm thinking that's the backup lights? I'll see if I can adjust it any, or if I can even make a slotted hole.
The neutral start switch is up at the front end of the shifter, I found that just fine. It needs adjusted and/or cleaned because the car starts Just Fine in Reverse!! That was exciting I tell ya!
There are No cruise control parts on this car other than the switch, the wires of which you can see peeking out from under the shifter. There is no extra throttle cable and no bellows. Someone tried to explain to me how to put a Chevy CC to the transmission but I didn't understand a word, except that if one already know how to do it, it was doable. I'm leaving that for the time, even though it would be nice if it worked.
I'm leaving the Viper alarm alone because it seems to work OK (kind of handy actually, to have the remote lock), and I have No idea what all they hacked into to make it work. I just know there's a wad of wires the size of a grapefruit under there that seem to be Viper related. I don't know if the car came with electric locks or if all that was added by the company at the time of conversion/restoration.
And yes, it is fun. I'm glad I have several months to figure it all out.
I was just now going to take pictures of the switches and my camera won't turn on! It looks like I'm in the market for a new one! Aw Darn!
(';')

Joined: Jan 2014
Posts: 28,386
Likes: 6,340
From: Delaneys Creek,Qld. Australia
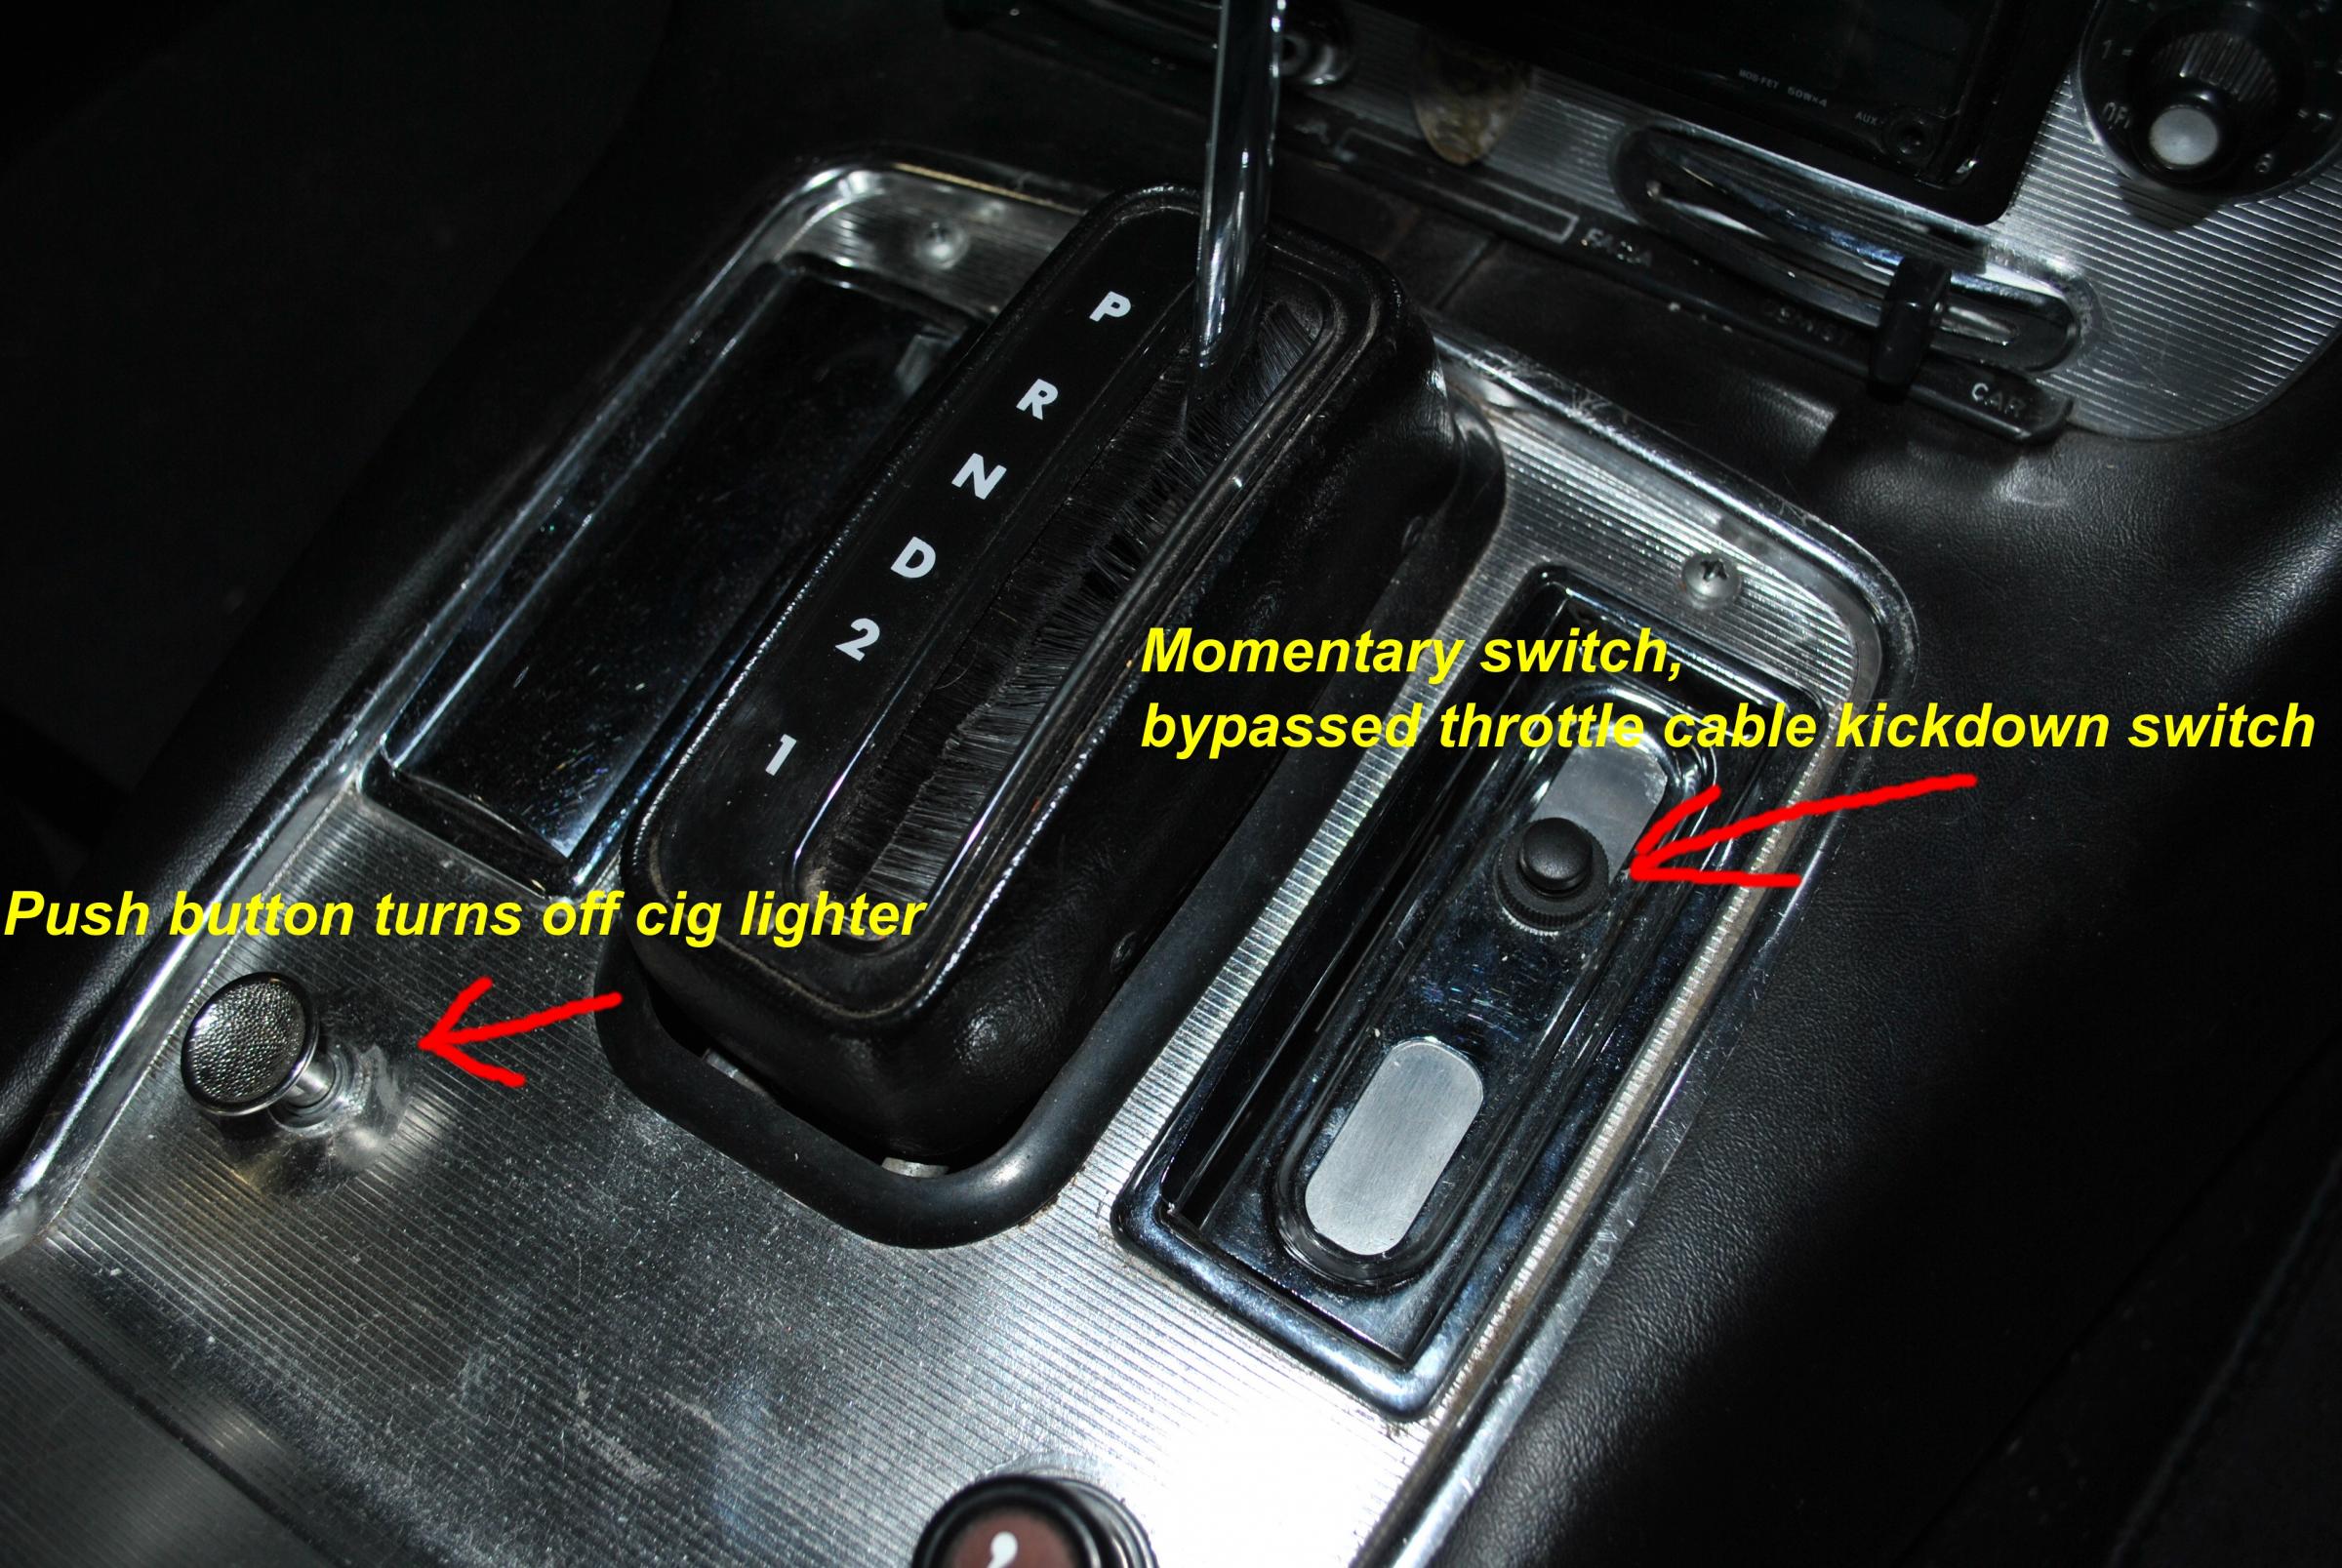
Mine has 8 wires + one harness!
Two wires to the cigarette lighter(or should I be now saying the accessory socket.)
Two to the lights,in the shifter panel and cig lighter.
Two to the switch I fitted to turn off the cig socket(for my gps) when I stop.
Two to the kick down switch in my ashtray I added.( I tell the kids it is the"super turbo boost " button)...why don't they believe me?
And one harness I had no reason to question where it goes or what it doe's.
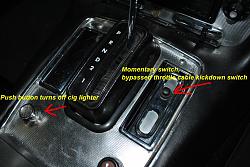
Thread Starter
|
Veteran Member
Joined: Mar 2014
Posts: 26,776
Likes: 10,317
From: Tehama County, California, USA
I only plan to add an extension to the AC relay wire so I can turn it off when it's not needed, Or when passing.
(';')
Trending Topics
Veteran Member
Joined: Jul 2012
Posts: 6,796
Likes: 2,403
From: Walnut Creek, California
At one time, an AC cut out was a great idea for hot engines. Too many revs with AC on could disintegrate the compressor.
My Jeep has such a switch. Kind of odd. Lots of power isn't among it's attributes. My son borrowed it once and agreed it ran nicely, albeit poopless , but the AC was lousy. Well, he built hot engines at the time. Then, I pointed out the button to shut the compressor off. Oh!!!
Unless you drop into low to pass, your 350 should have the suds to pass just fi9ne w/o screaming. Just another wire to go haywire. Sorry, could not resisit the weak pun.
As to the N/S and reverse, tis matte of fiddling to get the right adjustment. You have to keep in mind that the gates on that original shifter tower are for the BW, not quite the same as the gates for a GM transmission. But, doable. I chose the XJS shift tower as it was configured for a GM transmission. That is what some of the XJS V12 cars used.
As for cameras, decades ago, I got an new Olympus. Still works just fine. Limited as it has no USB port. So, I use a card reader. A somewhat newer but still antique is my Canon. It does well, and has a USB port.
Each is battery sensitive. The Canon refuses rechargeables. And eats even good AA's like popcorn
So, try nice fresh batteries, it might just work.
No luck with clicking on the picture to see it in a larger size. Might well be just my machine. It doesn't like big files!!!
Chores, then if it warmed up, get under the bonnet again for the start circuit.
Carl
Thread Starter
|
Veteran Member
Joined: Mar 2014
Posts: 26,776
Likes: 10,317
From: Tehama County, California, USA
At one time, an AC cut out was a great idea for hot engines. Too many revs with AC on could disintegrate the compressor.
My Jeep has such a switch. Kind of odd. Lots of power isn't among it's attributes. My son borrowed it once and agreed it ran nicely, albeit poopless , but the AC was lousy. Well, he built hot engines at the time. Then, I pointed out the button to shut the compressor off. Oh!!!
Unless you drop into low to pass, your 350 should have the suds to pass just fi9ne w/o screaming. Just another wire to go haywire. Sorry, could not resisit the weak pun.
As to the N/S and reverse, tis matte of fiddling to get the right adjustment. You have to keep in mind that the gates on that original shifter tower are for the BW, not quite the same as the gates for a GM transmission. But, doable. I chose the XJS shift tower as it was configured for a GM transmission. That is what some of the XJS V12 cars used.
As for cameras, decades ago, I got an new Olympus. Still works just fine. Limited as it has no USB port. So, I use a card reader. A somewhat newer but still antique is my Canon. It does well, and has a USB port.
Each is battery sensitive. The Canon refuses rechargeables. And eats even good AA's like popcorn
So, try nice fresh batteries, it might just work.
No luck with clicking on the picture to see it in a larger size. Might well be just my machine. It doesn't like big files!!!
Chores, then if it warmed up, get under the bonnet again for the start circuit.
Carl
My Jeep has such a switch. Kind of odd. Lots of power isn't among it's attributes. My son borrowed it once and agreed it ran nicely, albeit poopless , but the AC was lousy. Well, he built hot engines at the time. Then, I pointed out the button to shut the compressor off. Oh!!!
Unless you drop into low to pass, your 350 should have the suds to pass just fi9ne w/o screaming. Just another wire to go haywire. Sorry, could not resisit the weak pun.
As to the N/S and reverse, tis matte of fiddling to get the right adjustment. You have to keep in mind that the gates on that original shifter tower are for the BW, not quite the same as the gates for a GM transmission. But, doable. I chose the XJS shift tower as it was configured for a GM transmission. That is what some of the XJS V12 cars used.
As for cameras, decades ago, I got an new Olympus. Still works just fine. Limited as it has no USB port. So, I use a card reader. A somewhat newer but still antique is my Canon. It does well, and has a USB port.
Each is battery sensitive. The Canon refuses rechargeables. And eats even good AA's like popcorn
So, try nice fresh batteries, it might just work.
No luck with clicking on the picture to see it in a larger size. Might well be just my machine. It doesn't like big files!!!
Chores, then if it warmed up, get under the bonnet again for the start circuit.
Carl
Our van has a compressor switch and I use it quite a lot. Mostly it's good for ventilation without AC.
That's really what I want a switch for on Nix. In mild weather the compressor comes on needed or not and makes me too cold. It even comes on in Winter sometimes! I don't want that.
It will be an easy modification; I've already found the hot wire from the servo to the compressor, and I have a switch on the ski slope for it so I should have no trouble wiring it up.
I found the backup switch, I'll see if I can adjust it. I might be able to elongate the holes. If I can't do that I'll look for another shifter.
(';')
Thread Starter
|
Veteran Member
Joined: Mar 2014
Posts: 26,776
Likes: 10,317
From: Tehama County, California, USA
It's turned into Winter here. It's not cold, which makes it even harder to take, but it's so Dark and dreary. It's Very wet, too wet to work today, and it's December anyway, and I have everything done, so I got to working on Nix again, for the first time in THREE WEEKS!!
I thought it would be good to start slow with something relatively simple so I spent some time cleaning up the area from where husband cut out the rusty floor. Then I ran the compressor shut-off wire up to where it will connect to the window cut out switch on the ski slope.
Once I found all the parts it wasn't hard. First, the wires to the window cutout switch had to be connected together as I would Really like for the windows to work. I found a double tie-down in husband's electronics stuff which was Perfect! I wrapped the stub well to be sure nothing would short out later.
When the conversion was done the OEM compressor wire (green/brown) was unplugged from the servo and left hanging, and a new solid green wire was run in its place to the compressor relay, which is on the compressor on my car.
Husband just happened to have a spool of the exact same green wire in the shop! I cut into the existing wire, threaded the end from the spool through what seemed to be a safe and secure route, spliced the spool end to the compressor end coming out of the firewall.
Then I threaded another length exactly parallel to the first one and spliced it to the short piece coming off the servo. I put female spade connectors on both extensions. I have continuity throughout.
To keep both extension wires under control I zip-tied them to other bundles that lie along the route to the switches, the last tie being very near the merged ends of the window cut-off wires. There should be No trouble with them reaching the switch Just Fine!
(';')
Thread Starter
|
Veteran Member
Joined: Mar 2014
Posts: 26,776
Likes: 10,317
From: Tehama County, California, USA
When I took apart the console, after sorting through all the extra wires left lying around, I found the power wire for the shift indicator was broken off the bottom of the socket; too much flexing over the past 30 years since conversion I suspect.
But with all the "changes" in there, and so many wires just cut and left hanging, I don't know which wire was supposed to power the light (or if it's even there or if they vampired off something else), nor do I know how the socket was originally held in place.
When I uncovered it, the socket was just sitting in the hole, the bulb keeping it from falling through, which resulted in shaking the bulb's head off and it came out in my hand in pieces. I have no doubt I can rebuild the socket, but then what? Also, the socket mount appears to have its bottom half bent 90 degrees as shown in the second picture. What looks like a shadow of the top is actually the bottom.
Can someone please post a picture of what this is *Supposed* to look like? How the socket is *Supposed* to be held in place, and where the power is *Supposed* to come from?
Thanks Muchly.
(';')
Thread Starter
|
Veteran Member
Joined: Mar 2014
Posts: 26,776
Likes: 10,317
From: Tehama County, California, USA
Today I *Finally* found sockets that will work as replacements for the Opticell socket and the shifter indicator socket. I haven't specifically mentioned that the Opticell socket was so loose inside it was about to have a dead short and blow another GOK hidden fuse. This was also why it only worked some of the time. It seemed wise to deal with the socket issue while I have everything apart, along with upgrading to an LED source.
Plastic was the only material available for the Opticell replacement socket, but at least it does have a steel insert to which I could easily solder a ground wire. After that it was simply a matter of connecting the original colored harness to the socket -- Including making a soldered Y-splice to replace the vampire clip that fed the accessory socket light. Both of these are now LEDs so the current draw should be a mere fraction of the incandescents they replace.
(';')
Last edited by LnrB; Dec 13, 2014 at 01:53 AM.
Thread Starter
|
Veteran Member
Joined: Mar 2014
Posts: 26,776
Likes: 10,317
From: Tehama County, California, USA
Previously I mentioned how the shifter indicator didn't work when I got the car, and how the whole socket, bulb and all fell apart in my hand when I took it apart, and how all the parts weren't there anyway, and how it had been cobbled up to the point I had no idea how it was originally constructed. No one had their console apart at the time to post a picture of how this was intended to be so I knew I would have to find a replacement socket for the LED (I got a green one for this application) upgrade and do what I thought was the best option given my ignorance of the original configuration.
Husband The Searcher finally found the part number (S20) of a socket that might work for the shifter light but also might need a few alterations. I was completely Amazed he found one with a mount so close to OEM!! It indeed needed new holes after I discovered the existing holes made it mount too low but that was SO minor.
The new socket also came with a wire that was obviously too stiff for the continual flexing it would undergo when mounted on the shifter. Husband had some Really Fine Flexible wire of which I twisted two strands together and soldered them to the nail-head hot contact of the socket and put heat-shrink over 'just in case.' (Seeing as I'm replacing the incandescent bulb with LED the current draw will be a mere fraction and those Tiny wires should be OK.) Then I soldered a male spade connector to the other end for ease of disassembly in the event I ever have to take this apart.
I found where they got the power for this indicator; a *"Person"* who worked on this prior to me had vampired off the clock light to feed the shift indicator. ( I shortened that wire and put on a female spade connector for the shifter light.). However, during that first renovation that wire was installed so short and was so stiff that I imagine it might have worked correctly for about 15 minutes before the wire broke off the bottom of the socket. This was probably not entirely a bad thing as all the fuses for this stuff are buried and hidden God only knows where.
So anyway, I got the socket modified for the super flexible wires, soldered a male spade connector to it drilled new mounting holes and connected it up. As it's a hot wire I taped the connector with white electrical tape. I have run the shifter through its full range, Park through 1 (which I Never use), and there is no stress on the indicator wires.
I haven't put power to it all as yet because there are entirely too many other things to be done to the car before I ever connect the battery. But I'm confident this will all work better than it did when I got the car and that is my definition of Success.
(';')
Senior Member
Joined: Sep 2014
Posts: 366
Likes: 78
From: Dallas, TX
Ah, looks like Lnr is really out to straighten the POs follies, good going. Can you give me the bulb sizes for the opticell and shifter please? Ive done the dash, need to get to these. Thanks, and we love gawking at the great pics you post
Thread Starter
|
Veteran Member
Joined: Mar 2014
Posts: 26,776
Likes: 10,317
From: Tehama County, California, USA
I'm not sure I understand what you mean by 'sizes.' The original shifter bulb had a number of 1893 stamped on it. It has a T-3 base, 9mm diameter, miniature bayonet.
The LEDs are called Instrument Dashboard Gauge Lamps replacements, it's an assortment of 8/$12.79; 2-Ice Blue, 2-White (which looks a bit blue to me), 2-Red, 2-Green. They came from eBay, seller keylife. Power isn't listed but they're Bright!
The Opticell was originally a 5 watt bulb, feeble on its best night, but with the socket coming apart it was literally hit and miss. The replacement is called Xenon White, 3.5w, LED Interior bulb; came in a 2-pak/ $4.34. eBay seller, abl-powerzone. They have a domed lens built in and are Really Bright!! Well, you can imagine a 3.5 watt LED!
Husband thinks in might be too bright for the Opticell, but he doesn't know just how feeble the incandescent was as he never rode with me at night. I will say I haven't actually tested these for operational brightness, but they have to be better than what was there before.
(';')

Senior Member
Joined: Dec 2013
Posts: 106
Likes: 20
From: Upper Hudson Valley, NY
Not to hijack this thread, but in my S3 XJ6 there is a ground strap that I had to remove to rework the gear selector. I cannot remember where it is bolted to though, anyone have any idea what it is grounding? Thanks
Thread Starter
|
Veteran Member
Joined: Mar 2014
Posts: 26,776
Likes: 10,317
From: Tehama County, California, USA
No worries about hijacking the thread, all information is good, all questions are relevant to someone. I've learned some of the best things from "hijack" posts.
My car was converted to a Chevy 350 almost 30 years ago, I don't see a ground strap on the transmission. I assume it's grounding through the engine which has a Really Good ground that was added soon after I got the car.
(';')
My car was converted to a Chevy 350 almost 30 years ago, I don't see a ground strap on the transmission. I assume it's grounding through the engine which has a Really Good ground that was added soon after I got the car.
(';')
Veteran Member
Joined: Jul 2012
Posts: 6,796
Likes: 2,403
From: Walnut Creek, California
A couple of things.
1. A separate ground strap from shift tower to floor pan as opposed to the original jaguar strap down under from transmission to chassis? I don't recall the former beig present when I was in that cavity?
2. Yup, the shift indicator light in my car was just lying in the cavity, loose. A black plastic receptacle with an ear to secure it in the little 90 degree bracket. But, the plastic ear was busted off. Well, not elegant as LnrB's fix, I merely used a tad of safety wired to secure it. It does work, sorta. Bright, uh,uh.
3. Remember the old tech long reach telephone cords? Coiled to allow expansion and flexing. Very early on, we used them to "elegantly" cover wiring. But, a coiled wire works. Just wrap a length around a finger to form a coil. At times, I've done it in the engine bay, just to look "cool".
4. In order to get the n/s micro switch synchronized and the reverse switch also synchronized, the shift tower must be removed and the work done on the bench with the aid of a VOM for continuity or a test lamp and a power source for the bench. Each fiddly, but doable.
The mostly useless Haynes book has some schematics that might apply best to the S1 and S2 cars. Perhaps color codes that might be there could ID the needed wires and the unneeded.
Kudos, LnrB, you do nice work. Looks like in the kitchen, huh!!
Carl
Thread Starter
|
Veteran Member
Joined: Mar 2014
Posts: 26,776
Likes: 10,317
From: Tehama County, California, USA
Thank you, Carl,
The light on the tower works. I think I might have a bad ground in the Opticell because it doesn't work now that I replaced the socket. I'll check it out on the battery. I know the light worked before I put it in the socket so I have an idea where to look for discontinuity.
I do as much soldering in the kitchen as I can because the light is better there and I can hold components in the vise to work on them. If I absolutely Must do that stuff in the car I will, but it's just So much more convenient in the kitchen, especially if the part is out of the car anyway.
My NS switch works fine *except* that the car will start in reverse (That was exciting!!). It has some adjustment to it which I plan to try.
The reverse lights though, there is No Way to adjust that! But there is enough length in the wires to reach a toggle switch in that ash tray; that's what I plan to do (with some Killer LED backup lights). I do NOT want to take that shifter off!!
(';')
Thread Starter
|
Veteran Member
Joined: Mar 2014
Posts: 26,776
Likes: 10,317
From: Tehama County, California, USA
I mentioned above how the shifter LED works just fine but not the new Opticell. I thought maybe it had a bad ground but in fact it has no power.
It was working when I took it apart, although rather feebly, but it doesn't now. The assembly works fine when connected directly to the battery but not when plugged into its proper connector. I have checked the ground, it's good.
I'm assuming there's a fuse in the circuit that I've blown. All the other lights work as far as I can tell (except that half the marker lights are out), only the Opticell is affected.
Can someone tell me, does it have a hidden fuse, and if so where is it?
Thank you in advance.
(';')