
Failing Head Gasket ?


Senior Member


Joined: Aug 2013
Posts: 309
Likes: 197
From: Groningen
I'm not sure if a '73 engine is the long-stud engine. If it is then it is likely the block is cracked between the bores. This will be seen when the head is taken off, but unfortunately is very expensive to repair to ensure the head gasket won't keep blowing. I show a photo of a bore with the liner removed to show the coolant passages machined across the block. The cracks start at the top of the top passage and work their way to the top of the block. Insertion of lipped liners is the only real cure. You can see why the Americans are so keen on putting in US V8 engines, they keep running !!
If it's not a long stud engine, then a new head gasket may well cure the problem with a skimmed head and carefully checked block.
If it's not a long stud engine, then a new head gasket may well cure the problem with a skimmed head and carefully checked block.
I fixed this using an AJ6 engine and delivering this old block to the scrapyard.
the AJ6 was cheap though, especially after selling extra parts from the donor car I even made a little money. You just have to be into that... :-)
I think this particular crack could be seen without removal of the cilinder lining, and I bet you won't remove this so you will never know. Just replace the head gasket, and keep going!!!
Thread Starter
|

Joined: Jan 2014
Posts: 28,386
Likes: 6,340
From: Delaneys Creek,Qld. Australia
Follow R&R head explicitly - especially in separating exhaust at manifold flanges. Studs/nuts on the exhaust flanges can be a nightmare. Use plenty of WD40 penetrating oil and patience. Breaking off a stud here is no major panic provided you still have some to grip, but breaking out a corner of the manifold will certainly cloud your day.
Last edited by o1xjr; Feb 16, 2016 at 04:10 AM.
Veteran Member


Joined: Nov 2013
Posts: 3,415
Likes: 1,647
From: Regional NSW, Australia
Ah, then Clarke, you will do this on yer ear, in a full tuck position with both wrists handcuffed and a cute sweety blowing in yer ear just to keep you distracted . . .
Agree with all beyond my post. Crying shame to rebuild without thinking what else you might do. Just beware the trap I first fell into in 1968 with the 2.4L in my avatar. Cold winter nights in Lithgow, little else to do (sorry Chris) - ex ARDC race driver as local Speed Shop owner, mate of Bob Jane's and besotted Jaguar nut . . .
Next thing I know, the engine is bored and stroked to near 3.0L with 10.5 cr, D-Type high lift cams, straight port S gold top head and triple SUs in place of the quaint twin Strangleburg downdrafts. Never as agile as the later saloons, especially in the non-irs rear end, nevertheless with electric o/d disengaged, it could "post" the tacho beyond the red in any of the lower 3 gears.
So Clarke, first fix the head/head gasket; replace valves, guides and seats as needed. These engines breathe fine so bigger valves are no huge benefit. Higher and sharper lift cam grinds will boost power, but watch out you don't overplay the i/o overlap. Aim no higher than the proven competition specs, or lower rpm tractability will suffer badly. By comparison, easing both the induction side for cooler and greater airflow is a plus. Never underestimate under bonnet engine heat soak - a significant loss of power.
So also, you can find benefits in freer flowing exhaust systems. In other than supertuned high revving Jags in my speedboat and hydro days, extractor systems always proved impractical on Jaguar saloons. Even most of those hydro engines were turbo'd into twin water fed megaphones that would frighten the neighbours if fitted into cars. On the other hand, straight through pipes with tubular silencers (sic) front and back (Berkeley were all the rage) can uncage the beast.
So, to summarize, remove head; inspect, repair, skim and true head; replace valves, guides and seats as necessary or regrind faces, seats etc; fit new camshafts or regrind as required; then focus on air induction and exhaust.
. . . and 2 parting shots I overlooked. (1) You mentioned welsh plugs and so did I. Replace the buggas. First R&R I ever did, I overlooked them and was back within 3 months to replace the one most hidden and leaking under everything you will have off - not funny! . . . and (2) use a judicious amount of the all new whizz bang joint and thread sealant on all your head, manifold and exhaust studs - but NOT on your carefully tensioned head and camshaft nuts! Just because you have had all that fun dealing with a busted stud, doesn't mean you will enjoy a repeat!
Take pics, then laze in the admiration of lesser mortals who thought it too hard.

Ken
Agree with all beyond my post. Crying shame to rebuild without thinking what else you might do. Just beware the trap I first fell into in 1968 with the 2.4L in my avatar. Cold winter nights in Lithgow, little else to do (sorry Chris) - ex ARDC race driver as local Speed Shop owner, mate of Bob Jane's and besotted Jaguar nut . . .
Next thing I know, the engine is bored and stroked to near 3.0L with 10.5 cr, D-Type high lift cams, straight port S gold top head and triple SUs in place of the quaint twin Strangleburg downdrafts. Never as agile as the later saloons, especially in the non-irs rear end, nevertheless with electric o/d disengaged, it could "post" the tacho beyond the red in any of the lower 3 gears.
So Clarke, first fix the head/head gasket; replace valves, guides and seats as needed. These engines breathe fine so bigger valves are no huge benefit. Higher and sharper lift cam grinds will boost power, but watch out you don't overplay the i/o overlap. Aim no higher than the proven competition specs, or lower rpm tractability will suffer badly. By comparison, easing both the induction side for cooler and greater airflow is a plus. Never underestimate under bonnet engine heat soak - a significant loss of power.
So also, you can find benefits in freer flowing exhaust systems. In other than supertuned high revving Jags in my speedboat and hydro days, extractor systems always proved impractical on Jaguar saloons. Even most of those hydro engines were turbo'd into twin water fed megaphones that would frighten the neighbours if fitted into cars. On the other hand, straight through pipes with tubular silencers (sic) front and back (Berkeley were all the rage) can uncage the beast.
So, to summarize, remove head; inspect, repair, skim and true head; replace valves, guides and seats as necessary or regrind faces, seats etc; fit new camshafts or regrind as required; then focus on air induction and exhaust.
. . . and 2 parting shots I overlooked. (1) You mentioned welsh plugs and so did I. Replace the buggas. First R&R I ever did, I overlooked them and was back within 3 months to replace the one most hidden and leaking under everything you will have off - not funny! . . . and (2) use a judicious amount of the all new whizz bang joint and thread sealant on all your head, manifold and exhaust studs - but NOT on your carefully tensioned head and camshaft nuts! Just because you have had all that fun dealing with a busted stud, doesn't mean you will enjoy a repeat!
Take pics, then laze in the admiration of lesser mortals who thought it too hard.
Ken
Thread Starter
|
Joined: Jan 2014
Posts: 28,386
Likes: 6,340
From: Delaneys Creek,Qld. Australia
The head will be sent to a very reputable shop for them to weave their magic.
If the block needs any attention we will probably engage the services of Murray Scoble
Home - Peninsula Jag We are planning a forum visit to his workshop, hopefully as our next outing
Pretty much keeping everything stock though.
If the block needs any attention we will probably engage the services of Murray Scoble
Home - Peninsula Jag We are planning a forum visit to his workshop, hopefully as our next outing
Pretty much keeping everything stock though.

Thread Starter
|
Joined: Jan 2014
Posts: 28,386
Likes: 6,340
From: Delaneys Creek,Qld. Australia
I am aware of another member who has recently purchased a short stud block to replace his long stud block. I will see if I can get him to post some pics of both to clarify.
At best the 4.2 litre Jaguar/Daimler engine block could be described as suspect and its quality further declined throughout its production. It was designed in the early 1960s to give more torque and better low to mid range performance than the 3.8 litre engine, which it genuinely did. Early examples (fitted to the last Mark Xs, the E-types and the 420s until about 1968) are easily distinguishable from the XJ6 blocks by two fewer waterways at the rear (watch your cylinder heads), three large core plugs per side and studs screwed directly into the block face. The later engines are usually prefixed 7L (all 4.2 litre engined Jaguars from 1968 to 1975) or 8L (1975 onwards) and these are the ones covered in this article.
The pre-XJ6 block was said to be improved upon by the 7L block, which had a more efficient internal cooling flow. The problem was that the cylinder head studs screwed directly into the base of the block, through the waterways and, if the correct coolant is not used, then they will rot out very quickly. These studs are also twice as long as the pre-1968 blocks, allowing more stretch and therefore more variation in clamping pressure against what has been set with the torque wrench and this makes it more prone to head gasket problems. This improved block cracks, usually hairline cracks appearing in the block, eventually becoming stepped (when one side becomes slightly higher than the other) and the liners drop. The 8L block, a strengthened 7L block, cracks even more than the 7L, and this may be due to an increase in thermostat temperature or to unweathered blocks being used or, possibly, a reduction in standards under British Leyland.
The pre-XJ6 block was said to be improved upon by the 7L block, which had a more efficient internal cooling flow. The problem was that the cylinder head studs screwed directly into the base of the block, through the waterways and, if the correct coolant is not used, then they will rot out very quickly. These studs are also twice as long as the pre-1968 blocks, allowing more stretch and therefore more variation in clamping pressure against what has been set with the torque wrench and this makes it more prone to head gasket problems. This improved block cracks, usually hairline cracks appearing in the block, eventually becoming stepped (when one side becomes slightly higher than the other) and the liners drop. The 8L block, a strengthened 7L block, cracks even more than the 7L, and this may be due to an increase in thermostat temperature or to unweathered blocks being used or, possibly, a reduction in standards under British Leyland.


Joined: Feb 2010
Posts: 28,844
Likes: 11,293
From: Adelaide Stralia
Thanks Clarke.
I will stop looking.
Somewhere in the "library" is the engine number change point, but that 8L is S2, and all S2 4.2 were long stud engines that I remember.
I have an engine from the daughters S2 under the bench, and I will look at it later tonight and see what is what. I think it "pulled" a liner??. She got is as a 5cyl special, knowing I had a recon engine under the same bench, which she fitted to said car, and Dad got the left overs. She worked damn hard doing that install, AFTER she put the engine together herself.
Joined: Feb 2010
Posts: 28,844
Likes: 11,293
From: Adelaide Stralia
At GREAT expense to management I put down the drink and went looking at this damn engine in the shed.
From the top face of the block TO the top edge of the welch plug hole is 4" to the mark. Being they are a 1 5/8" welch plug, the 5" to the centre of that hole is close enough.
This from a 1977 S2 and is a LONG stud engine.
I forgot how bloody heavy these suckers are, I need a LONG drink now, "on ya Clarke".
Thread Starter
|
Joined: Jan 2014
Posts: 28,386
Likes: 6,340
From: Delaneys Creek,Qld. Australia
At GREAT expense to management I put down the drink and went looking at this damn engine in the shed.
From the top face of the block TO the top edge of the welch plug hole is 4" to the mark. Being they are a 1 5/8" welch plug, the 5" to the centre of that hole is close enough.
This from a 1977 S2 and is a LONG stud engine.
I forgot how bloody heavy these suckers are, I need a LONG drink now, "on ya Clarke".
From the top face of the block TO the top edge of the welch plug hole is 4" to the mark. Being they are a 1 5/8" welch plug, the 5" to the centre of that hole is close enough.
This from a 1977 S2 and is a LONG stud engine.
I forgot how bloody heavy these suckers are, I need a LONG drink now, "on ya Clarke".
So I assume now it a long stud engine.
Grant, go have well earned JD.
Last edited by o1xjr; Feb 17, 2016 at 12:32 AM.
Thread Starter
|
Joined: Jan 2014
Posts: 28,386
Likes: 6,340
From: Delaneys Creek,Qld. Australia
Just found the original engine #7L706254-S, so with the 8L engine it certainly has had a heart transplant.
So now hoping it was rebuilt before it went in an possibly no seized studs.
So now hoping it was rebuilt before it went in an possibly no seized studs.
Last edited by o1xjr; Feb 17, 2016 at 12:40 AM.
Joined: Feb 2010
Posts: 28,844
Likes: 11,293
From: Adelaide Stralia
I knew it was somewher, so I copied my TERRIBLE scribblings into a word doco.
Jaguar XK engine decoder.doc
If there are hiccups, so be it, thats all I have.
The V12 stuff is also there and I will scribe that when I feel like it.
ENJOY.
Jaguar XK engine decoder.doc
If there are hiccups, so be it, thats all I have.
The V12 stuff is also there and I will scribe that when I feel like it.
ENJOY.
Veteran Member
Joined: Nov 2013
Posts: 3,415
Likes: 1,647
From: Regional NSW, Australia
For many, the following summary may help . . .
From Clarke's post #26 . . .
Short Stud -
". . . studs screwed directly into the block face." So, after the first stud rotation when extracting, you will see stud thread starting to appear.
Long Stud -
". . . the cylinder head studs screwed directly into the base of the block, through the waterways and, if the correct coolant is not used, then they will rot out very quickly. These studs are also twice as long as the pre-1968 blocks, allowing more stretch and therefore more variation in clamping pressure against what has been set with the torque wrench and this makes it more prone to head gasket problems." So, after the first stud rotation when extracting, you will NOT see stud thread starting to appear.
The early XKs, even the 4.2L, may now be seen as more forgiving in one critical area - not just the initial tension down of head nuts, but the mantra of check and re-tension at 1,000 miles after any R&R head. Our mantra went even further (1) tension and check on assembly (2) check and re-tension after running to normal temp, test drive etc then (3) check and re-tension after 1,000 miles or 1,500 Km - as well as re-check of valve clearances.
Two points are worth emphasizing for those new to the task -
IIRC, Jaguar workshop manuals were silent on the engine temperature at which head bolt tensions were set. Strange, and different shops advocate different approaches. Normally, we assembled initially at ambient temp (in Oz, this can vary from a balmy 40C down to an arctic 20C, ).
).
More importantly, once fired up to normal engine operating temp, checked and OK'd, we sat car, bonnet shut to get good heat soak, but allowed to cool for 30 minutes (no-one likes working on a HOT engine). By that time and with bonnet up, engine was still warm to touch and tension checked and adjusted in sequence.
Hope this helps,
Ken
From Clarke's post #26 . . .
Short Stud -
". . . studs screwed directly into the block face." So, after the first stud rotation when extracting, you will see stud thread starting to appear.
Long Stud -
". . . the cylinder head studs screwed directly into the base of the block, through the waterways and, if the correct coolant is not used, then they will rot out very quickly. These studs are also twice as long as the pre-1968 blocks, allowing more stretch and therefore more variation in clamping pressure against what has been set with the torque wrench and this makes it more prone to head gasket problems." So, after the first stud rotation when extracting, you will NOT see stud thread starting to appear.
The early XKs, even the 4.2L, may now be seen as more forgiving in one critical area - not just the initial tension down of head nuts, but the mantra of check and re-tension at 1,000 miles after any R&R head. Our mantra went even further (1) tension and check on assembly (2) check and re-tension after running to normal temp, test drive etc then (3) check and re-tension after 1,000 miles or 1,500 Km - as well as re-check of valve clearances.
Two points are worth emphasizing for those new to the task -
- by design, tensioning or re-tensioning head nuts has no effect on valve clearances; this being counter-intuitive for those more familiar with OHV rather than OHC;
- while everyone rightly focuses on perils of stud corrosion in later XJ "long stud" engines, with due care and armed with knowledge, WD40 and patience, disaster of stud breakage can be avoided;
- spoken of all too briefly, is the real hazard here - that these far longer studs can (and do) stretch so that mantra of re-checking and re-tensioning is sound advice.
IIRC, Jaguar workshop manuals were silent on the engine temperature at which head bolt tensions were set. Strange, and different shops advocate different approaches. Normally, we assembled initially at ambient temp (in Oz, this can vary from a balmy 40C down to an arctic 20C,
More importantly, once fired up to normal engine operating temp, checked and OK'd, we sat car, bonnet shut to get good heat soak, but allowed to cool for 30 minutes (no-one likes working on a HOT engine). By that time and with bonnet up, engine was still warm to touch and tension checked and adjusted in sequence.
Hope this helps,
Thread Starter
|
Joined: Jan 2014
Posts: 28,386
Likes: 6,340
From: Delaneys Creek,Qld. Australia
Dr Phill and myself just shared a few bottles of amber happy juice and a look at the car,manuals etc working out a plan of attack.
It's looking like pulling everything down Sunday, getting the head off to the shop Monday an go from there.

Phill worked with the PO for many years at a Toyota dealership so he made a call to see if there was any info on the engine. Nothing touched in that dept, just the IRS and rack bushes were touched......gets me wondering about my IRS debacle
Questions we came up were:
1.Does anyone have a run down on doing upper timing chain removal and refit. Is the tensioner tool essential? We can fabricate one from the dimensions in the manual if we need to.
2.Cylinder head bolt tension. Is there a modified tension for the Payen(Monotorque gasket)?
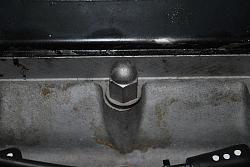
3. Do these cap nuts give any indication to what studs lye below?
It's looking like pulling everything down Sunday, getting the head off to the shop Monday an go from there.

Phill worked with the PO for many years at a Toyota dealership so he made a call to see if there was any info on the engine. Nothing touched in that dept, just the IRS and rack bushes were touched......gets me wondering about my IRS debacle
Questions we came up were:
1.Does anyone have a run down on doing upper timing chain removal and refit. Is the tensioner tool essential? We can fabricate one from the dimensions in the manual if we need to.
2.Cylinder head bolt tension. Is there a modified tension for the Payen(Monotorque gasket)?
3. Do these cap nuts give any indication to what studs lye below?

Veteran Member
Joined: Nov 2013
Posts: 3,415
Likes: 1,647
From: Regional NSW, Australia
Hiya Clarke,
(1.a) Nope, but as per my write-up, I would avoid a general dismantling of ALL the upper t/c unless there is obvious badly "scalloped" wear on cam gears. We start with plugs out and rotating engine to #1 TDC. The upper t/c idler/tensioner has no timing significance so get it out and away. Now, we have 3 gears - the bottom/upper transfer gear and 2 camshaft gears - all 3, together with t/c have timing registration or indexing marks. Those on cam gears should be easier to see. Use wire to fix loops of t/c to gears. Remove cam gearwheels with t/c wired on. DO NOT ROTATE ENGINE BEYOND THIS POINT.
Then with top idler gone, reach in and wire t/c over the bottom/top transfer gear so that it too cannot slip mesh. Now drop cam gears+t/c and they will centralize, partly overlap, and cam bearing half-shells, camshafts, buckets and shims removed, head lifts straight up and off. Watch for 2 drop-in annular locating rings at either end of block/head mating surface - knowing they will be there is the secret key to getting the head off - pointless banging it sideways - aim your blows with rubber mallet UPWARDS - one at back, then front, then swap sides and repeat.
(1.b) Yes . . .and No . . . and Yes. But as you have already hinted . . .
(1.c) Given the dimensions in manual, they are easy to fabricate and give a known, reliable timing. Get some of your Brissy XK/XJ mebers together; get them to make 10 and take 1 each - essential piece of DIY kit for about 30 years plus of Jaguar engine overhauls.
(2) I have absolutely no idea or can't remember. You need Grant on this!
(3) Good try, Clarke - but the answer is absolutely NO. Having said that, please don't sweat the head nut removal - rarely if ever a problem in my experience. Remember, WD40 and patience - but even these are more in the province of head STUD extraction.
Cheers,
Ken
Last edited by cat_as_trophy; Feb 17, 2016 at 05:13 AM.
Joined: Feb 2010
Posts: 28,844
Likes: 11,293
From: Adelaide Stralia
Questions we came up were:
1.Does anyone have a run down on doing upper timing chain removal and refit. Is the tensioner tool essential? We can fabricate one from the dimensions in the manual if we need to.
2.Cylinder head bolt tension. Is there a modified tension for the Payen(Monotorque gasket)?
3. Do these cap nuts give any indication to what studs lye below?
Attachment 125638[/QUOTE]
1) Slacken the locknut on that serated wheel, push the plunger IN with the finger, and rotate that wheel with a pair of SHORT pointy pliers, one point in each hole of that wheel. This will slacken the top chain, and that is ALL you need. Retighten to "firm" when replacing everything. If that top chain is too tight, it will "whirr", but I doubt you will get it too tight with pliers. The correct tool can do so in a heart beat.
2) Not that I am aware.
3) NOPE.
Last edited by Grant Francis; Feb 17, 2016 at 05:15 AM.

Senior Member
Joined: Dec 2011
Posts: 936
Likes: 193
From: London
Just to throw a spanner (or idea) into the works. If your head needs reworking anyway you could consider getting a head from a series 3 with the bigger valves. Might even be in a good condition so you don't have to send it to the machine shop, just rebuild it (Might even be cheaper).....unless you want to port it.....then fit triple webers (just because they look awesome your HS8s will do fine)....then......