
Help getting front lower ball joint out


Thread Starter
|
Senior Member


Joined: Mar 2018
Posts: 335
Likes: 100
From: Middlesex Cty, Massachusetts
So I am redoing the front suspension on my 84 XJ6 Vanden Plas. I have successfully pulled the subframe out as a unit. I have disassembled the Driver Side Removing both ball joints springs etc. On the passenger side I have run into some stubborn stuck parts.
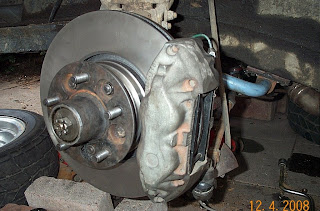
Specifically, one of the bolts that hold the Hub assembly (the part with the brake disk) that goes through the lower control arm/wishbone, snapped right off. It was completely seized and no amount of hammering and PB blaster would remove it. I drilled the bolt but the hole I made was so centered that even with the hole the remainder of the bolt wouldn't budge. So I got a bit the right size and determined to drill the thing out. Of course, because the hub assembly was still attached I couldn't get the drill at a true 90 degrees and I didn't want to wreck the knuckle, so I determined to take the hub off then. So the Hub is still attached. I got the upper ball joint out easily with the pitman arm puller kit from Advance Auto. But I cannot get a tool on that lower joint. I managed to get the opposing jaw one on the driver's side but somehow I just can't do the same thing on the other side. I've taken the bottom of the ball joint cup off and I can clearly see the ball. I removed the rubber boot from that joint. I can get the ball to stick up a bit but not enough to fork of the tool under the ball. one of the these
I borrowed Advanced Auto's

There has to be a way of doing this that I am missing. As is none of the tools I have will fit on there. I have to get the ball joint out in order to drill the seized bolt out at the correct angle. On the ball joint, I have not tried fire yet because even if I heated the knuckle up I couldn't get a tool on it to pop the ball out.
BTW, I am so glad I pulled the subframe out. I cannot imaging doing this with the subframe on the car.
Specifically, one of the bolts that hold the Hub assembly (the part with the brake disk) that goes through the lower control arm/wishbone, snapped right off. It was completely seized and no amount of hammering and PB blaster would remove it. I drilled the bolt but the hole I made was so centered that even with the hole the remainder of the bolt wouldn't budge. So I got a bit the right size and determined to drill the thing out. Of course, because the hub assembly was still attached I couldn't get the drill at a true 90 degrees and I didn't want to wreck the knuckle, so I determined to take the hub off then. So the Hub is still attached. I got the upper ball joint out easily with the pitman arm puller kit from Advance Auto. But I cannot get a tool on that lower joint. I managed to get the opposing jaw one on the driver's side but somehow I just can't do the same thing on the other side. I've taken the bottom of the ball joint cup off and I can clearly see the ball. I removed the rubber boot from that joint. I can get the ball to stick up a bit but not enough to fork of the tool under the ball. one of the these
I borrowed Advanced Auto's
There has to be a way of doing this that I am missing. As is none of the tools I have will fit on there. I have to get the ball joint out in order to drill the seized bolt out at the correct angle. On the ball joint, I have not tried fire yet because even if I heated the knuckle up I couldn't get a tool on it to pop the ball out.
BTW, I am so glad I pulled the subframe out. I cannot imaging doing this with the subframe on the car.

Veteran Member
Joined: Jul 2012
Posts: 6,796
Likes: 2,403
From: Walnut Creek, California
Might well be time to dispense with elegant pullers and go to the rough stuff.
A pickle fork. A two prong device with a place to hammer at the end.
Slip the opening over the rubber gaiter. Whack the thing with a BFH.
The slopes of the prongs will force the tapered fastener from it's seat.
the seal will be ruined and a new ball joint needed,
Not all bad, get a better one, new....
Carl
Senior Member
Joined: Jan 2014
Posts: 577
Likes: 246
From: Seattle
I would contact David Boger (everyday Xj) and buy / replace the part with a good used one. When you calculate the time you have spent (will spend) this may be the way to go. Prices are beyond reasonable and David is a great guy to work with.

Veteran Member


Joined: Mar 2014
Posts: 26,764
Likes: 10,312
From: Tehama County, California, USA
I agree with Alyn.
And if the ball joint isn't wonderful in the part you get from David (which it might not be, as it will probably be original with the car), at least it won't be seized like the one you're fighting with.
(';')
And if the ball joint isn't wonderful in the part you get from David (which it might not be, as it will probably be original with the car), at least it won't be seized like the one you're fighting with.
(';')

Veteran Member
Joined: Jul 2010
Posts: 2,459
Likes: 695
From: Key West, FL
Can you get a hammer in there to make contact with the knuckle? If so try the old pry and hammer tie rod trick where you apply force between the joint try to spread them apart and then give a hard whack on the suspension piece to knock in into an oval temporarily, which lets the joint pop out.

Veteran Member
Joined: Jun 2015
Posts: 1,514
Likes: 687
From: Florida
None of the tools you have pictured can be used to remove the lower ball joint from the knuckle.
You need a ball joint fork as mentioned previously.( HarborFreight). $9.95
I replaced the lower OEM Ball Joints on my Series 3 with the non serviceable ball joints from the XJ40.

You need a ball joint fork as mentioned previously.( HarborFreight). $9.95
I replaced the lower OEM Ball Joints on my Series 3 with the non serviceable ball joints from the XJ40.
Thread Starter
|
Senior Member
Joined: Mar 2018
Posts: 335
Likes: 100
From: Middlesex Cty, Massachusetts
Thanks Sanchez. and Everyone. I thought of the pickle fork this morning then read the comments I had bought one for the other side and didn't need it. The one I bought is too small. Do you know what size will fit? Also, I don't see how a pickle fork can even fit. There's no angle (with the brake disk and shields still on) that you can get the fork through the gap and have enough purchase to pry the joint apart. I am thinking that the brake disk and shield will need to come off and that I should attack from the outside of the joint inwards. What is the recommended approach and where to place the tines? Do you try to get them on top of the ball but below the lower ball joint connecting plate (where you bolt the joint to) or between that and the spindle? I am thinking between the connecting plate and spindle.
For those suggesting buying new parts, I don't know that you understand the problem. That is probably my fault because I don't know the accepted names for the parts I am describing. But that ball joint connects the wishbone and the spindle. So if I need to buy parts I'd need to buy both. Assuming I could get the hub off. If I couldn't then I need way more than I want to think of right now.
For those suggesting buying new parts, I don't know that you understand the problem. That is probably my fault because I don't know the accepted names for the parts I am describing. But that ball joint connects the wishbone and the spindle. So if I need to buy parts I'd need to buy both. Assuming I could get the hub off. If I couldn't then I need way more than I want to think of right now.
Trending Topics

Thread Starter
|
Senior Member
Joined: Mar 2018
Posts: 335
Likes: 100
From: Middlesex Cty, Massachusetts
Yes. That round portion ("D" shaped) on the part on the left has a pressed collar in it that holds the ball of the ball joint. The ball's stem goes upwards and through that hole in the piece on the right. The stem is lodged in that hole in the piece on the right (the wishbone) (the hole next to the Meet the Brewer ad). In other words those two pieces are locked together by the stuck ball joint.
Senior Member
Joined: Aug 2017
Posts: 817
Likes: 193
From: Auckland
So do you mean that the taper is holding the parts together? If so then the tines go between the two items,the other way is to get a BFH and belt three bells out of the wishbone, this distorts the tapered hole and generally releases the taper pin.
Veteran Member
Joined: Jun 2015
Posts: 1,514
Likes: 687
From: Florida
Harbor sells a kit with 3 ball joint separators each one is a different size.
When I did mine, I removed the brake caliper and the brake rotor assembly off the spindle.
That exposed the dust shield which is attached to the spindle base with 4 bolts.
Remove the dust shield.
Remove the nut from the lower ball joint.
Insert the tines of the separator between the ball joint and the 2 components where the rubber boot is and drive the separator in. The rubber boot will be destroyed in the process, but you are going to replace the ball joint anyway.
Veteran Member

Joined: Dec 2009
Posts: 9,548
Likes: 2,548
From: Crewe, England
And make sure your replace with the later XJ40 Lemforder non-adjustable joints introduced in 1986. Compared to the old 1954 design they last forever.
Thread Starter
|
Senior Member
Joined: Mar 2018
Posts: 335
Likes: 100
From: Middlesex Cty, Massachusetts
Hurrah!!!! Just finished disassembling the subframe. I picked up another pickle fork at Harbor Freight yesterday. Bigger this time (I think it is 7/8" wide ID) removed the disk and hub and four whacks with the BFH on the pickle fork and the ball joint came out. I was then able to finish drilling out that idiotic seized bolt. When I finally got the remains out, what came out was a piece of bolt about 2" long and 1/16" thick. Ridiculous how hard that was. I then pulled all the rest of the arm off and was going to give up for the night but decided to try my luck with the Fulcrum shaft and they both came right out no problem.
So lessons learned. (1) Take the brake disk off and use a pickle fork on the lower. (2) A Pitman Puller worked fine for the upper; (3) Drive the pickle fork from front to back (through the spindle).
And yes, my plan has always been to replace the ball joints with the Lemforder ones. I think this means I need to get the pressed in collar out of the spindle for that. But that is another day and another problem. If anyone wants to say the best way to do that I'm all ears.
Veteran Member
Joined: Mar 2014
Posts: 26,764
Likes: 10,312
From: Tehama County, California, USA
Thread Starter
|
Senior Member
Joined: Mar 2018
Posts: 335
Likes: 100
From: Middlesex Cty, Massachusetts
Not that bit, the one that the old ball joint matches up with. It's a circular collar that the lower ball of the lower ball joint matches up with from underneath.
Last edited by muttony; Aug 17, 2018 at 12:39 PM.
Veteran Member
Joined: Dec 2009
Posts: 9,548
Likes: 2,548
From: Crewe, England
Yes, that's the one, and mine came out with a couple of taps from a small hammer when I was replacing the old 1954-design ball joints. The old joints were OK for their time but technology moves on.

Thread
Thread Starter
Forum
Replies
Last Post
louismacrides
XK8 / XKR ( X100 )
5
Nov 12, 2018 12:19 AM
wotcham8
XK8 / XKR ( X100 )
4
Jul 25, 2013 09:38 AM
motorcarman
PRIVATE For Sale / Trade or Buy Classifieds
0
Mar 7, 2010 06:51 PM
Currently Active Users Viewing This Thread: 1 (0 members and 1 guests)