
Westinghouse Air Con Operation


Thread Starter
|
Senior Member
Joined: Jul 2012
Posts: 287
Likes: 50
From: Canberra, Australia
Hello All, hope you all had a great Christmas and New Year.
OK, I've got Westinghouse Air Con fitted to my S1 and it has never worked. I am taking it to a local mechanic who said "it may be salvageable but, you never know with old cars". Fair point.
What I would like to know is how to operate the damn thing when it is working? The manual isn't very clear.
Here's a pic of the setup:
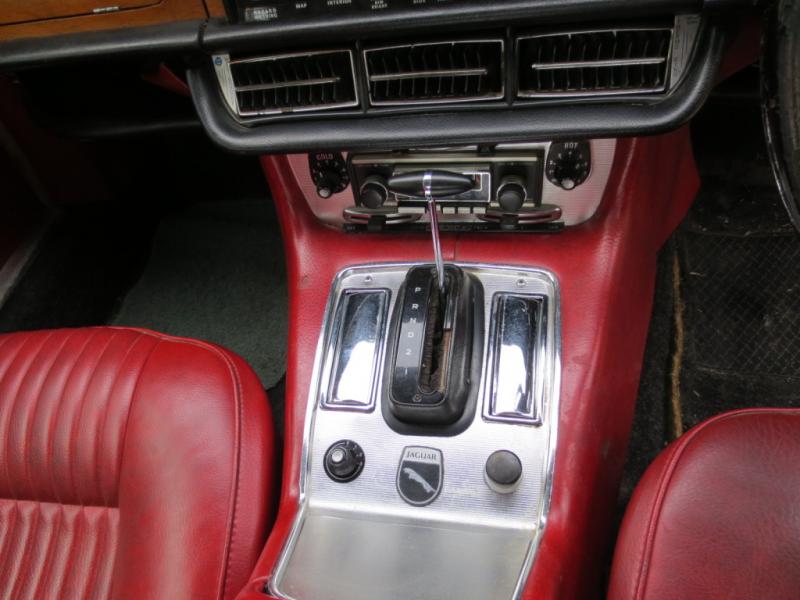
There's COLD adjustment knob on the left and HOT adjustment knob on the right with the fan speed adjustment knob on the centre console. Are the hot and cold adjustment knobs used independently or in conjunction with each other?
OK, I've got Westinghouse Air Con fitted to my S1 and it has never worked. I am taking it to a local mechanic who said "it may be salvageable but, you never know with old cars". Fair point.
What I would like to know is how to operate the damn thing when it is working? The manual isn't very clear.
Here's a pic of the setup:
There's COLD adjustment knob on the left and HOT adjustment knob on the right with the fan speed adjustment knob on the centre console. Are the hot and cold adjustment knobs used independently or in conjunction with each other?
Thread Starter
|
Senior Member
Joined: Jul 2012
Posts: 287
Likes: 50
From: Canberra, Australia
Car is booked in to have a look at the Air Con on Wednesday next week. Hopefully it will be sorted as the temperatures have been soaring recently! It only got up to 31 deg C (88 deg F) today but has been as high as 43 deg C (110 deg F)!!! Not pleasant without Air Con. 
Thread Starter
|
Senior Member
Joined: Jul 2012
Posts: 287
Likes: 50
From: Canberra, Australia
I have just spoken to the garage and he told me that the evaporator is at fault. I've just tried to find one on the web but, I'm only finding S2/3 fitments?
Does anyone have a P/N and/or picture or a Series 1 Evaporator?
Was the Westinghouse Thermo-King the original option A/C for the Series 1 or would it have been a non-standard fit option?
Does anyone have a P/N and/or picture or a Series 1 Evaporator?
Was the Westinghouse Thermo-King the original option A/C for the Series 1 or would it have been a non-standard fit option?
Veteran Member
Joined: Jun 2012
Posts: 1,336
Likes: 344
From: Glendora, CA USA
Have included a photo of a S1 evaporator unit. It was only used in the
Series 1 from 1971-1973. Earlier units had rear (boot) mounted AC from the prior Mark Series cars.
To remove it means taking our most of the dash, the center console (makes it easier for access) and the vent piping attached (assuming your car has stock vents into the dash top and sides????? I would ask more questions and report back with the mechanics answers.
Your unit is "very odd" and stock units do not have vents in the parcel tray at all.
The unit is so simple, I cannot imagine what fault your mechanic thinks it has? I have a spare one and could supply more photos and information.
If yours had a very late S1 evaporator unit, the PCB for the fans on the upper RH side (LHD cars) might be defective. But, you did not say your problem was with the fans....
I cannot see how the evaporator would cause a total AC failure????
Veteran Member


Joined: Mar 2007
Posts: 9,139
Likes: 2,662
From: Florida
I doubt it's the evaporator, most likely the Expansion Valve connected to the evaporator. If the evaporator is not leaking, I would not replace it. YET.
if the a.c unit has not worked for a long time, you'll need to:
1) change mechanic/get a second opinion (I'm not sure that mechanic knows much about Jaguar a/c).
2) flush all the system parts, particularly the Condenser, (or replace it with a modern cross flow condenser)
3) replace the Dryer (if you don't know the history of the Dryer, replace it).
4) replace the Expansion Valve, should be located at the firewall/bulkhead behind the center of the engine.
as to the knobs' operation:
a) the fan knob is for fan speeds,
b) the cold knob is to be kept at 10 (a/c)
c) the hot knob is to be kept at 0 (Heater?)
sounds like your system has both a/c and Heater. (the reason for the HOT knob; in Winter, do the opposite, COLD knob at zero, HOT knob as needed).
you can get more help from Mr. Jaguar / Retro Air in Texas; contact Rock Browning, he designs a/c systems for old Jags. Porsche Air Conditioning & Jaguar Air Conditioning
Last edited by Jose; Jan 30, 2013 at 06:09 PM.
Veteran Member
Joined: Jun 2012
Posts: 1,336
Likes: 344
From: Glendora, CA USA
Jose is correct in his recommendations:
The S1 expansion valve is totally different from the SII/SIII type. It uses a flare fitting and is short to clear the dash bracket right above it where the relay is mounted.
Finding the correct one is very hard today, using one that is similar but taller mean removing the bracket and moving the relay position. I just
shortened the original bracket and remounted it close by. I had to use a
taller version of the valve recently. Then new metal tubing had to be made
up to be bent correctly to connect to the valve and then be attached to a new hose for R134 use. It works 100% but you have to use a good AC guy. See the photo attached.
I also adjusted the screw inside the valve 1.5 more turn open to allow R134 to flow at the correct rate since the valve was adjusted for old Freon.
The new style condensers make the AC work better than stock ones. Be sure the one you get does not have an orifice valve inside...that can be done easily - ask me how I know?
I have more photos of the new expansion valve install if you need them...
Thread Starter
|
Senior Member
Joined: Jul 2012
Posts: 287
Likes: 50
From: Canberra, Australia
OK, I went to garage yesterday to pick the car up and the mechanic gave me the full run down. It is not the Evaporator itself but, the fan. He said it started to make a bit of noise then just gave up the ghost altogether.
He said that although the evaporator would probably be fine, he couldn't confirm because the fan isn't working.
The good news is that everything else seems to be working fine and the system holds pressure.
I'd like to have a look for the fan control unit/PCB if it's accessible without taking too much off.
Thanks for the replies.
Trending Topics
Veteran Member
Joined: Jun 2012
Posts: 1,336
Likes: 344
From: Glendora, CA USA
They are easy to remove, located on the firewall (it is the roundish black painted thing with the green wire in the photo) and held on with Philips screws and a couple of wire connectors.
Be careful moving the stuff around near the fans (which one L or R?) what type of drive is your car = LHD or RHD?
You car uses the later good fans and they are available at times. Remove the bad one first to confirm it is bad. It can be tested with 12V and a ground wire from the battery out of the car. Hold on tight as they have a lot of torque and the plastic squirrel cages are rare - if broken.
The noises they make are usually from touching the hole in the firewall as
there is a little side play to center the fan. Plus, all the foam on the fan is probably falling apart now.
You can tell which is bad by "sound and feel" - they make a lot of vibration
when running. They are controlled by relays and a PCB on the top of the
evaporator. It can be seen from the fuse door and just near the glove box (LHD car).
Getting to it means removing the glove box innards for access....
Last edited by Roger Mabry; Jan 31, 2013 at 04:39 PM.
Thread Starter
|
Senior Member
Joined: Jul 2012
Posts: 287
Likes: 50
From: Canberra, Australia
It's not as bad as it appears. He gave me a call the evening of the day I dropped it off. He told me over the phone that there was a problem with the Evaporator and that I could collect the car. I asked him if I could leave it there for the night and pick it in the morning.
When I got there he gave me the full diagnosis and only charged me for an hour of his time.
I don't think I need to swap him out just yet. That's often the problem with the internet conversation. It's hard to put a tone on the conversation or convey 'how' someone has told you something.
Thanks for the concern all the same.
Thread Starter
|
Senior Member
Joined: Jul 2012
Posts: 287
Likes: 50
From: Canberra, Australia
They are easy to remove, located on the firewall (it is the roundish black painted thing with the green wire in the photo) and held on with Philips screws and a couple of wire connectors.
Be careful moving the stuff around near the fans (which one L or R?) what type of drive is your car = LHD or RHD?
You car uses the later good fans and they are available at times. Remove the bad one first to confirm it is bad. It can be tested with 12V and a ground wire from the battery out of the car. Hold on tight as they have a lot of torque and the plastic squirrel cages are rare - if broken.
The noises they make are usually from touching the hole in the firewall as
there is a little side play to center the fan. Plus, all the foam on the fan is probably falling apart now.
You can tell which is bad by "sound and feel" - they make a lot of vibration
when running. They are controlled by relays and a PCB on the top of the
evaporator. It can be seen from the fuse door and just near the glove box (LHD car).
Getting to it means removing the glove box innards for access....
Be careful moving the stuff around near the fans (which one L or R?) what type of drive is your car = LHD or RHD?
You car uses the later good fans and they are available at times. Remove the bad one first to confirm it is bad. It can be tested with 12V and a ground wire from the battery out of the car. Hold on tight as they have a lot of torque and the plastic squirrel cages are rare - if broken.
The noises they make are usually from touching the hole in the firewall as
there is a little side play to center the fan. Plus, all the foam on the fan is probably falling apart now.
You can tell which is bad by "sound and feel" - they make a lot of vibration
when running. They are controlled by relays and a PCB on the top of the
evaporator. It can be seen from the fuse door and just near the glove box (LHD car).
Getting to it means removing the glove box innards for access....
Thanks for the advice, I'll try to take a look over the weekend if I get time. I have two other projects that I have to share my time with. My Renault and a newly purchased 1965 Morris Mini Deluxe.....
My 1973 S1 is a RHD South African built car.
Junior Member
Joined: Dec 2013
Posts: 5
Likes: 0
From: brooklyn
Roger-
I have just finished putting my 73 xj6 back together and in the process have replaced most of the AC system (everything except the evaporator and expansion valve). I now need to tackle replacing the expansion valve and flushing the evaporator.
If you have additional pictures of the expansion valve and any that show what you had to do to modify/fit a new one I would be very interested in seeing them.
I have not really stared at it/sized up the problem yet so forgive an ignorant question (my car is in a garage about 60 miles away). I had thought that the expansion valve on the series 1s were on the passenger side of the firewall but your picture seems to show it as being in the engine compartment. Is that right - is the expansion valve in the engine compartment?
Any tips/suggestions on replacement of the exp. valve or flushing of the evaporator would be gratefully received - AC is still new to me.
Thank you
Miles
Jose is correct in his recommendations:
The S1 expansion valve is totally different from the SII/SIII type. It uses a flare fitting and is short to clear the dash bracket right above it where the relay is mounted.
Finding the correct one is very hard today, using one that is similar but taller mean removing the bracket and moving the relay position. I just
shortened the original bracket and remounted it close by. I had to use a
taller version of the valve recently. Then new metal tubing had to be made
up to be bent correctly to connect to the valve and then be attached to a new hose for R134 use. It works 100% but you have to use a good AC guy. See the photo attached.
I also adjusted the screw inside the valve 1.5 more turn open to allow R134 to flow at the correct rate since the valve was adjusted for old Freon.
The new style condensers make the AC work better than stock ones. Be sure the one you get does not have an orifice valve inside...that can be done easily - ask me how I know?
I have more photos of the new expansion valve install if you need them...
The S1 expansion valve is totally different from the SII/SIII type. It uses a flare fitting and is short to clear the dash bracket right above it where the relay is mounted.
Finding the correct one is very hard today, using one that is similar but taller mean removing the bracket and moving the relay position. I just
shortened the original bracket and remounted it close by. I had to use a
taller version of the valve recently. Then new metal tubing had to be made
up to be bent correctly to connect to the valve and then be attached to a new hose for R134 use. It works 100% but you have to use a good AC guy. See the photo attached.
I also adjusted the screw inside the valve 1.5 more turn open to allow R134 to flow at the correct rate since the valve was adjusted for old Freon.
The new style condensers make the AC work better than stock ones. Be sure the one you get does not have an orifice valve inside...that can be done easily - ask me how I know?
I have more photos of the new expansion valve install if you need them...
Veteran Member
Joined: Jun 2012
Posts: 1,336
Likes: 344
From: Glendora, CA USA
I wrote the whole thing up and found out this Forum does not work with IE 11!
Had to start over using Chrome...here are some photos of the valve, the line
that goes to the other side and a document about adjust the expansion valve. It takes a small screwdriver to turn the screw inside the valve to allow more of the R134 to flow than was used with R12.
You will have to move the bracket on top of the expansion valve to one side
when done since the replacement I found was much taller - it is difficult to find the correct S1 type valve today with the long line going to the other valve and having the flare type fitting.
Note that the new valve is turned about 180 degrees and the new incoming metal line has a bend in it to connect. It works fine and it functioning 100% today.
Somewhere I have the part number and source of the valve I used and will
attempt a search...
Last edited by Roger Mabry; Dec 5, 2013 at 08:43 AM.
Veteran Member
Joined: Jun 2012
Posts: 1,336
Likes: 344
From: Glendora, CA USA
Note how tall this valve is compared to your stock one. We had to turn
it around and make a bend in the new hard line so it would fit.
Still looking for the part number and source....
it around and make a bend in the new hard line so it would fit.
Still looking for the part number and source....
Junior Member
Joined: Dec 2013
Posts: 5
Likes: 0
From: brooklyn
Roger-
First of all thank you for posting the pictures and write up.
Your write up & pictures scare me. My car has done less than 30 k miles and did not suffer a catastrophic AC failure (but the front compressor seal did leak). I thought it made sense to replace the compressor, condenser and hoses and convert to 134A while doing the engine but after looking at your pictures I would like to avoid pulling my dash/console apart if possible.
After looking at what you had to do I am considering just charging the system and hoping that the expansion valve works. If I take this route would you suggest just buying some R12 on ebay and charging it with that or would you try to somehow get as much old oil out of the evaporator as possible and switch over to 134A? The AC wisdom on the internet is that the old oil is not compatible with 134A (and a new parallel flow condenser) and that I need to flush the system to switch to 134A - but I would be very interested in hearing your thoughts.
Best
Miles
Junior Member
Joined: Dec 2013
Posts: 5
Likes: 0
From: brooklyn
Roger-
It may not be clear from the my last message that I have already replaced the condenser, compressor and hoses - the issue is what to charge the system with and the related question as to whether or not I flush it.
Thanks'Miles
It may not be clear from the my last message that I have already replaced the condenser, compressor and hoses - the issue is what to charge the system with and the related question as to whether or not I flush it.
Thanks'Miles
Veteran Member
Joined: Jun 2012
Posts: 1,336
Likes: 344
From: Glendora, CA USA
Around here you have to go to Mexico to get R12 for cars. Some of the house
AC companies have it available for use in old house systems...
If you put on all those new pieces, a new dryer (the little round can shaped
item) and have proper hoses made up and use 134 O-rings...you can do a simple flush of the internal parts like the expansion valve etc.
It is possible that it will work just fine with the old valve - mine worked for
about a year before it started failing.
Taking the dash apart for the access is not as bad as it looks...but I have done it several times now on two cars (put in new dash wood, fix the expansion valve and the worst job of all - replace the heater matrix (core) that is buried behind the evaporator. It is located in that rectangular shaped spot covered with thin foam.
Junior Member
Joined: Dec 2013
Posts: 5
Likes: 0
From: brooklyn
Roger-
I have replaced everything except the expansion valve and the hose between the receiver/drier and the expansion valve (this hose still uses flare fittings). All the new hoses are barrier hoses with green o ring fittings.
Is there any way to flush the evaporator (or at least remove the majority of the old oil) with out removing the expansion valve? My limited internet research suggests that if I am switching to 134 it is important to get the old oil out.
Thanks again-
Miles
Veteran Member
Joined: Jun 2012
Posts: 1,336
Likes: 344
From: Glendora, CA USA
Check out this article: You should just take the car to a competent AC
mechanic/shop. Make sure they have the equipment to flush the system.
Flushing Automotive Air Conditioning Systems
I am blessed with the best AC person around So Cal, he does all the work for the Jag dealers and other shops...they just have him do their work...
mechanic/shop. Make sure they have the equipment to flush the system.
Flushing Automotive Air Conditioning Systems
I am blessed with the best AC person around So Cal, he does all the work for the Jag dealers and other shops...they just have him do their work...