
Wood Dash Refinishing

Thread Starter
|
Senior Member
Joined: Apr 2015
Posts: 118
Likes: 79
From: Boise, ID
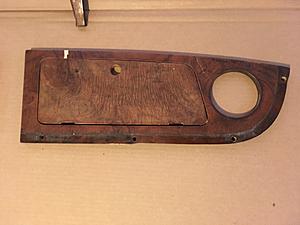
I just finished one of my "winter projects"  . The varnish on my dash was cracking ( and subsequently the veneer). As you can see in the picture, it was very faded as well.
Here's the refinish process I used and some tips for anyone that wants to take it on.
Removal : Take care removing the dash pad. As you can see in the before picture, I inadvertently chipped some of the veneer when I pull off the pad. I had to use a patch to fix it. It's not perfect but its not too noticeable.
Stripping: Since this is a Series 1, any paint or varnish stripper will work. I used a scuff pad to help remove the varnish. Be VERY careful. I got a little aggressive and went through the veneer in several places. The old veneer was very fragile and, as mentioned, chips very easily.
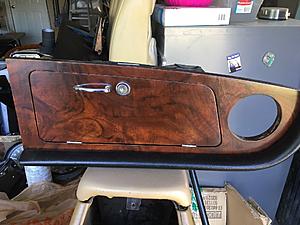
Dye : I used a light walnut water based dye to lay down a background tone. This was done to give all the pieces a consistent tone. The dye is also fade resistant. The dye normally has a very red tint to it, but it went on darker than I really wanted. That's the fun of working with wood, you never know how it is going to respond. Since I didn't have anything to experiment on, it was a real crapshoot on what I was going to get.
Sealer : This was a thinned dewaxed shellac to seal the wood for the next step.
Stain : I used a dark, oil based stain as a glaze. The intent of this process is to darken the red tone from the dye. Since the dye was very dark to begin with, the stain was way too dark. Having sealed the wood, I was able to remove the vast majority of it. I just left spots to cover up the blemishes.
Varnish : I used an exterior grade, waterbased varnish. I used water based because I didn't want any yellowing that comes with an oil based varnish. The exterior grade has UV inhibitors in it as well. I put 4 coats on.
It's not perfect and a little darker than I wanted, but it is a 100 times better than before.
I also did the door caps. They turned out very nice. I'll get a picture of those later.
. The varnish on my dash was cracking ( and subsequently the veneer). As you can see in the picture, it was very faded as well. Here's the refinish process I used and some tips for anyone that wants to take it on.
Removal : Take care removing the dash pad. As you can see in the before picture, I inadvertently chipped some of the veneer when I pull off the pad. I had to use a patch to fix it. It's not perfect but its not too noticeable.
Stripping: Since this is a Series 1, any paint or varnish stripper will work. I used a scuff pad to help remove the varnish. Be VERY careful. I got a little aggressive and went through the veneer in several places. The old veneer was very fragile and, as mentioned, chips very easily.
Dye : I used a light walnut water based dye to lay down a background tone. This was done to give all the pieces a consistent tone. The dye is also fade resistant. The dye normally has a very red tint to it, but it went on darker than I really wanted. That's the fun of working with wood, you never know how it is going to respond. Since I didn't have anything to experiment on, it was a real crapshoot on what I was going to get.
Sealer : This was a thinned dewaxed shellac to seal the wood for the next step.
Stain : I used a dark, oil based stain as a glaze. The intent of this process is to darken the red tone from the dye. Since the dye was very dark to begin with, the stain was way too dark. Having sealed the wood, I was able to remove the vast majority of it. I just left spots to cover up the blemishes.
Varnish : I used an exterior grade, waterbased varnish. I used water based because I didn't want any yellowing that comes with an oil based varnish. The exterior grade has UV inhibitors in it as well. I put 4 coats on.
It's not perfect and a little darker than I wanted, but it is a 100 times better than before.
I also did the door caps. They turned out very nice. I'll get a picture of those later.


Last edited by baudrate; Jun 14, 2018 at 05:53 PM.


Thread Starter
|
Senior Member
Joined: Apr 2015
Posts: 118
Likes: 79
From: Boise, ID
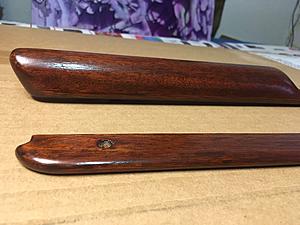
Here's the door caps. When I applied the dye, they were very red (as I was hoping the dash would be). I had to put 3 or 4 coats to darken it up (it was cut 50% to begin with). I was also able to use the stain to darken them. They are a little lighter than the dash, but the same tone. They should look good once back on the car.

Thread Starter
|
Senior Member
Joined: Apr 2015
Posts: 118
Likes: 79
From: Boise, ID
Trending Topics

Veteran Member
Joined: Jul 2012
Posts: 6,796
Likes: 2,403
From: Walnut Creek, California
Rich, very rich. Very nice. The natural grain of the wood perfectly enhanced.
Add a layer of high carnauba content wax and buff for more shine and UV protection???
I improved mine a lot by doing that. But, not as nice as this example.
Carl
Add a layer of high carnauba content wax and buff for more shine and UV protection???
I improved mine a lot by doing that. But, not as nice as this example.
Carl
Senior Member
Joined: Jun 2017
Posts: 101
Likes: 11
From: Vancouver
Very nice. Just a couple of suggestions: when using wood stripper, it's much better to scrape it off gently with a credit card or plastic scraper than using steel wool or scuff pad. Repeat the stripper process 2 or 3 times if need be, and be very gentle removing it.
Oil-based varnish will give an old-world amber glow to the wood, and therefore you likely don't need to use any stain. Personally I prefer oil-based varnish for this reason. I used Varathane high gloss finish on my dash.
There are purists who would be horrified at the thought of oil-based stain under a water-based varnish. Hopefully your varnish doesn't crack.
Carl: Rubbing compound and a buffer work wonders to get that piano gloss finish.
Last edited by Adrian L; Jun 16, 2018 at 02:36 PM.
Thread Starter
|
Senior Member
Joined: Apr 2015
Posts: 118
Likes: 79
From: Boise, ID
I don't think this is as big of a deal with the newer coatings. You just have to make sure the oil-based stain is completely dry before coating it. Also, I ended up with a very small amount of the stain left on the wood.
Last edited by baudrate; Jun 17, 2018 at 12:23 AM.

Thread
Thread Starter
Forum
Replies
Last Post
Currently Active Users Viewing This Thread: 1 (0 members and 1 guests)