
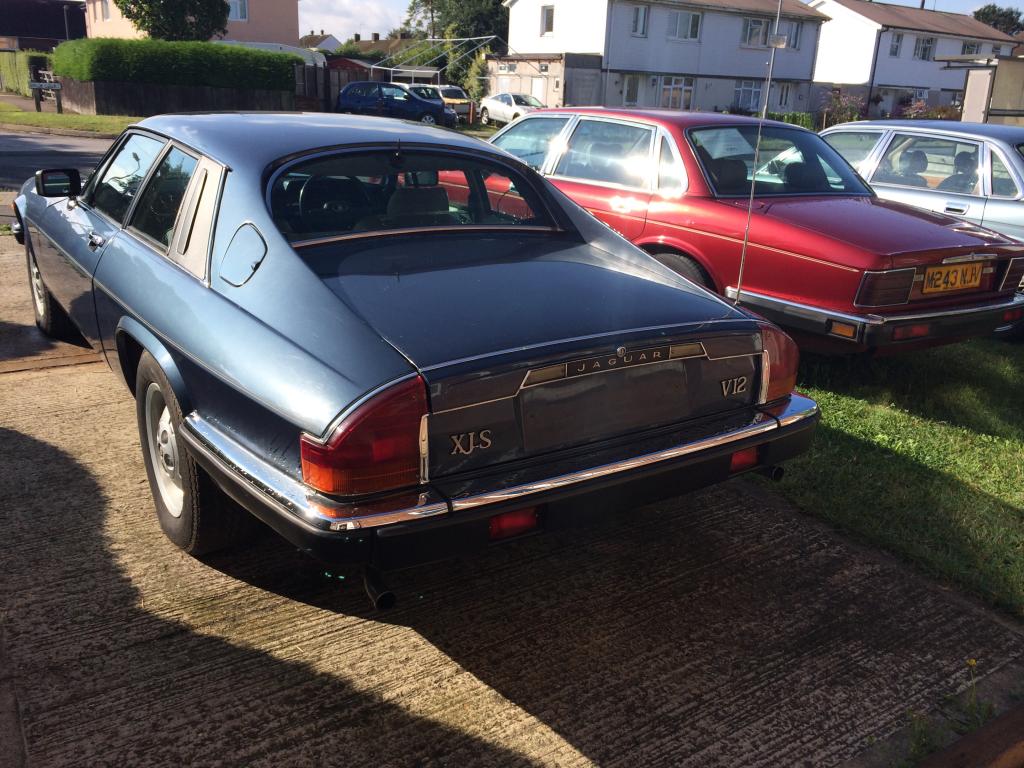
5.3 V12 HE Light Restoration Project


Thread Starter
|
Member
Joined: Apr 2012
Posts: 68
Likes: 21
From: u.k
With the additional purchase of a large temp garage i have been able to thwart the english weather and actualy continue with my project.
I thought i would share some pics as like me most members here like lots of pictures.
Mostly strip down of the interior to start with as water was leaking in everywhere. Welding of the floor pan and drying out everything was quick and easy. Stopping the ingress of water not so much. New front a rear window rubbers (The rear window actualy moved in and out about 5mm) with lots of non setting window mastic pumped in between the frame and glass and glass and rubber both from the inside and the outside actualy stopped water coming in, had to do the same with both front quarter panels to make the car weather resistant.
All interior out to make sure nothing was missed, cleaning, drying then waxoyl in any cavity i could find including doors, floor, sills in fact every hole i could find.
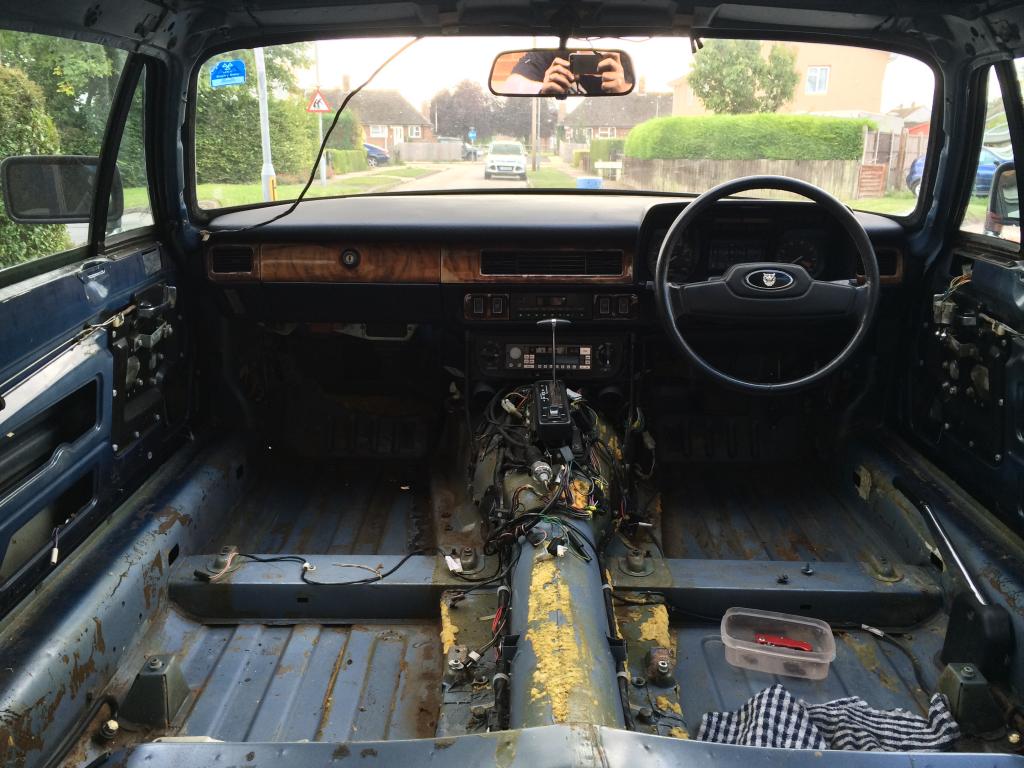
I did take the dash out as well but had no picture i could find.
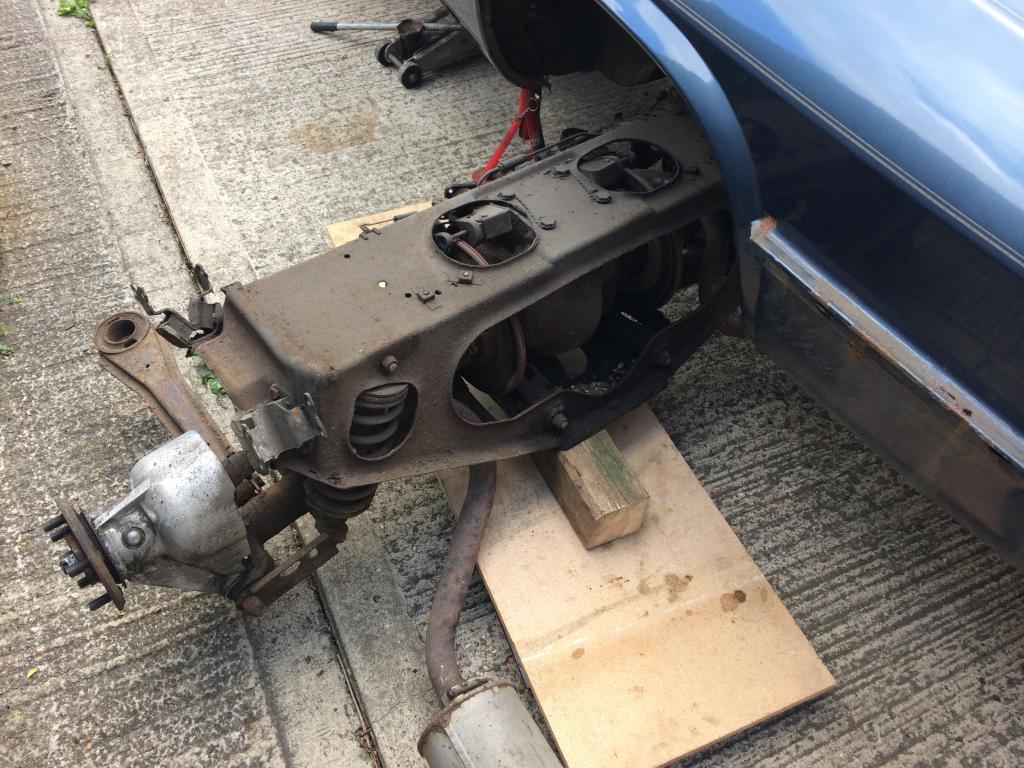
The rear subframe was next and was stripped rust protected and painted with new brakes and suspension fitted
Next front subframe rebuild same as rear sure i have some pics somwhere and will add when i find them if this post even takes off lol
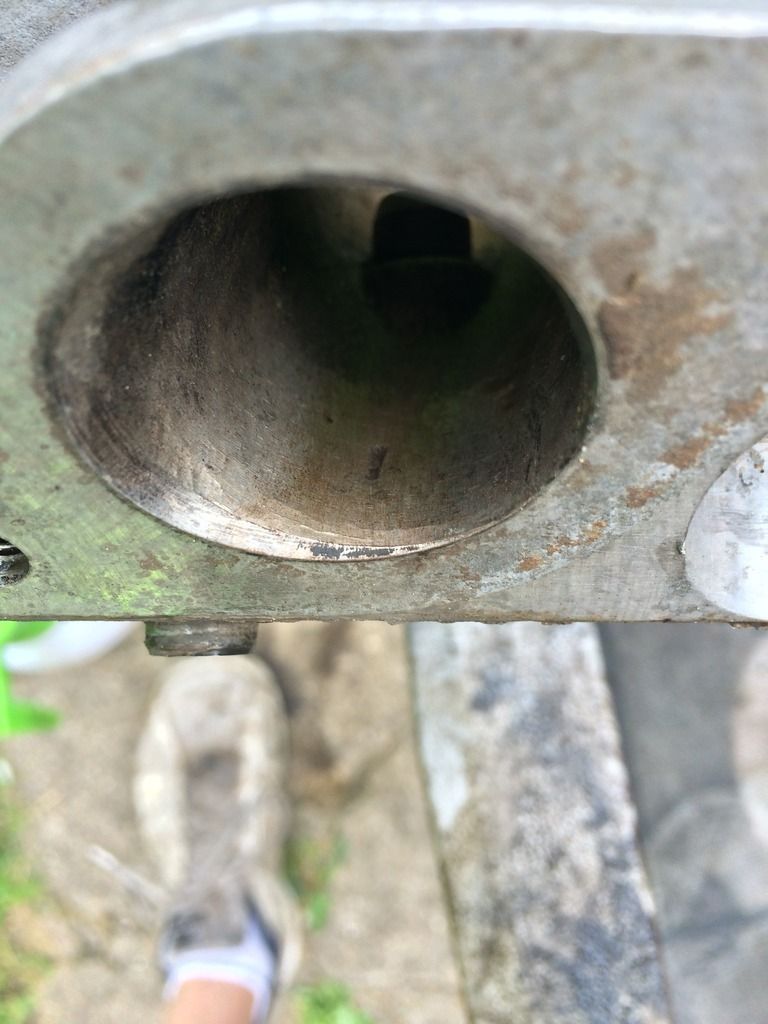
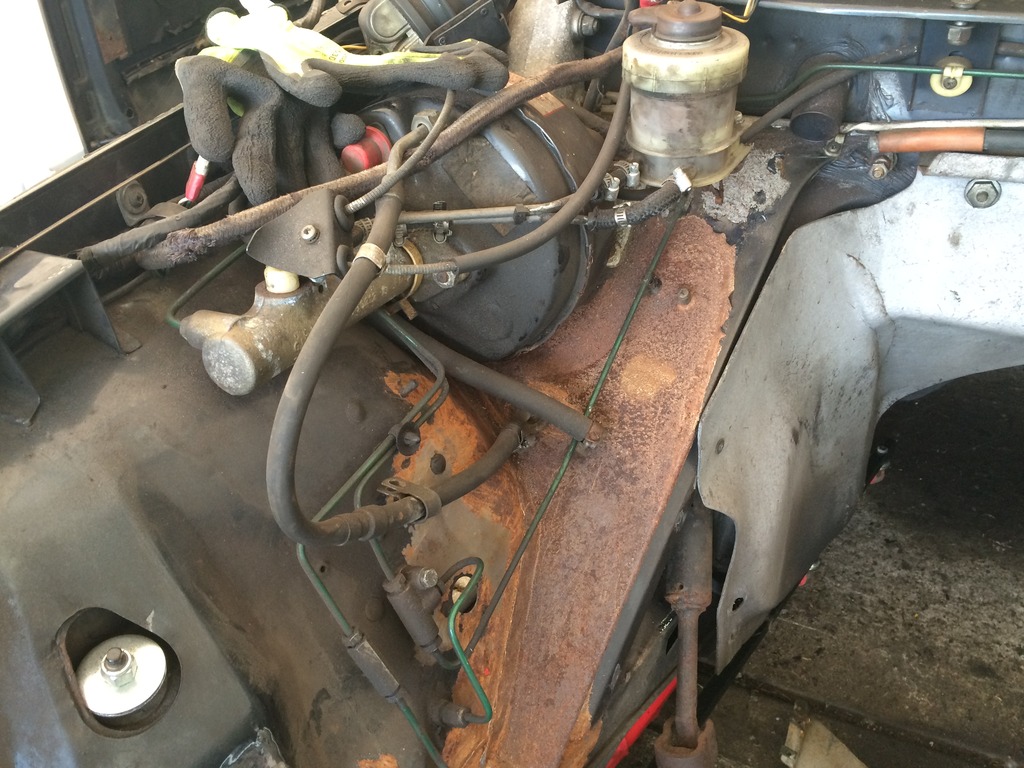
With the car back on a rolling chassis time to whip out the engine and gearbox. Not as hard as i thought it was going to be if i am honest, most threads made it sound worse than it was. It left a nice open space to work inside the engine bay and so far i have only found some repair needed at the drivers side suspension as you can make out in the pic below i have for now cleaned and rust coated while the engine gets stripped down
I am sure i will find more to do here but for now i want to strip the engine and see how much work needs doing and if its worth the time and cost.
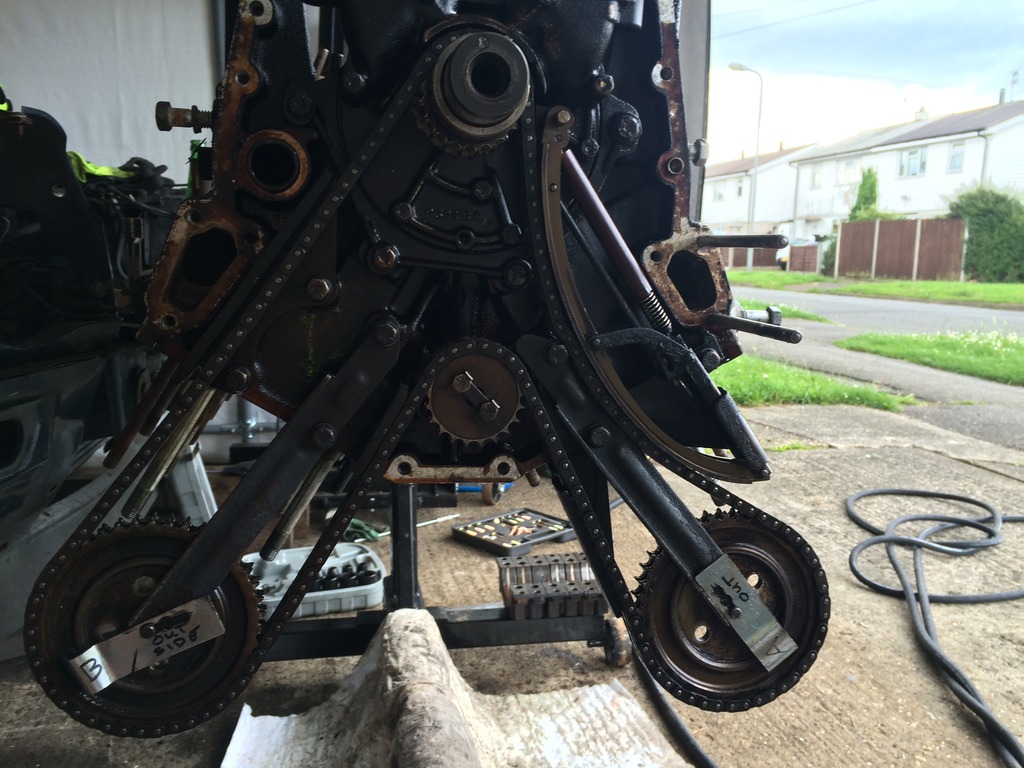
The head puller made from this very sites posts worked well once i remembered the three bolts on the timming chain cover
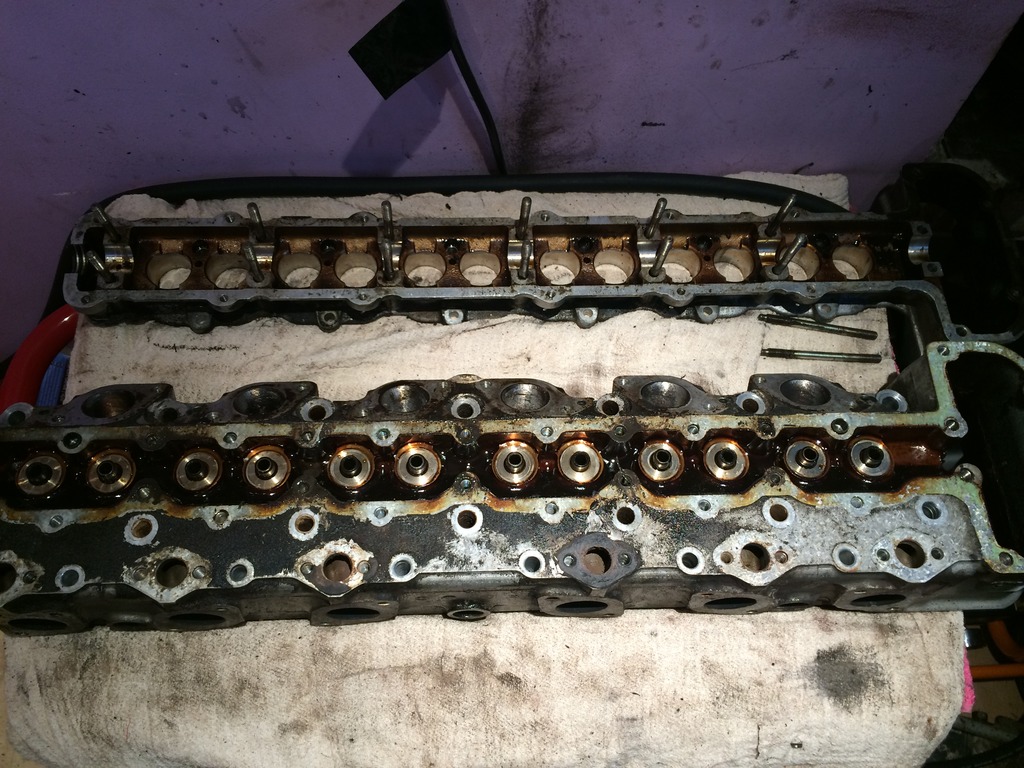
So much dirt i think i will be spending days cleaning parts once its all stripped down. The heads are stripped and need skimming and cleaning once the bottom half is stripped all machine shop work can be done at once.
Having to both two side really adds to the work load and no doubt the cost by the end.
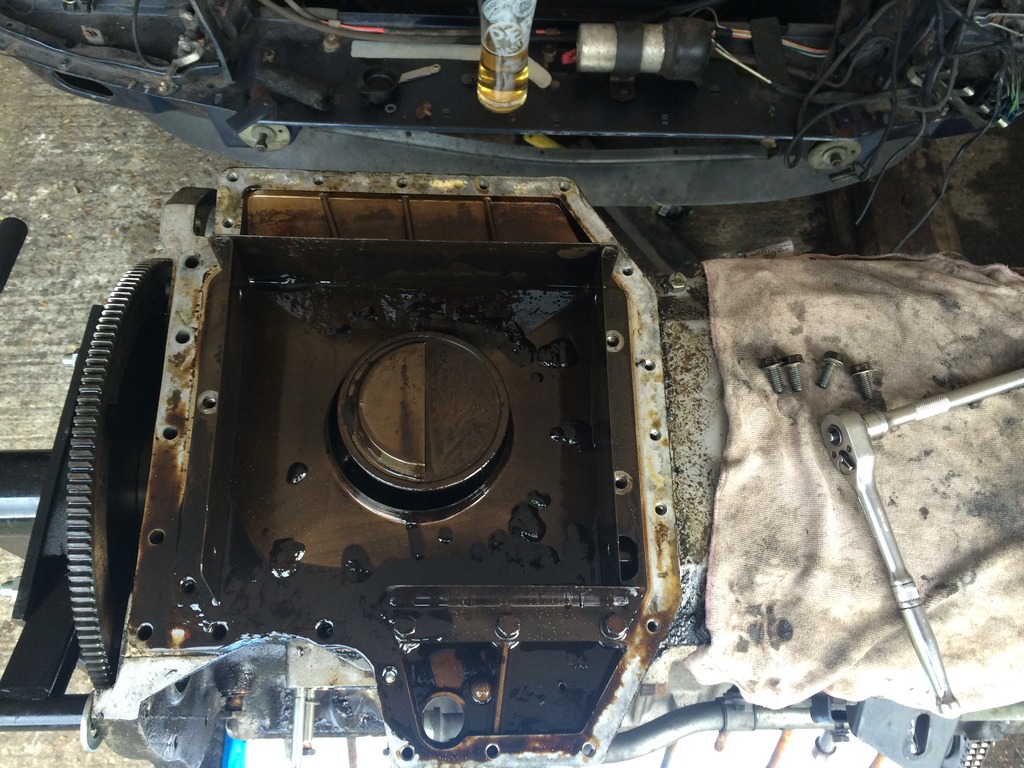
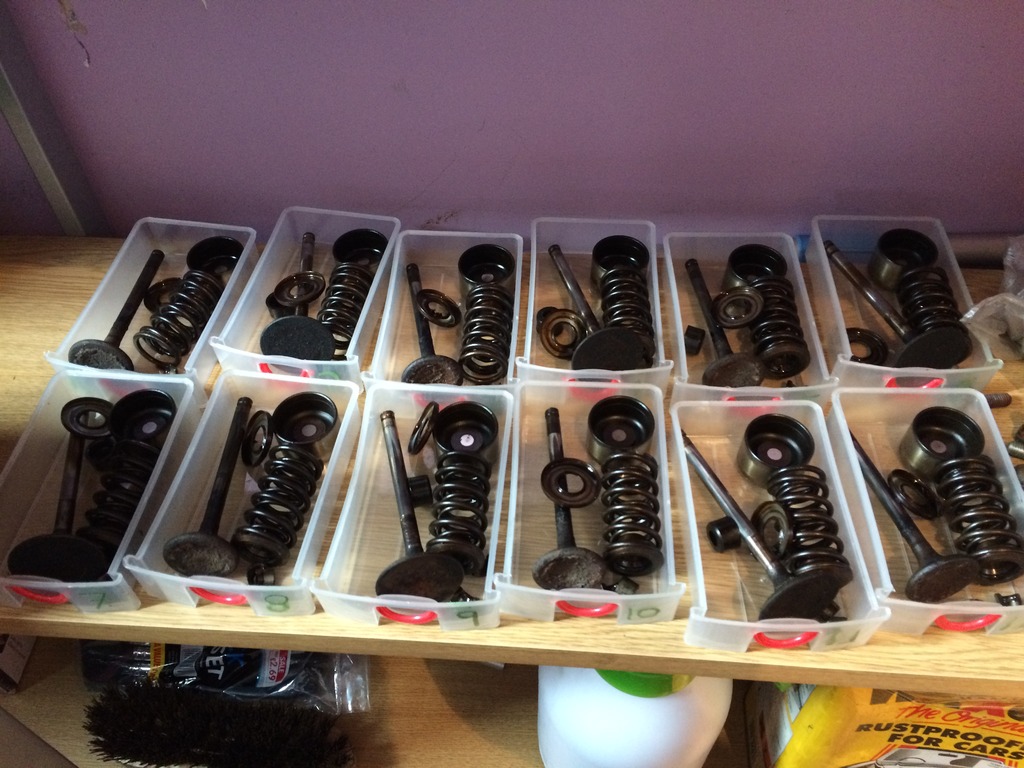
Bottom end had some lumpy oil in the pan but then it had been sat for a few years at least. This is about as far as i have got as need to get some punches to mark the parts before more strip down can continue but was at work with a little time so thought i would throw this up and see if people were interested. If you are let me know and i will try and keep a better record of progress and pictures.
Some marks already stamped on the engine looks like the letter C, not sure if this is part of the original building at the factory or if someone has already been in here
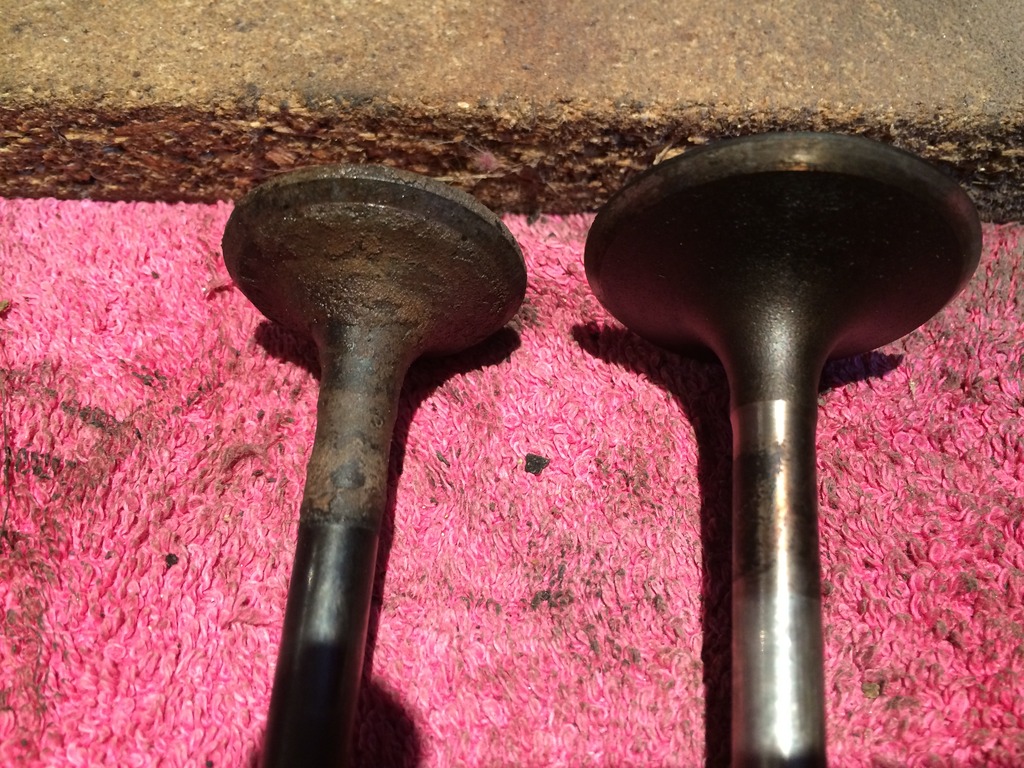
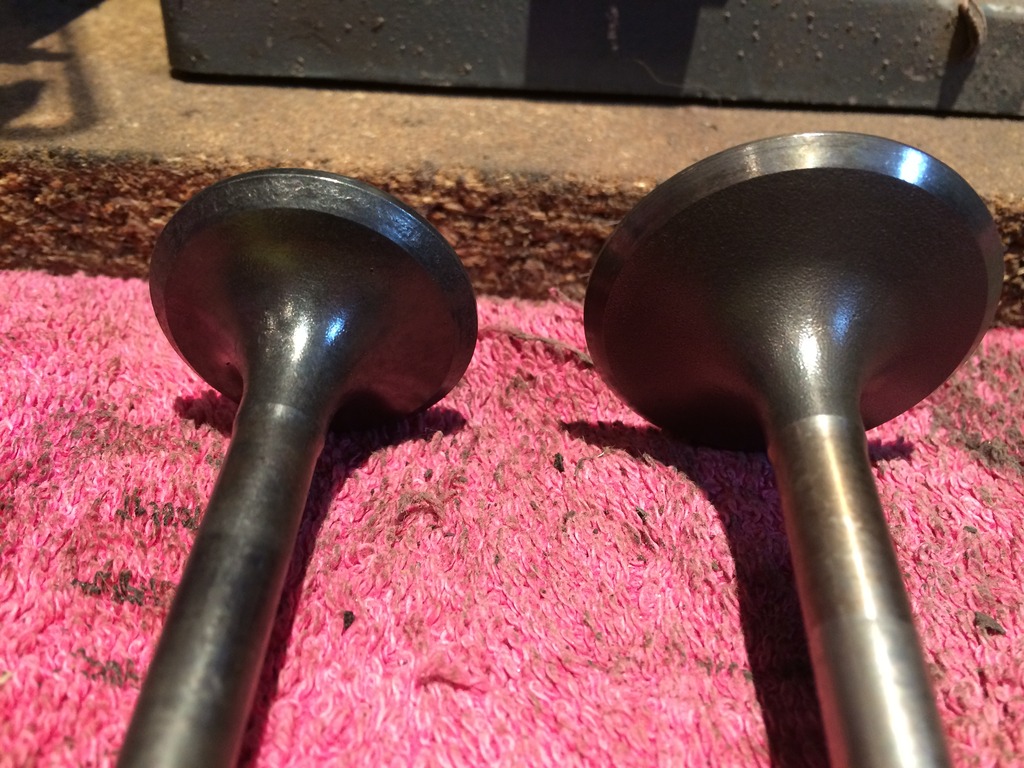
The valves were covered in crud and needed some serious cleaning. The exhaust valve is pitted where it contacts the seat and im not sure if its to far to just grind back with valve grinding paste.


Well back to work now hope some of you like the pics at least

I thought i would share some pics as like me most members here like lots of pictures.
Mostly strip down of the interior to start with as water was leaking in everywhere. Welding of the floor pan and drying out everything was quick and easy. Stopping the ingress of water not so much. New front a rear window rubbers (The rear window actualy moved in and out about 5mm) with lots of non setting window mastic pumped in between the frame and glass and glass and rubber both from the inside and the outside actualy stopped water coming in, had to do the same with both front quarter panels to make the car weather resistant.
All interior out to make sure nothing was missed, cleaning, drying then waxoyl in any cavity i could find including doors, floor, sills in fact every hole i could find.

I did take the dash out as well but had no picture i could find.
The rear subframe was next and was stripped rust protected and painted with new brakes and suspension fitted

Next front subframe rebuild same as rear sure i have some pics somwhere and will add when i find them if this post even takes off lol
With the car back on a rolling chassis time to whip out the engine and gearbox. Not as hard as i thought it was going to be if i am honest, most threads made it sound worse than it was. It left a nice open space to work inside the engine bay and so far i have only found some repair needed at the drivers side suspension as you can make out in the pic below i have for now cleaned and rust coated while the engine gets stripped down

I am sure i will find more to do here but for now i want to strip the engine and see how much work needs doing and if its worth the time and cost.
The head puller made from this very sites posts worked well once i remembered the three bolts on the timming chain cover


So much dirt i think i will be spending days cleaning parts once its all stripped down. The heads are stripped and need skimming and cleaning once the bottom half is stripped all machine shop work can be done at once.
Having to both two side really adds to the work load and no doubt the cost by the end.
Bottom end had some lumpy oil in the pan but then it had been sat for a few years at least. This is about as far as i have got as need to get some punches to mark the parts before more strip down can continue but was at work with a little time so thought i would throw this up and see if people were interested. If you are let me know and i will try and keep a better record of progress and pictures.

Some marks already stamped on the engine looks like the letter C, not sure if this is part of the original building at the factory or if someone has already been in here

The valves were covered in crud and needed some serious cleaning. The exhaust valve is pitted where it contacts the seat and im not sure if its to far to just grind back with valve grinding paste.


Well back to work now hope some of you like the pics at least

Veteran Member
Joined: May 2010
Posts: 4,638
Likes: 2,583
From: Vic Australia
That damn beer keeps popping up.
If you are going to recon the wood work your self, the polyester coating comes off easy with a heat gun. I used Wattyl 7008 2 pack polyurethane estapol, it is great stuff and comes up like glass when wet sanded and polished.
Are you planning on any mods to the engine?
If you are going to recon the wood work your self, the polyester coating comes off easy with a heat gun. I used Wattyl 7008 2 pack polyurethane estapol, it is great stuff and comes up like glass when wet sanded and polished.
Are you planning on any mods to the engine?

Senior Member
Joined: Nov 2015
Posts: 192
Likes: 42
From: Salisbury Heights South Australia
Very interesting to see , keep going , Valves there seems to be enough meat to recut/regrind the valves but as Grant has said you really can't beat new and I guess you could look at the cost of both options .Grinding paste is for seating new or newly machined valves and seats and would be just a waste of your time at this stage . Out of curiosity what is the mileage on your engine .
Thread Starter
|
Member
Joined: Apr 2012
Posts: 68
Likes: 21
From: u.k
Thanks for the support.
Was looking into getting new valves but wasnt sure if i would then have to replace the seats and guides as well.
Also looked into if i had harder seats fitted it would allow it to run on unleaded fuel and the info i found appears to say these engines already have hard seats and dont need changing while others say they do need new seats to run unleaded, talk about confused lol.
The beer allways pops up as i normally only get to work on her at weekends and a couple of beers helps with my stress levels while working on parts that may not have moved in decades.
Wood will def need some work as while removing the dash some pieces were split and fell off the metal back plates.
The plan first is to see if the engine (110k miles by the way) is good to do a rebuild of bearings, rings, valve and head work or if the cost adds up so much that a secondhand low mile engine will be better. I would rather have the rebuilt engine if i am honest and if it comes in under �1000.00 for parts then thats the way i will go. Labour is cheap as i dont charge myself and as for time it has already been off the road almost two years and will no doubt be another year as money is not free flowing. The great thing so far is cost has been low really and the purchase price at less than �900 was a great start, would say i have spent less thank �1000 so far with the front and rear subframe rebuilds, floor pan welding and rustproofing the body inside and out as well as new battery, door handle, quarter glass gaskets and sealant and so on.
I need to find a good machine shop so if anyone knows a good one near Aylesbury, Buckinghamshire please let me know. I have had head work done on my XJ40 head but that was a simple skim and if i go for new seats and guides as well as new valves i like the idea of the valves and seats being cut to match and dont think the guy who done the last head has all the gear for that.
Need to get the pistons out and check the liners and then bearing clearance/wear to see if a rebuild is posible. It was one owner from new when i got her and she was looked after by Paul Hands of Hyper Engineering and was parked up when the cost of a full suspension rebuild was needed and the cost was to much for the owner so i think/hope the engine will be good for a rebuild.
Never come accross an engine with liners so any advice would be great. Not sure if i should be looking to replace them or if they will be ok with just new piston rings and a rehone or something.
No engine mods planed, aim is to get her back on the road first after at least 3 years parked up outside a barn in a field and probably more like 7 years. Once she is proven road worthy and reliable a full body respray will be the next plan no doubt at a huge cost into the thousands.
Trending Topics

Veteran Member


Joined: Jan 2012
Posts: 14,564
Likes: 10,753
From: France
The plan first is to see if the engine (110k miles by the way) is good to do a rebuild of bearings, rings, valve and head work or if the cost adds up so much that a secondhand low mile engine will be better. I would rather have the rebuilt engine if i am honest and if it comes in under �1000.00 for parts then thats the way i will go.
I need to find a good machine shop so if anyone knows a good one near Aylesbury, Buckinghamshire please let me know. I have had head work done on my XJ40 head but that was a simple skim and if i go for new seats and guides as well as new valves i like the idea of the valves and seats being cut to match and dont think the guy who done the last head has all the gear for that.
Need to get the pistons out and check the liners and then bearing clearance/wear to see if a rebuild is possible.
Rings and shells are not expensive, valves can be up to about 14 quid a go, but honestly, while I agree with Grant that new is best, yours look perfectly re-usable. Sometimes new valves come up on Ebay much cheaper, so keep a lookout. Your engine is an HE, so be aware that pistons and valves from earlier XJS and other V12 models (so-called flathead engines) will NOT fit.
Valve seats are hardened inserts from the factory on all Jaguar V12s, as indeed all ally headed engines must have. The confusion comes from people not realising the Jaguar V12 is a completely different beast from the original 1950s originating famous cast-iron headed Jaguar straight 6, so no worries there. Even with new valves there is no necessity to recut the seats, just lap them in.
With any luck at all, a skim will be all the machining work you need to do. You can see what the valve guide clearances are, if out of spec at all, new guides are available.
There is a book you can download for free by Kirbert Palm from the Jaglovers site, it has quite a bit of useful info on engine rebuilding, making it oiltight, etc etc. Renewing the O rings in the oil pickup pipes in the sump that feed the oil pump and from the pump to the main gallery is also very important.
Greg
Veteran Member
Joined: May 2010
Posts: 4,638
Likes: 2,583
From: Vic Australia
If you can, why don't you have the valve seats re-cut at 3 angles, this will increase flow significantly, and these days with modern machinery its no more expensive than a regular single cut.
The 5.3 chamber is small about 25cc's so be aware a valve cut will sink the valves deeper in the head, increasing volume and lowering CR.
The 5.3 chamber is small about 25cc's so be aware a valve cut will sink the valves deeper in the head, increasing volume and lowering CR.
Veteran Member
Joined: May 2014
Posts: 5,906
Likes: 2,182
From: Bremen, Germany
I like the title: Light restoration' 
I'm currently doing the same, though the buying price was a good bit higher compared to yours (�2900). On the other hand though mine is cheap compared to German prices (a cheapish XJ-S in the same condition ran at around �5000 at the time of my purchase).
I'll be following this thread! Like to see how this come out. My engine and tranny are out at the moment too. Like you, to track an oil leak. Though mine has more leaks than seals Hopefully all done soon...
I'm currently doing the same, though the buying price was a good bit higher compared to yours (�2900). On the other hand though mine is cheap compared to German prices (a cheapish XJ-S in the same condition ran at around �5000 at the time of my purchase).
I'll be following this thread! Like to see how this come out. My engine and tranny are out at the moment too. Like you, to track an oil leak. Though mine has more leaks than seals
Hopefully all done soon...

Thread Starter
|
Member
Joined: Apr 2012
Posts: 68
Likes: 21
From: u.k
OK so weather no longer an issue with my "tent" i managed to get on with some more work this weekend.
Head/Cam carrier split and started the cleaning process
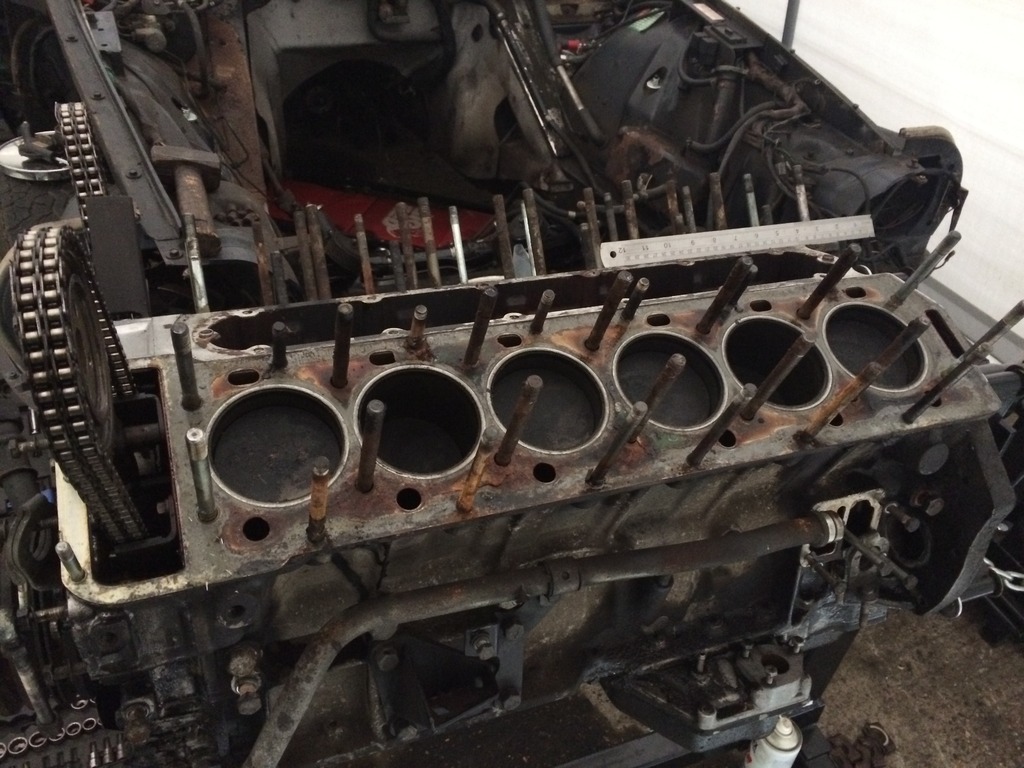
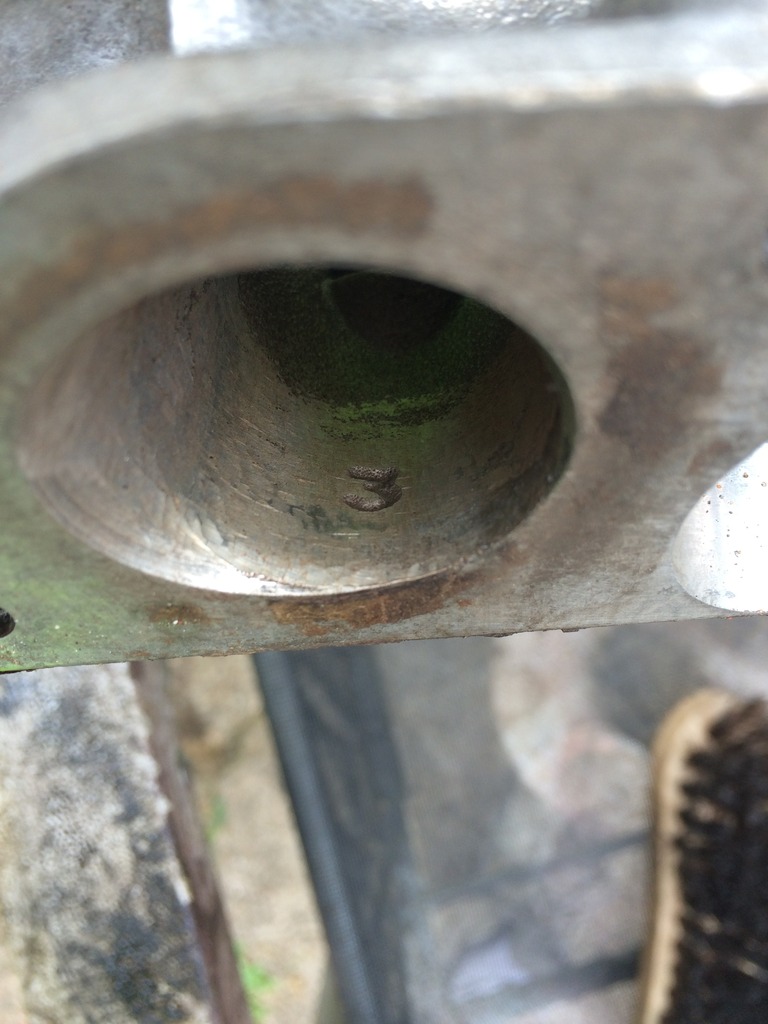
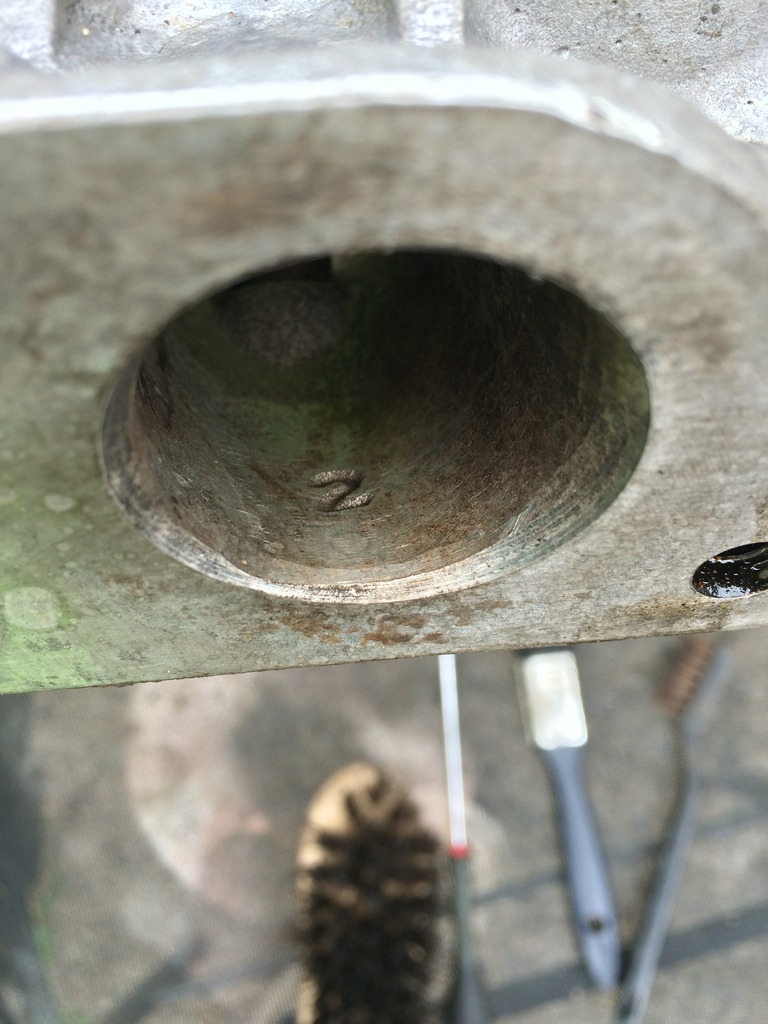
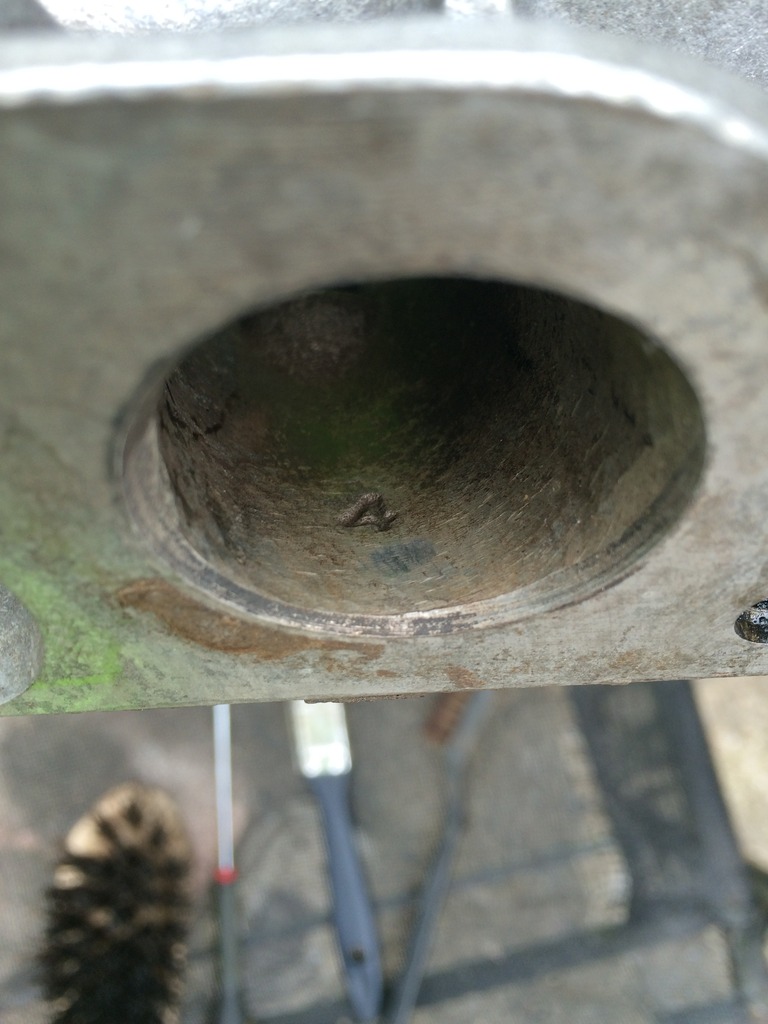
Found some numbers stamped inside the ports on the head, not sure what these are for so if anyone knows or has some ideads i would love to hear them. The numbers 1 2 3 4 are not in number order and some have been duplicated accross the six ports.
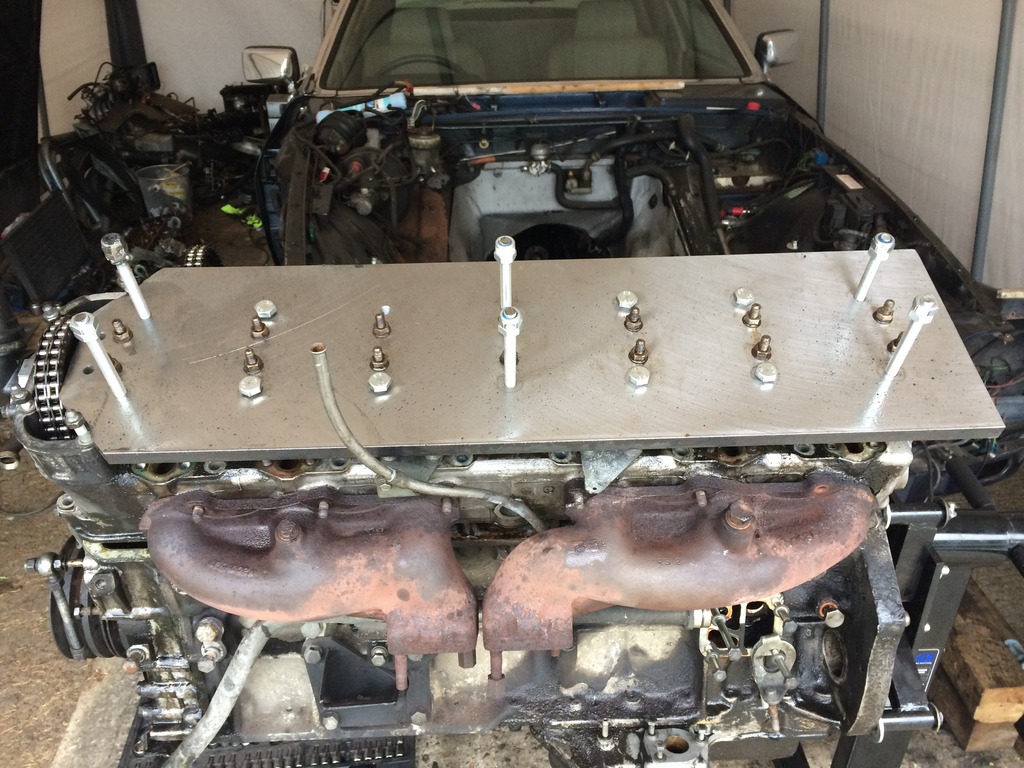
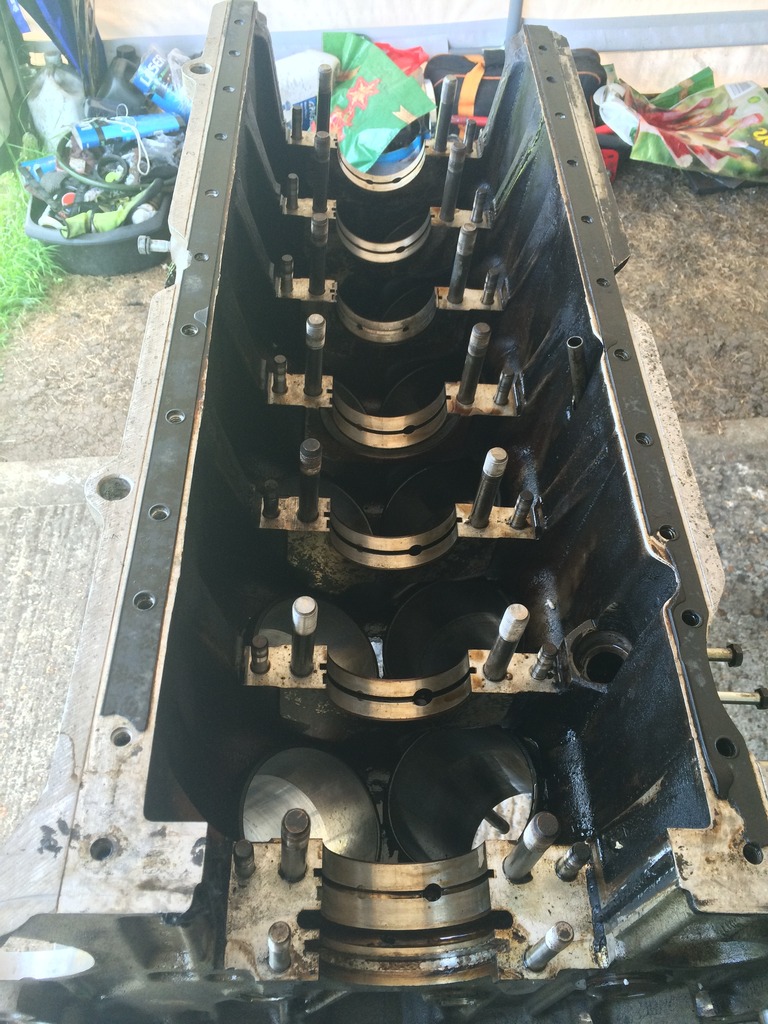
Next job was to get the pistons out and check the bearing surface and the cyclinder walls. I marked all the caps first and made up some cylinder retaining tools using some tube and flat plate grinding out the middle leaving room for the pistons to slide out, also a view of the other "tool" made out of sheet metal to hold the cam gears on the arms.
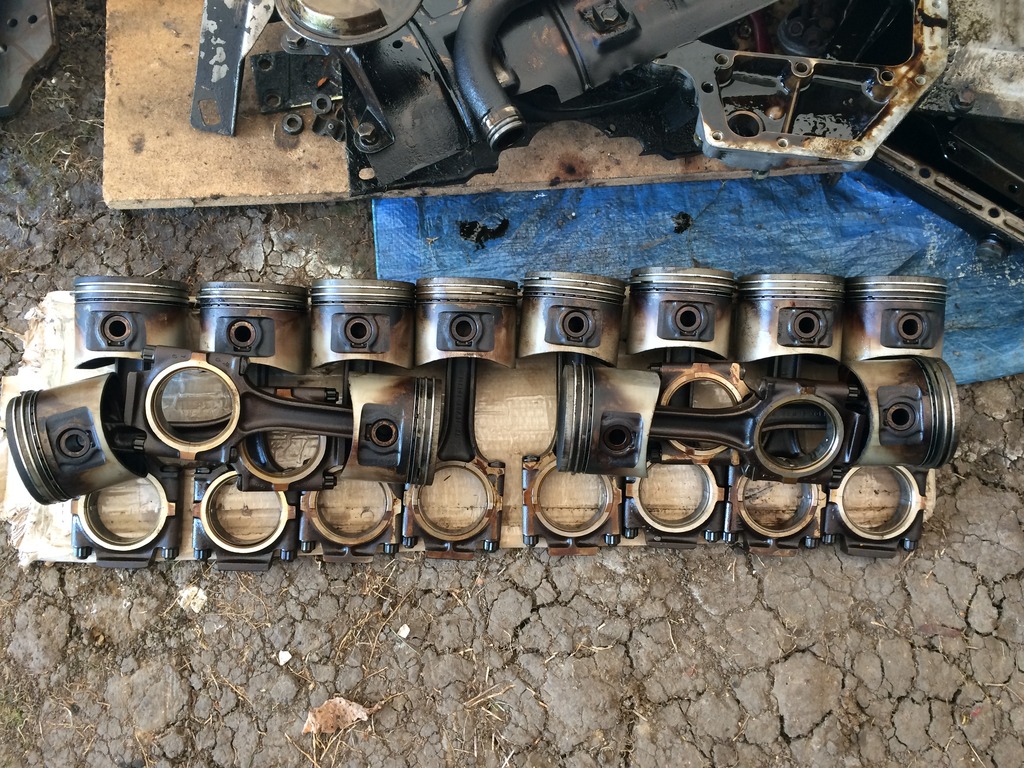
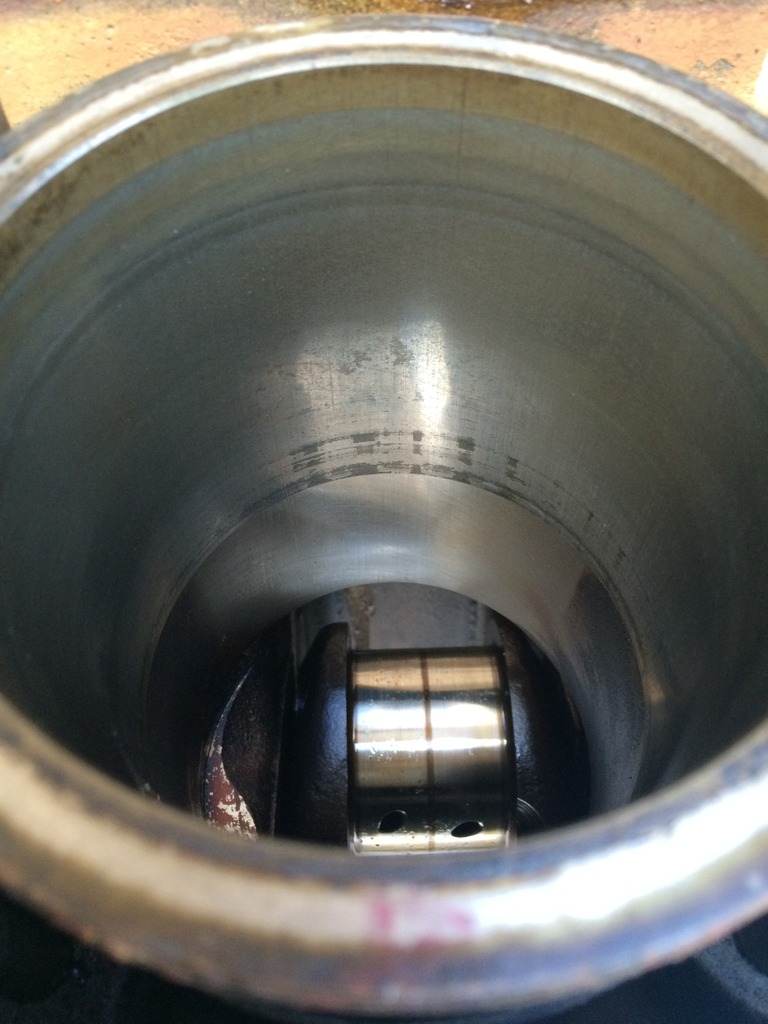
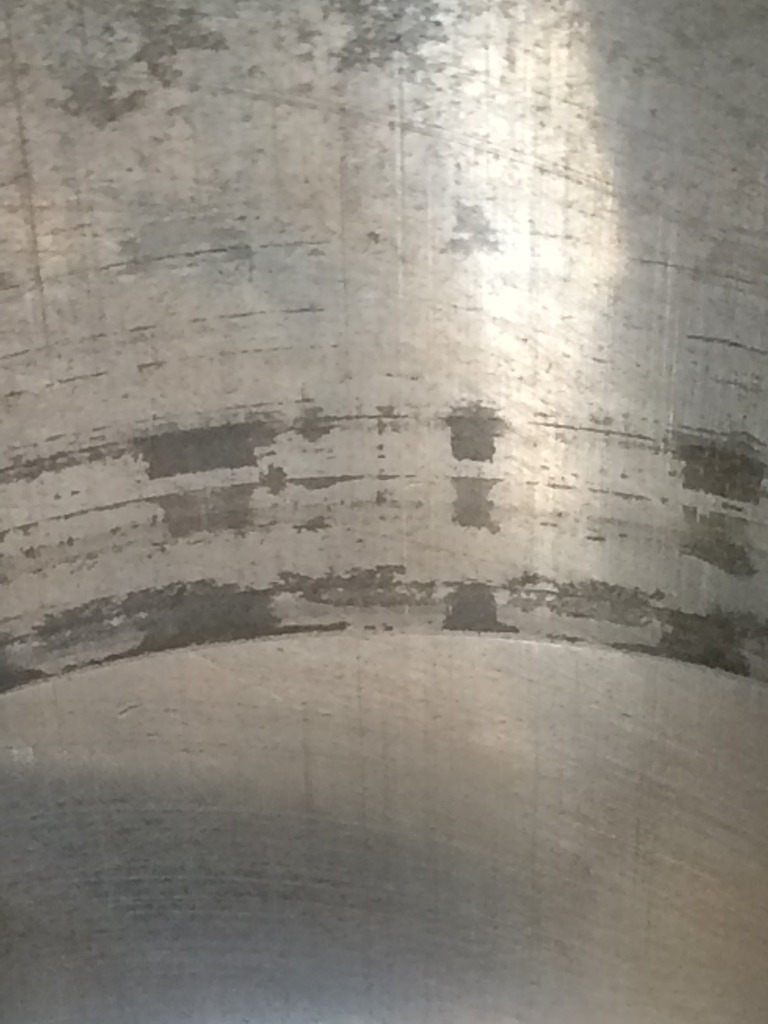
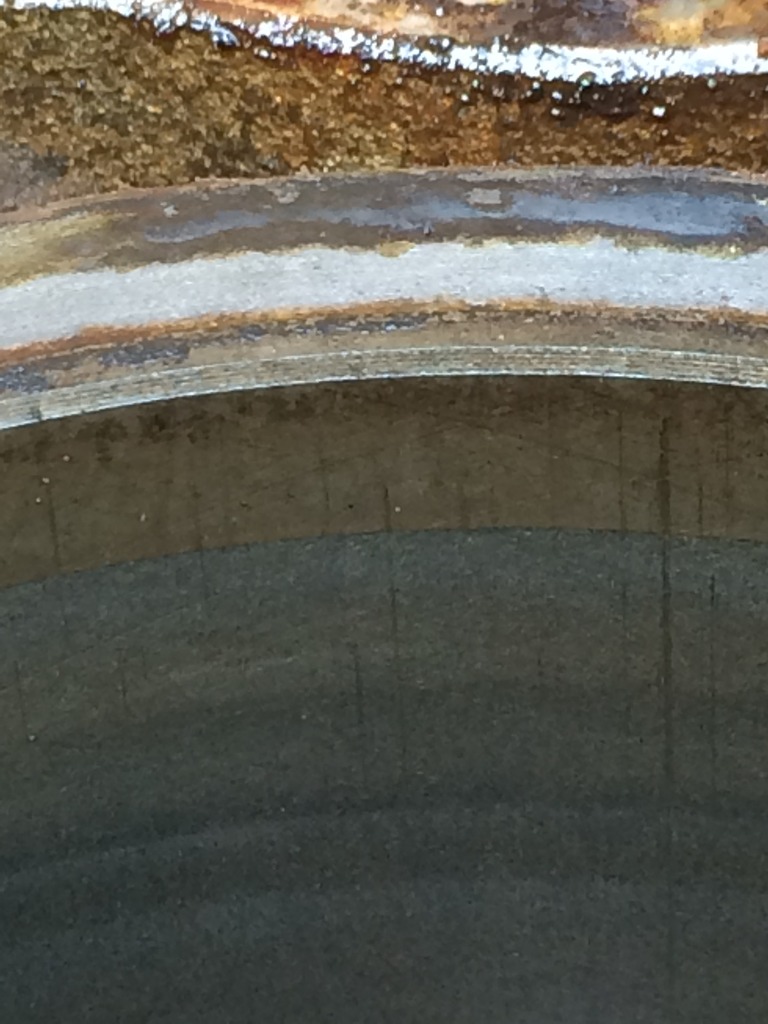
The cylinder liners have some marks that look like it is from being stood for a long time where the piston rings were sat, no real carbon build up just a light stain at the top. I hope that a light honing will clean them up so any information on a good honing tool would be nice.
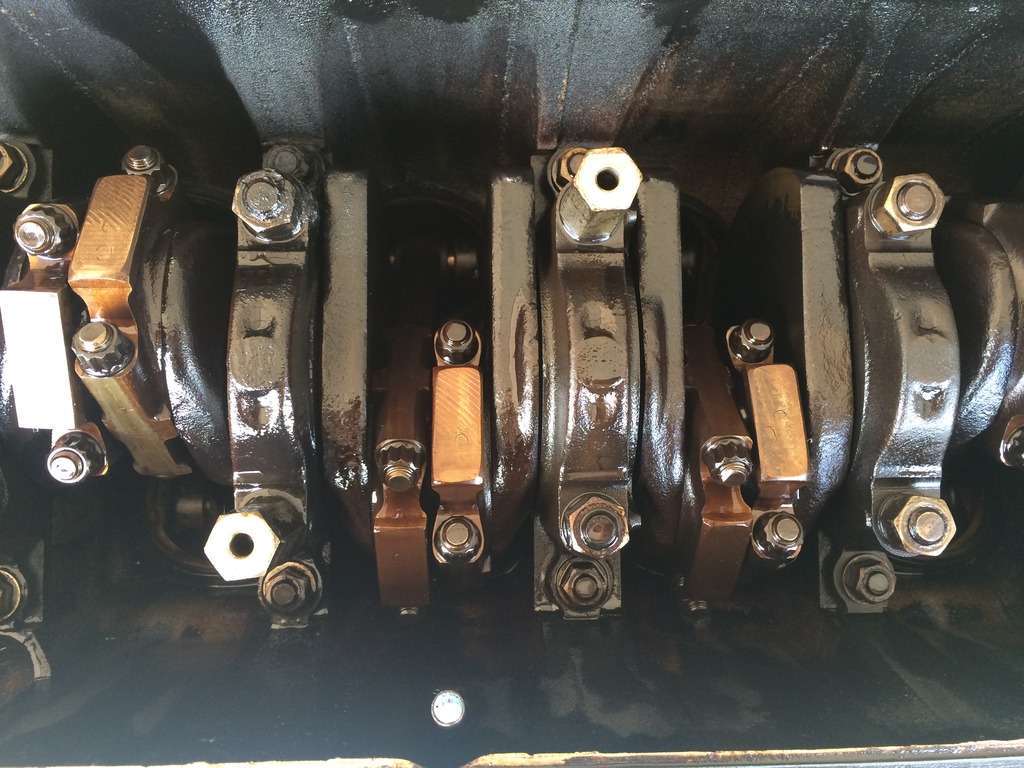
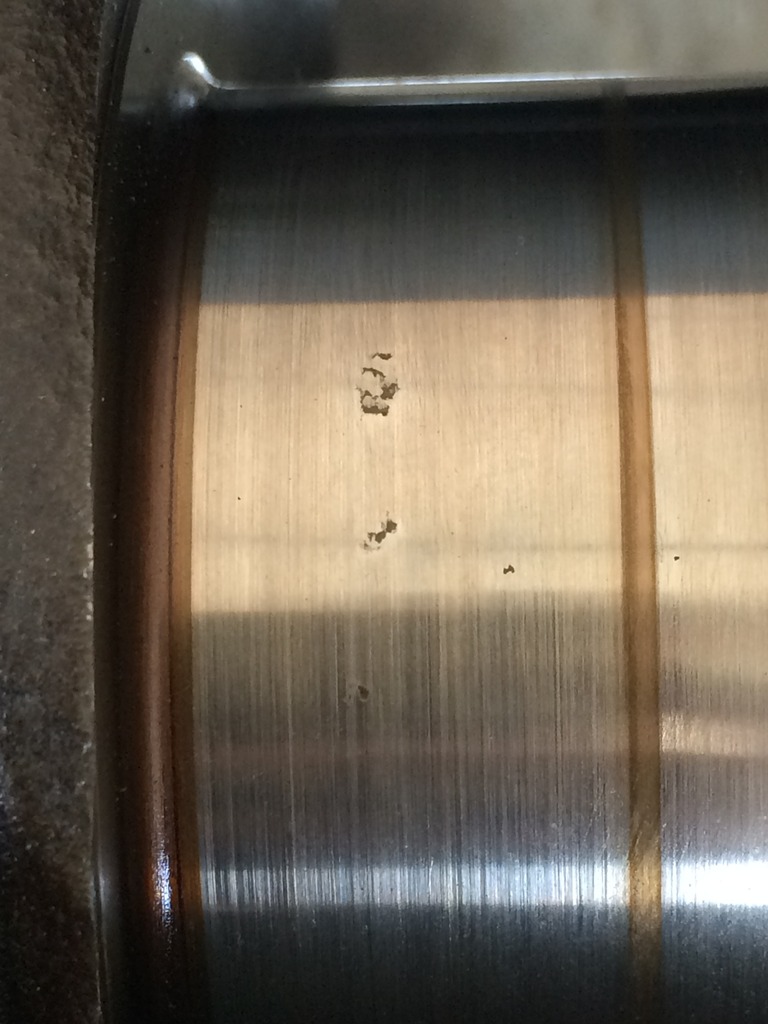
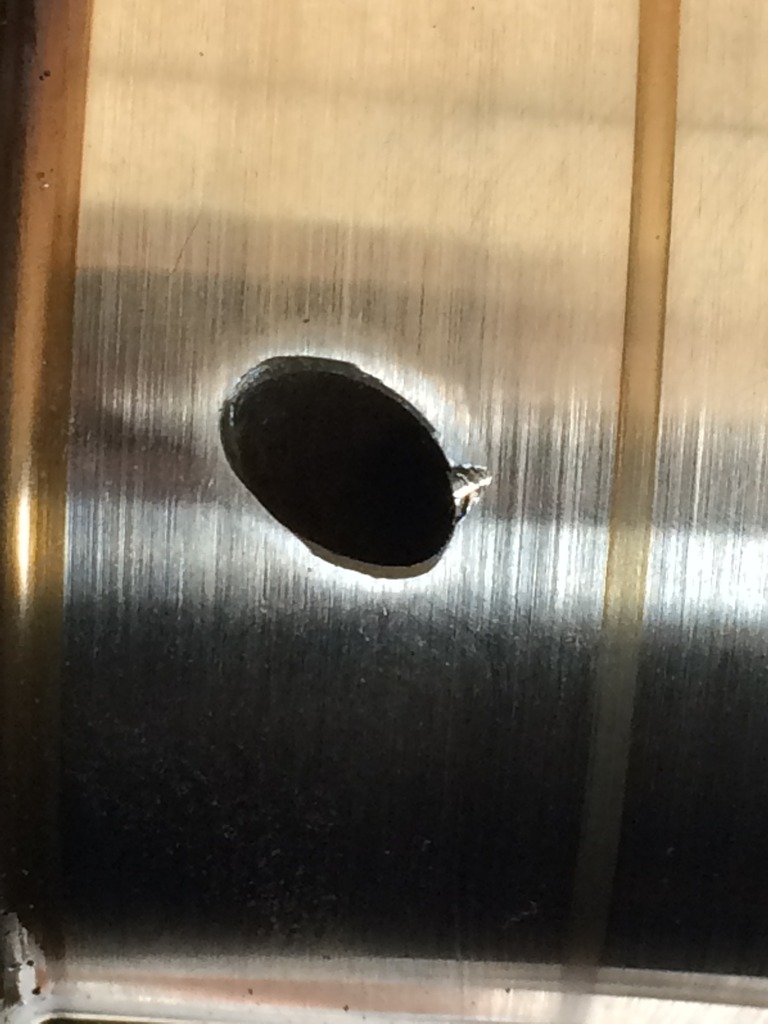
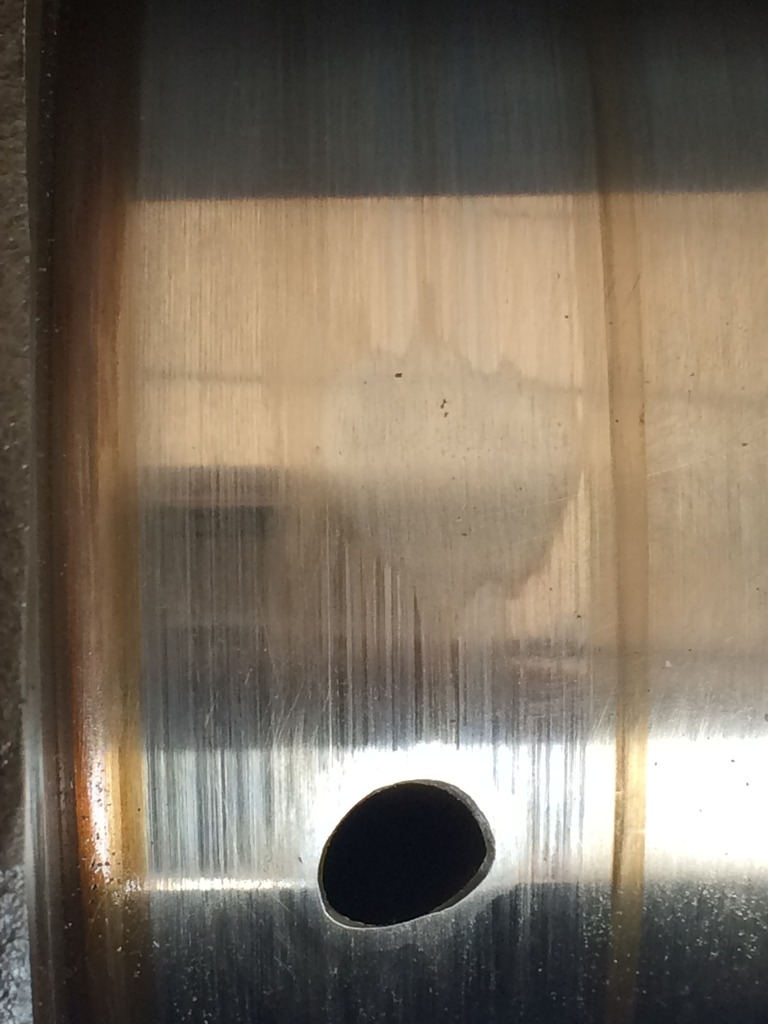
The Con Rod/Crank conections revealed some slight markings that are only just feelable using a finger nail, the only one i am not sure about is a slight chip on one of the oil holes, its not raised but slightly sunk with no rough edges so i hope the crank is reusable and might just need a light polish.
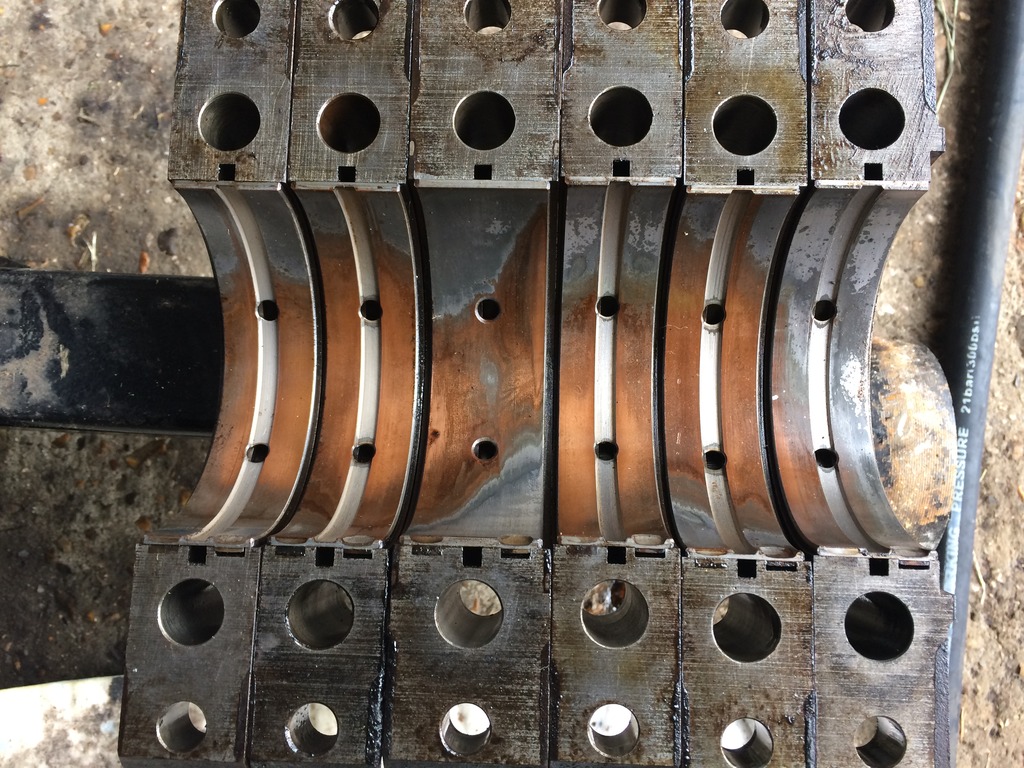
The crank main bearings have worn a bit but nothing that indicates anything other than straight forward replacment of standard bearings
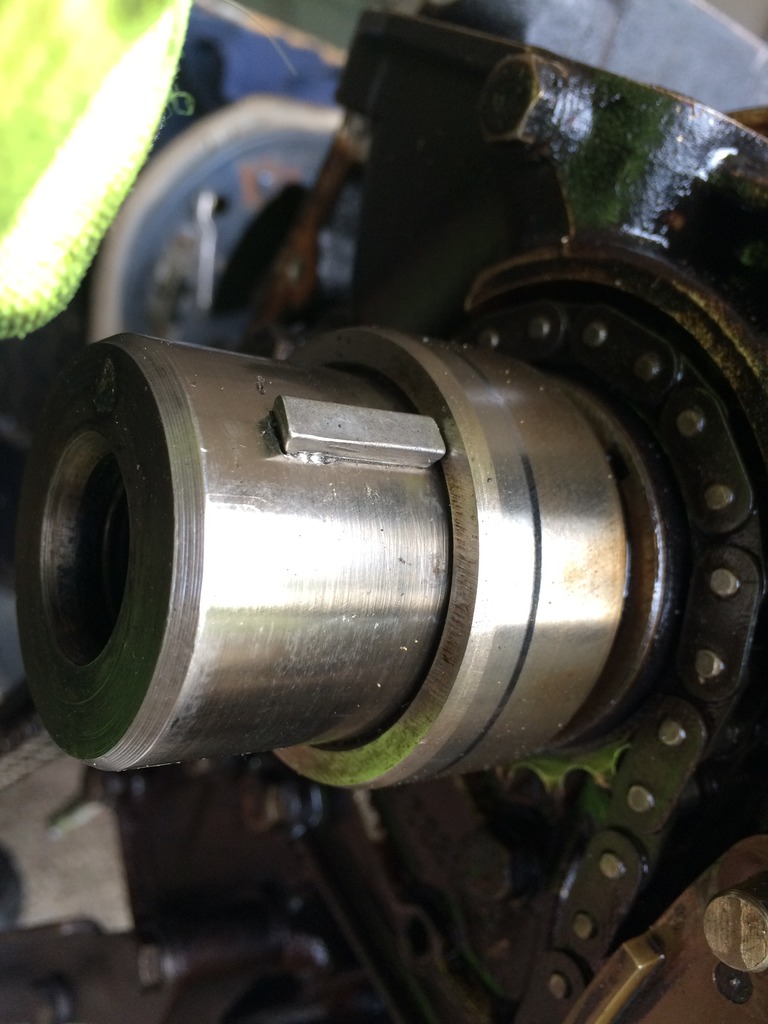
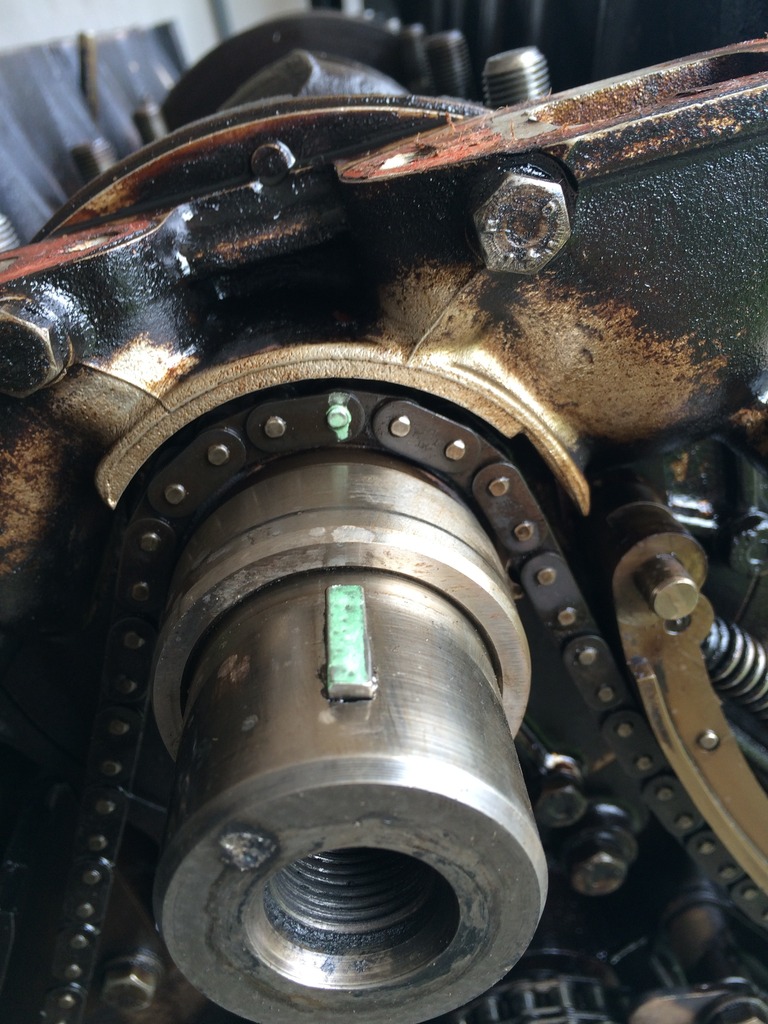
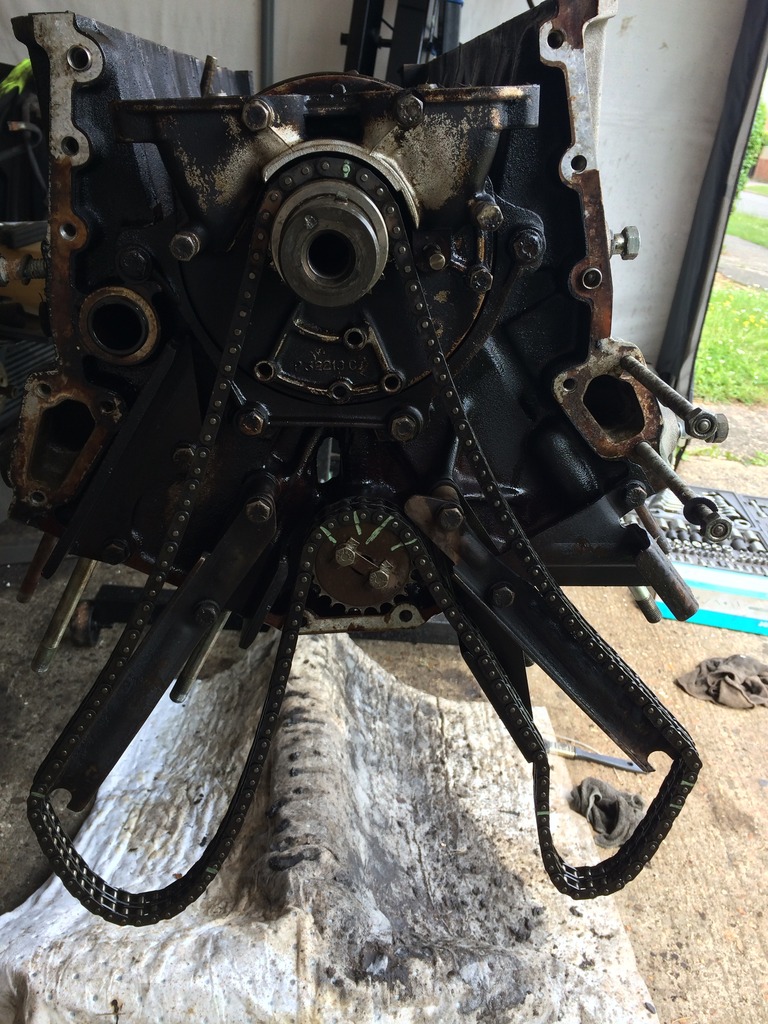
Next off with the timing chain cover after removing the crank Damper and pulley . At this point i have become stuck. The woodruff key in the crank looks like it has been welded in place, not sure if this is right as i thought it needed to be removed to get the spacer the timing gear and the oil pump off to then be able to remove the crank and remaining bearings. Any information on this would be great as my workshop manual just says to recover the woodruff key from the crankshaft. I tried heating the key up with a propane tourch but it still wouldnt budge i even tried a screwdriver and hammer with no luck. Will be gutted if i have got this far just to get stuck. I might have to try and drill and tap a thread and use a sliding hammer to pull it out and hope i dont damage the shaft, i guess you can still buy the woodruff keys so damaging the key wont matter
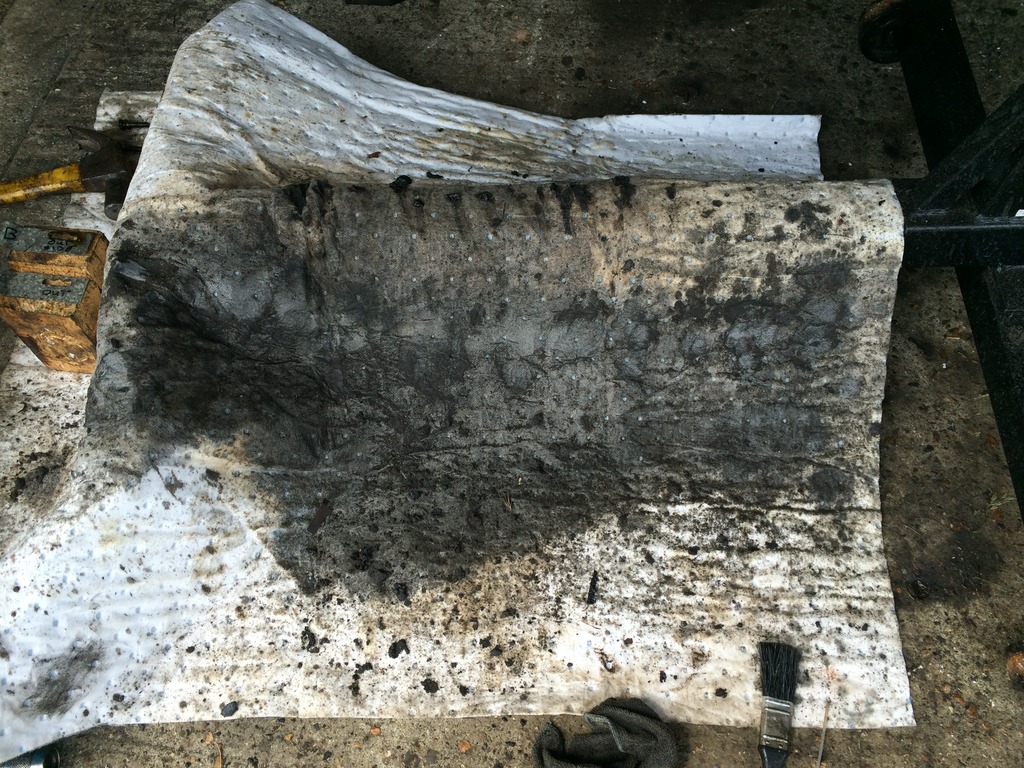
So as i was stuck i thought i would start cleaning the outside of the engine block. So much crud on just one side alone i am glad i come across the oil spil mats at my local halfords worth the two pounds to keep all the mess in one place
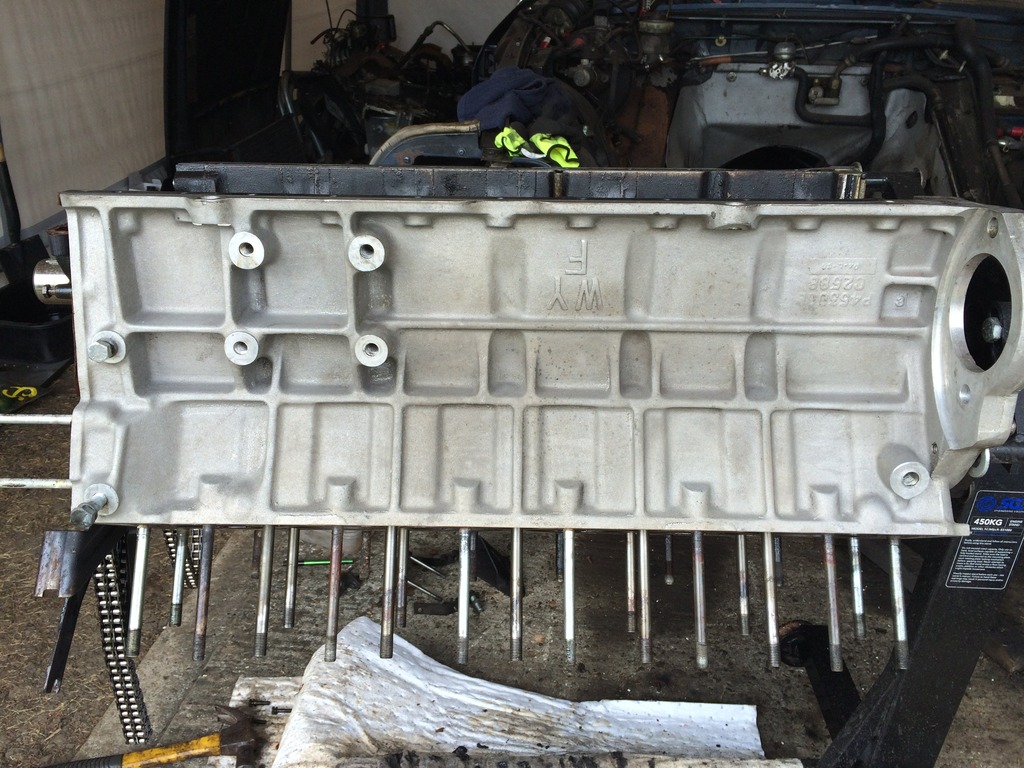
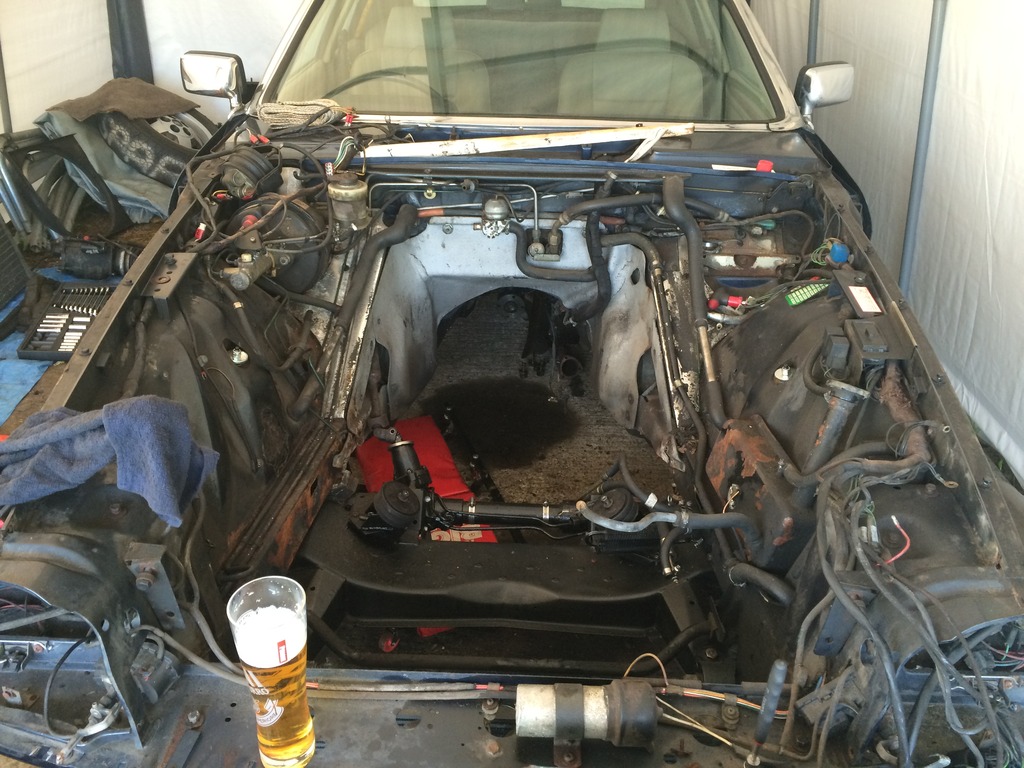
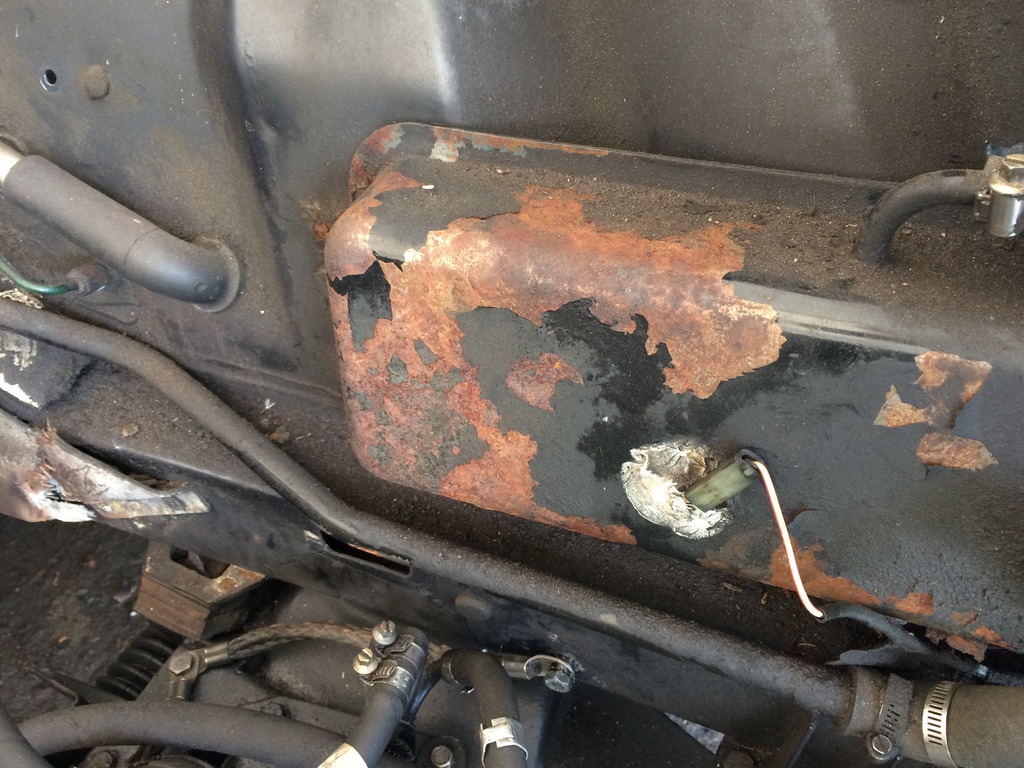
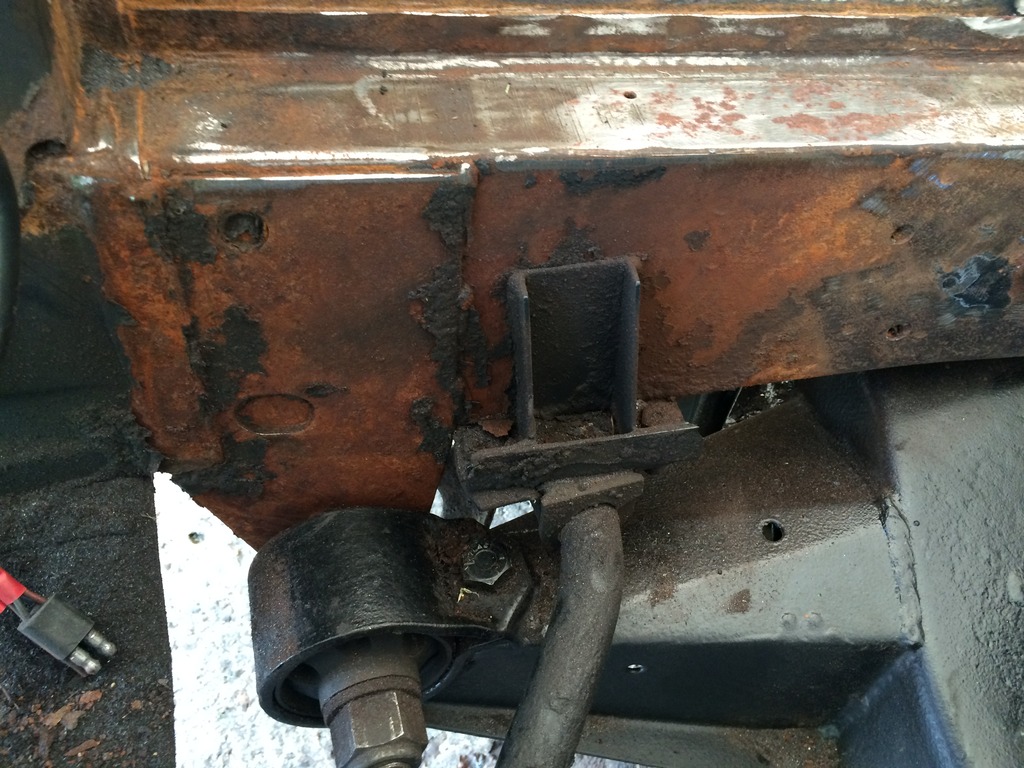
Back started to hurt bent over cleaning the block so used the rest of the afternoon to sort out the engine bay hole. This is actualy the reason for all the engine work as such. I had to remove the engine to get at the rust and weld in some new plate metal so thought while the engine is out i better make the most of it lol. Lots of surface rust inside the bay so will have to remove the remaining items and clean rust coat and paint the entire engine bay and referb the water tank while i am at it

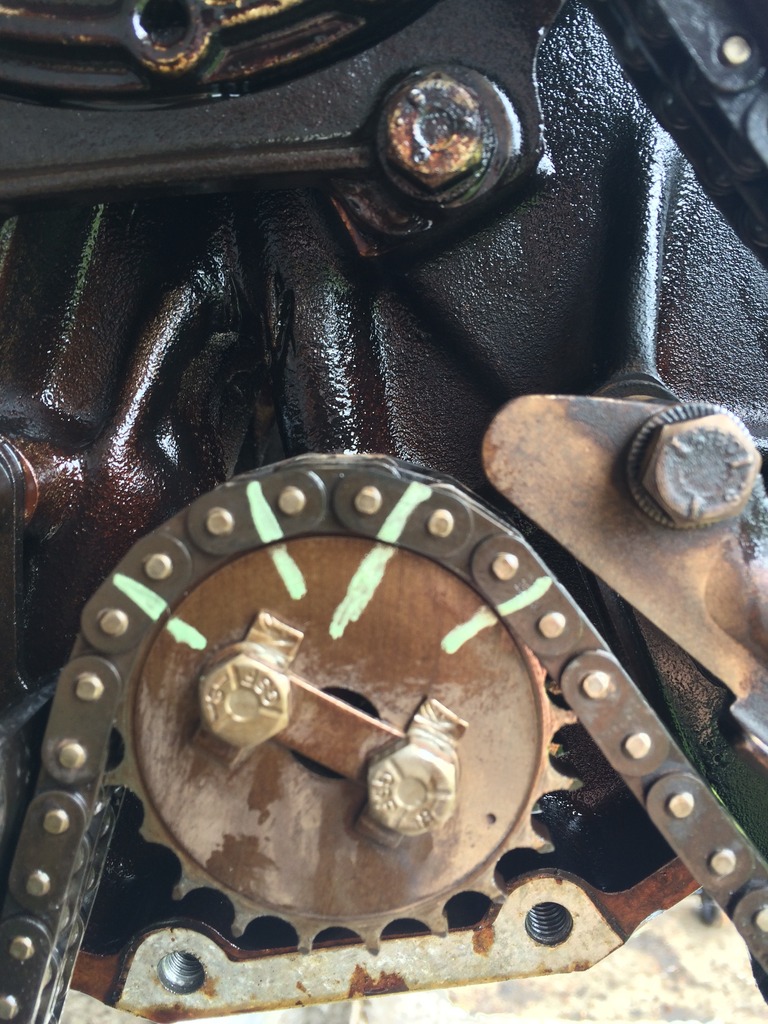
Finaly marked the timing chain and gears to make sure everything goes back as it should, Will prob get a new chain and transfer the marks over when it comes ready to rebuild
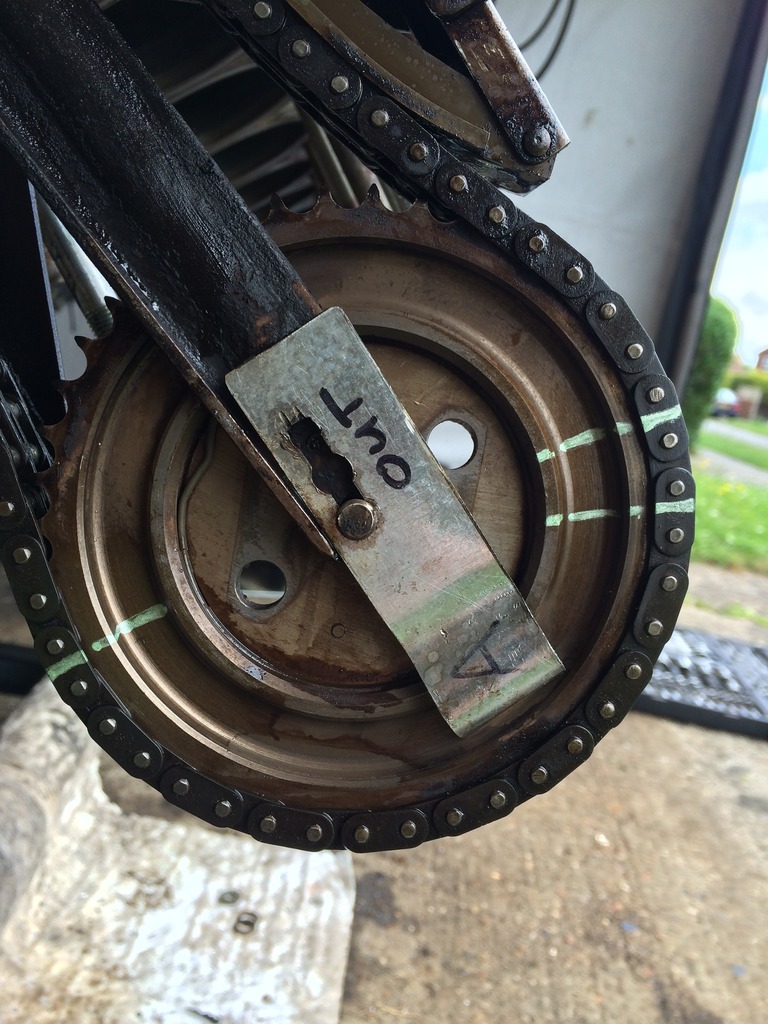
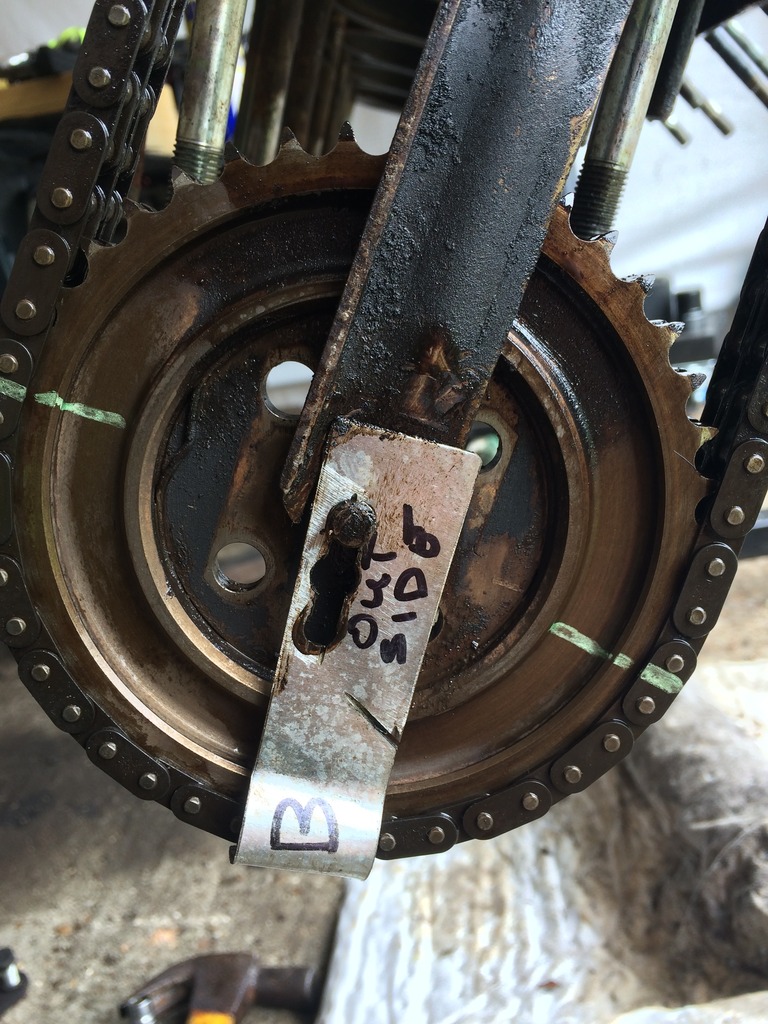
Well back to work now but hope some of you have some information on honing tools, the stamped numbers and the bloody woodruff key. Also managed to release the timing chain tensioner using a hook on my slide hammer and pulling on the weight to pull it straight saving the cost of another "special tool" no doubt i will need to sort something better when i comes to refitting it lol
Head/Cam carrier split and started the cleaning process


Found some numbers stamped inside the ports on the head, not sure what these are for so if anyone knows or has some ideads i would love to hear them. The numbers 1 2 3 4 are not in number order and some have been duplicated accross the six ports.


Next job was to get the pistons out and check the bearing surface and the cyclinder walls. I marked all the caps first and made up some cylinder retaining tools using some tube and flat plate grinding out the middle leaving room for the pistons to slide out, also a view of the other "tool" made out of sheet metal to hold the cam gears on the arms.


The cylinder liners have some marks that look like it is from being stood for a long time where the piston rings were sat, no real carbon build up just a light stain at the top. I hope that a light honing will clean them up so any information on a good honing tool would be nice.


The Con Rod/Crank conections revealed some slight markings that are only just feelable using a finger nail, the only one i am not sure about is a slight chip on one of the oil holes, its not raised but slightly sunk with no rough edges so i hope the crank is reusable and might just need a light polish.


The crank main bearings have worn a bit but nothing that indicates anything other than straight forward replacment of standard bearings

Next off with the timing chain cover after removing the crank Damper and pulley . At this point i have become stuck. The woodruff key in the crank looks like it has been welded in place, not sure if this is right as i thought it needed to be removed to get the spacer the timing gear and the oil pump off to then be able to remove the crank and remaining bearings. Any information on this would be great as my workshop manual just says to recover the woodruff key from the crankshaft. I tried heating the key up with a propane tourch but it still wouldnt budge i even tried a screwdriver and hammer with no luck. Will be gutted if i have got this far just to get stuck. I might have to try and drill and tap a thread and use a sliding hammer to pull it out and hope i dont damage the shaft, i guess you can still buy the woodruff keys so damaging the key wont matter


So as i was stuck i thought i would start cleaning the outside of the engine block. So much crud on just one side alone i am glad i come across the oil spil mats at my local halfords worth the two pounds to keep all the mess in one place


Back started to hurt bent over cleaning the block so used the rest of the afternoon to sort out the engine bay hole. This is actualy the reason for all the engine work as such. I had to remove the engine to get at the rust and weld in some new plate metal so thought while the engine is out i better make the most of it lol. Lots of surface rust inside the bay so will have to remove the remaining items and clean rust coat and paint the entire engine bay and referb the water tank while i am at it


Finaly marked the timing chain and gears to make sure everything goes back as it should, Will prob get a new chain and transfer the marks over when it comes ready to rebuild


Well back to work now but hope some of you have some information on honing tools, the stamped numbers and the bloody woodruff key. Also managed to release the timing chain tensioner using a hook on my slide hammer and pulling on the weight to pull it straight saving the cost of another "special tool" no doubt i will need to sort something better when i comes to refitting it lol

Veteran Member
Joined: Jan 2012
Posts: 14,564
Likes: 10,753
From: France
Fantastic job so far. Congratulations. Remove woodruff key as follows:
Flex-Hone � Tools
Interesting photos on this thread, plus which oil to use with the tool:
http://www.guy-croft.com/viewtopic.php?t=1128
Good luck, do not forget the change the O rings in the sump oil pickup pipes, and there is a big one which is part of the oil filter head. On the engine bay rust, having cleaned it up and welded as required, I very strongly suggest using AquaSteel on the metal, two coats, before painting with something suitable and waxing over the top of that. Spray it inside the chassis members and sills too, then wax after it has dried. The stuff is fanatastic. http://aquasteel.co.uk/
FYI, at the top back of the headlight nacelle is a large oblong rubber bung, if you remove this you can get a spray probe right along the inside of the top chassis rail as far as the scuttle.
Greg
- Take a flat ended round punch a little narrower than the key.
- Grasp a lump hammer
- Whack the punch straight downwards on ONE END of the FLAT part of the key
- This will cause the other end to pop upwards (sort of in a seesaw motion) and also break the hold of the round part in the crank indentation.
- Repeat a bit as needed on the SAME end you hit first, and gradually keep pushing the same end round into the indentation and thus driving the other end further out and the thing pops out of the other side as you drive it round.
Flex-Hone � Tools
Interesting photos on this thread, plus which oil to use with the tool:
http://www.guy-croft.com/viewtopic.php?t=1128
Good luck, do not forget the change the O rings in the sump oil pickup pipes, and there is a big one which is part of the oil filter head. On the engine bay rust, having cleaned it up and welded as required, I very strongly suggest using AquaSteel on the metal, two coats, before painting with something suitable and waxing over the top of that. Spray it inside the chassis members and sills too, then wax after it has dried. The stuff is fanatastic. http://aquasteel.co.uk/
FYI, at the top back of the headlight nacelle is a large oblong rubber bung, if you remove this you can get a spray probe right along the inside of the top chassis rail as far as the scuttle.
Greg
Last edited by Greg in France; Jun 27, 2016 at 06:18 AM.


Joined: Feb 2010
Posts: 28,788
Likes: 11,269
From: Adelaide Stralia
Agreed, well sorted and identified.
That "mig welded" key is unique, and someones answer to the key coming loose in the crankshaft slot because the front damper bolt was NOT tightened correctly. Very common issue with the V12. Get NEW keys, they are cheap and NOT unique to Jaguar.
That crankshaft is a worry. Someone has been here before me thinks, and that oil hole chip is the give away. Those bearing journals need polishing, or Linishing, as we say in the trade. That engine has had LOUSY oil change periods, and probably ElCheapo oil used. The bearings have lost their top coating, and the Copper is visible all round, not good.
DO NOT get sucked into regrinding that crankshaft, it is a NO NO.
Remove the liners to hone them. All that honing oil, or Kerosene, will wash all that crud down into the main crank bearings if done in situ. The liners need resealing anyway.
Keep at it, you will win.
Senior Member
Joined: Aug 2012
Posts: 656
Likes: 180
From: Millstadt, IL
The liners are glued in. There are liner holders to keep them in place while doing piston work. Proper work is to replace liners and pistons as a set. Be careful of the rear seal area as the block is useless if seal are is worn. I have not heard of a fix or machining of the seal to make it proper for a line bore. Too big of a chance of breaking glue seal of liner while honing or rotating crank while installing pistons.

Veteran Member
Joined: Jul 2012
Posts: 6,796
Likes: 2,403
From: Walnut Creek, California
Yeah, that engine has doe well in spite of....
Wow, what a project. My compliments, Sir!!
Bearings, as stated, babbit gone, running on copper.
I'd think of what to do about the nick. Any sign of a gouge or scratch on the corresponding bearing? Perhaps, a small Dremel tip stone to
countersink it and remove the sharp edge. Sharp edges adjacent to soft bearing metal creeps me a bit.
Well, for the DIY guy, two hoes are available.
1. One with spring loaded segments topped with a stone material.
Known in the trade as 'glaze busters". Not complimentary by machinists.
2. Another looking like a stiff round brush. A ball hone. A bit better.
But, not anywhere as good as a proper hone in a tank with measured strokes bathed in oil. So much depends on that, that if I were you, I'd get a hone job by a shop. O'wise the rings may never seat and it will be a burner...
I'd not mess with old valves. One in the picture shows a seat out on the edge. Once considered good for racing. "hang t on the edge. Not good for say to day. too thin, early burn....
And,even if you get a good seat by the lap method or a full grind, the stems can be worn and in spite of a seal, allow oil in to the combustion chamber. Smokey exhaust.,
My son operated a machine shop for a long time. performance engines his specialty. Altough bread and butter work done as well.
Disdain for the lap method. Only true seats are the ground ones.
Precision, means a lot here.
But, SOG, I've lapped more than a few and it worked....
Carl
Thread Starter
|
Member
Joined: Apr 2012
Posts: 68
Likes: 21
From: u.k
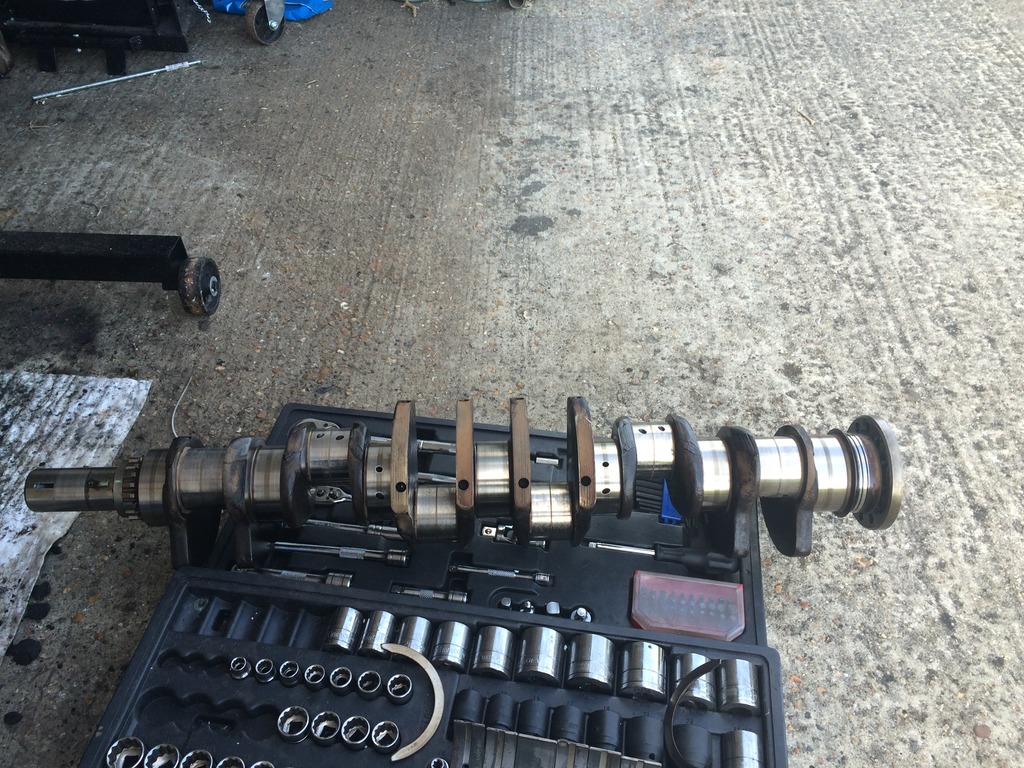
The woodruff key is out, thanks for the advice Greg it worked well. The punch actualy bent a few times i had to hit it that hard but eventualy it came out. Removed the oil pump and timing gear then the crank and remaining bearing halfs.
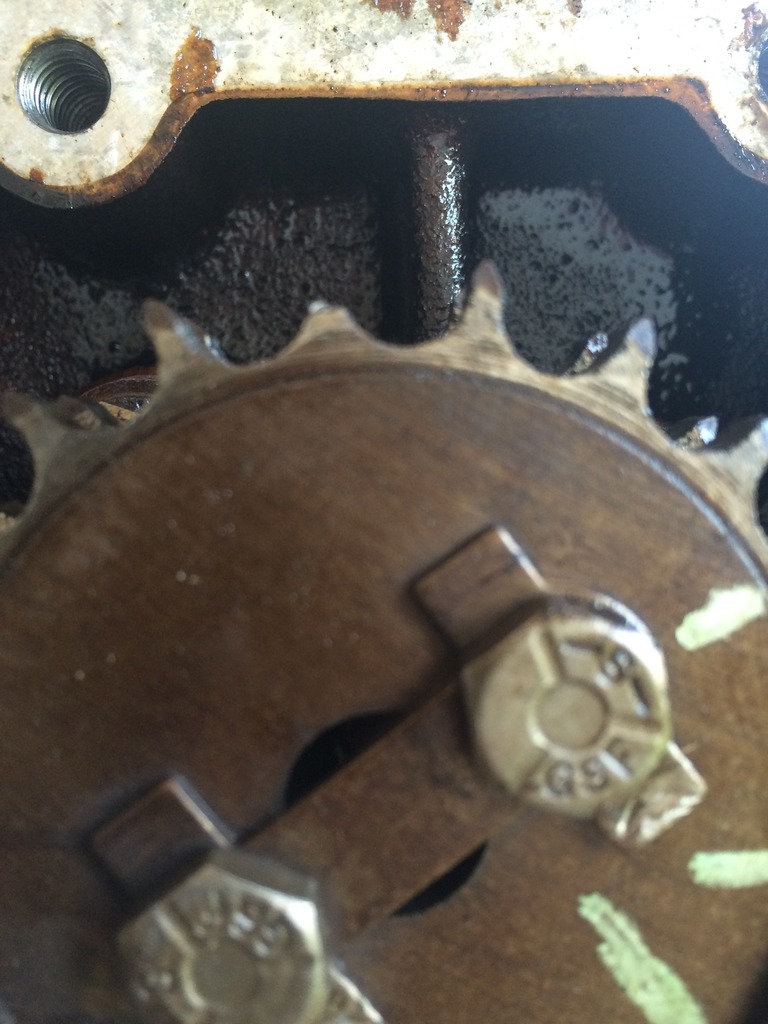
Noticed the gear for the dizzy has two teeth missing, very strange
Ok so with the information you guys have given me i was starting to worry about the condition of the bearing journals so i spoke to the guy who worked on my XJ40 heads and he said if i brought the parts to him he would check them out.
So i loaded the parts in the truck and drove out to see him.
Heads first, he said they are in really good condition and that they dont need a skim just "cleaning up". The valve seats are fine for a recut and the guides are good. Valves are also good enough to be re used once re cut.
Engine block/cyclinder liners next, again he said they are in great condition with only the slight carbon rings as per previous photos and that a very light honing will be all that is needed, cam shafts are good also with no work needed on them except a clean.
Then the bomb shell, started looking at the crankshaft and all was looking great untill he got to the number one conrod journal. He ran his finger across and pointed out a ridge between the one and two journal, i could also feel this with my finger and he said it was at least a thou difference and that it means the crankshaft is no good. He said it was a real shame as the rest of the crank is good and only needed a light polish.
I asked about possible regrind and oversized bearings but he said the cranks can shatter/break and that i should look for another crankshaft if possible as the rest of the engine is in great condition and the rebuild would be worth it.
So now i am at the point where i have to deside if i can even find a crankshaft do i get it and then get the guy to check it or do i look at a second hand low mile engine and hope its ok? Knowing me though even if i find a low mile engine that i am lucky enough is in a car running i think i would still want to strip that one down as well as its only time with no real expense.
Trouble is i dont want to end up with two or even three engines all out of any kind of warranty as i have stripped them down lol. If anyone knows of a good second hand shaft that can be bought sale or return if its no good then feel free to let me know :-)
For now i need to research whats out there and at what cost before i go any further.


Noticed the gear for the dizzy has two teeth missing, very strange

Ok so with the information you guys have given me i was starting to worry about the condition of the bearing journals so i spoke to the guy who worked on my XJ40 heads and he said if i brought the parts to him he would check them out.
So i loaded the parts in the truck and drove out to see him.
Heads first, he said they are in really good condition and that they dont need a skim just "cleaning up". The valve seats are fine for a recut and the guides are good. Valves are also good enough to be re used once re cut.
Engine block/cyclinder liners next, again he said they are in great condition with only the slight carbon rings as per previous photos and that a very light honing will be all that is needed, cam shafts are good also with no work needed on them except a clean.
Then the bomb shell, started looking at the crankshaft and all was looking great untill he got to the number one conrod journal. He ran his finger across and pointed out a ridge between the one and two journal, i could also feel this with my finger and he said it was at least a thou difference and that it means the crankshaft is no good. He said it was a real shame as the rest of the crank is good and only needed a light polish.
I asked about possible regrind and oversized bearings but he said the cranks can shatter/break and that i should look for another crankshaft if possible as the rest of the engine is in great condition and the rebuild would be worth it.
So now i am at the point where i have to deside if i can even find a crankshaft do i get it and then get the guy to check it or do i look at a second hand low mile engine and hope its ok? Knowing me though even if i find a low mile engine that i am lucky enough is in a car running i think i would still want to strip that one down as well as its only time with no real expense.
Trouble is i dont want to end up with two or even three engines all out of any kind of warranty as i have stripped them down lol. If anyone knows of a good second hand shaft that can be bought sale or return if its no good then feel free to let me know :-)
For now i need to research whats out there and at what cost before i go any further.
Veteran Member
Joined: Jan 2012
Posts: 14,564
Likes: 10,753
From: France
Newbound
Rest easy, cranks are dirt cheap and plentiful eg
Jaguar XJS XJ12 V12 Crankshafts X 3 | eBay
Just phone them and ensure the one you buy is for the same rear seal as yours is (either lipseal or rope seal). AS someone said, you cannot regrind an XJS V12 crank or you knacker the nitriding or something or other on the surface treatment.
Keep going, great project. Also ask Just XJS for a jackshaft sprocket while you are on the blower to them!
Greg
Joined: Feb 2010
Posts: 28,788
Likes: 11,269
From: Adelaide Stralia
BUGGA.
Being in the UK, Greg has given you the good oil steer.
That sprocket is not a drama, but the chain, and that $$$$$ tensioner will be toast.
I reckon the oil pipe o/rings have contributed to this situation, and as I said, lousy oil/filter maintenance.
Keep at it with the engine ya got, is my 2 cents worth.
Veteran Member
Joined: May 2010
Posts: 4,638
Likes: 2,583
From: Vic Australia
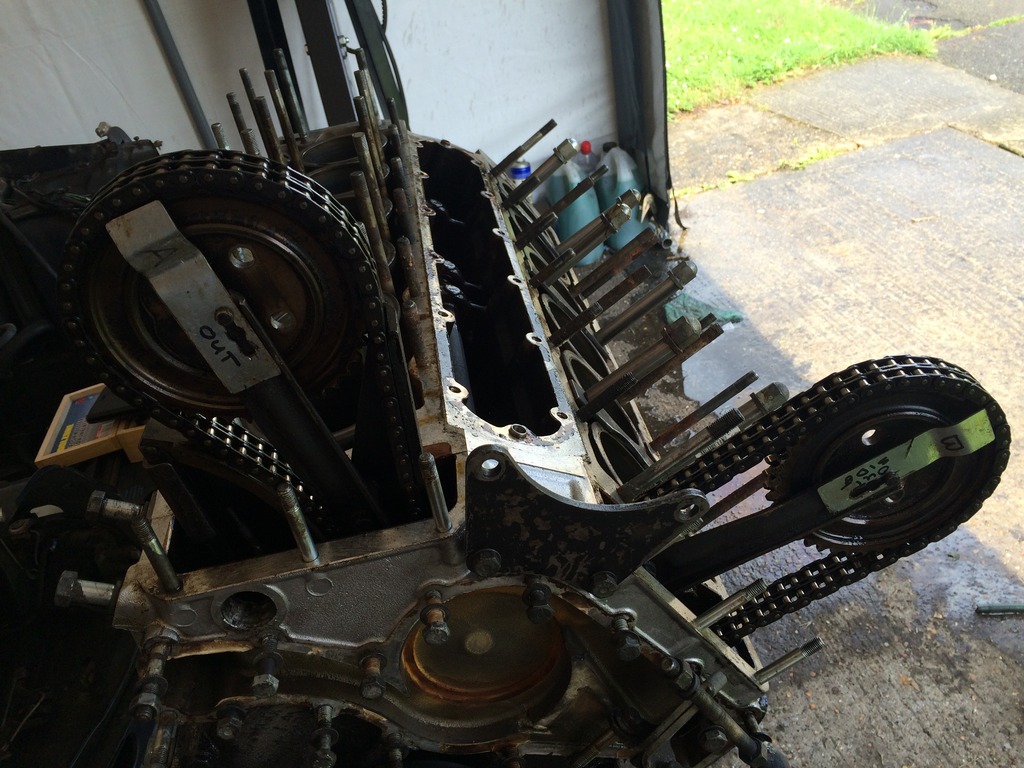
That engine has definitely been tampered with, those inlet ports are not as they came from the factory, you can see the burr makings on the port.
This is a pic of one of my heads (albeit a 6.0L)
This is a pic of one of my heads (albeit a 6.0L)