
89 XJS V12 rebuild


Senior Member
Joined: Dec 2011
Posts: 882
Likes: 65
From: new york
i remember you posting on a different thread that you were looking to put a 500-600hp rebuilt motor in it? have you came up with any ideas for this? i was just thinking about this myself and since i am having so much trouble coming up with pre he heads cheaply i was wondering about stroking it to something like 6.4 liters? it would requite stroking the crankshaft, something im curious about doing, a company called Arden did it with a jaguar, and it had 430 hp. not your mark but somewhere closer than a stock he engine. just food for thoughts, tell me what you think?Jaguar XJS Coup� mark III ARDEN AJ 7 1.Hand !! orig.12500 km!! for sale: Anamera
Thread Starter
|
Veteran Member
Joined: May 2010
Posts: 4,638
Likes: 2,583
From: Vic Australia
i remember you posting on a different thread that you were looking to put a 500-600hp rebuilt motor in it? have you came up with any ideas for this? i was just thinking about this myself and since i am having so much trouble coming up with pre he heads cheaply i was wondering about stroking it to something like 6.4 liters? it would requite stroking the crankshaft, something im curious about doing, a company called Arden did it with a jaguar, and it had 430 hp. not your mark but somewhere closer than a stock he engine. just food for thoughts, tell me what you think?Jaguar XJS Coup� mark III ARDEN AJ 7 1.Hand !! orig.12500 km!! for sale: Anamera
Stroking you can offset grind the crank to accept 2.1 journal Chev rods giving 80mm stroke and with a bore to 93mm will yield 6.8l. The Jag crank has 2.3 journals so does not need welding. Some basic engine building techniques like hollowing the journals and radiusing for strength and fatigue resistance. If you stroke you will need new pistons so may as well bore to max which is 93.5mm on stock liners.
By changing to Chev rods you can save a kg of weight and that is rotating mass, lighter pistons and hollow journals you should save a couple of kgs.
Hope this gives you some ideas
Last edited by warrjon; Feb 17, 2012 at 03:18 PM.
Senior Member
Joined: Dec 2011
Posts: 882
Likes: 65
From: new york
Martin Jansen's Austin-Healey 100 with Jaguar V12 Engine supercharged v12. i want to go naturally aspirated for my car. having driven blower cars, i think it would just be easier to drive naturally aspirated on the road. although ive never driven a centrfical supercharged car, suposibl they spool up like turbos.
would i want to offset grind the crank to fit 80mm rods?
would i want to offset grind the crank to fit 80mm rods?

Senior Member
Joined: Dec 2011
Posts: 215
Likes: 30
From: Petrie, Qld Australia
Thanks Jim big picsare good.
I did it for 2 reasons, I could hear the junk inside and the bottom had dents. When I cut it open the center support is bent and there is no way for the water to easily drain. It has to seep between the 2 bits of metal spot welded together. I will be cutting channels in the supports and rear to allow the water to drain.
It's then off for sandblasting and I will prime the inside before its powdercoated.
After that, I'd suggest that continuous welding of the whole unit to prevent any water getting in might be better than creating drain holes.
Cheers,
Languid
Senior Member
Joined: Dec 2011
Posts: 215
Likes: 30
From: Petrie, Qld Australia
What amazes me is the inconsistency and the parochialism here in Aus. No two states have the same rules, and New South Wales (NSW) has the nearest thing to a regular check of a vehicle's roadworthiness in the country, with the only possible exception being the ACT (Australian Capital Territory- kind of like Washington) where I have heard that they have an annual check of some sort. I don't go there (too full of bureaucrats for my liking).
New Zealand has a system called Warrant of Fitness which applies to all cars, and Certificate of Fitness for trucks & buses etc. Licensed Inspection Stations or Inspectors only. The average grease monkey can't do it.
New vehicles are only required to be inspected every 12 months up to 4 or 6 years, after that every 6 months. No current WoF, off the road. Any minor defects, 28 days to get repaired, any safety defects, off & get it fixed before further use. You can only get an inspection done within 14 days of the current WoF expiry. If the vehicle fails the examination, you have 28 days to get repairs done without having to have another full inspection, but you can only take the vehicle to a place of repair - you cannot continue to use it.
Modifications afecting vehicle safety have to be licenced & approved, but ordinary modifications which effectively update such as putting on improved brake rotors or similar will pass the standard WoF.
Personally I don't disagree with their approach. At least you know that the chances of being hit by a rogue vehicle are much reduced. Now if only they could come up with a similar system of fitness for the drivers! The nut behind the wheel is still the worst hazard, & some of them are worse than a bald retread.
the LVV plate number)
In Queensland, the only time you have to get a 'Roadworthy' done is if you want to sell the vehicle. That is scary.
Cheers,
Languid
New Zealand has a system called Warrant of Fitness which applies to all cars, and Certificate of Fitness for trucks & buses etc. Licensed Inspection Stations or Inspectors only. The average grease monkey can't do it.
New vehicles are only required to be inspected every 12 months up to 4 or 6 years, after that every 6 months. No current WoF, off the road. Any minor defects, 28 days to get repaired, any safety defects, off & get it fixed before further use. You can only get an inspection done within 14 days of the current WoF expiry. If the vehicle fails the examination, you have 28 days to get repairs done without having to have another full inspection, but you can only take the vehicle to a place of repair - you cannot continue to use it.
Modifications afecting vehicle safety have to be licenced & approved, but ordinary modifications which effectively update such as putting on improved brake rotors or similar will pass the standard WoF.
Personally I don't disagree with their approach. At least you know that the chances of being hit by a rogue vehicle are much reduced. Now if only they could come up with a similar system of fitness for the drivers! The nut behind the wheel is still the worst hazard, & some of them are worse than a bald retread.
List 2: Inspection items
The following items are listed in the order in which they appear in the VIRM. All items
must be listed on a detailed checksheet.The following items are listed in the order in which they appear in the VIRM. All items
Vehicle identification
��
VIN/chassis number *
Vehicle exterior
Vehicle exterior
��
External projections
��
Dimensions
��
Footrests (motorcycle only)*
Vehicle structure
Vehicle structure
��
Structure
Lighting
Lighting
Note: Cornering lamps, Daytime running lamps, Side-marker lamps, End-outline
marker lamps, Reversing lamps and Cosmetic lamps may be summarised into �Other
lamps�.
marker lamps, Reversing lamps and Cosmetic lamps may be summarised into �Other
lamps�.
��
Headlamps
��
Front and rear fog lamps
��
Cornering lamps
��
Daytime running lamps
��
Direction indicator lamps (front)
��
Direction indicator lamps (rear)
��
Forward-facing position lamps
��
Rearward-facing position lamps
��
Side-marker lamps
��
End-outline marker lamps
��
Stop lamps
��
High-mounted stop lamps
��
Rear registration plate lamps
��
Rear reflectors
��
Reversing lamps
��
Cosmetic lamps
Vision
Vision
��
Windscreen *
��
Other glazing
��
Sun visors *
��
Wipers *
��
Washers *
��
Rear view mirrors *
Entrance and exit
Entrance and exit
��
Door and hinged panel retention systems
Vehicle interior
Vehicle interior
��
Seats and seat anchorages*
��
Head restraints *
��
Seatbelts and seatbelt anchorages * #
��
Airbags *
��
Interior impact *
��
Speedometer *
��
Audible warning device *
Brakes
Brakes
��
Components
��
ABS self check *
��
Service brake performance
��
percentage (for decelerometers) and/or recordings for each wheel (for roller
brake machines)
brake machines)
��
Service brake balance
��
Parking brake performance
��
percentage (for decelerometers) and/or recordings for each wheel (for roller
brake machines)
brake machines)
��
tickbox for stall test (optional)
��
Trailer breakaway brake
��
Optional (recommended): Service brake recheck readings: percentage (for
decelerometers) and/or recordings for each wheel (for roller brake machines)
Steering and suspension
decelerometers) and/or recordings for each wheel (for roller brake machines)
Steering and suspension
��
Steering mechanism
��
Suspension mechanism
Tyres, wheels and hubs
Tyres, wheels and hubs
��
Tyre condition
��
Tread depth (recorded in mm)
��
left front
��
right front
��
left rear
��
right rear
��
Optional (recommended): Tyre tread depth recheck readings recorded in mm as
above
above
��
Spare wheel security (and space-saver tyre label)
��
Wheels
��
Hubs and axles
��
Mudguards
Exhaust
Exhaust
��
Exhaust system *
��
Visible exhaust smoke *
Towing connections
Towing connections
��
Towing connection
Miscellaneous items
Miscellaneous items
��
Engine and drive train *
��
Fuel tank and fuel lines *
Alternative fuels *
Alternative fuels *
��
Alternative fuels system in working order (Yes/No) *
��
Alternative fuels inspection certificate current (P/F) *
��
Alternative fuels system safe (P/F) *
Modified vehicle *
Modified vehicle *
��
Valid LVV plate, declaration or authority card * (optional: add space to record
the LVV plate number)
In Queensland, the only time you have to get a 'Roadworthy' done is if you want to sell the vehicle. That is scary.
Cheers,
Languid
Thread Starter
|
Veteran Member
Joined: May 2010
Posts: 4,638
Likes: 2,583
From: Vic Australia
I was thinking I might have it galvanized, then powder coated. I just need to talk to the powder coating guys to see how powder goes over gal.
Problem here is the upper spring seats are open into the subframe, no way of welding them shut as they have the hole for the spring compressor, so what I have done is cut channels in the inner section for water to drain. I have also welded 2.5mm steel center supports to strengthen the bottom so the car can be jacked without damaging the subframe.
Problem here is the upper spring seats are open into the subframe, no way of welding them shut as they have the hole for the spring compressor, so what I have done is cut channels in the inner section for water to drain. I have also welded 2.5mm steel center supports to strengthen the bottom so the car can be jacked without damaging the subframe.
Thread Starter
|
Veteran Member
Joined: May 2010
Posts: 4,638
Likes: 2,583
From: Vic Australia
What amazes me is the inconsistency and the parochialism here in Aus. No two states have the same rules, and New South Wales (NSW) has the nearest thing to a regular check of a vehicle's roadworthiness in the country, with the only possible exception being the ACT (Australian Capital Territory- kind of like Washington) where I have heard that they have an annual check of some sort. I don't go there (too full of bureaucrats for my liking)
I am planning on modifying the car but I need to get it through NSW rego first then I will modify things as I go, mostly the things I will modify will not be picked up on the regular annual inspection.
Last edited by warrjon; Feb 17, 2012 at 07:30 PM.
Senior Member
Joined: Dec 2011
Posts: 882
Likes: 65
From: new york
I am thinking of getting mine powdercoated when i rebuild the front suspension. and the rear cage. i am going to do it in a blue or a purple. no particular reason i just feel like it would add some flare. and i enjoy adding bright colors to normallydull parts of my car. just my .02$
Thread Starter
|
Veteran Member
Joined: May 2010
Posts: 4,638
Likes: 2,583
From: Vic Australia
I made an engine support, a couple of hours including going to buy the wood. Once this was done and I patched up my arm - angle grinder incident but that's another story.
It took about an hour to remove the subframe and have it in stripped, my trusty gearbox Jack made it easy.
It took about an hour to remove the subframe and have it in stripped, my trusty gearbox Jack made it easy.
Last edited by warrjon; Feb 19, 2012 at 03:34 AM. Reason: damn predictive typing on the tablet driving me nuts
Thread Starter
|
Veteran Member
Joined: May 2010
Posts: 4,638
Likes: 2,583
From: Vic Australia
This is what you get in a RUST FREE car.
I found this after removing the RH guard (fender for you Americans). There were NO tel tail signs but the rust had eaten a hole.
Pic 6 everything is welded in place and I began to add body solder - DAMN ran out of gas, so it looks a bit of a mess - but I decided to teach myself to lead fill panels - I can solder electronics been doin it for 30 years so how hard can it be to solder a panel instead.
I thought I would post the last 2 pics for anyone learning to weld. The 2nd last pic is a fire blanket I use to keep grinding and welding spatter off my glass - I made this mistake once and have a pitted windscreen in my daily driver. The last pic is a bit of steel wrapped in Aluminum sheet it makes a great heatsink for welding thin panel steel, especially where the bits have a gap. It will not stick to the panel steel because of the aluminum wrap.
Thread Starter
|
Veteran Member
Joined: May 2010
Posts: 4,638
Likes: 2,583
From: Vic Australia
Oops forgot this one..
I drilled a hole to allow water to drain. Water can get in there via the grill where the wipers are. As I see, this slopes downwards slightly so water can pool in the corner. The hole allows water to drain into the inner top support, just make sure the factory drain in the support is not clogged with sealer as mine was.
I drilled a hole to allow water to drain. Water can get in there via the grill where the wipers are. As I see, this slopes downwards slightly so water can pool in the corner. The hole allows water to drain into the inner top support, just make sure the factory drain in the support is not clogged with sealer as mine was.

Thread Starter
|
Veteran Member
Joined: May 2010
Posts: 4,638
Likes: 2,583
From: Vic Australia
Slow progress but I have the front subframe almost ready to go back in. Tomorrow I will turn up 2 new front subframe bushes as 1 of the originals had the hole slightly off center.
Everything black was painted in POR15 this stuff is great and screwing down against it barley scratches it.
The rack has been reconditioned by a local Jag specialist. New Bilsteins. I haven't painted the calipers yet will get to that some time this week.
I also have some 50mm high tensile rod that I am going to make bushes to go between the inner and outer wheel bearings so I can tighten the castle nut up and the bush will set the preload. I'll post pics when I have them made, there is quite a bit metal to turn off them so I think they will take a few hours to make on my small lathe.
The first pic is what I used as a spring compressor. I ended up re-drilling the lower pan mounting holes and re-tapping 7/16 as 2 of the 3/8 holes the thread was damaged.


Veteran Member


Joined: Jan 2012
Posts: 14,564
Likes: 10,753
From: France
I also have some 50mm high tensile rod that I am going to make bushes to go between the inner and outer wheel bearings so I can tighten the castle nut up and the bush will set the preload. I'll post pics when I have them made, there is quite a bit metal to turn off them so I think they will take a few hours to make on my small lathe.
Slightly lengthened stub outer:
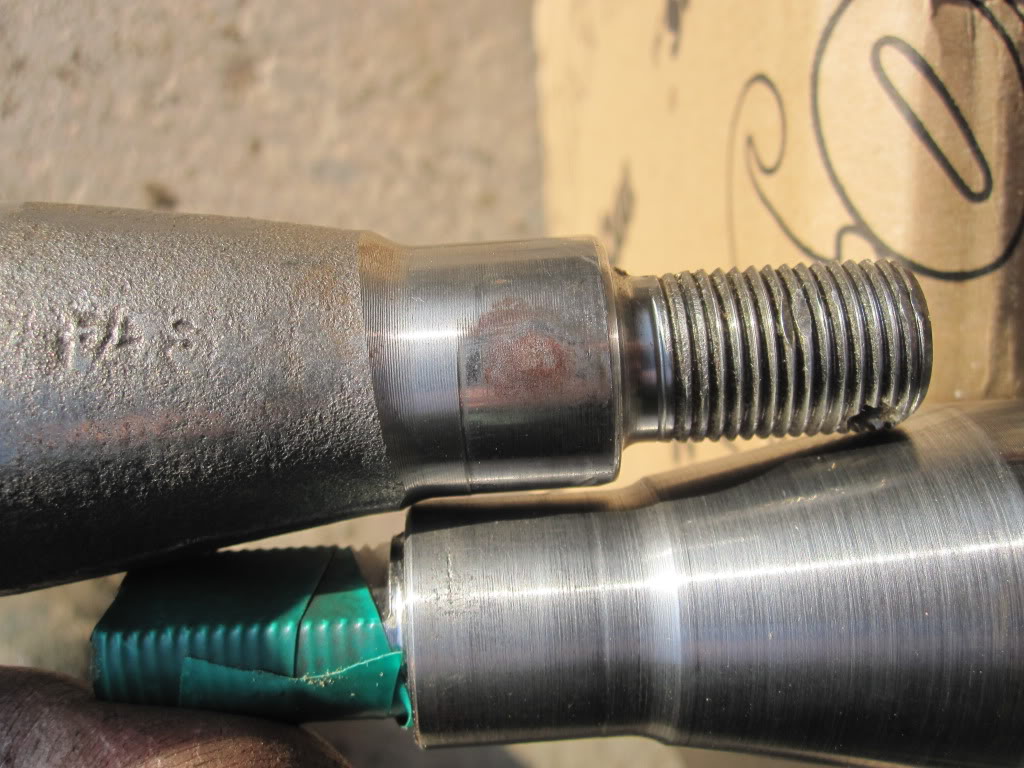
Spacer and stub:

Spacer fitted before trial measuring and machining the outer end of the spacer

Building up the hub for measuring, the hub is about to be dropped over the stun/spacer:
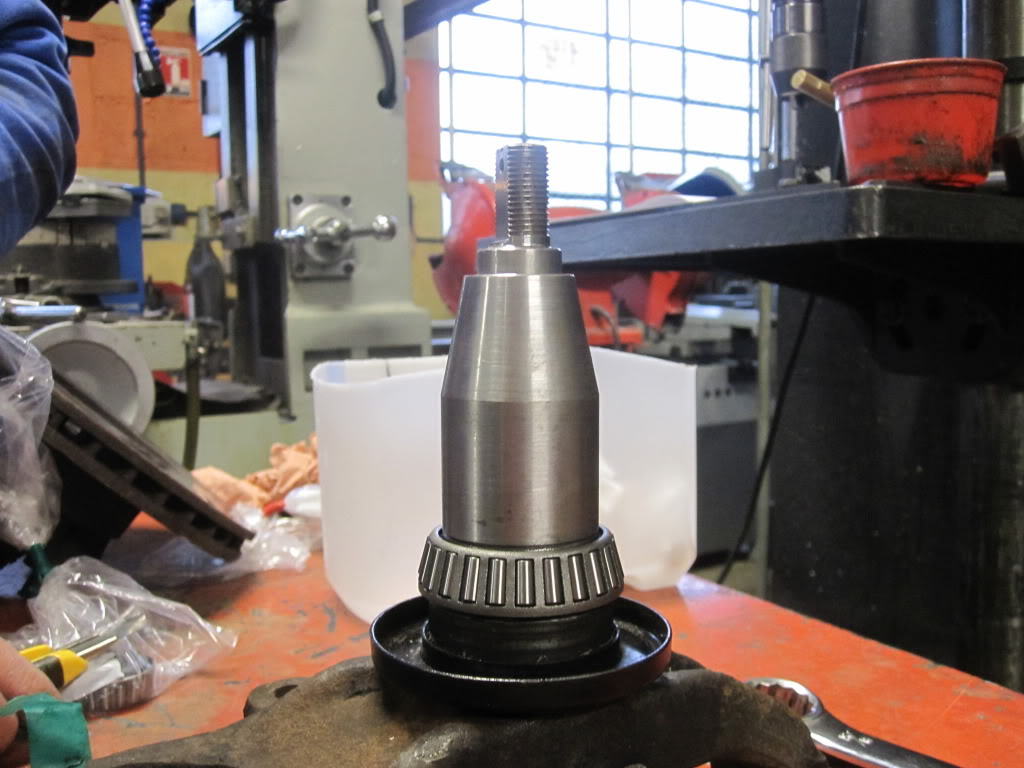
Still building up the hub, the hub is in place ready for the outer bearing inner race:

As you can see, in this pic we have everything installed, and the outside bearing's inner race is being held a bit off its outer race by the spacer. The amount it is being held proud by is measured by the difference, with spacer and without, to a common reference point (in my case the reference point was the shoulder on the stub at the end of the threads).
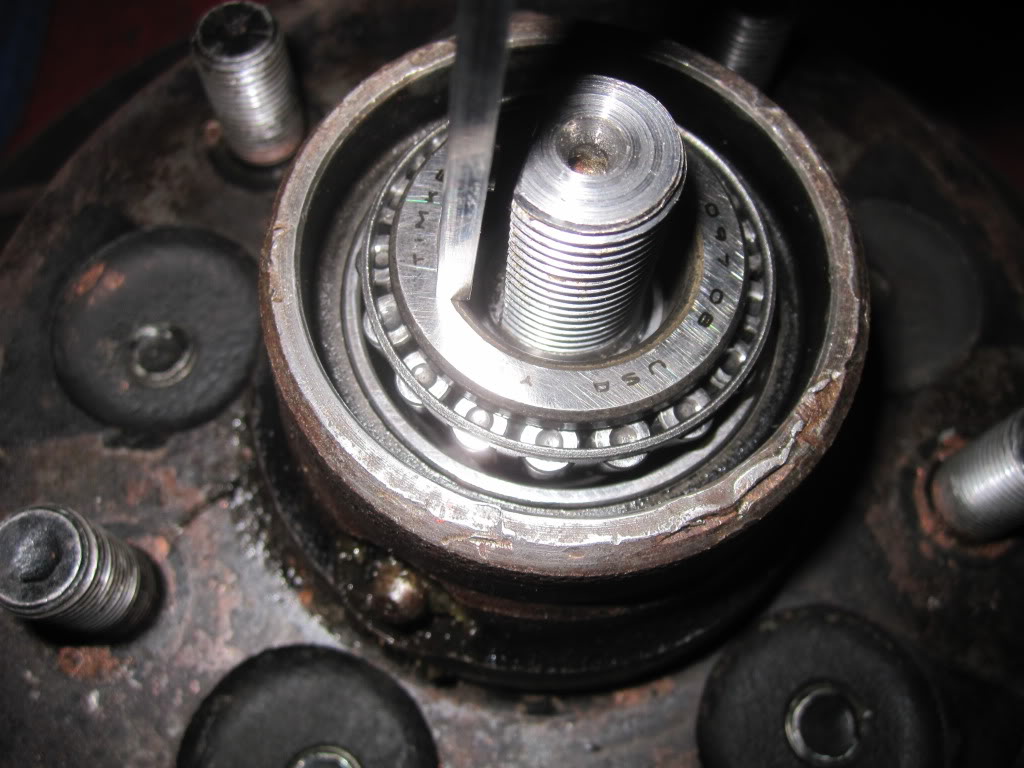
I was advised to go for zero to at most 1 thou max preload.
Greg
Last edited by Greg in France; May 18, 2012 at 10:36 AM.
Thread Starter
|
Veteran Member
Joined: May 2010
Posts: 4,638
Likes: 2,583
From: Vic Australia
Thanks Greg the pics help a lot. It means I don't have to reinvent the wheel. I was planning 1thou this is what I set the rear at and once greased the end float reduced to almost zero.
Thread Starter
|
Veteran Member
Joined: May 2010
Posts: 4,638
Likes: 2,583
From: Vic Australia
Thanks Greg the pics helped, I made this today, took forever my SB (clone) 9" can only manage a 5tho cut in 4340. I'll make the other side tomorrow.
I didn't have to machine the stub axle they fit as is, maybe because they are new, who knows??
I did not have your forethought and decided to make these after I assembled the subframe so I ended up having to trial fit on the car, a PITA.
I didn't have to machine the stub axle they fit as is, maybe because they are new, who knows??
I did not have your forethought and decided to make these after I assembled the subframe so I ended up having to trial fit on the car, a PITA.
Last edited by warrjon; Jun 9, 2012 at 02:44 AM.