XJS ( X27 ) 1975 - 1996 3.6 4.0 5.3 6.0

96 XJS trunk lock button

Thread Tools
 
Search this Thread
 
Old Jul 25, 2016 | 01:20 PM
  #1  
Anchor2's Avatar
Thread Starter
|
Junior Member
Joined: Jul 2012
Posts: 18
Likes: 2
From: La Quinta
Default 96 XJS trunk lock button

My trunk lock button broke on the inside of the car. It is the plastic back section which connects to the exterior push button. I am really having a hard time finding the part. Part # BEC4568

Spoke to a couple of salvage yard which say they cannot help (probably too small a part and $ to be worth the time). Any ideas?

Thank you
 
Reply
Old Jul 25, 2016 | 01:53 PM
  #2  
Vee's Avatar
Vee
Veteran Member
15 Year Member
Liked
Loved
Community Favorite
Joined: May 2010
Posts: 5,329
Likes: 1,739
From: Arlington, VA
Default

I was lucky to come across a part on eBay for not a lot of money.


They must be a way to fix this. I believe I have posted photos in a previous post. Since I found a replacement, I haven't spent anytime figuring on a better fix, but sounds like you have that time.


I wish I could offer you a better solution, but necessity is the mother of invention... I was planning on creating some kind of metal band around the cylinder and drilling a pin through it so that it could actuate the lock release.
 
Reply
Old Jul 25, 2016 | 06:02 PM
  #3  
Anchor2's Avatar
Thread Starter
|
Junior Member
Joined: Jul 2012
Posts: 18
Likes: 2
From: La Quinta
Default

I wish I had time. I was going to take a good look at it and see if I can do something like placing in a new pin. I am just wishing I come across one first. The metal band may be a solution - good idea!

Thanks for the help.
 
Reply
Old Aug 26, 2019 | 04:04 PM
  #4  
Vee's Avatar
Vee
Veteran Member
15 Year Member
Liked
Loved
Community Favorite
Joined: May 2010
Posts: 5,329
Likes: 1,739
From: Arlington, VA
Default

I believe I have found the solution to my problem!


This video shows a perfect way of burying a steel wire within the head of the plastic latch end!

I'll try to take some pics of my finished product, but thought I would share in advance.

Now if only I could get a Moderator to fix Trank to Trunk in the title of this thread!!!
 
Reply
Old Aug 27, 2019 | 06:56 AM
  #5  
petemohr's Avatar
Senior Member
10 Year Member
Liked
Loved
Community Favorite
Joined: Aug 2013
Posts: 812
Likes: 281
From: Pittsboro, NC
Default

Matthias Wandel is an amazing guy.
Check his YouTube channel and be amazed at the stuff he designs and builds.
 
Reply
Old Aug 28, 2019 | 06:01 AM
  #6  
Vee's Avatar
Vee
Veteran Member
15 Year Member
Liked
Loved
Community Favorite
Joined: May 2010
Posts: 5,329
Likes: 1,739
From: Arlington, VA
Default

How is this guy still married? Amazing stuff he builds.

I had no idea when i stumbled upon his video, thanks for recommending a deeper dive.
 
Reply
Old Aug 31, 2019 | 03:20 PM
  #7  
Vee's Avatar
Vee
Veteran Member
15 Year Member
Liked
Loved
Community Favorite
Joined: May 2010
Posts: 5,329
Likes: 1,739
From: Arlington, VA
Default

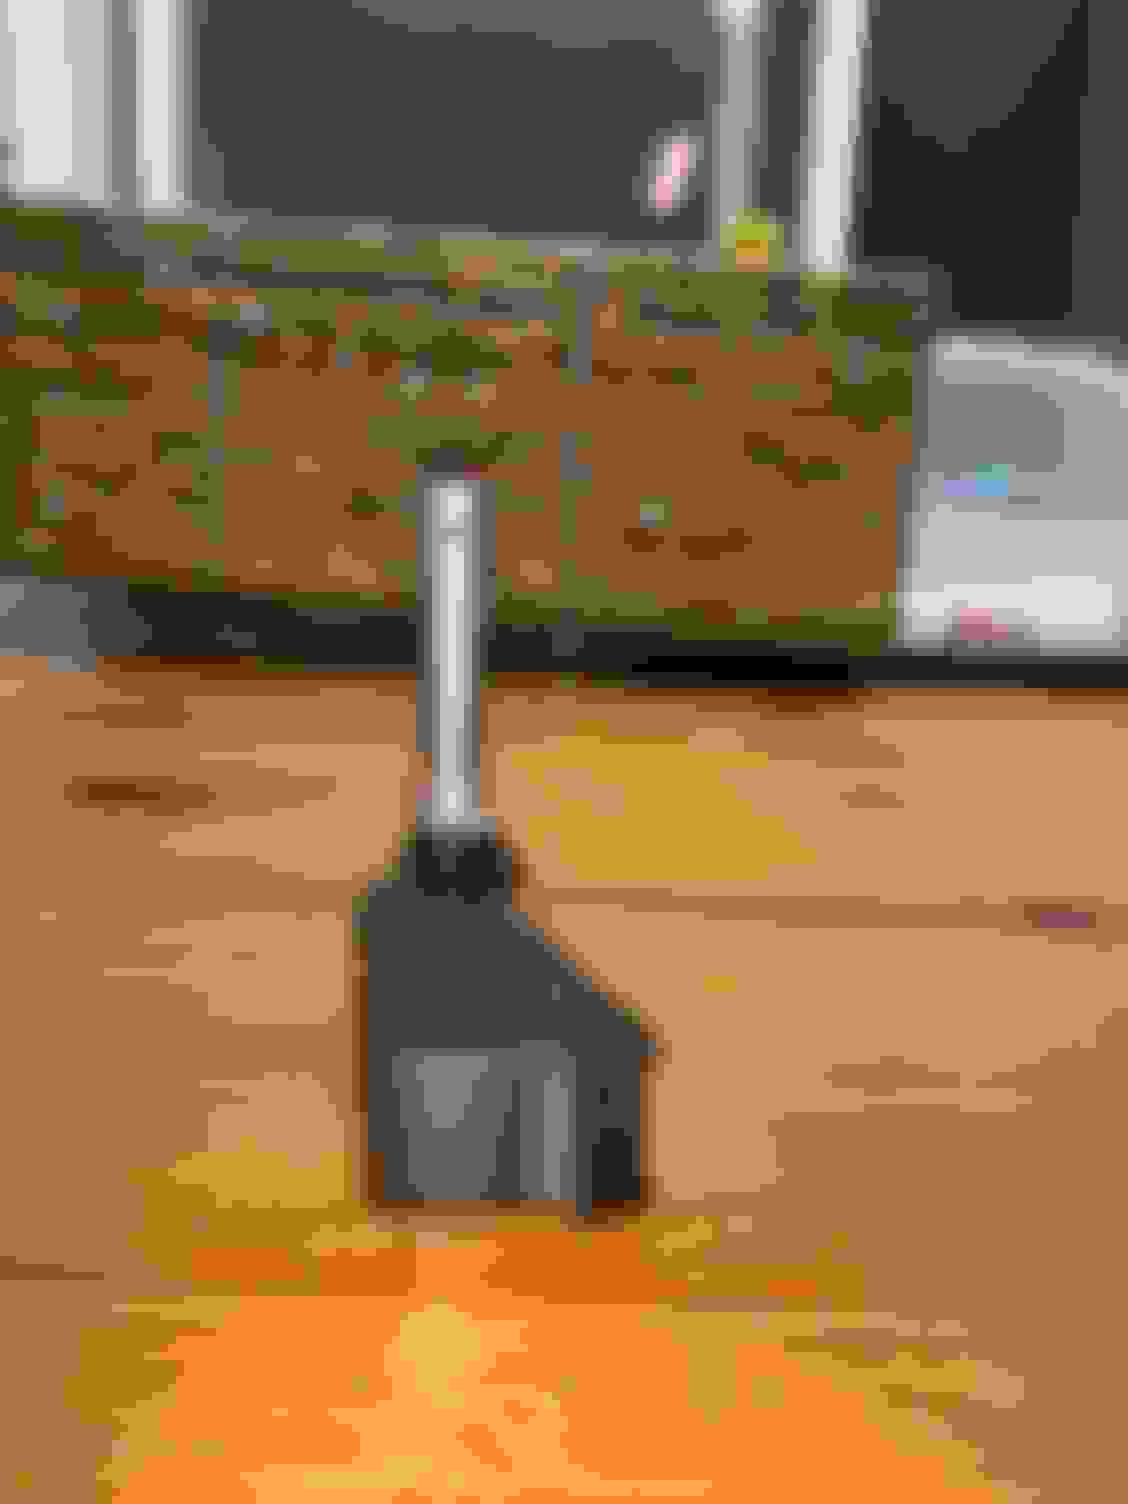
I ground down the post, enough to slide a 3/8” OD stainless steel tube over the plastic shaft. I got the tube at a hardware/hobby store. They had it in brass too.

The length of the shaft will need to be about 45mm. I say about because it’s not super critical. You can be a bit sloppy here, just don’t make it a whole lot shorter.

Whats critical here is the hole for the pin. I used a 3/32” drill bit and it was about 40mm from the bottom.

I didn’t take a picture of the ground down plastic post, but because I am not perfect, there were plenty of ridges and imperfections along the shaft that the glue is going to love sticking into.

I tried running a narrow steel brush through the tube, but that didn’t seem to rough anything up. I had a conical Dremel attachment that fit inside the ID of the tube and I was able to scuff it up very well.

I soaked both pieces in some cleaner/degreaser left over from a POR15 project I did a few years ago and I was ready to go!

I ended up using a plastic welding epoxy, but now that the project is done, I think I should have just gone with an epoxy that specializes in bonding to metal, even though this particular plastic epoxy claims it works with metal too. As mentioned before, there are enough ridges and gaps for the epoxy to fill such that any cured epoxy would be able to grab and hold. It’s the bond to the metal that is critical here. Hopefully the dremel did enough scuffing to let this epoxy bite into it permanently.

Now I’m letting this thing cure out for 24 hours before I see if I can separate it with my hands. If I can’t, I’ll be satisfied and it will become my new permanent latch!

Here’s some pics.


Reply
Old May 8, 2022 | 12:51 PM
  #8  
XJSHouston's Avatar
Junior Member
Joined: Dec 2018
Posts: 15
Likes: 3
From: Houston, TX
Default How did you get the trunk button out?

My button broke last week and trying to get it out to try a fix. How did you get yours out?
 
Reply
Old May 9, 2022 | 06:41 AM
  #9  
Vee's Avatar
Vee
Veteran Member
15 Year Member
Liked
Loved
Community Favorite
Joined: May 2010
Posts: 5,329
Likes: 1,739
From: Arlington, VA
Default

You need to remove the (I think) three bolts holding the assembly in from the inside. Then it all comes out, lock cylinder and all!
 
Reply
Old May 17, 2022 | 06:28 PM
  #10  
XJSHouston's Avatar
Junior Member
Joined: Dec 2018
Posts: 15
Likes: 3
From: Houston, TX
Default Did your fix work?

Originally Posted by Vee
You need to remove the (I think) three bolts holding the assembly in from the inside. Then it all comes out, lock cylinder and all!
forgot to ask: did your fix work?
 
Reply
Old May 17, 2022 | 08:40 PM
  #11  
Vee's Avatar
Vee
Veteran Member
15 Year Member
Liked
Loved
Community Favorite
Joined: May 2010
Posts: 5,329
Likes: 1,739
From: Arlington, VA
Default

Been working great ever since. No problems.
 
Reply
Related Topics
Thread
Thread Starter
Forum
Replies
Last Post
kstevusa
XK8 / XKR ( X100 )
1
Apr 11, 2021 09:42 AM
Dean Wheatley
F-Type ( X152 )
7
Jun 5, 2020 04:48 AM
vdpnyc
XJ XJ8 / XJR ( X308 )
13
Nov 14, 2016 12:17 AM
Rae
XJ XJ8 / XJR ( X308 )
1
Aug 5, 2010 09:46 AM

Currently Active Users Viewing This Thread: 1 (0 members and 1 guests)


All times are GMT -5. The time now is 04:27 AM.