
Fuel Pump/Fuel Filter

Thread Starter
|
Senior Member


Joined: Aug 2014
Posts: 716
Likes: 90
From: Venice, Fl
Some time ago I posted a thread regarding How To remove the fuel pump from the 1996 XJS. Even Temporarily, I would be happy with a procedure for replacing the fuel filter.
I spent some time looking at the "HOW TO" links for the Fuel Pump/Fuel Filter but could not find what I thought was a good "Step by Step Procedure".....Hopefully with Pictures!!!!!!
There were almost 400 reviews of the Post but not one (1) response.....WOW!
The car still runs great but I didn't want to wait till failure.
I just didn't want to tear into the project without some idea!!!
Any Ideas on "Where to Look" or "This is how you do it"
As always Thank the Good Lord for this site!!!!!
SoftballPaul
1996 XJS 2+2 Conv
1957 XK 140 Drop Head
Every Other British Sports Car known to Mankind
Veteran Member

Joined: May 2010
Posts: 5,352
Likes: 1,750
From: Arlington, VA
I understand that replacement of the pump requires removal of the tank, which on the facelift cars, is a herculean task.
I've done it before to a 2000 Ford Taurus, and it was labor intensive (about 4 hours work for a first timer), but ultimately straightforward.
I understand that I would expect to blow a whole weekend replacing the pump on this car.
Inevitably I will force myself to get in there and do that job, I plan on cutting a hole underneath the rear seats, so that the pump area can be accessed by removing the seats instead of the tank.
I would LOVE to know if that's feasible to do without bothering to drop the tank...
Thread Starter
|
Senior Member
Joined: Aug 2014
Posts: 716
Likes: 90
From: Venice, Fl
That's an idea!!
Is the opening to the pump located in that general area?
I have read a number of threads on location of the fuel filter but I don't believe I've ever heard where it is exactly located. I read where it's inside the left front wheel opening but then I also read where it is close in proximity to the tank.
If it is located anywhere near where the hole was opened in the rear seat area perhaps two (2) birds with one (1) stone.
TOOOO........Easy
Softball Paul
1996 XJS 2+2 Conv.
1957 XK140 Drophead
Every other British Sports Car known to Mankind
Veteran Member
Joined: Feb 2013
Posts: 17,809
Likes: 3,945
That's an idea!!
Is the opening to the pump located in that general area?
I have read a number of threads on location of the fuel filter but I don't believe I've ever heard where it is exactly located. I read where it's inside the left front wheel opening but then I also read where it is close in proximity to the tank.
If it is located anywhere near where the hole was opened in the rear seat area perhaps two (2) birds with one (1) stone.
TOOOO........Easy
Softball Paul
1996 XJS 2+2 Conv.
1957 XK140 Drophead
Every other British Sports Car known to Mankind
Is the opening to the pump located in that general area?
I have read a number of threads on location of the fuel filter but I don't believe I've ever heard where it is exactly located. I read where it's inside the left front wheel opening but then I also read where it is close in proximity to the tank.
If it is located anywhere near where the hole was opened in the rear seat area perhaps two (2) birds with one (1) stone.
TOOOO........Easy
Softball Paul
1996 XJS 2+2 Conv.
1957 XK140 Drophead
Every other British Sports Car known to Mankind
If you have to replace the Fuel Pump, on a Face Lift Convertible its an absolute PIA job, as its behind a Steel Baffle plate in the Boot/Trunk.
If you just pull away the Carpet/Trim right at the back of the Boot/Trunk, you will see the Baffle Plate, which I am talking about, which has been cut to perfection as even when you have undone all the bolts that hold it in place.
It is such a perfect fit, that everything else in that area is going to be in the way and will have to come out, including the hydraulics for the Soft Top, though you might just be able to get away with tying the unit out of the way like I did.
The Pump is in the Top of the Tank, so you have to pull the Tank back or maybe even out to get at it but you need to build a platform out of blocks of wood, so when you pull the Tank back, it doesn't drop down to the lower level.
But then its not over yet, as there are breather pipes to undo, which are really awkward to get at and then there is the rubber boot/sleeve, that connects the Filler Cap to the Tank.
Unless you are lucky, its a real PIA to get it off, which in my case was so impossible that I had to cut right through the Sleeve and then replace it with new, so if you feel you need to do that, get a new rubber boot sleeve to replace it with beforehand.
Then the real fun starts, as before you can pull the Tank forward, or maybe take it out, you have to undo the Two Fuel Pipes under the Car, which are held in place with clips, that are really awkward to get to.
When you manage to get them off, then its still not over because you have to push and twist each of those pipes to undo them, for which you ideally need a Special Tool which is like a tube that fits over the pipes, that you can use to push and twist.
At a pinch you could probably make something out of a piece of hard plastic tube with a slot cut in it big enough to go over the pipes. One of the Fuel Pipes is Flow and the other one is return.
Both really awkward to get to, as you will see but you will also see a fuel filter in that area (no longer available doh!) but you can get an After Market one on ebay or a filter supplier.
Then you have to pull the Tank Back, which is wedged in really Tight! but when you have managed to do that, then you will see where the fuel pump goes into the Top, where a Special Tool is required in order to turn the Lock ring.
The Fuel pump will probably set you back $200-$300 �100-�200 (UK) and while you are about it, you had better replace the sender because this is the kind of job, you won't be wanting to make a habit of doing.
As for cutting holes in the Bodywork, it might de-value your Car, as I'm guessing you have the Celebration Model, Wood and Leather Steering Wheel and all that.
So if your Car is running fine, then I would let well alone, although you could replace the filter underneath.
Fuel Filter and Pipes-4.0 Litre - Parts For XJS from (V)179737 to (V)226645 | Jaguar Heritage Parts UK
Veteran Member
Joined: Feb 2013
Posts: 17,809
Likes: 3,945
I understand that replacement of the pump requires removal of the tank, which on the facelift cars, is a herculean task.
I've done it before to a 2000 Ford Taurus, and it was labor intensive (about 4 hours work for a first timer), but ultimately straightforward.
I understand that I would expect to blow a whole weekend replacing the pump on this car.
Inevitably I will force myself to get in there and do that job, I plan on cutting a hole underneath the rear seats, so that the pump area can be accessed by removing the seats instead of the tank.
I would LOVE to know if that's feasible to do without bothering to drop the tank...
I've done it before to a 2000 Ford Taurus, and it was labor intensive (about 4 hours work for a first timer), but ultimately straightforward.
I understand that I would expect to blow a whole weekend replacing the pump on this car.
Inevitably I will force myself to get in there and do that job, I plan on cutting a hole underneath the rear seats, so that the pump area can be accessed by removing the seats instead of the tank.
I would LOVE to know if that's feasible to do without bothering to drop the tank...
If you decided to cut a hole, which I wouldn't really advise you to do as tempting as it might be, the hole would probably need to be a lot bigger than you would think.
Which could not only de-value your Car but might compromise the construction, on which your insurance company, might take a very dim view, in the event you happened to have an accident at some time.
So the best plan is to 'Get in the Zone' and get yourself a new Fuel Pump and a New Sender, plus a New Rubber Boot/Sleeve, to connect the Fuel Filler to the Tank, just in case you can't get it off and have to cut it through.
Then take a deep breath and knuckle down and slowly work your way through it, one nut at a time, as it really is a bit of a PIA job, especially if you enjoy driving her more than you do working on her.
Its really not that difficult but it certainly is a bit awkward and there will be tears of frustration and consumption of the 'JD'
But the upside is its not a job, that you are going to need to do every day and once you've got it done, you've got it done!
The only other alternative, is to pay 'Big Bucks' to a Garage/Shop to do this for you, making sure you tell them, not to start cutting any holes in your Car!
I'm guessing $500+ Plus Parts!
I had a quote for �500 (UK) where most of that, would be down to Labour.
It's one of the Slings and Arrows of owning a XJS but why the hell they put the fuel pump there, is anybodies guess.
Its just another day at the office, for an XJS owner as well another good reason, why most normal Motorists would avoid one of these Cars.
(Obviously disconnect the Battery before you start messing about)
Thread Starter
|
Senior Member
Joined: Aug 2014
Posts: 716
Likes: 90
From: Venice, Fl
Orangeblossum,
Probably the best post Iv'e had in the last two (2) yrs of being on this site. I am going on 71 yrs. but still enjoy wrenching on my cars.
With regards to the hole in the rear seat area, do you think It might have to be that large if it is located in the correct area. I can't imagine the port that has to be removed much larger than 6-8inches. Could the hole be located directly over the fuel pump opening??
You also mentioned doing the filter, which I should immediately, as I have had the car for a couple of yrs and have not done anything to replace new
You stated you can get to the fuel filter from underneath. Did you mean if I lay on my back or put it up on the list I can access?
Do you know of any pictures showing the location of the fuel filter.
I know on some prior posts there was lots of discussion as to where the fuel filter is really located.
As I mentioned Great Post on your part and thank goodness for this site!!!
Softball Paul
1996 XJS 2+2 Conv.
1957 XK 140 Drop Head
Every other British Sports car know to mankind

Veteran Member

Joined: Apr 2014
Posts: 4,590
Likes: 3,535
From: Kent, UK
Paul,
The fuel filter on your car is located in the LH front wheelarch in the rear corner. Here's my suggested routine:
- Jack up car, use axle stand and remove LHF wheel.
- Thoroughly wash all around the black plastic cover that conceals the fuel filter.
- Use a rag soaked with white spirit and clean any underseal from the cover, particularly around the 7(?) mounting nuts. There will probably be a lot of crud and underseal in your wheelarch in this area
- Thoroughly dry everything
- Carefully undo the 7(?) mounting nuts & remove the cover
- Pull the fuel pump fuse
- Put a drip tray under the filter and have some rags ready
- Activate the starter for a few seconds to depressurise the fuel pressure in the lines
- Undo just 1/8 of a turn, the top and bottom fuel pipe joining nuts to the filter. They can be VERY tight. Do NOT undo the filter mounting bracket until you know that you can undo the fuel pipe joint nuts. If the filter is left free to move, you can easily distort the fuel pipe when undoing the nuts.
- When both of the the nuts can be freely undone, only then undo the filter mounting bracket, remove the fuel pipes from the filter and remove the filter
- OPTIONAL - Wire brush and paint the filter mounting bracket
- Fit new filter with pipes very loosely connected
- Fit filter mounting bracket
- Tighten up the fuel pipe joint nuts
- Clean any residual fuel
- Refit pump fuse
- Start engine and check for any leaks at filter
- Turn off engine
- Clean any corrosion on fuel pipes underneath the filter and apply some protective wax or paint
- Refit filter plastic cover
- Refit wheel
- Go for a rewarding drive!
Hope that helps
Paul
Last edited by ptjs1; Mar 3, 2016 at 03:25 PM.
Trending Topics
Veteran Member
Joined: Feb 2013
Posts: 17,809
Likes: 3,945
Orangeblossum,
Probably the best post Iv'e had in the last two (2) yrs of being on this site. I am going on 71 yrs. but still enjoy wrenching on my cars.
With regards to the hole in the rear seat area, do you think It might have to be that large if it is located in the correct area. I can't imagine the port that has to be removed much larger than 6-8inches. Could the hole be located directly over the fuel pump opening??
You also mentioned doing the filter, which I should immediately, as I have had the car for a couple of yrs and have not done anything to replace new
You stated you can get to the fuel filter from underneath. Did you mean if I lay on my back or put it up on the list I can access?
Do you know of any pictures showing the location of the fuel filter.
I know on some prior posts there was lots of discussion as to where the fuel filter is really located.
As I mentioned Great Post on your part and thank goodness for this site!!!
Softball Paul
1996 XJS 2+2 Conv.
1957 XK 140 Drop Head
Every other British Sports car know to mankind
Probably the best post Iv'e had in the last two (2) yrs of being on this site. I am going on 71 yrs. but still enjoy wrenching on my cars.
With regards to the hole in the rear seat area, do you think It might have to be that large if it is located in the correct area. I can't imagine the port that has to be removed much larger than 6-8inches. Could the hole be located directly over the fuel pump opening??
You also mentioned doing the filter, which I should immediately, as I have had the car for a couple of yrs and have not done anything to replace new
You stated you can get to the fuel filter from underneath. Did you mean if I lay on my back or put it up on the list I can access?
Do you know of any pictures showing the location of the fuel filter.
I know on some prior posts there was lots of discussion as to where the fuel filter is really located.
As I mentioned Great Post on your part and thank goodness for this site!!!
Softball Paul
1996 XJS 2+2 Conv.
1957 XK 140 Drop Head
Every other British Sports car know to mankind
Although I am not a 'Purist' myself, I wouldn't go hacking your Car about, as you will only be making yourself more work of a very different kind and in any event you would have to cut that hole 'spot on' at least 7ins across and probably more.
So please don't even go there! do it like this.........
Day One: Remove all the Carpet and interior trim in the Boot/Trunk
You can still drive the Car as normal.
Day Two: With the Carpet/Trim out of the way you will be able to see the Steel Baffle Plate. So with some WD and a Spanner, go around all the Bolts and loosen them off
including the Battery Holder and the Brackets that hold the Hydraulics for the Roof.
Day Three: Borrow the Special Tool to undo the Fuel Pipes and the other Special Tool to remove the Locking Ring, that Hold the Pump and Evaporator (Big Plastic Thingy) that sits on top of where the Fuel Pump Goes.
The Locking Ring is right on top of the Tank.
You can still drive the Car as Normal
The Special Tools are really not that Special, You can make a Fuel Pipe 'Undoer' out of a 2ft length of Solid plastic pipe.
Then cut a fairly big slot in the side, so it goes over the fuel pipe but the Plastic Pipe must be small enough not to slide over the Fitting on the end of the Fuel Pipe.
The idea being you 'Slip the Slot' over the Fuel Pipe and then slide it down to the Fitting and when you get to the fitting, you 'Push it and Twist It' and then you Pull it out, so have something ready to catch any Petrol/Gas.
They are supposed to be self sealing, so in theory you shouldn't have much come out.
It would help to cut some Serrations into the end of the Plastic Pipe to give it more grip but the Fuel Pipes have also got Spring Clips, that you can flick off with a long handled screwdriver (Don't lose these!)
As for removing the Locking Ring, You can very gently knock it round with a piece of Hardwood and a rubber/wooden hammer or a mallet.
But you are Still on Day: Three and Driving the Car!
So use the Car as you normally would and run it well down on Petrol/Gas.
You've got your New Fuel Pump and Sender at the Ready, together with a New Rubber Boot, to join the Fuel Tank to the Fuel Filler.
Also get a New Rubber Gasket to go underneath the Locking Ring in case it gets Broken or Torn.
If you've got an Air Wrench (not the sort that you would use on Wheel Nuts)
Then you are ready to go.
Doing it all in 'Very Small Steps' will really cut the agony in half.
Then Pick a Weekend when you don't need the Car and get the Air Wrench out and then go round and whip out all of those Bolts that you loosened.
Remove the Steel Baffle Plate.
And Tie the Hydraulic Soft Top Pump up out off the Way.
Then get underneath and remove the Fuel Pipes or the Tank won't move!
Then get back in the Boot/Trunk and make a Shelf up out of Blocks of Wood or some old Books, so the Tank doesn't Drop down when you pull it back/out.
Undo the Breather Pipes, near the Filler Pipe and try and get the Rubber Joiner, that joins the Filler to the Tank off, or Cut off the Old one, to replace with a New one.
Lubricate with some washing up liquid to get the new one on when the Time comes.
Then Pull out the Tank, which will feel as if its been Welded in place, although its only the Fuel Pipes that actually hold it, together with the rubber packing and of course the Baffle.
It will be quite hard to pull it but it WILL COME OUT!
Then Change the Pump and the Sender and then push it all back and do up everything that you've undone.
But test that the Pump is working before you replace the Baffle.
The Pump only runs for seconds before it cuts out.
I'm not an expert mechanic but if I could manage to do it so can you.
Hope this helps.
Veteran Member
Joined: Feb 2013
Posts: 17,809
Likes: 3,945
Hi Paul
Before someone states the obvious, I was assuming rightly or wrongly, that your Car was still drivable.
But even if it isn't, it pays to do a little bit, every day rather than go 'hell for leather' as it pays to take your time and do it right.
Or it can be a frustrating job that could leave you tearing your hair out and also throwing your spanners out of the pram.
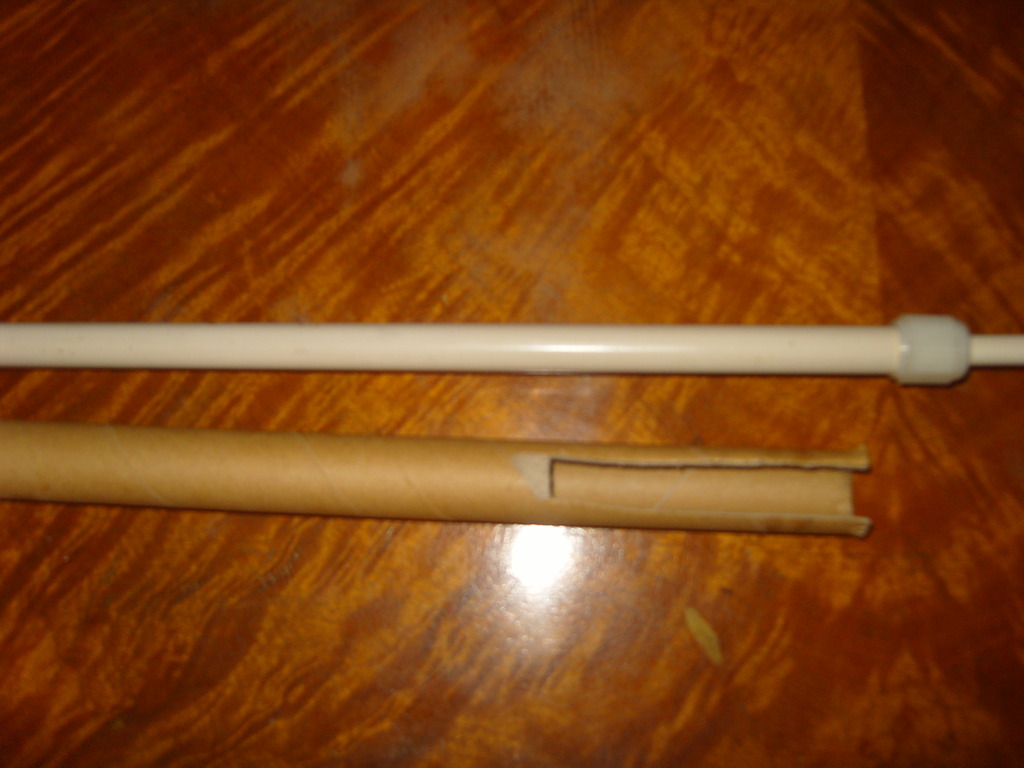
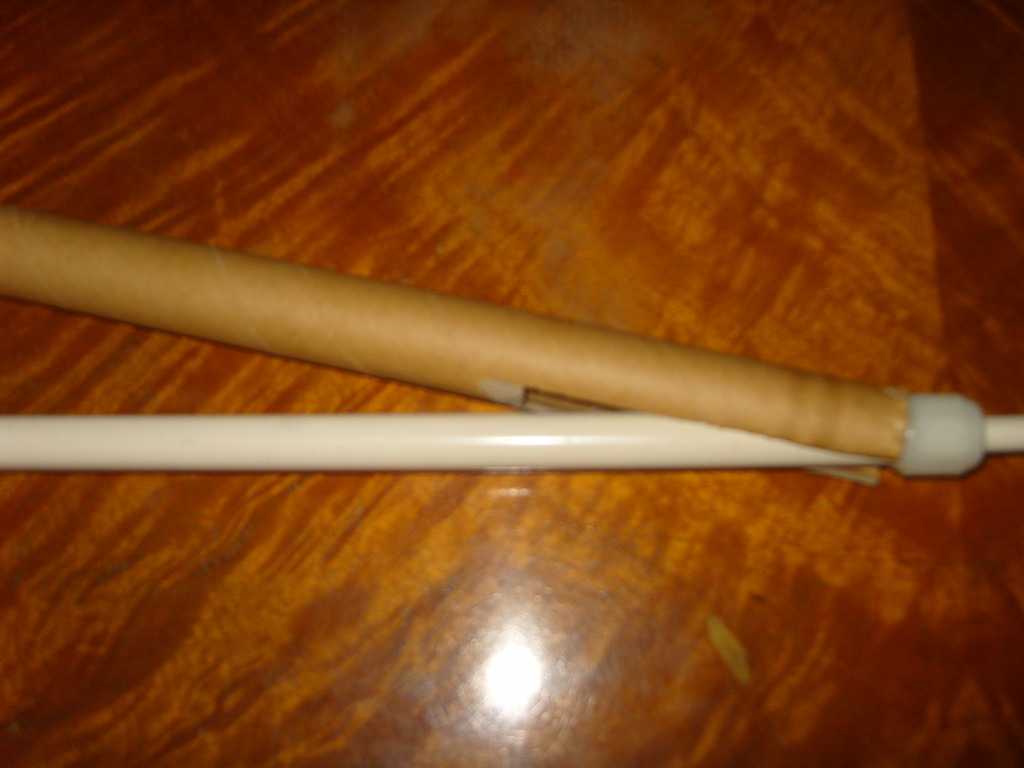
I've also included a couple of Pics of a 'mock up' of a Tool you can easily make from plastic pipe, that just needs to be big enough to contain the pipe, while at the same
time small enough, so it doesn't slide over the fitting, on the end of the fuel pipe.
So that you can Push on the fitting on the end of the Fuel Pipe and then 'Twist it' to unlock it.
The real thing is ideally about 2ft long and the Slot in the Tube should be longer, than that shown in the 'Mock up' so the 'Tool' and the 'Fuel Pipe' can lay closer together.
But I reckon you get the idea.
Before someone states the obvious, I was assuming rightly or wrongly, that your Car was still drivable.
But even if it isn't, it pays to do a little bit, every day rather than go 'hell for leather' as it pays to take your time and do it right.
Or it can be a frustrating job that could leave you tearing your hair out and also throwing your spanners out of the pram.
I've also included a couple of Pics of a 'mock up' of a Tool you can easily make from plastic pipe, that just needs to be big enough to contain the pipe, while at the same
time small enough, so it doesn't slide over the fitting, on the end of the fuel pipe.
So that you can Push on the fitting on the end of the Fuel Pipe and then 'Twist it' to unlock it.
The real thing is ideally about 2ft long and the Slot in the Tube should be longer, than that shown in the 'Mock up' so the 'Tool' and the 'Fuel Pipe' can lay closer together.
But I reckon you get the idea.


Thread Starter
|
Senior Member
Joined: Aug 2014
Posts: 716
Likes: 90
From: Venice, Fl
The original thread (Several weeks back) written stated that my vehicle was working well but just turned 90K miles.
Because of this I wanted to look at possible replacing the pump prior to failure.
What kind of diameters on the tool?
Thanks
Softball Paul
Because of this I wanted to look at possible replacing the pump prior to failure.
What kind of diameters on the tool?
Thanks
Softball Paul
Veteran Member
Joined: Feb 2013
Posts: 17,809
Likes: 3,945
If your Car is running, I (personally) would let well alone, as the Pump that is in there, will/should be an OEM Jaguar Pump, that could go on indefinitely for many more Thousand miles.
No point in making work for yourself, if you don't have to.
You could fit a New one, which may be an After market Copy, made who knows where, that could fail in a Few Thousand Miles.
That's one set of dice, I wouldn't want to roll.
But I would replace the Fuel Filter under the Car @PTJS
I know you want to be 'Belt and Braces' but there are plenty of other things that can go wrong, hence the many Thousands of threads on this Forum.
Short of a Brand New Car, you can't really plan for every eventuality, or you would be replacing lots of other things, that are working OK at the moment.
When you replace the filter underneath, you will see the Fuel Pipes, so just take a rough measurement off one of those.
Thread Starter
|
Senior Member
Joined: Aug 2014
Posts: 716
Likes: 90
From: Venice, Fl
Thanks for the response. You are probably correct and I should leave well enough alone.
I have ordered the filter it should be here in a couple of days.
Thanks for all the support.
Softball Paul
I have ordered the filter it should be here in a couple of days.
Thanks for all the support.
Softball Paul

Veteran Member
Joined: Jul 2010
Posts: 2,459
Likes: 695
From: Key West, FL
Sorry no one replied to your post. I'm usually busy and don't spend much time here anymore, but I have always made a point to scan the front page and pull up the least responded to posts, especially any zero response posts. I get how frustrating it is to see that hundreds of people have looked and didn't even bother with a "Idk mate."
Unfortunately, it just seems not many people have torn into that area of their late XJSs, because it seems to sound like such a pain.
If it were me personally, I would leave it until it broke, unless you can heard it struggling and know it is on its last legs. Either way, it would appear to me, as it does to you, that there is little to no info on this topic. While it is always nice to have a handy walkthrough, part of working on cars, bikes, w/e, is just tearing into something and analyzing how it works and why it is assembled in a particular way while you are at it. It gives you better diagnostic skills and helps you put the puzzle back together. Take pics when in doubt or when tackling a big project.
Overall, sometimes you just have to bite the bullet and do everything yourself. Take the opportunity to document the process and be helpful to future owners that run into the same issue. I'm sure if you tore partly into the work and hit a speedbump, unsure how to remove something or what to do next, you could always pop on here for advice.

Thread
Thread Starter
Forum
Replies
Last Post
Wayne'sJaguar
XJ6 & XJ12 Series I, II & III
15
Feb 8, 2016 06:20 PM
Currently Active Users Viewing This Thread: 1 (0 members and 1 guests)