
How do I bleed the ABS Brakes 1989 XJS V12?

Thread Starter
|
Veteran Member
Joined: Feb 2013
Posts: 17,809
Likes: 3,945
How do I Bleed the ABS Brakes on my 1989 XJS V12
Is there anything special I need to do, that I wouldn't have to do on other Cars?
Should I for instance have the Engine running or not?
Is there anything special I need to do, that I wouldn't have to do on other Cars?
Should I for instance have the Engine running or not?

Veteran Member


Joined: Jan 2012
Posts: 14,611
Likes: 10,809
From: France
https://www.jaguarforums.com/forum/x...xjs-abs-81794/
If your system needs a complete fluid change/has air everywhere, which it may or may not, this seems a great plan as long at you hose off the fluid that gets spilt in the engine bay. A Gunson eezibleed will do the pressurizing. Otherwise, assuming you have the same system as Warrjon, and it is not full of air everywhere, to bleed conventionally you can do it as follows:
Two people, one in car and you underneath:
Start with rears, passenger side first, get person inside car to turn on ignition, you then open bleed nipple. The ABS pump runs and pumps out the fluid. ONLY 15 seconds MAX at a time though, or the pump will burn out. Then wait for 90 seconds to let the pump cool and do it again; and so on until no bubbles. The rear driver's side nipple the same.
Fronts can be done normally ignition off, quite normally, by the inside person pushing and holding the pedal down. I have always found that using a one way bleed valve on the nipple (eg Bike It Bleeding Assistor Kit - SPORTSBIKESHOP) as well as opening/closing the nipple gave a much more reliable bleed.
If you want to do the full XJS nerd thing (like I have just done) a set of remote rear bleeders makes the entire process a sodding sight easier. Certainly something to do when you refurb the rear axle. This guy has a great setup which I have got:
Remote Bleed Kit for Jaguar IRS Brakes - Fosseway PerformanceFosseway Performance
Buy the banjo adaptors too, they make the whole installation a piece of cake.
Greg
Last edited by Greg in France; May 23, 2014 at 02:24 AM.
Thread Starter
|
Veteran Member
Joined: Feb 2013
Posts: 17,809
Likes: 3,945
A search revealed this from Warrjon, maybe your system is the same?
https://www.jaguarforums.com/forum/x...xjs-abs-81794/
If your system needs a complete fluid change/has air everywhere, which it may or may not, this seems a great plan as long at you hose off the fluid that gets spilt in the engine bay. A Gunson eezibleed will do the pressurizing. Otherwise, assuming you have the same system as Warrjon, and it is not full of air everywhere, to bleed conventionally you can do it as follows:
Two people, one in car and you underneath:
Start with rears, passenger side first, get person inside car to turn on ignition, you then open bleed nipple. The ABS pump runs and pumps out the fluid. ONLY 15 seconds MAX at a time though, or the pump will burn out. Then wait for 90 seconds to let the pump cool and do it again; and so on until no bubbles. The rear driver's side nipple the same.
Fronts can be done normally ignition off, quite normally, by the inside person pushing and holding the pedal down. I have always found that using a one way bleed valve on the nipple (eg Bike It Bleeding Assistor Kit - SPORTSBIKESHOP) as well as opening/closing the nipple gave a much more reliable bleed.
If you want to do the full XJS nerd thing (like I have just done) a set of remote rear bleeders makes the entire process a sodding sight easier. Certainly something to do when you refurb the rear axle. This guy has a great setup which I have got:
Remote Bleed Kit for Jaguar IRS Brakes - Fosseway PerformanceFosseway Performance
Buy the banjo adaptors too, they make the whole installation a piece of cake.
Greg
Thank you so much for replying!
I did try to do things 'The Proper Way' (if you know what I mean?) but there are so many threads to go through, that I was going word blind, by the end of it!
And since you've been holding my hand on this, I am very happy to follow your advice.
I will get the (bribe the GF) to help me, just as soon as She has finished having her operation, to have her 'high heels' Surgically removed!
Having got some practice in, on the Brake Pipe making tool, I am happy they will be ok.
Every things bolted together, so the only thing left for me to do, is to Bleed the Brakes.
Thank the Lord you told me about the Motor!
As I had absolutely no idea, that you could burn the thing out!
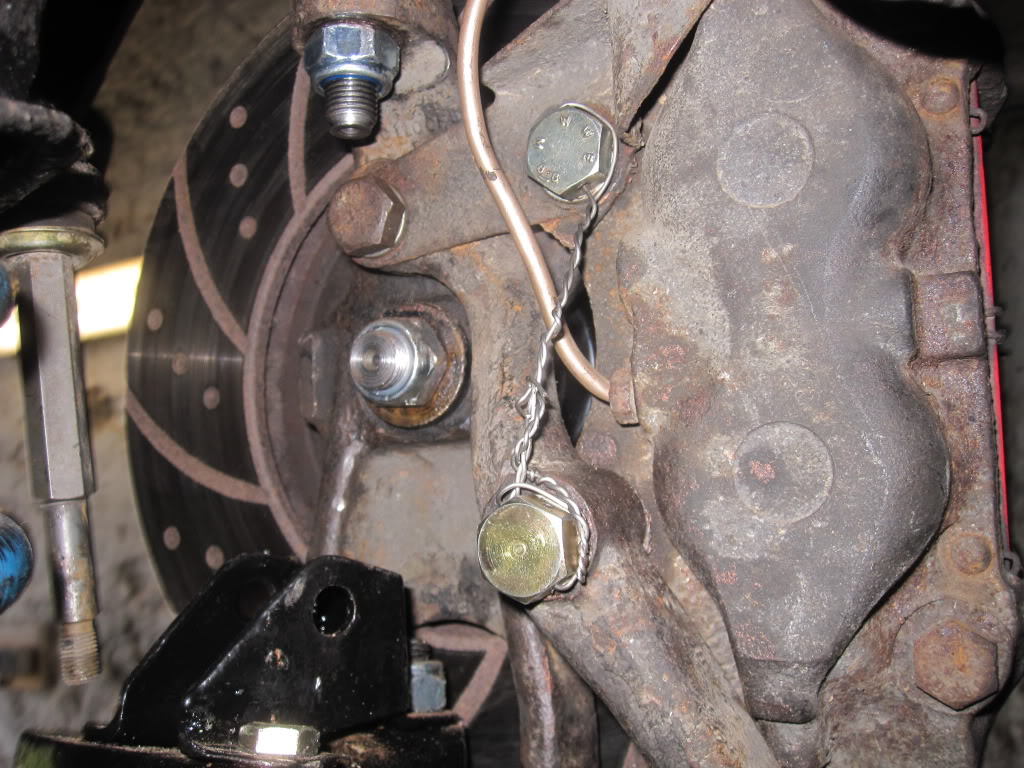
Please would you very kindly take a look at the Photo's and see if you are able to spot any blindingly obvious mistakes I may have made!
It looks ok to me but what do I know!
I torqued the Caliper bolts up to 50lbs per foot and then locked them with Stainless Steel Locking Wire, even though I cannot see how they would be able to come loose on their own.
Because they were a nightmare to undo!
Then I fitted new slotted disc pads and new brake hoses and am ready with a new can of Dot4.
When I put the Flexi Brake Pipes on, I was able to use some full size plain nuts, which should be easier to undo in future if needs be.
And just in case the Brakes don't work, I always carry some Chocs in the Car, unless the long suffering GF has eaten them first!
She is now the Co Owner of a beauty Salon, where they do Spray Tanning and all that sort of Stuff.
But in the early days of meeting her, She had a little bit of an Orange Complexion! and as her mother was called Blossom, I decide to use that Combo for a user name.
But beauty products have come a long way and now She looks the Color of whatever it says on the tin!
Though as an added bonus, She is so good with the 'Spray Gun' that if I need anything touching up, then maybe I will let her loose on the Car!
Or maybe not!
http://

http://

http://

Last edited by orangeblossom; May 23, 2014 at 08:21 AM.
Veteran Member
Joined: Jan 2012
Posts: 14,611
Likes: 10,809
From: France
Check the photo I posted on the original thread, (below) it should be like that, only neater! The technique is the get a long piece of the wire; thread it through the top bolt so there is an equal amount each side of the bolt; then twist it tight against the flats, NOT over the top of the bolt, then carry on twisting it until you get the twisted together double strand near the other bolt; then pass one end through the other bolt and twist together again for a inch-worth or so, and them bend over and snip off any residual.

Greg
Last edited by Greg in France; May 23, 2014 at 08:49 AM.
Thread Starter
|
Veteran Member
Joined: Feb 2013
Posts: 17,809
Likes: 3,945
OB, it all looks good, and the subframe and spring towers look very solid too which is a real bonus, one thing to check: the lockwire looks from the photo as though it is not straight from bolt to bolt, but is looping over the brakepipe. If repeat if, the straightness of the lockwire is "triangularised" by the brakepipe, it must be replaced (and brake pipe bent out of the way a bit if necessary) so that if the bolts unwind, the lockwire prevents them and does not first cut through the brakepipe taking up any slack in the lockwire between the two bolts !
Check the photo I posted on the original thread, (below) it should be like that, only neater! The technique is the get a long piece of the wire; thread it through the top bolt so there is an equal amount each side of the bolt; then twist it tight against the flats, NOT over the top of the bolt, then carry on twisting it until you get the twisted together double strand near the other bolt; then pass one end through the other bolt and twist together again for a inch-worth or so, and them bend over and snip off any residual.
Greg
I just had a check and the locking wire, 'is in front' of the Brake Pipes although I know it does look like its behind them in the Photo.
But in any event I will do them again, in the way that you said and somewhere in the Shed I've got a special 'Wire Twirling tool' which I bought to do bin bags with.
I also managed to remove the Air Filter Elements but didn't realize that each side was different.
Although I am going to buy some new ones, I've got to put the old ones back in temporarily.
So as you look at the photo from the passenger seat, would the 'Top one' go on the passenger side and the bottom one go on the drivers side.
And is the one with the metal blank supposed to have the blank bit at the radiator end?
http://

Thread Starter
|
Veteran Member
Joined: Feb 2013
Posts: 17,809
Likes: 3,945
A search revealed this from Warrjon, maybe your system is the same?
https://www.jaguarforums.com/forum/x...xjs-abs-81794/
If your system needs a complete fluid change/has air everywhere, which it may or may not, this seems a great plan as long at you hose off the fluid that gets spilt in the engine bay. A Gunson eezibleed will do the pressurizing. Otherwise, assuming you have the same system as Warrjon, and it is not full of air everywhere, to bleed conventionally you can do it as follows:
Two people, one in car and you underneath:
Start with rears, passenger side first, get person inside car to turn on ignition, you then open bleed nipple. The ABS pump runs and pumps out the fluid. ONLY 15 seconds MAX at a time though, or the pump will burn out. Then wait for 90 seconds to let the pump cool and do it again; and so on until no bubbles. The rear driver's side nipple the same.
Fronts can be done normally ignition off, quite normally, by the inside person pushing and holding the pedal down. I have always found that using a one way bleed valve on the nipple (eg Bike It Bleeding Assistor Kit - SPORTSBIKESHOP) as well as opening/closing the nipple gave a much more reliable bleed.
If you want to do the full XJS nerd thing (like I have just done) a set of remote rear bleeders makes the entire process a sodding sight easier. Certainly something to do when you refurb the rear axle. This guy has a great setup which I have got:
Remote Bleed Kit for Jaguar IRS Brakes - Fosseway PerformanceFosseway Performance
Buy the banjo adaptors too, they make the whole installation a piece of cake.
Greg
https://www.jaguarforums.com/forum/x...xjs-abs-81794/
If your system needs a complete fluid change/has air everywhere, which it may or may not, this seems a great plan as long at you hose off the fluid that gets spilt in the engine bay. A Gunson eezibleed will do the pressurizing. Otherwise, assuming you have the same system as Warrjon, and it is not full of air everywhere, to bleed conventionally you can do it as follows:
Two people, one in car and you underneath:
Start with rears, passenger side first, get person inside car to turn on ignition, you then open bleed nipple. The ABS pump runs and pumps out the fluid. ONLY 15 seconds MAX at a time though, or the pump will burn out. Then wait for 90 seconds to let the pump cool and do it again; and so on until no bubbles. The rear driver's side nipple the same.
Fronts can be done normally ignition off, quite normally, by the inside person pushing and holding the pedal down. I have always found that using a one way bleed valve on the nipple (eg Bike It Bleeding Assistor Kit - SPORTSBIKESHOP) as well as opening/closing the nipple gave a much more reliable bleed.
If you want to do the full XJS nerd thing (like I have just done) a set of remote rear bleeders makes the entire process a sodding sight easier. Certainly something to do when you refurb the rear axle. This guy has a great setup which I have got:
Remote Bleed Kit for Jaguar IRS Brakes - Fosseway PerformanceFosseway Performance
Buy the banjo adaptors too, they make the whole installation a piece of cake.
Greg
It turns out that I have got 'exactly' the same System as Warrjon, so as bleeding the Brakes by hand didn't work, I've gone out and bought a 'Power Bleeder'
That works by using Compressed Air from a 'Spare Tyre' so Tomorrow I will give that a try and hope it works as well for me, as it did for him!
I will keep you updated and let you know how I get on.
Many Thanks as always for your help.
Veteran Member
Joined: Jan 2012
Posts: 14,611
Likes: 10,809
From: France
Although I am going to buy some new ones, I've got to put the old ones back in temporarily.
So as you look at the photo from the passenger seat, would the 'Top one' go on the passenger side and the bottom one go on the drivers side.
And is the one with the metal blank supposed to have the blank bit at the radiator end?
http://
Ring up D Manners, SNG Barratt, Jag Classic parts, etc etc, and give them the model and year and VIN and get the correct filters for your car. A few runs without them will not hurt!
Congrats on it all, by the by
Greg
Trending Topics

Veteran Member
Joined: Apr 2014
Posts: 4,593
Likes: 3,537
From: Kent, UK
OB,
You really have to bleed these Teves ABS systems properly. I don't know if you are using the proper Jaguar service manual for all this work (I really hope you are!) but rather unusually the Jaguar defined procedure has a major difference to the way that Teves defined how to bleed the system.
Teves states to have the ignition ON when bleeding the fronts whereas at least one version of the manual states to switch the ignition OFF when bleeding the fronts. The system must be pressurised correctly for bleeding to be successful so you need to bleed it the Teves way, not the Jaguar way. Also forget using a pressure bleeder. Slow strokes by foot is better for judging the feel in the front brakes. This is the Teves -defined method:
BLEEDING TEVES BRAKES
TWO PEOPLE REQUIRED
START AT REAR LEFT, THEN REAR RIGHT (UNLESS JUST ONE REAR BRAKE NIPPLE) THEN FRONT LEFT, FRONT RIGHT.
ONE PERSON IN THE CAR, ENSURE BRAKE FLUID LEVEL IS FULLY TOPPED UP.
TURN ON IGNITION AND WAIT UNTIL BOTH ABS AND LOW PRESSURE LIGHTS HAVE EXTINGUISHED AND ALSO THE MOTOR PUMP HAS CUT OUT.
THEN, OPEN REAR LEFT BLEED NIPPLE AND HOLD BRAKE PEDAL DOWN, WITH IGNITION ON FOR 15 SECONDS – NO MORE
TIGHTEN BLEED NIPPLE, TURN OFF IGNITION, RELEASE BRAKE PEDAL.
WAIT ONE MINUTE AND REPEAT FROM RESTORING SYSTEM PRESSURE AS ABOVE FOR OTHER NIPPLE IF FITTED – THEN WAIT ONE MINUTE AT LEAST BEFORE MOVING TO FRONT BRAKES – THIS PREVENTS THE MOTOR PUMP FROM OVERHEATING.
AT THE FRONT, ENSURE SYSTEM PRESSURE IS CREATED AND THEN BLEED CALIPERS CONVENTIONALLY WITH IGNITION ON, USING SLOW STROKES AND GO THE FULL TRAVEL BUT DO NOT FORCE.
ONCE THE LEFT SIDE HAS BEEN DONE, AGAIN WAIT ONE MINUTE AND THEN RESTORE SYSTEM PRESSURE.
ENSURE BRAKE FLUID LEVEL IS CHECKED AND TOPPED UP AFTER EACH CALIPER IS BLED.
Hope that helps.
Good luck
Paul
Thread Starter
|
Veteran Member
Joined: Feb 2013
Posts: 17,809
Likes: 3,945
OB,
You really have to bleed these Teves ABS systems properly. I don't know if you are using the proper Jaguar service manual for all this work (I really hope you are!) but rather unusually the Jaguar defined procedure has a major difference to the way that Teves defined how to bleed the system.
Teves states to have the ignition ON when bleeding the fronts whereas at least one version of the manual states to switch the ignition OFF when bleeding the fronts. The system must be pressurised correctly for bleeding to be successful so you need to bleed it the Teves way, not the Jaguar way. Also forget using a pressure bleeder. Slow strokes by foot is better for judging the feel in the front brakes. This is the Teves -defined method:
BLEEDING TEVES BRAKES
TWO PEOPLE REQUIRED
START AT REAR LEFT, THEN REAR RIGHT (UNLESS JUST ONE REAR BRAKE NIPPLE) THEN FRONT LEFT, FRONT RIGHT.
ONE PERSON IN THE CAR, ENSURE BRAKE FLUID LEVEL IS FULLY TOPPED UP.
TURN ON IGNITION AND WAIT UNTIL BOTH ABS AND LOW PRESSURE LIGHTS HAVE EXTINGUISHED AND ALSO THE MOTOR PUMP HAS CUT OUT.
THEN, OPEN REAR LEFT BLEED NIPPLE AND HOLD BRAKE PEDAL DOWN, WITH IGNITION ON FOR 15 SECONDS � NO MORE
TIGHTEN BLEED NIPPLE, TURN OFF IGNITION, RELEASE BRAKE PEDAL.
WAIT ONE MINUTE AND REPEAT FROM RESTORING SYSTEM PRESSURE AS ABOVE FOR OTHER NIPPLE IF FITTED � THEN WAIT ONE MINUTE AT LEAST BEFORE MOVING TO FRONT BRAKES � THIS PREVENTS THE MOTOR PUMP FROM OVERHEATING.
AT THE FRONT, ENSURE SYSTEM PRESSURE IS CREATED AND THEN BLEED CALIPERS CONVENTIONALLY WITH IGNITION ON, USING SLOW STROKES AND GO THE FULL TRAVEL BUT DO NOT FORCE.
ONCE THE LEFT SIDE HAS BEEN DONE, AGAIN WAIT ONE MINUTE AND THEN RESTORE SYSTEM PRESSURE.
ENSURE BRAKE FLUID LEVEL IS CHECKED AND TOPPED UP AFTER EACH CALIPER IS BLED.
Hope that helps.
Good luck
Paul
Now I am Confused!
If I turn the ignition on and if the pump is dry which it (probably/possibly) is, due to an Air lock as the reservoir was empty.
Then the pump might not stop running before the 15 seconds is up, in which case the Pump might burn out.
In the Link that 'Greg' sent me, it looks as if 'Warrjon' may have been in exactly the same situation, so he had to bleed it manually, just to get some fluid into the Pump, or the System 'may not' pressurize at all.
I don't know, I may be wrong but that's the way I'm thinking, so erring on the side of caution, I would rather have to mop up some brake fluid than buy a new Pump and even if you could find one, it would be megabucks.
I'm 'Guessing' that the TEVES bleeding instructions are assuming that the reservoir has still got fluid in and as such the system is still capable of being pressurized.
Anyone else want to chip in on this?
Thread Starter
|
Veteran Member
Joined: Feb 2013
Posts: 17,809
Likes: 3,945
You have at least one example of the wrong filter(s) being installed. Because there are so many iterations of the V12, from the earliest saloons onwards, all the filters are the same on the periphery, but not on the inside, so they all fit (as in go in) even if incorrect. The correct filters for your car will be identical, and the difference between models is principally where the hole opposite the intake throttles is placed, also the protection against blowback and against getting the paper element sucked into the throttle body and thus jamming the throttles open - just to cheer you up!!
Ring up D Manners, SNG Barratt, Jag Classic parts, etc etc, and give them the model and year and VIN and get the correct filters for your car. A few runs without them will not hurt!
Congrats on it all, by the by
Greg
Ring up D Manners, SNG Barratt, Jag Classic parts, etc etc, and give them the model and year and VIN and get the correct filters for your car. A few runs without them will not hurt!
Congrats on it all, by the by
Greg
I wonder what on earth that set of filters was doing on there?
But they are the least of my worries at the moment, as the problem is 'Bleeding the Brakes' and I think I will do it the way that you sent in the link.
Although I would be interested what you think of 'Pauls' Idea with the TEVES instructions.
Veteran Member
Joined: Apr 2014
Posts: 4,593
Likes: 3,537
From: Kent, UK
OB,
I worry that you're looking for problems that don't exist. Your brakes were working before including the MoT. You've just changed the front calipers. You've got no reason to presume that you have a seized pump or airlock. So, I would just fill up the reservoir and bleed the brakes as defined. We've all changed calipers, reservoirs, pumps etc and we just go through the normal procedure.
Good luck
Paul
Thread Starter
|
Veteran Member
Joined: Feb 2013
Posts: 17,809
Likes: 3,945
OB,
I worry that you're looking for problems that don't exist. Your brakes were working before including the MoT. You've just changed the front calipers. You've got no reason to presume that you have a seized pump or airlock. So, I would just fill up the reservoir and bleed the brakes as defined. We've all changed calipers, reservoirs, pumps etc and we just go through the normal procedure.
Good luck
Paul
I worry that you're looking for problems that don't exist. Your brakes were working before including the MoT. You've just changed the front calipers. You've got no reason to presume that you have a seized pump or airlock. So, I would just fill up the reservoir and bleed the brakes as defined. We've all changed calipers, reservoirs, pumps etc and we just go through the normal procedure.
Good luck
Paul
We have tried bleeding the Brakes with 2 People but the brake pedal does not pump any fluid.
We have tried using an Ezi Bleed (Type gadget) that works of 15-20 psi using this, Clear Brake Fluid comes out of all the Calipers (bled in the right order) but The Brake Pedal still doesn't work it doesn't pump anything!
So I am thinking that what with renewing the Calipers/Brake Pads/Hoses/etc the Master Cylinder has run dry and needs bleeding, as it can't seem to get any brake fluid to pump.
The only problem being I have no idea how to do this!
When the engine is running, the hand brake light goes out and the ABS light also goes out.
The Brake Pedal is the Problem, it cannot seem to get any Fluid to pump!
Veteran Member
Joined: Apr 2014
Posts: 4,593
Likes: 3,537
From: Kent, UK
OB,
We have had a number of club members who have had the same problem and the answer always seems to be the same. You HAVE to bleed the brakes properly as per the Teves procedure. A number of owners have also said that the problem lies in really getting the rear brakes done properly first, often involving doing it a number of times and using a few litres of fluid.
The other possibility (although I'm not sure how this could have happened if you've just changed the calipers) is that you have air on the low pressure side of the pump. If this is the case, the pump can't charge the accumulator. However, from your description, I think you're confirming that the accumulator is being charged. However, if you do somehow have air on the low pressure side, you need to use the fluid intake hose bleeding procedure first. As I said, I don't think this is your issue.
The service manual is incredibly good at describing the system and how it works. Spend an hour reading that section carefully so you really understand it and then use the Teves bleeding procedure, rather than the one in the manual, don't use a pressure bleeder, and bleed the back brakes 4 or 5 times even if you think you've done them properly.
Understanding the system description in the manual is key. You'll really understand how the brake system works, with the front brakes being driven off the master cylinder (hence why I don't think there is air in there) but the back brakes being driven by the hydraulic accumulator.
Boil a kettle, make a cup of tea and enjoy the read!
Good luck
Paul
Last edited by ptjs1; May 25, 2014 at 08:21 AM.
Thread Starter
|
Veteran Member
Joined: Feb 2013
Posts: 17,809
Likes: 3,945
OB,
We have had a number of club members who have had the same problem and the answer always seems to be the same. You HAVE to bleed the brakes properly as per the Teves procedure. A number of owners have also said that the problem lies in really getting the rear brakes done properly first, often involving doing it a number of times and using a few litres of fluid.
The other possibility (although I'm not sure how this could have happened if you've just changed the calipers) is that you have air on the low pressure side of the pump. If this is the case, the pump can't charge the accumulator. However, from your description, I think you're confirming that the accumulator is being charged. However, if you do somehow have air on the low pressure side, you need to use the fluid intake hose bleeding procedure first. As I said, I don't think this is your issue.
The service manual is incredibly good at describing the system and how it works. Spend an hour reading that section carefully so you really understand it and then use the Teves bleeding procedure, rather than the one in the manual, don't use a pressure bleeder, and bleed the back brakes 4 or 5 times even if you think you've done them properly.
Understanding the system description in the manual is key. You'll really understand how the brake system works, with the front brakes being driven off the master cylinder (hence why I don't think there is air in there) but the back brakes being driven by the hydraulic accumulator.
Boil a kettle, make a cup of tea and enjoy the read!
Good luck
Paul
I don't have any manual or instructions and I do think the problem is on the low pressure intake side.
So what is the intake hose bleeding procedure?
And where can I find it?
Veteran Member
Joined: Jan 2012
Posts: 14,611
Likes: 10,809
From: France
Dear me OB, is he right, I cannot see from the photo? If so, swap the fronts side to side (a cinch with new bolts thank goodness) and try the bleed again. Ir xjsV12 is right, this could account for the bleed trouble, or some of it anyway!
Hats off to him if it is true, and dunces' corner for the rest of us!.
Greg
Hats off to him if it is true, and dunces' corner for the rest of us!.
Greg
Veteran Member
Joined: Apr 2014
Posts: 4,593
Likes: 3,537
From: Kent, UK
OB,
I genuinely don't mean to sound personally critical but I am staggered that you haven't got the official Jaguar Parts and Service manual (although it does now explain the reason for some of your questions).
You're running 6 XJSs costing up to �50,000 each when new, you're undertaking safety related-work yet you won't spend �25 on the most comprehensive manual that you'll find. How did you even know what torque setting to run the caliper mounting bolts?
I know we all have different approaches to running our cars, but I wouldn't even consider running one of my cars without that type of technical support. It's just a suggestion, but I would go online to Jaguar Heritage and order the manual now, or pop into your dealer and order it up on Tuesday (they might even have some in stock). Everything will make sense then and you'll also find the rebuild of your IRS cage one thousand times easier!
Sorry, I'm still in shock...
Paul


Joined: Oct 2007
Posts: 121,143
Likes: 6,654
From: PHX some of the time
Dear me OB, is he right, I cannot see from the photo? If so, swap the fronts side to side (a cinch with new bolts thank goodness) and try the bleed again. Ir xjsV12 is right, this could account for the bleed trouble, or some of it anyway!
Hats off to him if it is true, and dunces' corner for the rest of us!.
Greg
Hats off to him if it is true, and dunces' corner for the rest of us!.
Greg
Thread Starter
|
Veteran Member
Joined: Feb 2013
Posts: 17,809
Likes: 3,945
OMG! You are right!
This could be the reason why the Brakes won't Bleed!
Because the Calipers cannot fill up with fluid!
Well spotted! I was about to call in a mate of mine, who is a Jag Expert and he would have been dining out on this Story for years!
I cannot thank you enough for pointing that out!
This could be the reason why the Brakes won't Bleed!
Because the Calipers cannot fill up with fluid!
Well spotted! I was about to call in a mate of mine, who is a Jag Expert and he would have been dining out on this Story for years!
I cannot thank you enough for pointing that out!