When you click on links to various merchants on this site and make a purchase, this can result in this site earning a commission. Affiliate programs and affiliations include, but are not limited to, the eBay Partner Network.
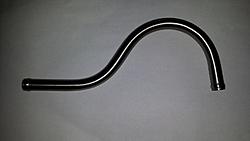
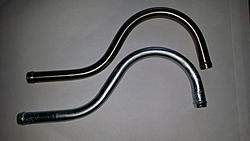
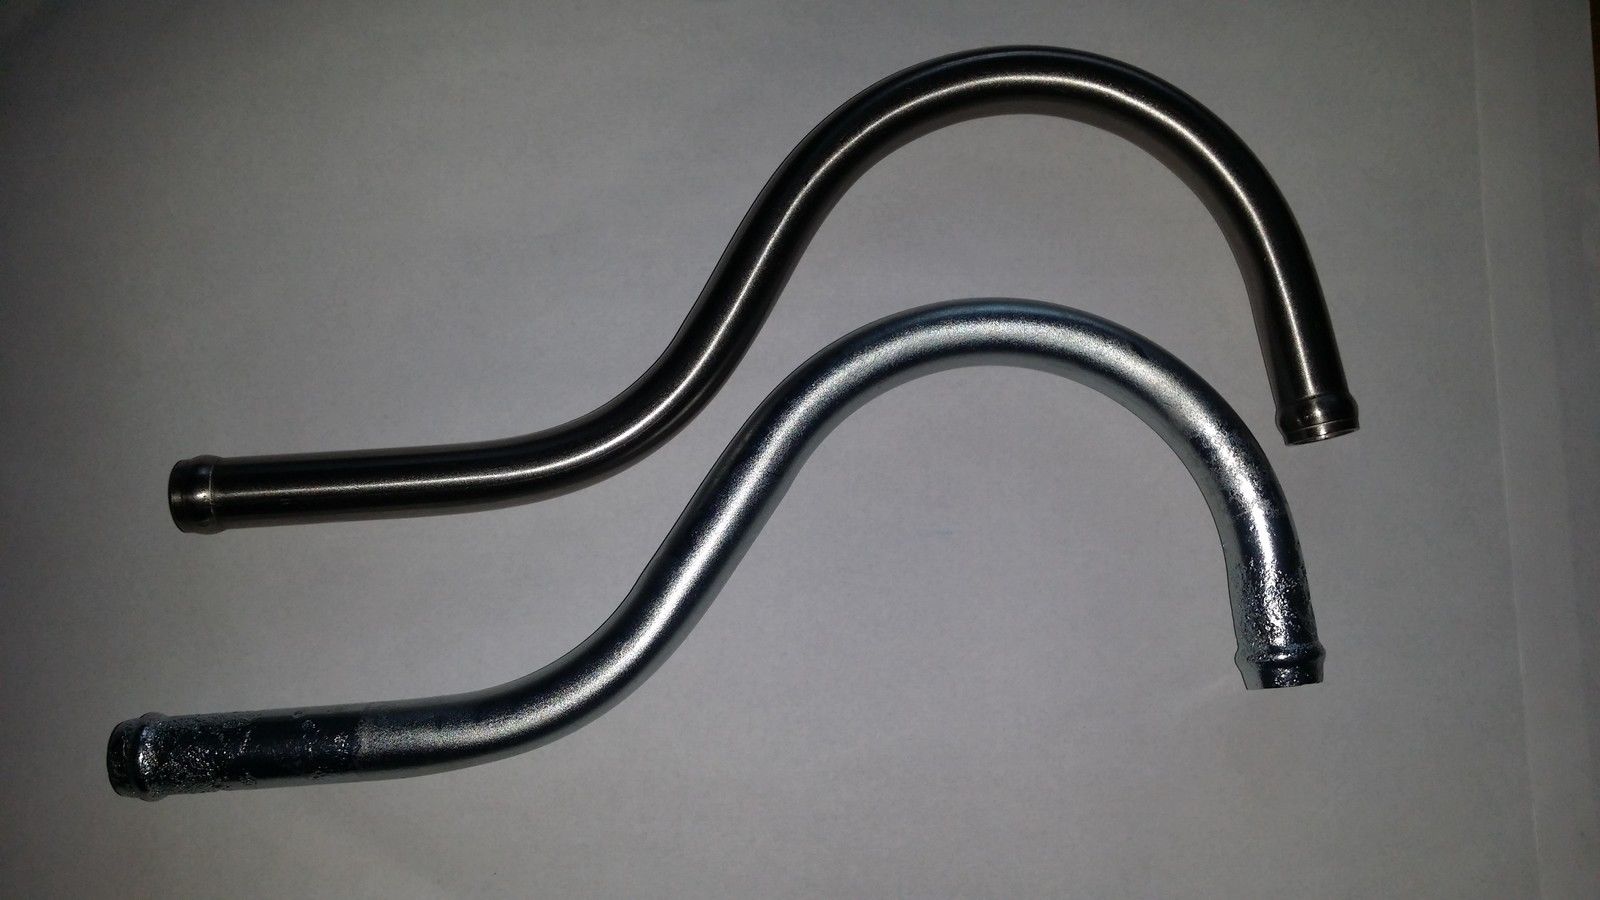
Well, on my quest for shiney new parts and rare bits and bobs, I came across something, my V12 really needed in new... The ?-pipe (no, not a question pipe but a pipe in the shape of a question mark) from the water bottle to the bypass pipe...
It isn't original BUT it was made to original spec and it is, like I really want for all metal piping in the car, made of stainless steel... I though �38 was a bargain!
The lower pipe is the original one just been cleaned up (mine looks a LOT worse and I can't be arsed to do anything to it... Would need welding/brazing etc.).
That is one of the things I did as well. Though I thought I had walnut where as it is actually darkend due to the varnish going blunt. So I need another one Got to love classic Jaguar shiftlevers!
Varnish going blunt? Do you mean dull? And yes, I love the shift lever shape, though it could be rather smoother. I'd imagined a simple, gentle press down to shift it, perhaps just the tip of the fingers brushing it with minimal effort. Instead it's a bit notchy, especially getting to the end. Presumably so you don't just accidentally bump it from D to R....
I did the same... :-)
misplaced the knob when re-veneering the console...
ordered nice knob and was surprised when I found the old one it being so "BLACK"
just kept it as a spare...
Last edited by Jonathan-W; Apr 20, 2017 at 10:44 AM.
I didn't buy anything today per se, but a bunch of the stuff that I ordered last week came in. I got a new driver's side rear chrome bumper blade ( the old one was pretty badly dented when I bought the car) a driver side window switch that needed replaced, a Jaguar lanyard with leaper key chain, and some Jaguar valve stem caps. I still have a lot of stuff on my shopping list but the trick is actually finding it for a decent price. the last 2 bumper parts I need will set me back nearly $400 on ebay
I think the black shift knob would look a lot better than the wood I have currently, as the rest my interior is Pre-HE with no wood at all.
My gearbox and thereby also lever is not PreHE, so thats probably where the wooden knob comes from.
I suppose there must be many black knobs for sale on eBay as you all change to wood...
Yes, definitely. And why do you have two clocks? Wait, it's not a clock. That gauge in front of the gear selector - is it a thermometer?
Yes, thermometer. It was there when I bought the car. I should just remove it. Thanks for reminding me, I was getting used to it sitting there.
The actual clock does by the way stop quite shortly after I stop the engine, so it needs setting before each ride. I thinks it's mechanical with electric winding just to make things a bit more complicated.
I'm tempted to replace my trip computer with a clock. More elegant, more wood on show, and less "oh my god is that my mileage?!?!" to worry about. (Not that I'm worried financially so much as "But I just filled her up last week!"....)
Picked up another missing body part today! The front passenger side plastic bumper cover was AWOL when I bought the car so now it will finally look complete from the outside! The rear center bumper cover is warped on the left side so Im going to try and straighten it with my heat gun, a 2x4, and some C-Clamps before shelling out $285 for a new one.
When I bought my Volvo, I thought it had a tachometer, but soon realized it was a clock the same size as my speedometer. Fancy.
240... Time is as important as speed...
My old 740 had an analpg clock, just like my 960. I really prefered them rather than the modern digital ones. That is why I like the XJ8 dash with a classic analog clock which still works, 20 years on! And the time is kept really nicely!
Yes, thermometer. It was there when I bought the car. I should just remove it. Thanks for reminding me, I was getting used to it sitting there.
The actual clock does by the way stop quite shortly after I stop the engine, so it needs setting before each ride. I thinks it's mechanical with electric winding just to make things a bit more complicated.
no, it is most likely an electric clock that some one wired WRONG. the power coming from the key and not the constant Hot ...
just find the constant hot and replug the wire that runs it into that...
Last edited by Jonathan-W; Apr 21, 2017 at 04:37 PM.
Hi, today I finally opened up the top and repaired the rear window support strap anchors, as both sides had one failed rivet; and the straps were floating around in-between the top and the headliner.
Four new rivets later, it's looking like new!
A job i had been meaning to do for a few years. A lot easier than i expected it to go, which hardly ever happens.
Happy to report that the top now goes down smoothly; no more chance of the rear-window frame rubbing on the rear headrests; until today it was necessary to reach back while lowering, and catch and guide the window frame back and down to prevent damage to the upholstery -- no more!.
Today I redyed my driver's seat, which looked almost as if someone had at one stage tried to dye it grey and then wiped off most of the grey dye. It was always a slightly different tone to the rest, as you can clearly see in this photo (no, that's not me in the back seat).
One day I used a melamine sponge with Autoglym leather cleaner, not rubbing too hard (and always following up with plenty of leather conditioner), and the grey came away like magic. However, it was never perfect - it remained in the cracks, as shown here:
So I finally got around to ordering an Export Car Care Kit from Gliptone, after reading various reviews, and today I actually got around to trying it out. The dye was very easy to apply with a sponge, and coated well. So now the seat looks like this:
Now to leave for 24 hours, and then apply more leather conditioner I think. I will skip the Top Coat Gloss Sealant as I very much do not want a glossy seat.
Slowly, bit by bit, the car is getting better and better....
More seat work today: I removed the seat backs to see why the lumbar supports weren't lumbar supporting. I could hear the motor running when the button was pressed, so was not at all surprised to find that the stiff hoses connecting the nipples were completely shot. As is non-existent by and large, and what remained literally crumbled under my fingers.
So a short cycle ride (got to get some exercise...) to get some bits of hose, I had a go at fixing it. Driver's side first.
I had to manoeuvre the hose down into the grey bag and onto the lower nipple, which wasn't actually that hard. The 4 mm (int. diameter) plain hose (it only needs to carry air after all) went on perfectly, and held firmly.
Snipped it to length, and used a shorter piece to join the top nipple with the hose leading to the actual lumbar bladder.
Then I used another plastic zip tie to reseal the grey leather bag (whatever it is there for), and tested it. Lumbar support now inflates! Yay! Oops. Leak from where it enters the bladder. The leak stopped when the hose was pushed to the left, so for the moment I have held it to the left with some electrical tape, and will see how things go.
I may need to drop a spot of glue into the hose opening, so I have left the tilt handles off, as they can be buggers of things to remove. At least without spilling blood....