
XJS Shooting Brake!! (pics)


Veteran Member


Joined: Jan 2012
Posts: 14,612
Likes: 10,809
From: France
Greg

Thread Starter
|
Senior Member
Joined: Mar 2015
Posts: 937
Likes: 590
From: Atlanta
headlight surrounds, grill and hood installed and aligned.
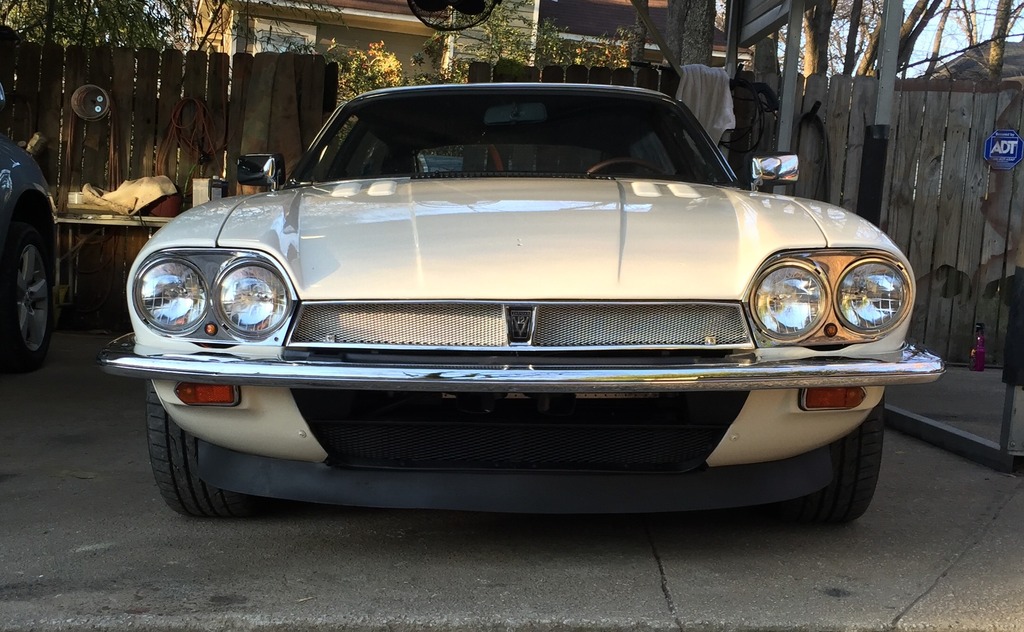
Notice the small orange dots in the bottom of the headlight surround, those are 3/4" LED side marker lights that are tied into the turn signals:

Notice the small orange dots in the bottom of the headlight surround, those are 3/4" LED side marker lights that are tied into the turn signals:


Thread Starter
|
Senior Member
Joined: Mar 2015
Posts: 937
Likes: 590
From: Atlanta
Nice thing about top piece was that it was already a shiny silver color so that saved painting effort.
Senior Member
Joined: Sep 2014
Posts: 366
Likes: 78
From: Dallas, TX
That front profile looks stunning with the sleek chrome bumper and custom touches. While I'm not usually a fan of whimbleton white or whatever the marketeers call cream, it suit this build very well.
Thread Starter
|
Senior Member
Joined: Mar 2015
Posts: 937
Likes: 590
From: Atlanta

Finished several sections of interior but have been stalled by a few loose ends. I can't install the light switches beside the trip computer because the light bulb is burned out and I discovered what a weird bulb it is.
Interior wood, Ski slope, dash, and door panel trim are mahogany veneer with self adhesive, finished with satin spray polyurethane.
Aligning the glove box door and the wood on the glove box door and dash was amazingly hard because I mixed and matched parts from my parts car and surprise!... How the wood is attached between two glove box lids is slightly different apparently. No need for jigs at Jaguar..
Notice the cup holders, they are standard cup holders offered on eBay and all over the web. Unfortunately, they were too deep for the ski slope and hit stuff underneath. I cut the bottom off of them and shaved a 1/4" from the depth and then re-attached the bottom with clear epoxy.
Also notice the center vent, I bought this one off eBay from an XJ6 (maybe? can't recall) and took it apart, gluing it together in the frame of the original vent.
Thread Starter
|
Senior Member
Joined: Mar 2015
Posts: 937
Likes: 590
From: Atlanta
It sounds (and looks) good but the sound stage is a little low. I'm going to try and add some small tweeters (run off head unit) to the a pillar and see if that raises it a bit.
Veteran Member
Joined: Aug 2014
Posts: 1,858
Likes: 366
From: Pensacola Florida USA
It is, the sound system consists of 5 1/4" Polk components in front with the woofers mounted to the door, and tweeters in door panel and these are driven by a 2 channel Blaupunkt amp with 5 1/4" two way speakers in rear driven off the head unit. I also have a powered subwoofer behind the rear seat.
It sounds (and looks) good but the sound stage is a little low. I'm going to try and add some small tweeters (run off head unit) to the a pillar and see if that raises it a bit.
It sounds (and looks) good but the sound stage is a little low. I'm going to try and add some small tweeters (run off head unit) to the a pillar and see if that raises it a bit.
it will raise the sound stage if, the distance to the ear is less that the distance to the ear of the tweeters on the door on the panel
if it is greater then it will have no effect...
Polk Fan at large
Veteran Member

Joined: Jul 2010
Posts: 1,124
Likes: 368
From: Southern California
It is, the sound system consists of 5 1/4" Polk components in front with the woofers mounted to the door, and tweeters in door panel and these are driven by a 2 channel Blaupunkt amp with 5 1/4" two way speakers in rear driven off the head unit. I also have a powered subwoofer behind the rear seat.
It sounds (and looks) good but the sound stage is a little low. I'm going to try and add some small tweeters (run off head unit) to the a pillar and see if that raises it a bit.
It sounds (and looks) good but the sound stage is a little low. I'm going to try and add some small tweeters (run off head unit) to the a pillar and see if that raises it a bit.
The A-pillar triangles are perfect for the tweeters, but I believe that some prefacelift cars don't have that triangle. Can't 6 1/2" speakers be fit to a pre-facelift car? They fit OK on my facelift '94 (behind the stock grilles).
I think that you've done a phenomenal job with the interior finish. The wood looks fantastic with very modern matte finish like Jag used on the newer XK's and the leather just perfectly matches the wood; it looks like a brand new upper class ride (which Jag is) from the showroom. Kudos to good taste and to great achievement.
Cheers,

Member
Joined: Nov 2015
Posts: 40
Likes: 4
From: Morgantown, PA
The seats in the pictures the ShootingBrake looked great. Is that a factory color or did you have them custom made? If you have the time can you post a picture of the seat?... Thanks, XJSrookie
Thread Starter
|
Senior Member
Joined: Mar 2015
Posts: 937
Likes: 590
From: Atlanta
Here is a pic of the seat


Thread Starter
|
Senior Member
Joined: Mar 2015
Posts: 937
Likes: 590
From: Atlanta
A new development!
No judgment if you don't like it, 3M stainless vinyl wrap on roof, an idea I've had to mimic the Rolls Drop Head Coupe' hood and also to hide some bodywork flaws in roof.
No judgment if you don't like it, 3M stainless vinyl wrap on roof, an idea I've had to mimic the Rolls Drop Head Coupe' hood and also to hide some bodywork flaws in roof.

Joined: Sep 2012
Posts: 757
Likes: 315
From: Denver, CO
Mark
Member
Joined: Nov 2015
Posts: 40
Likes: 4
From: Morgantown, PA
Bullittandy, Great pix of the seat, nice color. Also kudos on the Shooting Break, been a 'wagon' fan all my life. 55 Chevy Nomad as a kid, a few in between and a Saab 9-5 Areo Wagon now. Look forward to seeing more of the SB pix... XJSROOKIE...
Love it! I love all that you've done to make this car your own. Those seats and interior look superb, too. How does the finish feel on the ski slope/dash panels? I've thought about recovering mine in vinyl similar to that, but I was worried that it would feel too much like, well, vinyl.
Excellent work!
Excellent work!
Thread Starter
|
Senior Member
Joined: Mar 2015
Posts: 937
Likes: 590
From: Atlanta
Love it! I love all that you've done to make this car your own. Those seats and interior look superb, too. How does the finish feel on the ski slope/dash panels? I've thought about recovering mine in vinyl similar to that, but I was worried that it would feel too much like, well, vinyl.
Excellent work!
Excellent work!
If you wanted to change wood finish I would HIGHLY recommend using a vinyl wrap, it is so easy and the choices of wood grain are infinite. And the vinyl wouldn't feel like wood it would not feel like vinyl either-if you know what I mean.
You probably wouldn't even need to remove the wood to apply vinyl.
But, if you really wanted to change wood color with real wood then definitely get the veneer with PSA, almost as easy as vinyl and also has endless varieties.