
AJ's 2007 Coupe Mod Thread


Thread Starter
|
Senior Member
Joined: Jun 2015
Posts: 107
Likes: 117
I dropped the car off at the shop during the Christmas holiday so that they could do a pre-track inspection in preparation for my HPDE on the 21st. I didn't expect much other than maybe needed new brake pads and rear tires.
I was completely shocked when they called and said I needed $4-6K worth of suspension work.
The list of what they said was wrong:
Front Drivers Shock Leaking
Rear Passenger Shock Leaking
Front Lower Control Arm Rear Bushing Worn
Rear Lower Control Arm Bushings Worn (All 3 of them)
Rear Tie Rod (or control arm, depending on which website you look at) Bushings Worn
Rear Sway Link Bushings Worn
And boy are Control Arms* for Jaguars Expensive ($350 - $900, depending on which of the 4-6 you look at), plus all the labor.
Yikes!!
A little research led me to this handy thread on the forum:
https://www.jaguarforums.com/forum/x...-159852/page2/
Where I find it is not uncommon for these cars to need all new suspension after 60K miles (mine has 68K).
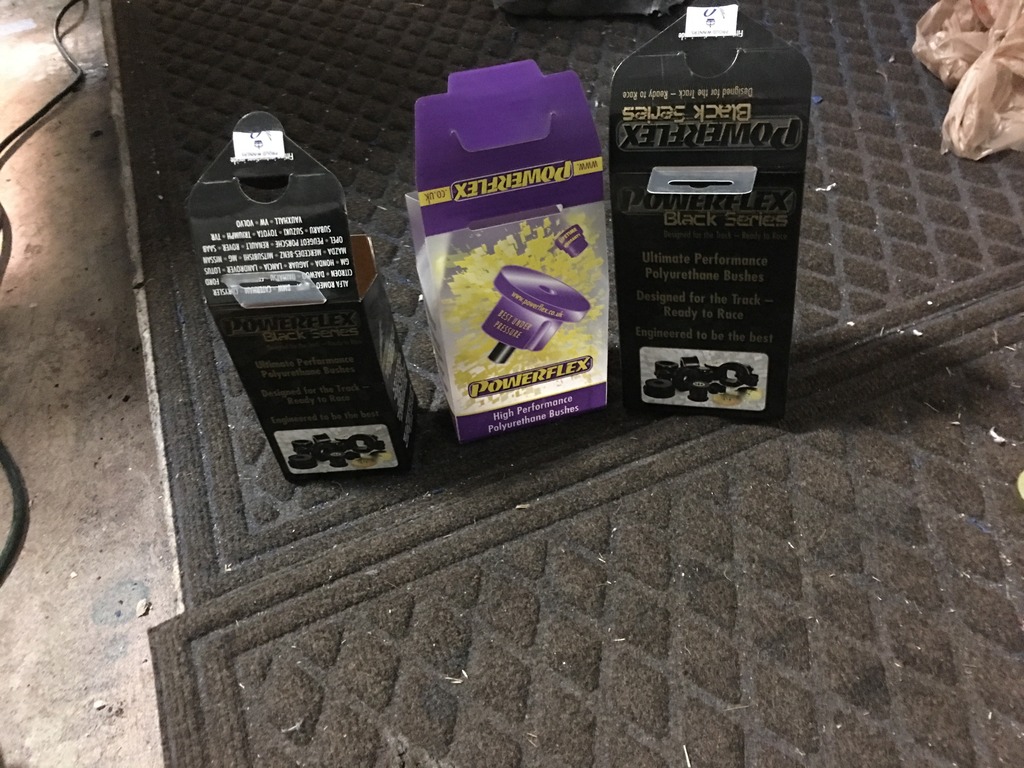
But also in that thread I found a wonderful little link where you can buy Poly bushings for all the control arms and roll bars.
I'm not sure if I'll be able to get it all done before the 21st, but I ordered a full set of poly bushings for the car. I only needed about half of them, but it didn't make sense not to replace them all now, who knows how long the others have left, and now they will all match.
here is the complete shopping list:
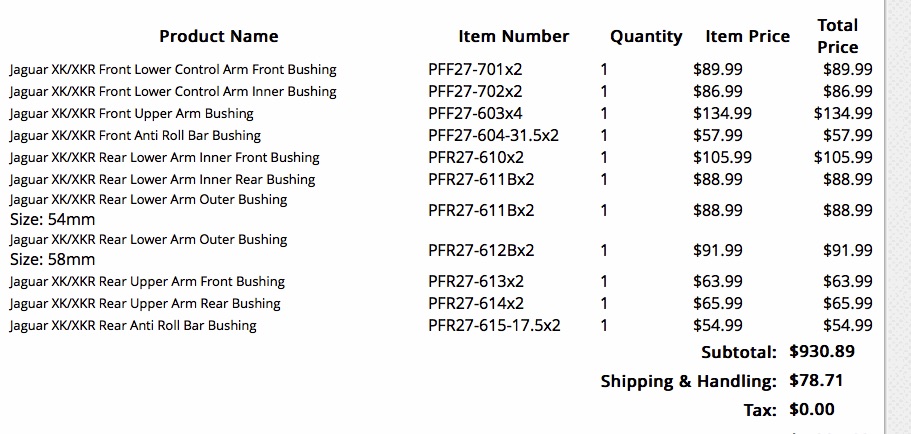
I didn't have time to pull the rear control arm out to see if I needed 54mm or 58mm bushings, so I ordered both and will just have to send back the set I don't use.
I also ordered all 4 new shocks, new MOOG sway bar links for both sides, and new tie rods (bc I couldn't get poly sway link or tie rod bushings for some reason).
I'll be ripping into the suspension sometime by the weekend, so that I can go ahead and press all the bushings out and be waiting on the new ones to arrive.
I'll be sure to take lots of pictures in case anyone else is crazy enough to try this after me.
*To be clear the shop had just priced complete Control Arms, not just bushing. When looking in the parts catalog only a few of the bushings are listed as something you can buy and replace.
I was completely shocked when they called and said I needed $4-6K worth of suspension work.
The list of what they said was wrong:
Front Drivers Shock Leaking
Rear Passenger Shock Leaking
Front Lower Control Arm Rear Bushing Worn
Rear Lower Control Arm Bushings Worn (All 3 of them)
Rear Tie Rod (or control arm, depending on which website you look at) Bushings Worn
Rear Sway Link Bushings Worn
And boy are Control Arms* for Jaguars Expensive ($350 - $900, depending on which of the 4-6 you look at), plus all the labor.
Yikes!!
A little research led me to this handy thread on the forum:
https://www.jaguarforums.com/forum/x...-159852/page2/
Where I find it is not uncommon for these cars to need all new suspension after 60K miles (mine has 68K).
But also in that thread I found a wonderful little link where you can buy Poly bushings for all the control arms and roll bars.
I'm not sure if I'll be able to get it all done before the 21st, but I ordered a full set of poly bushings for the car. I only needed about half of them, but it didn't make sense not to replace them all now, who knows how long the others have left, and now they will all match.
here is the complete shopping list:

I didn't have time to pull the rear control arm out to see if I needed 54mm or 58mm bushings, so I ordered both and will just have to send back the set I don't use.
I also ordered all 4 new shocks, new MOOG sway bar links for both sides, and new tie rods (bc I couldn't get poly sway link or tie rod bushings for some reason).
I'll be ripping into the suspension sometime by the weekend, so that I can go ahead and press all the bushings out and be waiting on the new ones to arrive.
I'll be sure to take lots of pictures in case anyone else is crazy enough to try this after me.
*To be clear the shop had just priced complete Control Arms, not just bushing. When looking in the parts catalog only a few of the bushings are listed as something you can buy and replace.
Last edited by ajzride; Jan 3, 2017 at 11:02 PM.
Thread Starter
|
Senior Member
Joined: Jun 2015
Posts: 107
Likes: 117
it will be somewhat harsher than brand new stock. Should not be any worse than my currently shot bushings.
Veteran Member


Joined: Jun 2015
Posts: 3,005
Likes: 1,675
From: Sydney, Australia
This is my suspension story
Have been putting it off have only managed to change the tie rod end at this stage .
https://www.jaguarforums.com/forum/x...ar-end-162319/
Have been putting it off have only managed to change the tie rod end at this stage .
https://www.jaguarforums.com/forum/x...ar-end-162319/
Thread Starter
|
Senior Member
Joined: Jun 2015
Posts: 107
Likes: 117
Does anyone know the collapsed and extended lengths of the shocks? I've looked all over the googlewebz and can't find them, even on the Bilstein website.
I have stock replacement on order, but was thinking today I might be able to get some QA1 coilovers that would sit in the same space and give me adjustable ride height. I built a custom coil-over for my mustang that way and I'm very happy with it.
I have stock replacement on order, but was thinking today I might be able to get some QA1 coilovers that would sit in the same space and give me adjustable ride height. I built a custom coil-over for my mustang that way and I'm very happy with it.
Thread Starter
|
Senior Member
Joined: Jun 2015
Posts: 107
Likes: 117
Updates have not been coming because the actual work has taken every last spare second of my life. I finally got the rear suspension back together at 4:30 this morning after pulling an all-nighter.
This is 5-fold the toughest car project I've ever embarked on, and that has caught me completely by surprise. I've worked on suspension components before, but this IRS is pretty complicated, and there is some just plain out stupid placement of fasteners that make it way harder to work on than it should be for this car.
To start with, the chrome capped lug nuts are crap, three of them stripped out while I was pulling the rear wheel, so I had to drill and cut them out to get to the steel nut underneath. This was just a prelude of the misery to come.
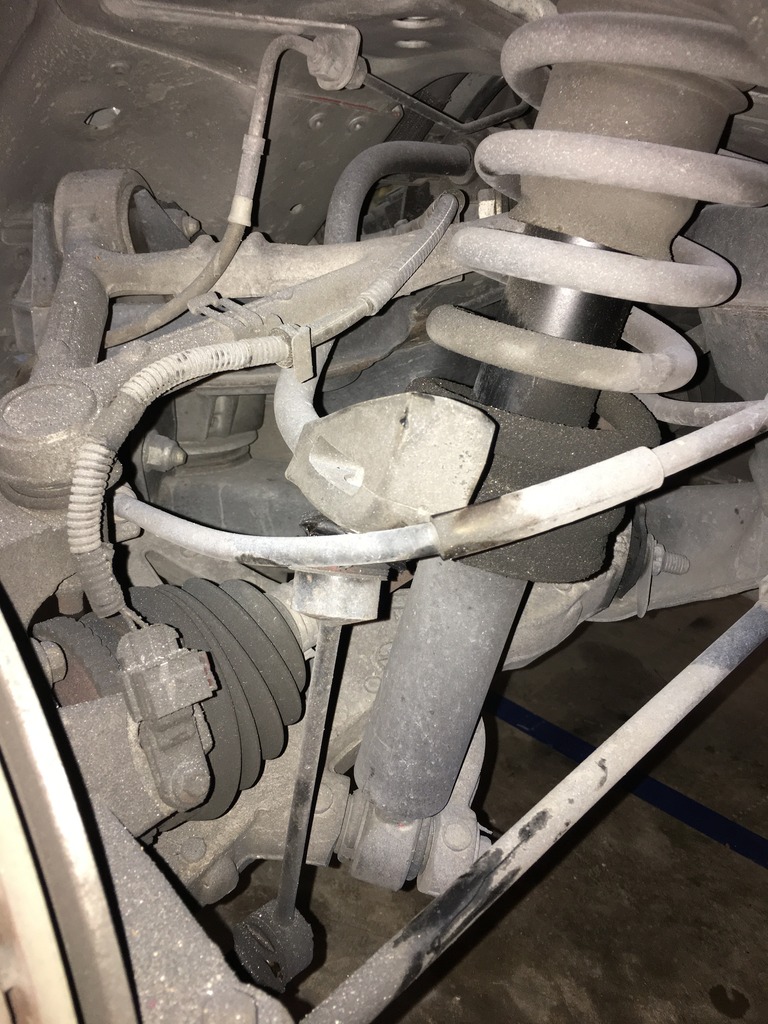
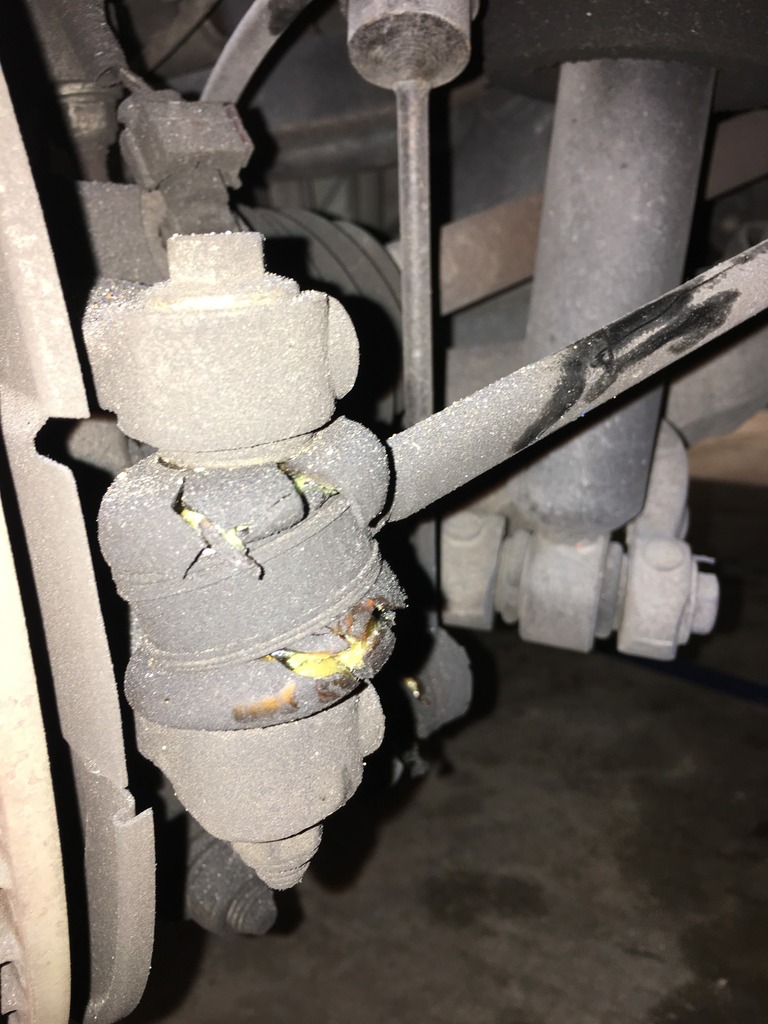
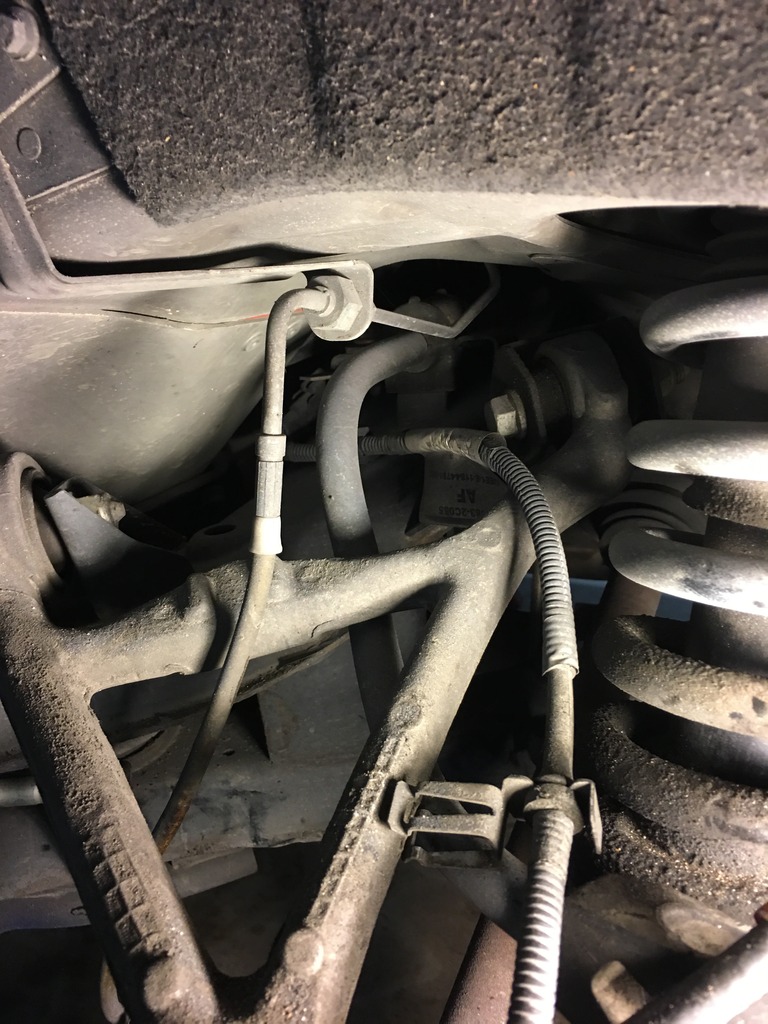
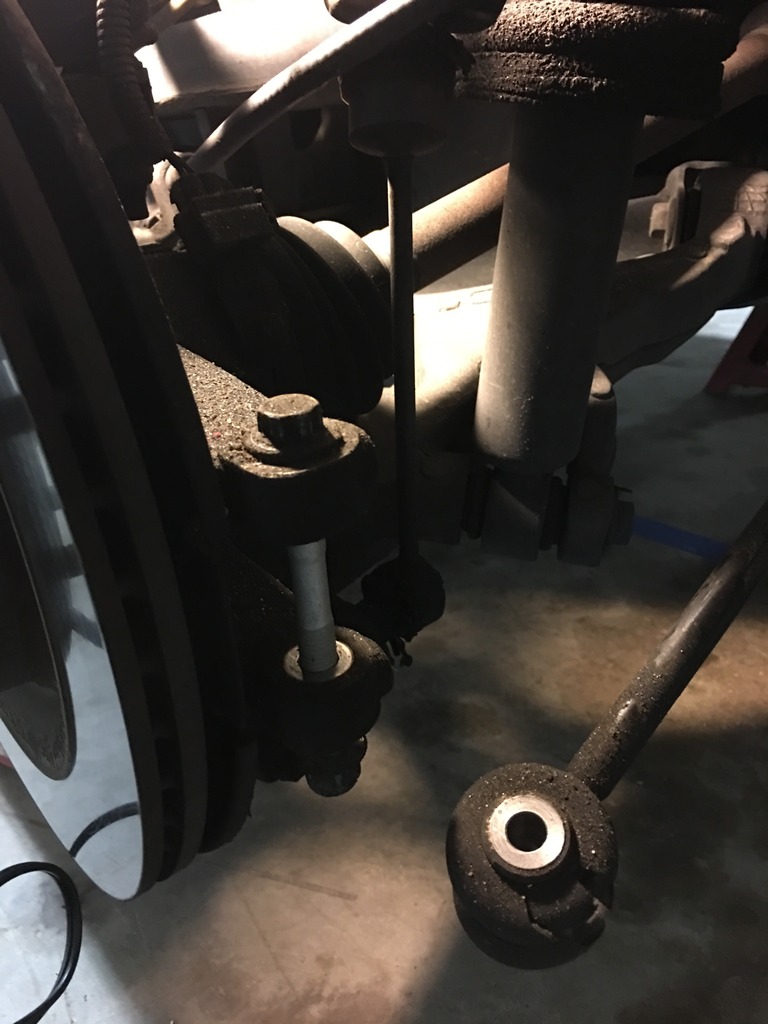
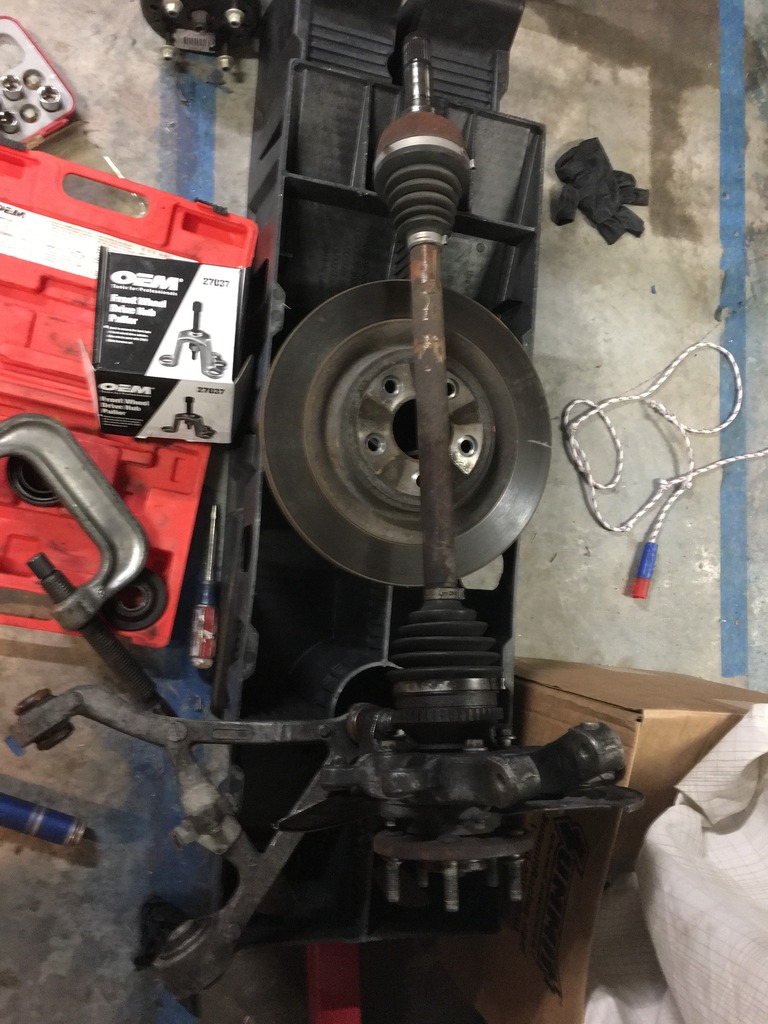
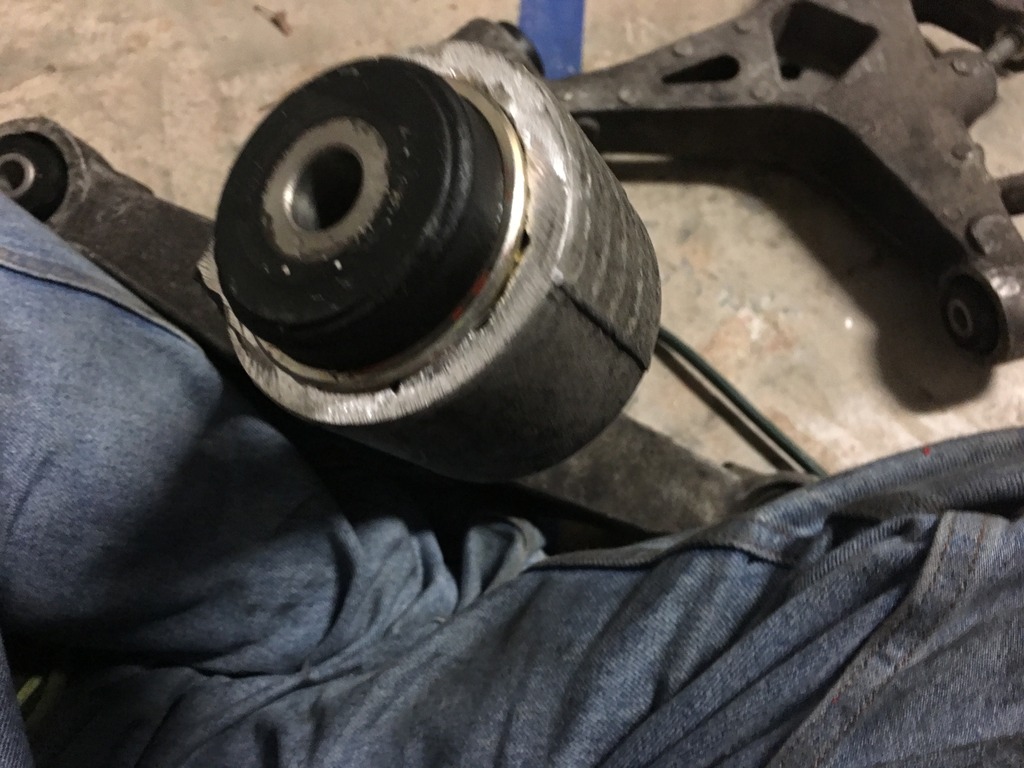
Here are some shots I took of the suspension to help me with re-assemble and to show off how bad some of the components were:

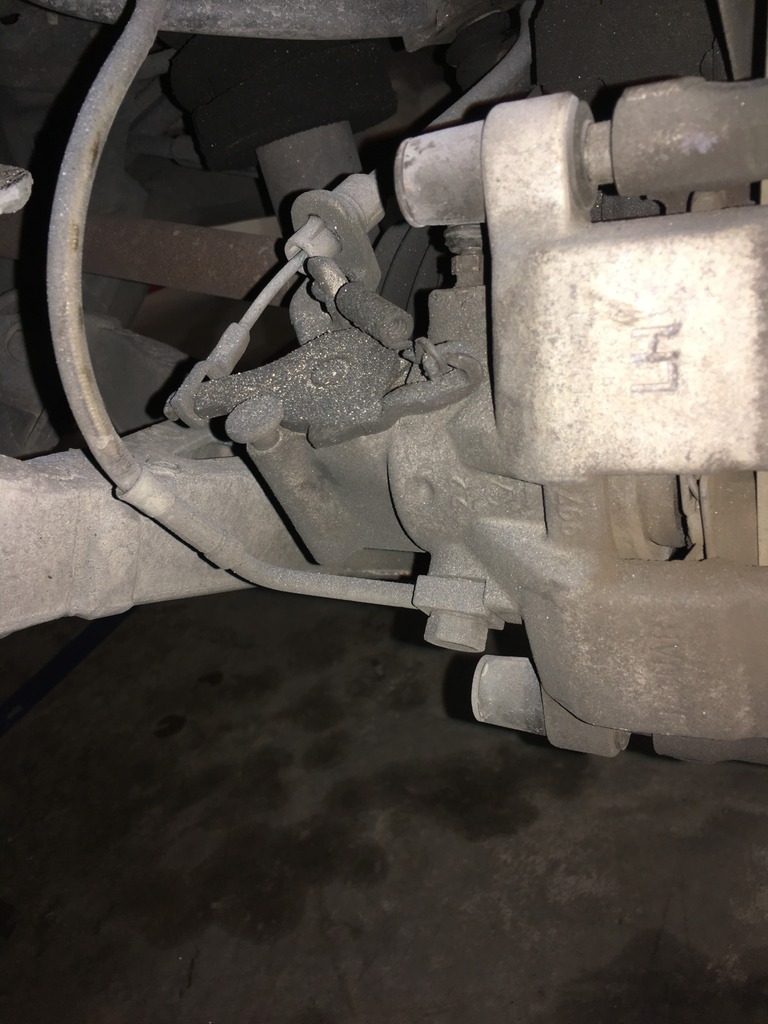
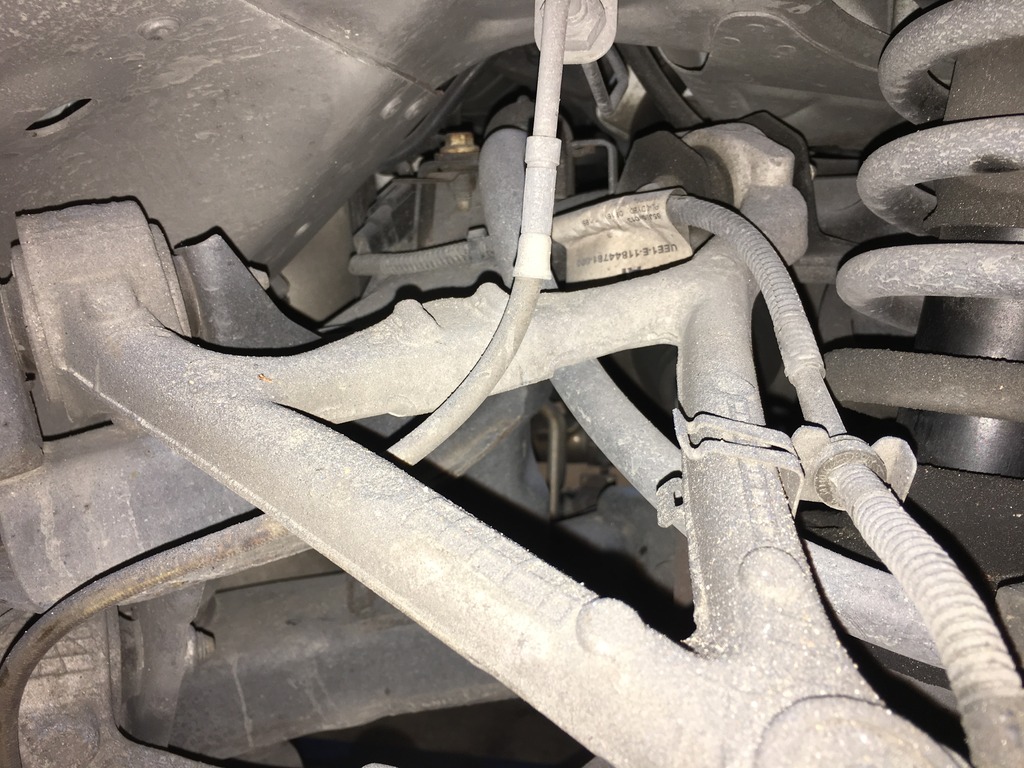
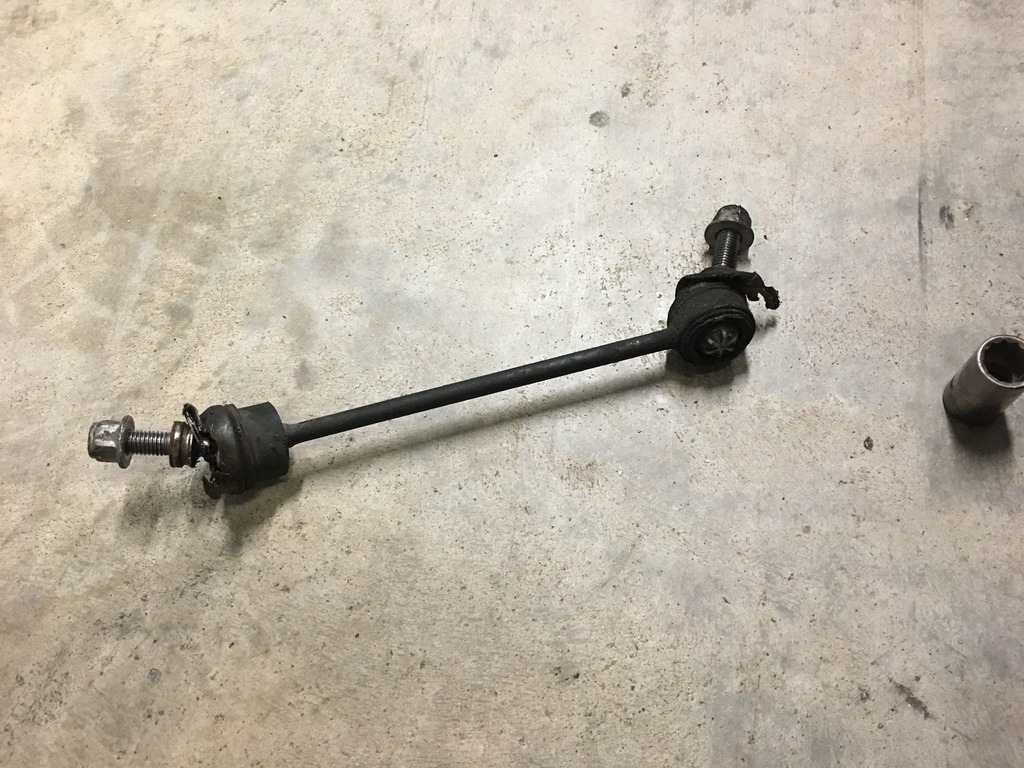
I started on the drivers side and for the most part didn't hit many snags, I had the entire drivers side apart in about 2 hours (not bad for my first time tearing into, stopping to take lots of pictures, and bag + tag everything). First I pulled the sway links and stabilizer bars. Detaching neither is fun. The factory ball joints on the sway links don't have a jam-nut on the back side to hold them still while you remove the flange nut, so you have to just shred the rubber and grease to get a set of pliers on the shaft. The stabilizer bar has a nut-bolt at the knuckle, but on the frame side it connects with a balljoint that has a 8MM tip on that you can use to hold it still while you take of the flange nut. The drivers side came off decent, but if you don't have a ratcheting 18mm end wrench, it could take an hour. You can only get about a 20 degree swing with an end wrench and there is no way to get a socket in there. In a common theme, the passenger side was a total pain. The 8mm tip was so rusted that it disintegrated about half way though. Where these are located (tight against the body behind the muffler), there is no way to get pliers in there. I was able to bend a sawzall blade at a 45 degree angle and get it in there well enough to cut the passenger side off.
It's impossible to remove the rear LCA without removing the brake calipers (easily solved by designing the bolt to come in from the other side). Even if you could do this without removing the calipers, you still have to disconnect the brake lines because it is routed through the frame of the upper A-arm.
Pulling the LCA is easy after you remove the caliper.
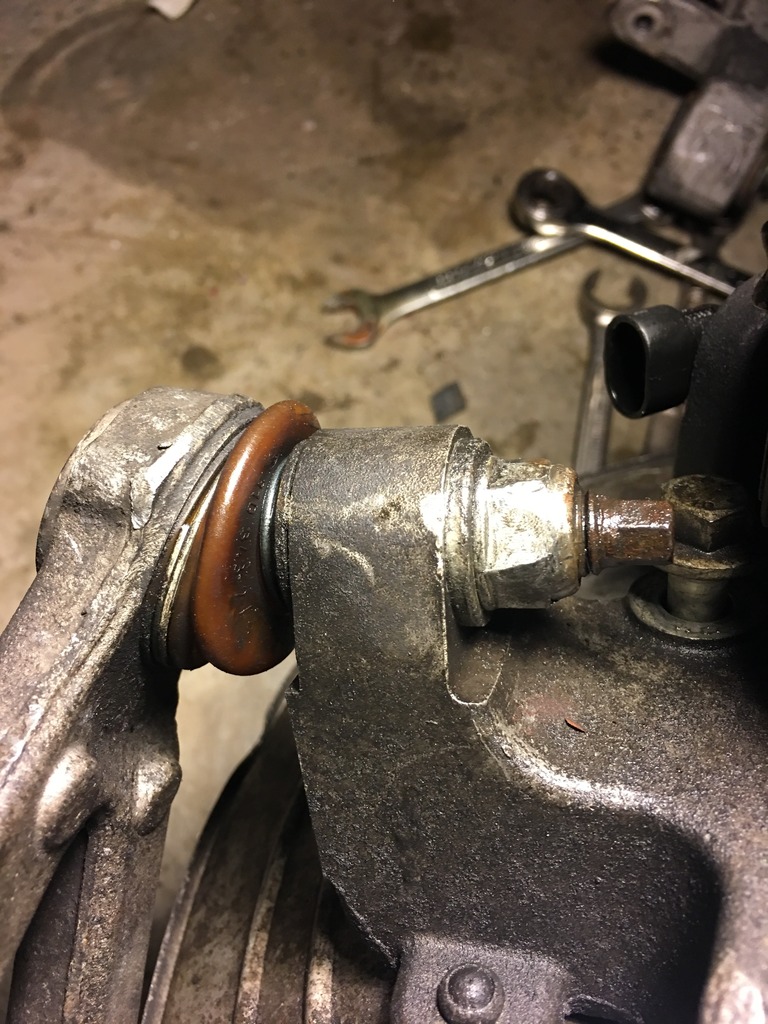
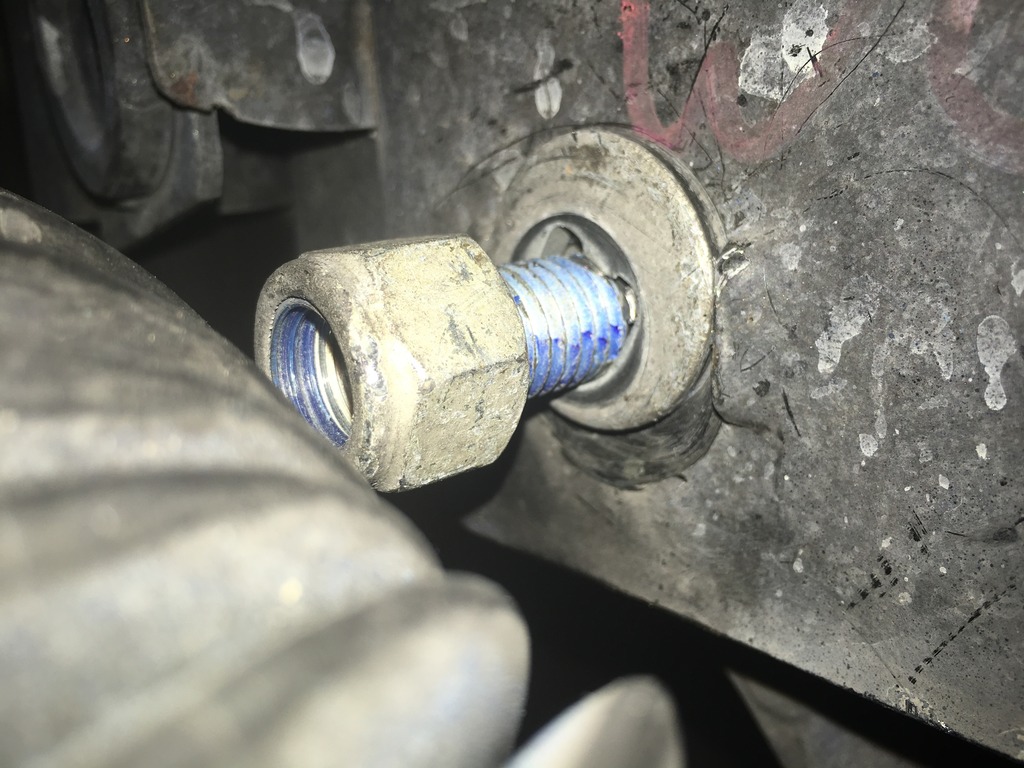
Pulling the UCA should be easy, and once again the drivers side was. Remove the nut on the ball joint to the knuckle (8mm box wrench on the end).
With both the LCA and UCA out and the caliper laid to the side, I was able to pull the anti-roll bar bushings which are hidden way in the back. It's nearly impossible to get the nut out because of the location. I only got it out using a flexible head ratcheting in wrench.
These did not need to be changed, but I wanted to so that I would have a full matched set of poly bushings. Boy was I regretting that at one point yesterday. I literally spent two hours trying to get the first one in until I finally devised a rig to help me with it. The new bushings sets in place, and the top has a tab on one side that slide into a slot, then you swing the top closed like a lid, and the bolt comes in from the top. The nut on the bottom has a tab on it so that you don't have to get a wrench down there to keep it from spinning while you tighten, but that only makes things worse. Because you have to clamp down tightly on the bushing from the top, the bolt is under lots of stress and it is really hard to spin, and the nut on the bottom can't spin because of the tab. To top all of that off, this bushing is way in the back sandwiched between the subframe and the body, with a brake line running right in front of it. Finally I devised a plan to take the stress off of the bolt. I got a zip-tie started around the top and bottom flange, used some needle nose pliers to squeeze it closed, and tightened the zip tie down. Doing this really requires 3 hands in a space the size of a box of playing cards, but somehow I pulled it off and tightened down the clamp. I was able to cut out the zip tie when I was done.
The passenger side was a total fiasco. Not only did I have to cut off the stabilizing bar, but the nut to the balljoint on the UCA was galled on. After fighting it for almost 4 hours I had to pull the entire axle. I took it to 4 machine shops and none of them thought they could get it off without destroying the balljoint. Since I can't find a new one and there is nothing wrong with the current one, I decided to try and swap the bushings with the arm attached to the axle.
Along the way I damaged the connector for the ABS sensor:
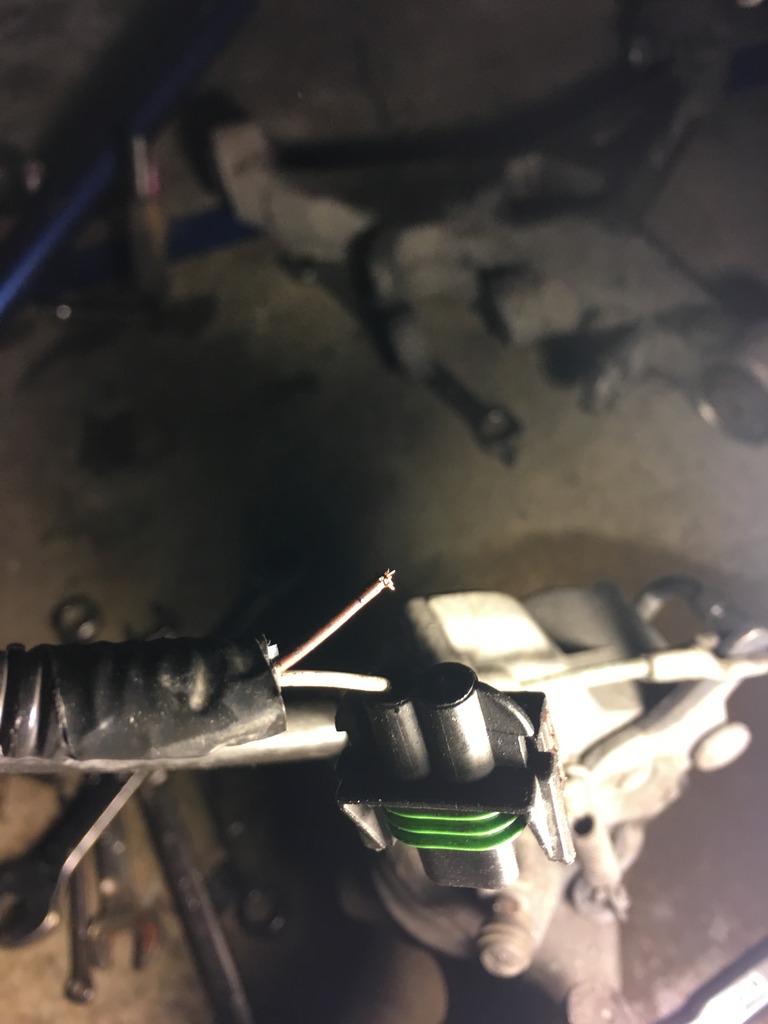
Luckily I had some extra weatherpack components from when I put a new harness in my mustang so I was able to repair it.
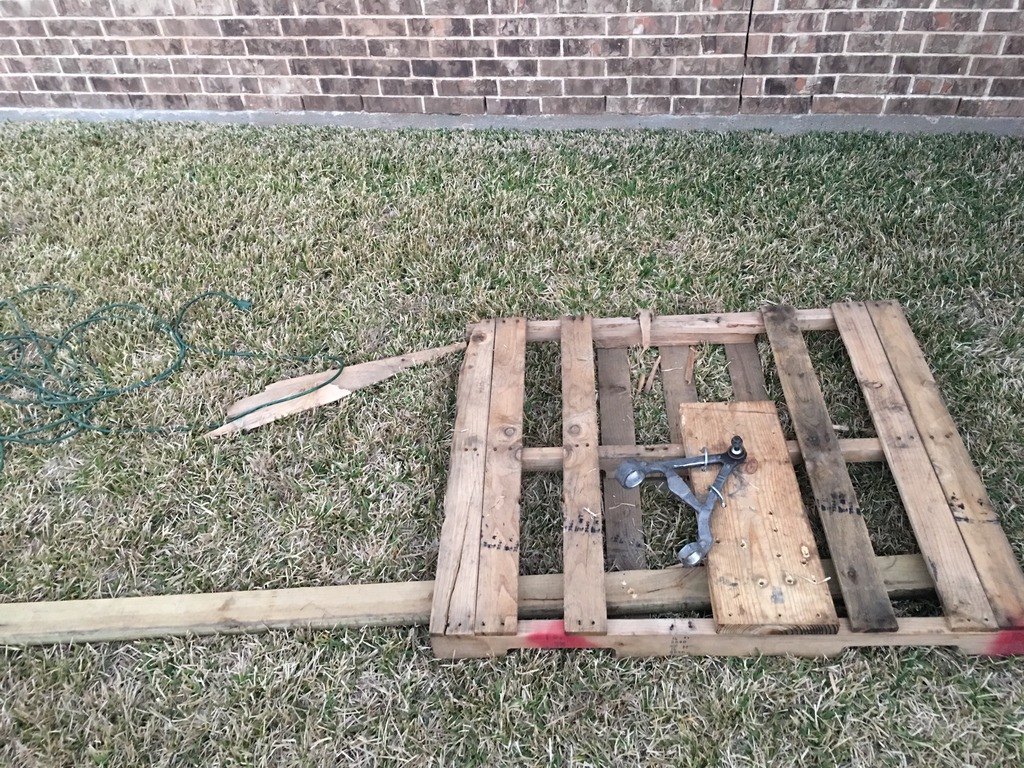
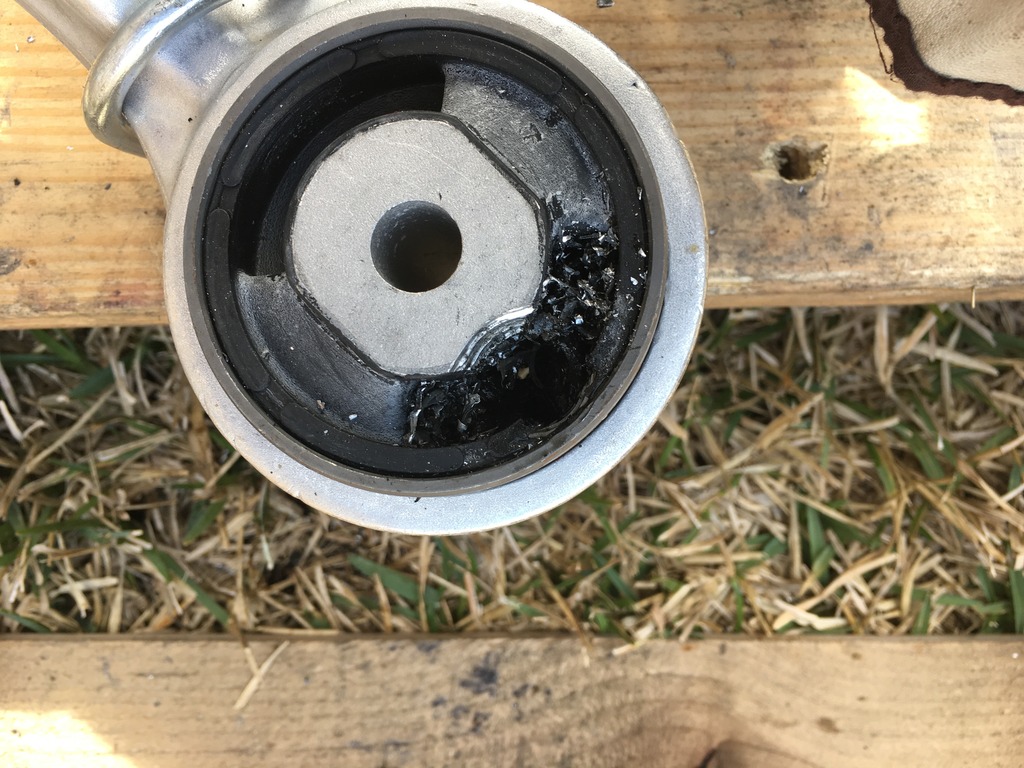
Removing bushings was to say the least not a fun experience. Of the 10 I needed to remove on the back control arms, only 2 were not seized. The rest I had to remove the rubber, cut the sleeve, and then press out. And even after being cut they were insanely hard to press out. I had to build a rig out of an old pallet, some 2x10 and 2x4 to get enough leverage to drive them out.
With all all 10 bushings out, I moved on to installing the new ones. The rear LCA bushings all had metal sleeves on them, all the other bushings are all-poly. I threw the rear LCA bushings in the freezer over night, and they were pretty easy to install. They slid about 25% of the way in by hand, and then pressed in super easy with the c-clamp.
The poly ones are even easier, just throw a little soap on them, and hit them with the c-clamp and some big washers. Probably could be done by hand, but after almost 30 hours on the car this week (all in the evenings), I was too sore to even try it. The c-clamp puts them in in 2 minutes.
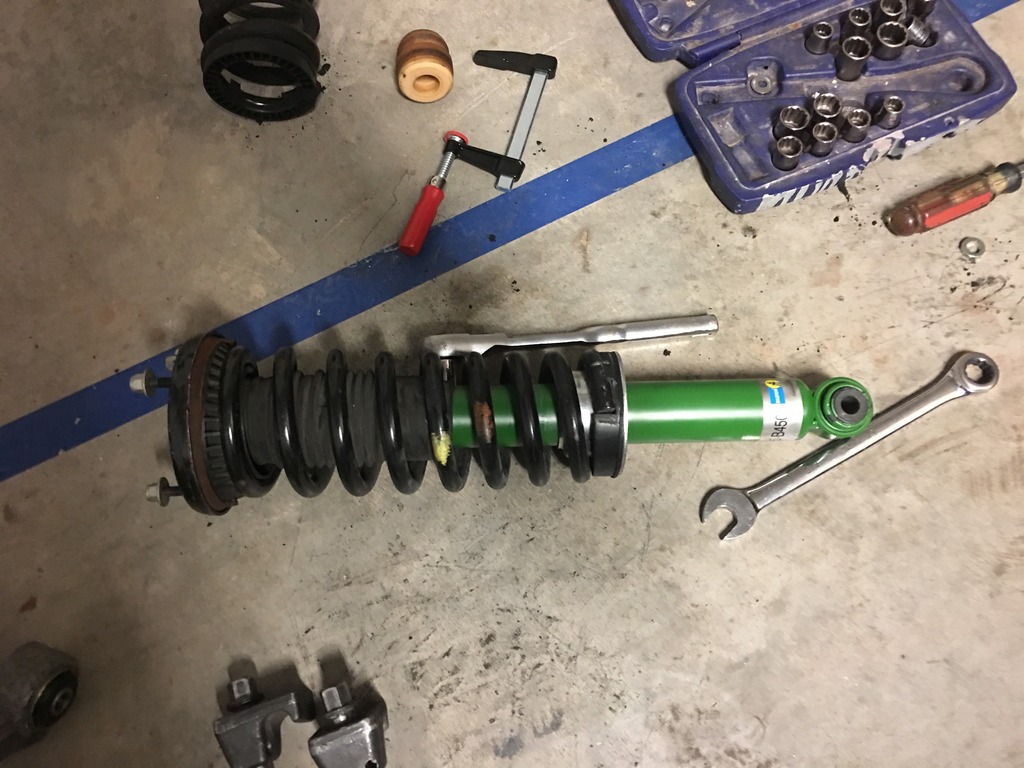
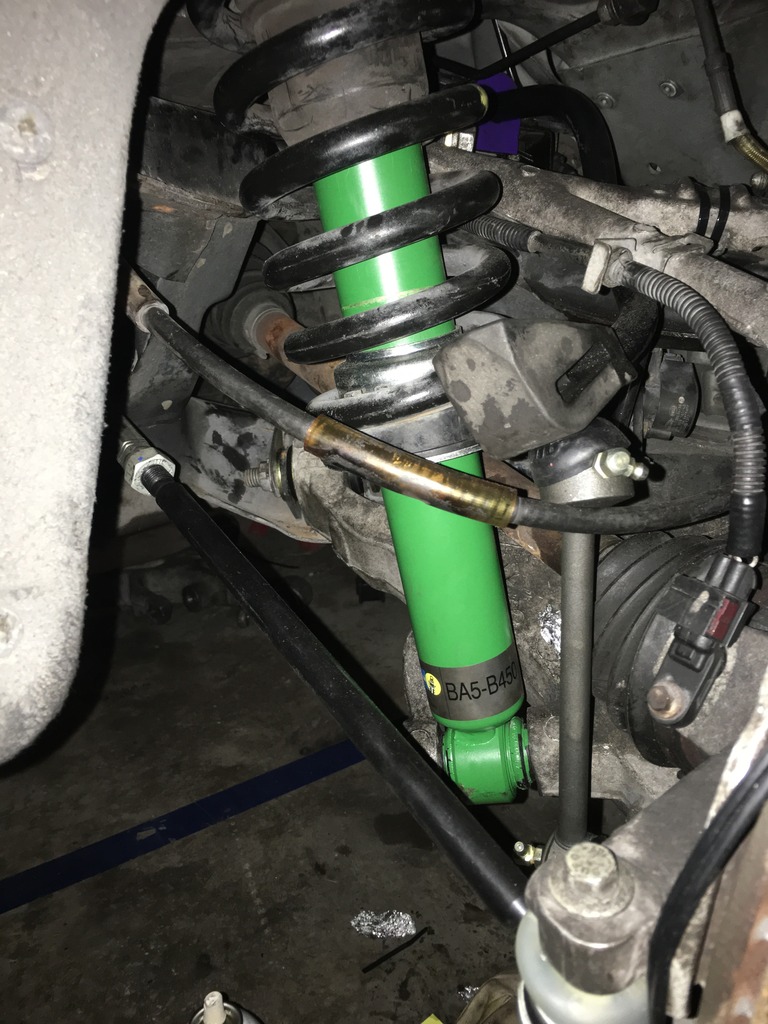
I also had to change at least one shock while I was in there (drivers was leaking). I ordered the Bilstien non-active ones because they were only $115 each. Unfortunately even though 5 sites all listed them as in stock, they all emailed after my order and gave a deliver date around January 30th. I canceled every one of the orders because I am really aiming to have it back together in time for track event on 21st. I looked extensively for some coil-over shocks I could install, but the front's use a clevis for the bottom mount and I could not find a single coil-over with a clevis.
I wound up ordering the Bilstien active dampening shocks. Those were only $250, which is twice the non-active but still half of the CATS OEM shocks.
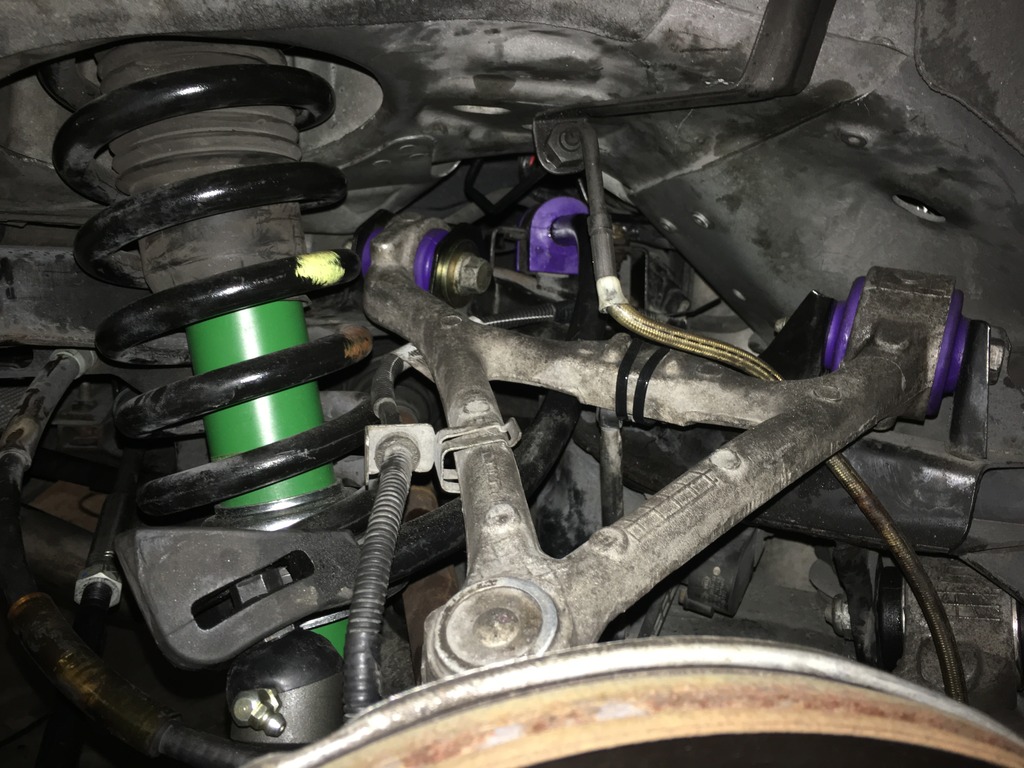
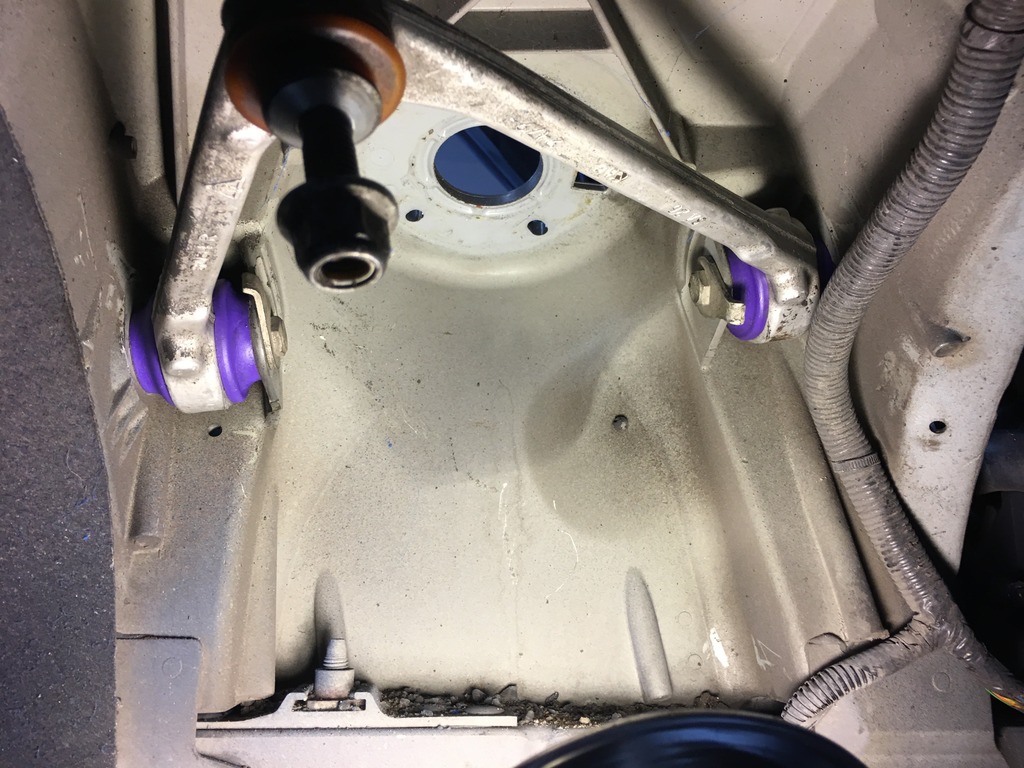
Here is the rear finally assembled. The LCAs all have black poly bushings with metal sleeves and uppers are purple poly with no sleeves.
Tomorrow I'll have my neighbor help me bleed the brakes so that I can put the wheels back on, then I'll get started on the front.
This is 5-fold the toughest car project I've ever embarked on, and that has caught me completely by surprise. I've worked on suspension components before, but this IRS is pretty complicated, and there is some just plain out stupid placement of fasteners that make it way harder to work on than it should be for this car.
To start with, the chrome capped lug nuts are crap, three of them stripped out while I was pulling the rear wheel, so I had to drill and cut them out to get to the steel nut underneath. This was just a prelude of the misery to come.
Here are some shots I took of the suspension to help me with re-assemble and to show off how bad some of the components were:


I started on the drivers side and for the most part didn't hit many snags, I had the entire drivers side apart in about 2 hours (not bad for my first time tearing into, stopping to take lots of pictures, and bag + tag everything). First I pulled the sway links and stabilizer bars. Detaching neither is fun. The factory ball joints on the sway links don't have a jam-nut on the back side to hold them still while you remove the flange nut, so you have to just shred the rubber and grease to get a set of pliers on the shaft. The stabilizer bar has a nut-bolt at the knuckle, but on the frame side it connects with a balljoint that has a 8MM tip on that you can use to hold it still while you take of the flange nut. The drivers side came off decent, but if you don't have a ratcheting 18mm end wrench, it could take an hour. You can only get about a 20 degree swing with an end wrench and there is no way to get a socket in there. In a common theme, the passenger side was a total pain. The 8mm tip was so rusted that it disintegrated about half way though. Where these are located (tight against the body behind the muffler), there is no way to get pliers in there. I was able to bend a sawzall blade at a 45 degree angle and get it in there well enough to cut the passenger side off.


It's impossible to remove the rear LCA without removing the brake calipers (easily solved by designing the bolt to come in from the other side). Even if you could do this without removing the calipers, you still have to disconnect the brake lines because it is routed through the frame of the upper A-arm.
Pulling the LCA is easy after you remove the caliper.
Pulling the UCA should be easy, and once again the drivers side was. Remove the nut on the ball joint to the knuckle (8mm box wrench on the end).
With both the LCA and UCA out and the caliper laid to the side, I was able to pull the anti-roll bar bushings which are hidden way in the back. It's nearly impossible to get the nut out because of the location. I only got it out using a flexible head ratcheting in wrench.
These did not need to be changed, but I wanted to so that I would have a full matched set of poly bushings. Boy was I regretting that at one point yesterday. I literally spent two hours trying to get the first one in until I finally devised a rig to help me with it. The new bushings sets in place, and the top has a tab on one side that slide into a slot, then you swing the top closed like a lid, and the bolt comes in from the top. The nut on the bottom has a tab on it so that you don't have to get a wrench down there to keep it from spinning while you tighten, but that only makes things worse. Because you have to clamp down tightly on the bushing from the top, the bolt is under lots of stress and it is really hard to spin, and the nut on the bottom can't spin because of the tab. To top all of that off, this bushing is way in the back sandwiched between the subframe and the body, with a brake line running right in front of it. Finally I devised a plan to take the stress off of the bolt. I got a zip-tie started around the top and bottom flange, used some needle nose pliers to squeeze it closed, and tightened the zip tie down. Doing this really requires 3 hands in a space the size of a box of playing cards, but somehow I pulled it off and tightened down the clamp. I was able to cut out the zip tie when I was done.
The passenger side was a total fiasco. Not only did I have to cut off the stabilizing bar, but the nut to the balljoint on the UCA was galled on. After fighting it for almost 4 hours I had to pull the entire axle. I took it to 4 machine shops and none of them thought they could get it off without destroying the balljoint. Since I can't find a new one and there is nothing wrong with the current one, I decided to try and swap the bushings with the arm attached to the axle.


Along the way I damaged the connector for the ABS sensor:

Luckily I had some extra weatherpack components from when I put a new harness in my mustang so I was able to repair it.
Removing bushings was to say the least not a fun experience. Of the 10 I needed to remove on the back control arms, only 2 were not seized. The rest I had to remove the rubber, cut the sleeve, and then press out. And even after being cut they were insanely hard to press out. I had to build a rig out of an old pallet, some 2x10 and 2x4 to get enough leverage to drive them out.

With all all 10 bushings out, I moved on to installing the new ones. The rear LCA bushings all had metal sleeves on them, all the other bushings are all-poly. I threw the rear LCA bushings in the freezer over night, and they were pretty easy to install. They slid about 25% of the way in by hand, and then pressed in super easy with the c-clamp.
The poly ones are even easier, just throw a little soap on them, and hit them with the c-clamp and some big washers. Probably could be done by hand, but after almost 30 hours on the car this week (all in the evenings), I was too sore to even try it. The c-clamp puts them in in 2 minutes.


I also had to change at least one shock while I was in there (drivers was leaking). I ordered the Bilstien non-active ones because they were only $115 each. Unfortunately even though 5 sites all listed them as in stock, they all emailed after my order and gave a deliver date around January 30th. I canceled every one of the orders because I am really aiming to have it back together in time for track event on 21st. I looked extensively for some coil-over shocks I could install, but the front's use a clevis for the bottom mount and I could not find a single coil-over with a clevis.
I wound up ordering the Bilstien active dampening shocks. Those were only $250, which is twice the non-active but still half of the CATS OEM shocks.

Here is the rear finally assembled. The LCAs all have black poly bushings with metal sleeves and uppers are purple poly with no sleeves.


Tomorrow I'll have my neighbor help me bleed the brakes so that I can put the wheels back on, then I'll get started on the front.

Thread Starter
|
Senior Member
Joined: Jun 2015
Posts: 107
Likes: 117
Tie rod ends are pretty notorious for falling apart on many makes, not just jaguar. I grabbed new ones when I put the front end back together even though mine looked fine because they were only $18 each.
Thread Starter
|
Senior Member
Joined: Jun 2015
Posts: 107
Likes: 117
Well, to put it mildly, this sucked.
I worked pretty much non-stop for 3 week, pulled 3 or 4 all-nighters... and still didn't get the car ready for the track day.
In general the front was much much easier to work on than the rear. There were a few quirks to overcome, but there is much more room and it is not nearly as complex.
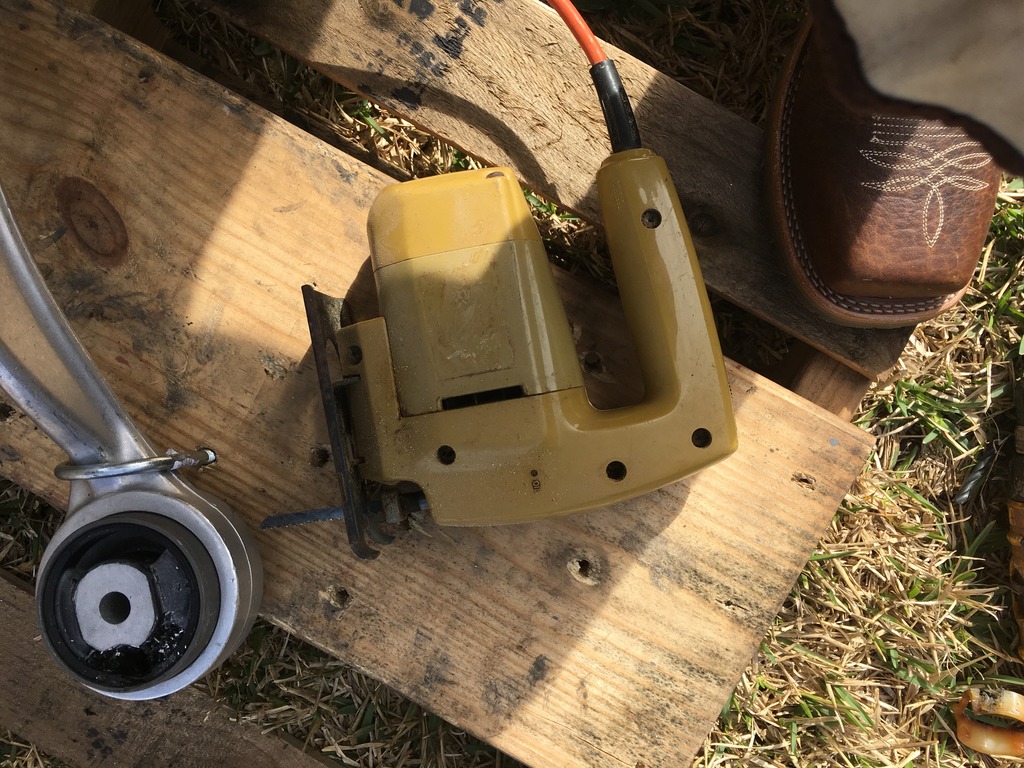
First, I finally found an easy way to remove the bushings. I used the largest drill bit I could that would fit between the center metal section and the out metal shell (the size varies on each bushing) to drill a hole through. Then I used a jig-saw to cut the metal shell (be careful not to get into the control arm). With a groove cut in the shell, you can tap the bushing out with a hammer.
To make things easy I removed all of the plastic under the nose giving me easy access to everything from as many angles as possible. The upper controls arms are a little interesting to remove because the nuts are in the engine compartment. The front nuts are a breeze, but both the back side ones are buried underneath stuff. On the passengers side it is sandwiched behind the washer fluid bottle, that I couldn't figure out how to remove for anything. Luckily I was able to get a ratcheting end wrench slid in there. On the other side I had to loosen the bolts and pull aside some fuse and relay boxes, but didn't need to disconnect anything.
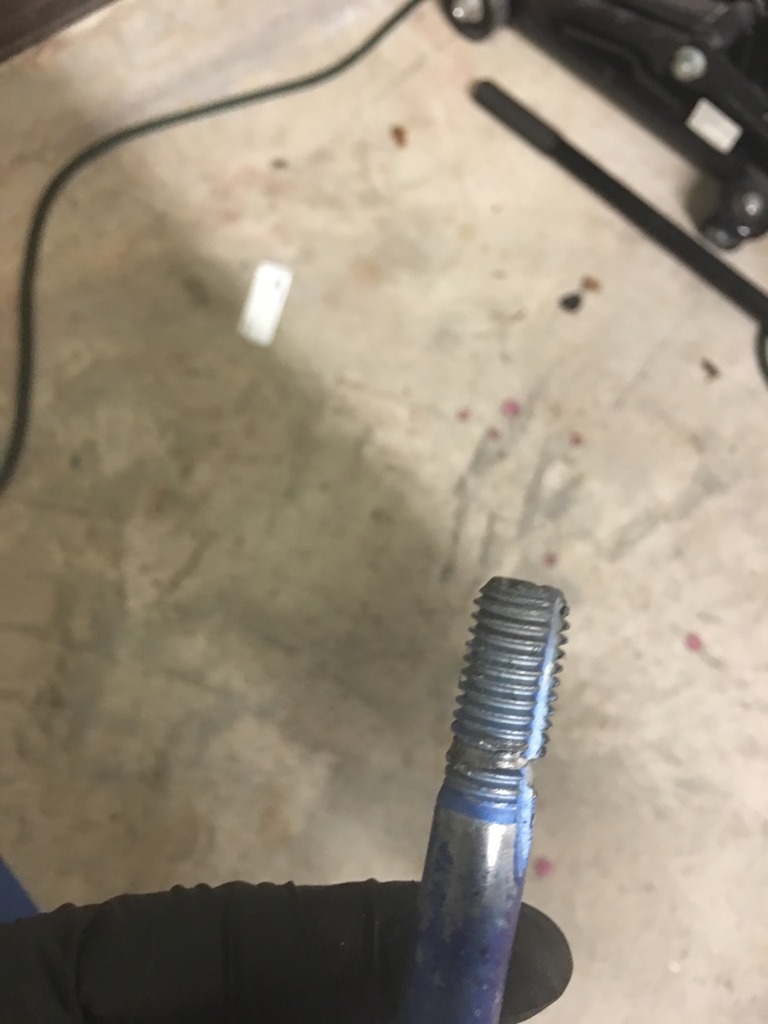
Both of the lower control arms (The banana and the straight one) have a camber adjustment bolt in them. Some nimrod along the way in the past had decided to hold a wrench on the nut and turn the bolt to break things loose (This doesn't work by the way, you have to take the nut off and then pull the bolt out), resulting in the notched washer cutting a groove in the bolt and making it nearly impossible to get the washer off. After much cussing and leverage from a very large screwdriver, a 3lb hammer, and some channel locks, I was able to twist the washer back to the groove and pull it out:
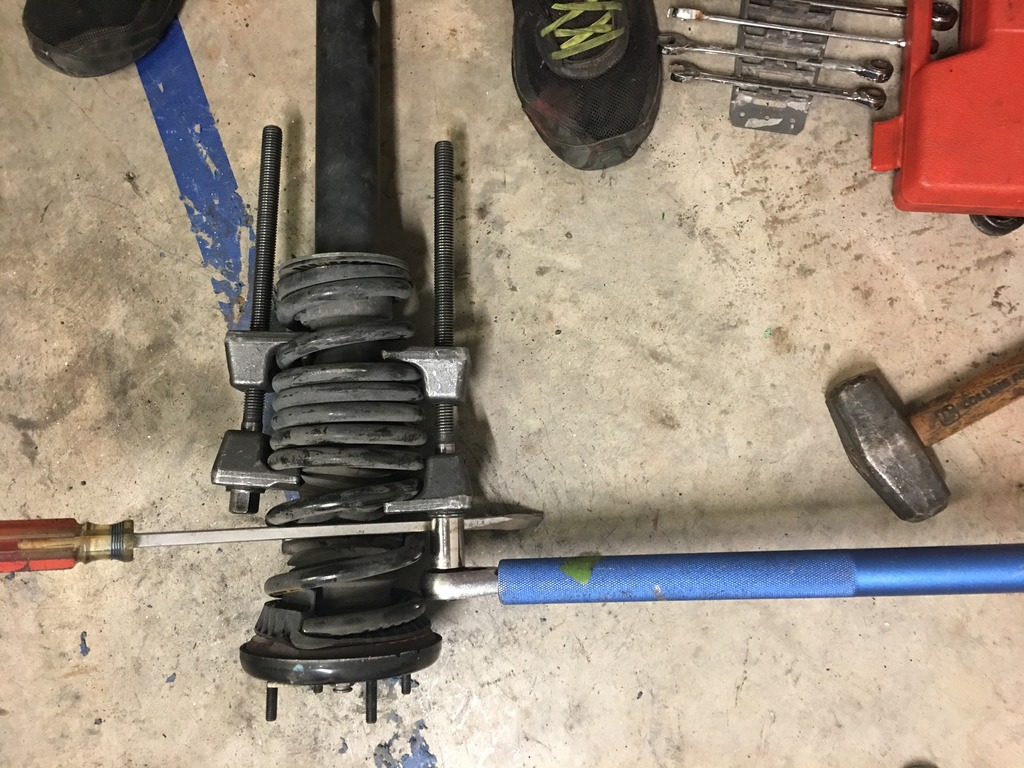
The shocks on the front really kicked my butt too. On the rear shocks I compressed 4 coils and easily got the shock out and the new one in. On the fronts I started with the same (4) coils, but it wasn't enough. So I had to release all the pressure, and then grab 6 coils, and it still wasn't enough. So I had to release all the pressure again and grab 7 coils (That is all I could get with the compressors I had). Luckily 7 was just enough. The problem is that I couldn't find a spring compressor (I tried 3) that would fit these cone shaped springs in a way that would allow me to get a ratchet or even the ratcheting end of a wrench on them. I was stuck using the one end of a wrench, which means I spent almost 2 hours to get the first spring swapped. The second one should have been easier because I knew how many coils to grab, but the spring compressed galled on me when I was taking it off, and I had to go find another one so that I could take the pressure off it, cut it with a grinder, and then pull the other compressor off.. sheesh!
In the end what kept me from getting the car ready in time was the banana control arm on the drivers side. There are two bushings, the huge one in the back and a small one that is kind of a combo between a bushing and ball joint in the front. I damaged the small one while working on the big one, and I couldn't find a replacement anywhere. I ordered a Beck Arnley that I thought would fit, but when it arrived it was about 2mm too big. So then I ordered some universal poly ones that were the right diameter, but they were too short and so they were giving way to much flex, putting the bolt in danger of breaking under a hard corner. My only option it seemed was to buy a new one. No big deal, every S-Type and XK for 12 years used one so I'll run down to the Jag dealership and give them a vital organ for a genuine part. Only problem was that they didn't have one, neither did any of the other 3 Jag dealers in Houston, or any of the junkyards. Myself and the guy at my local shop burned up the phones for 3 hours and could not find one that would arrive in less than 3 days. What really pisses me off is that if I had just ordered one online as soon as I damaged the first one I would have had it in time for the track day. I still can't believe no one had one in stock.
I got everything back together yesterday and had it aligned today.
To recap, all 18 control arm bushings and the front and back anti-roll bar bushings were all swapped for poly. Plus 4 new Bilstien dynamic shocks.
The poly bushings definitely make the car handle tighter, much tighter. Almost no roll, and in fact I need to look into ways to reduce the power steering boost because the response is so fast it almost feels twitchy. I don't notice any more harshness in the ride (and Houston's concrete roads suck) but all of the bumps are definitely way louder now. Hitting the concert expansion joints on the interstate sounds like hitting the lane diving reflectors used to.
Hopefully I'll get it out to the track day in May so that I can find out exactly how much improvement all this has made.
I worked pretty much non-stop for 3 week, pulled 3 or 4 all-nighters... and still didn't get the car ready for the track day.
In general the front was much much easier to work on than the rear. There were a few quirks to overcome, but there is much more room and it is not nearly as complex.
First, I finally found an easy way to remove the bushings. I used the largest drill bit I could that would fit between the center metal section and the out metal shell (the size varies on each bushing) to drill a hole through. Then I used a jig-saw to cut the metal shell (be careful not to get into the control arm). With a groove cut in the shell, you can tap the bushing out with a hammer.


To make things easy I removed all of the plastic under the nose giving me easy access to everything from as many angles as possible. The upper controls arms are a little interesting to remove because the nuts are in the engine compartment. The front nuts are a breeze, but both the back side ones are buried underneath stuff. On the passengers side it is sandwiched behind the washer fluid bottle, that I couldn't figure out how to remove for anything. Luckily I was able to get a ratcheting end wrench slid in there. On the other side I had to loosen the bolts and pull aside some fuse and relay boxes, but didn't need to disconnect anything.

Both of the lower control arms (The banana and the straight one) have a camber adjustment bolt in them. Some nimrod along the way in the past had decided to hold a wrench on the nut and turn the bolt to break things loose (This doesn't work by the way, you have to take the nut off and then pull the bolt out), resulting in the notched washer cutting a groove in the bolt and making it nearly impossible to get the washer off. After much cussing and leverage from a very large screwdriver, a 3lb hammer, and some channel locks, I was able to twist the washer back to the groove and pull it out:


The shocks on the front really kicked my butt too. On the rear shocks I compressed 4 coils and easily got the shock out and the new one in. On the fronts I started with the same (4) coils, but it wasn't enough. So I had to release all the pressure, and then grab 6 coils, and it still wasn't enough. So I had to release all the pressure again and grab 7 coils (That is all I could get with the compressors I had). Luckily 7 was just enough. The problem is that I couldn't find a spring compressor (I tried 3) that would fit these cone shaped springs in a way that would allow me to get a ratchet or even the ratcheting end of a wrench on them. I was stuck using the one end of a wrench, which means I spent almost 2 hours to get the first spring swapped. The second one should have been easier because I knew how many coils to grab, but the spring compressed galled on me when I was taking it off, and I had to go find another one so that I could take the pressure off it, cut it with a grinder, and then pull the other compressor off.. sheesh!

In the end what kept me from getting the car ready in time was the banana control arm on the drivers side. There are two bushings, the huge one in the back and a small one that is kind of a combo between a bushing and ball joint in the front. I damaged the small one while working on the big one, and I couldn't find a replacement anywhere. I ordered a Beck Arnley that I thought would fit, but when it arrived it was about 2mm too big. So then I ordered some universal poly ones that were the right diameter, but they were too short and so they were giving way to much flex, putting the bolt in danger of breaking under a hard corner. My only option it seemed was to buy a new one. No big deal, every S-Type and XK for 12 years used one so I'll run down to the Jag dealership and give them a vital organ for a genuine part. Only problem was that they didn't have one, neither did any of the other 3 Jag dealers in Houston, or any of the junkyards. Myself and the guy at my local shop burned up the phones for 3 hours and could not find one that would arrive in less than 3 days. What really pisses me off is that if I had just ordered one online as soon as I damaged the first one I would have had it in time for the track day. I still can't believe no one had one in stock.
I got everything back together yesterday and had it aligned today.
To recap, all 18 control arm bushings and the front and back anti-roll bar bushings were all swapped for poly. Plus 4 new Bilstien dynamic shocks.
The poly bushings definitely make the car handle tighter, much tighter. Almost no roll, and in fact I need to look into ways to reduce the power steering boost because the response is so fast it almost feels twitchy. I don't notice any more harshness in the ride (and Houston's concrete roads suck) but all of the bumps are definitely way louder now. Hitting the concert expansion joints on the interstate sounds like hitting the lane diving reflectors used to.
Hopefully I'll get it out to the track day in May so that I can find out exactly how much improvement all this has made.
Last edited by ajzride; Jan 28, 2017 at 12:26 AM.
Veteran Member
Joined: May 2013
Posts: 1,368
Likes: 636
From: tampa, fl
AJ, you are the man!
It is shocking how much was needed. My previous BMW 650 new front LCA bushings at 60k miles, but that car was a collection of parts that weren't designed to last high mileage.
It is shocking how much was needed. My previous BMW 650 new front LCA bushings at 60k miles, but that car was a collection of parts that weren't designed to last high mileage.
Thread Starter
|
Senior Member
Joined: Jun 2015
Posts: 107
Likes: 117
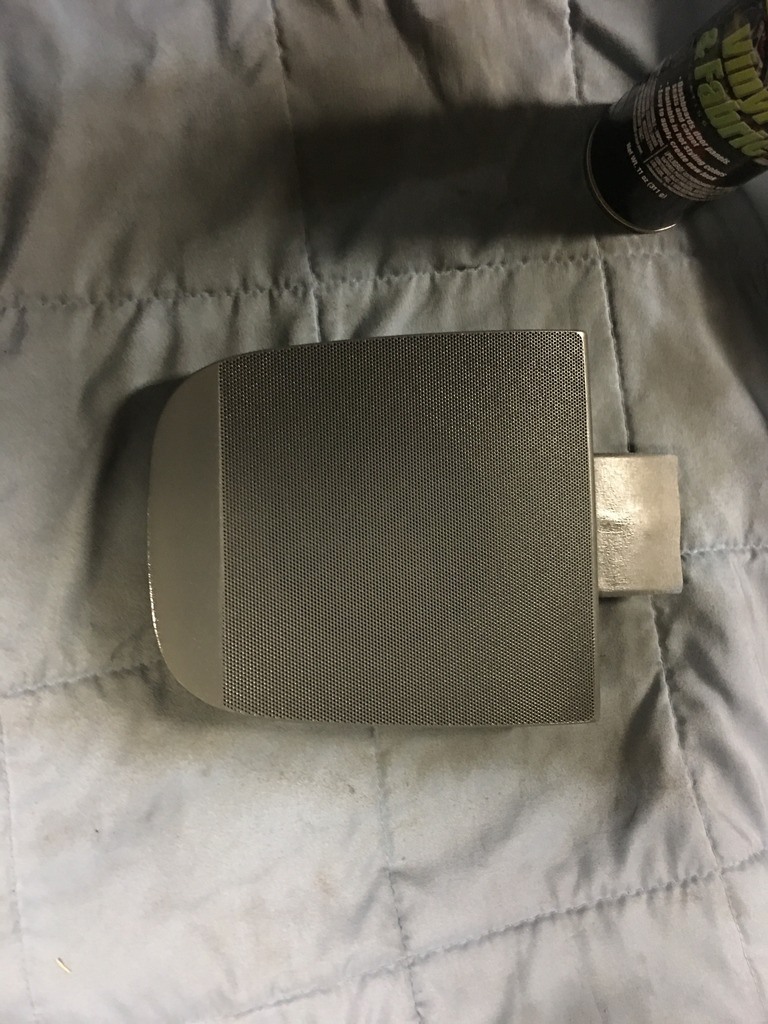
When I pulled the dash back in October, I broke the grill for center speaker. I hopped on the interwebz to buy a new one, but holy cow are they expensive. $45 was the cheapest I could find. I guess mine is probably salvageable. Besides... it gave me a chance to prove there are practical uses for a 3D Printing pen:
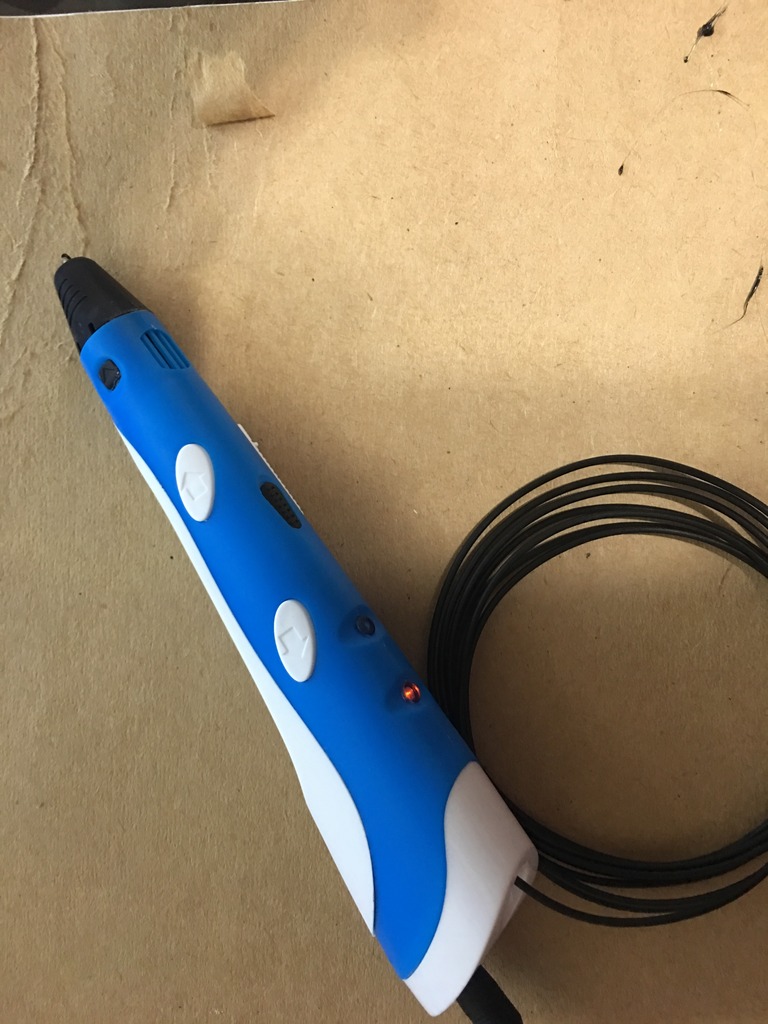
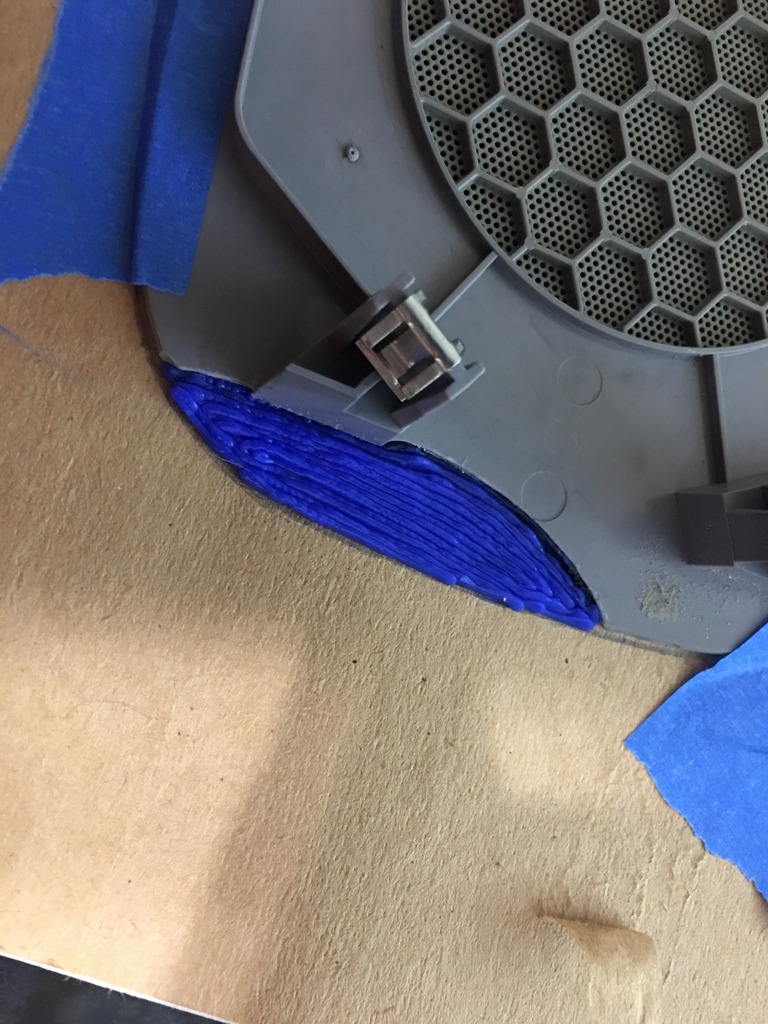
I forgot to take a picture of the damaged grill, but the blue is pretty obviously what I made with the 3D printer. The filament comes out at 185C, which was plenty hot enough to melt the grill and get great adhesion:
Next I smoothed everything out with some 80 grit:
Obviously there was no realistic way to match the peroration pattern where I made my repair, so I decided to eliminate the pattern in a symmetrical manner:
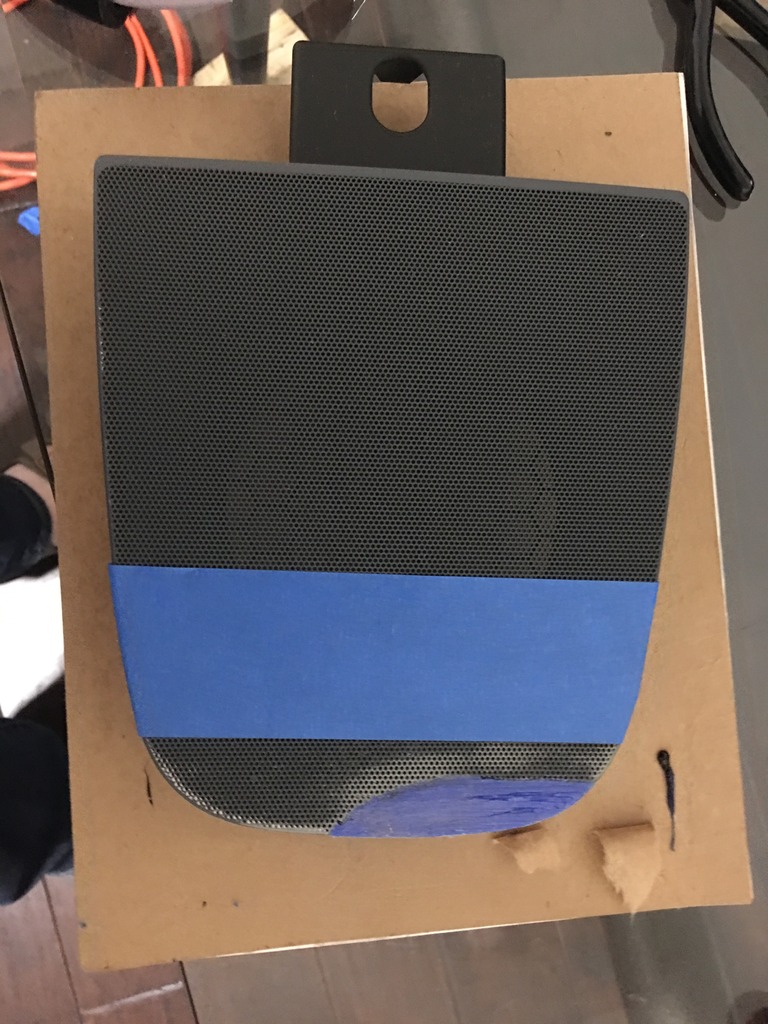
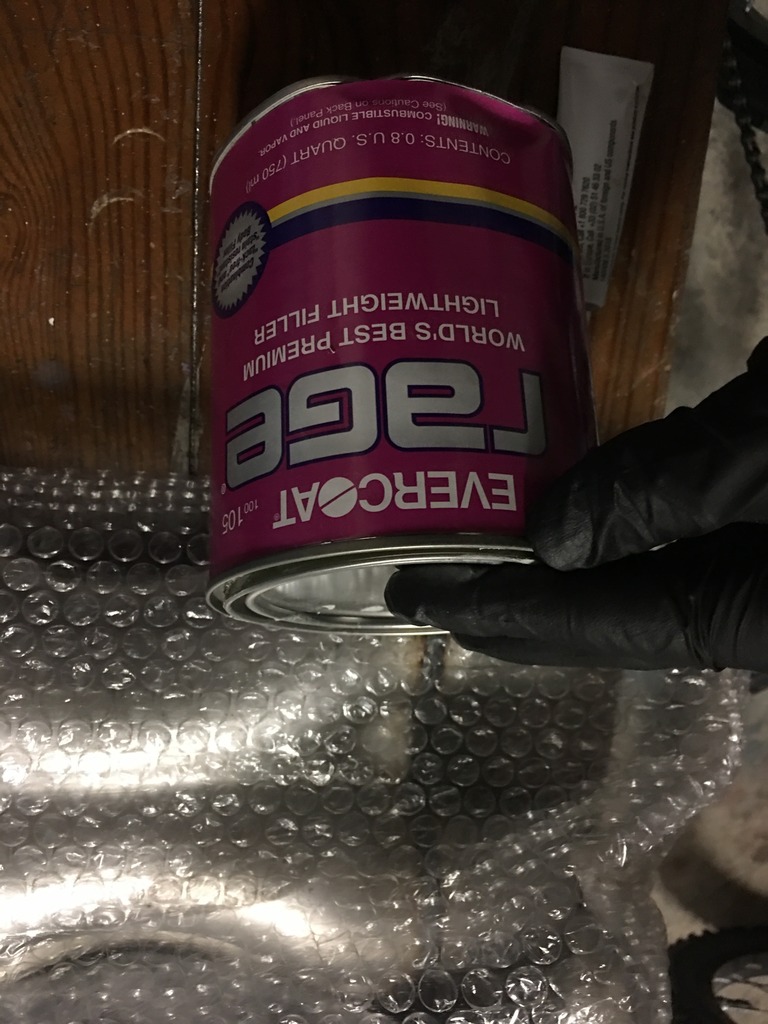

I taped off a nice straight line right above the repair, smoothed out a little body filler on the tip, and then pulled the tape off with the filler wet. Left a perfect little area of solid.
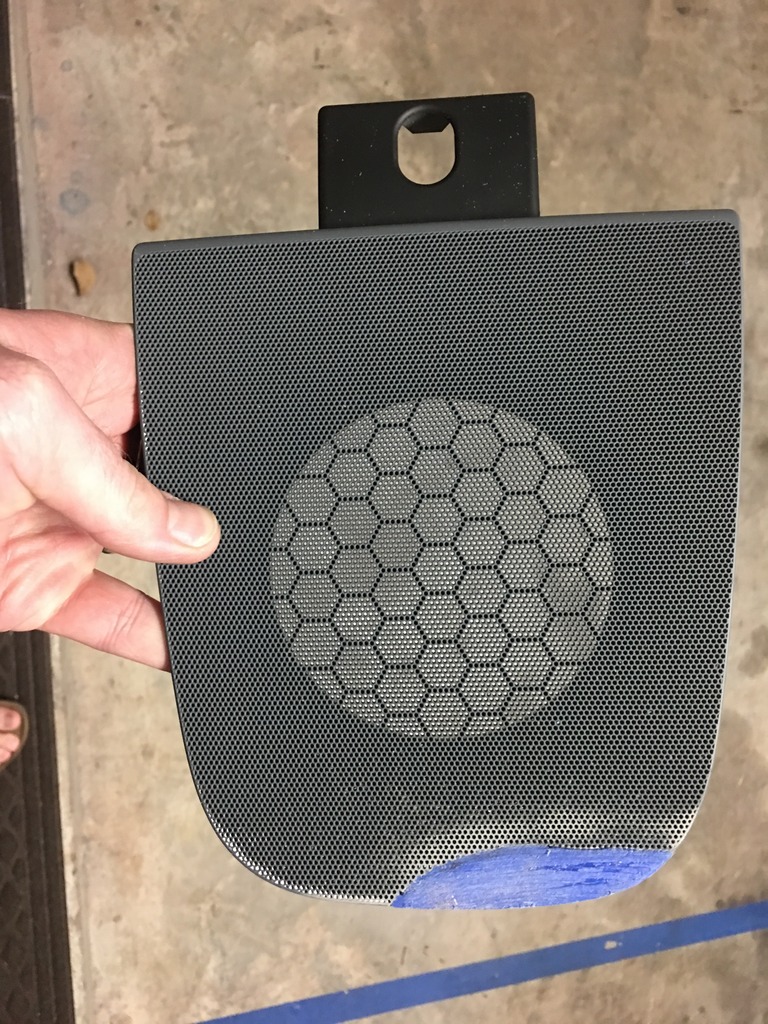
I cleaned up the body filler with some 80 grit followed by 180 grit and then 400 grit. Next a little primer and then some interior dye (Which is a dead on match for my leather), and it was ready to install.


I forgot to take a picture of the damaged grill, but the blue is pretty obviously what I made with the 3D printer. The filament comes out at 185C, which was plenty hot enough to melt the grill and get great adhesion:

Next I smoothed everything out with some 80 grit:

Obviously there was no realistic way to match the peroration pattern where I made my repair, so I decided to eliminate the pattern in a symmetrical manner:


I taped off a nice straight line right above the repair, smoothed out a little body filler on the tip, and then pulled the tape off with the filler wet. Left a perfect little area of solid.
I cleaned up the body filler with some 80 grit followed by 180 grit and then 400 grit. Next a little primer and then some interior dye (Which is a dead on match for my leather), and it was ready to install.


Veteran Member
Joined: Sep 2013
Posts: 5,209
Likes: 1,847
From: NY
Great job . Coming from some cars where you can't buy parts it is great to rebuild something . It looks like you had some fun with the challenge of doing this but on the other hand it would have been less expensive to buy the $45 part.