XK / XKR ( X150 ) 2006 - 2014

Conv. rr qtr trm sliding panel questions..

Thread Tools
 
Search this Thread
 
Old May 10, 2017 | 07:32 PM
  #1  
qcktvr's Avatar
Thread Starter
|
Member
Joined: Jul 2015
Posts: 67
Likes: 8
From: Durham ON., nice rural area.
Default Conv. rr qtr trm sliding panel questions..

Hello again,
I have some more questions for those that have gone before..
My roof now goes up and down again, but the LHS/drivers side sliding plastic piece is staying forward, it was wedged but now slides freely and springs forward, the cord to pull it back was hanging on the top frame and still has the a loop on the front but it has pulled out of the air damper / spring cylinder.
So, it looks as if the quarter trim panel will have to come out to get at things.
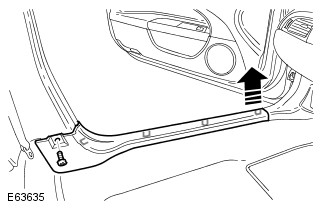
I purchased a pdf manual and understand that the bright Jaguar trim has to be removed from the door scuff plate and discarded!! If careful can it be reused?
I found a 2016 post that Steve / WhiteXKR mentioned and have the part ##s for the repair kit, there are LH/RH ###s, what is the Jaguar protocol for LH, is it the even number?? (C2P21070SEP)?
I suspect that I could find a way to repair the thing once I see it, but to be safe I will buy the repair kit and have it available when I pull it apart.
These jobs always seem a bit intimidating the first time and any advice / tips will be appreciated..
Last question; Is there a good source / dealer in the US that will mail parts? I am going to be in SC in 2 weeks and would like to compare price with the local, 2hrs, dealer here in ON.
Many thanks
 
Reply
Old May 10, 2017 | 07:48 PM
  #2  
Stuart S's Avatar
Veteran Member
15 Year Member
Community Builder
Loved
Community Favorite
Joined: Aug 2010
Posts: 10,106
Likes: 7,108
From: Atlanta suburbs
Default

I suggest that you contact the Forum sponsors that sell parts, as most provide discounts for Forum members. Hopefully, they'll be able to obtain that kit and have it delivered to South Carolina before you arrive.
 
Reply
Old May 10, 2017 | 09:03 PM
  #3  
qcktvr's Avatar
Thread Starter
|
Member
Joined: Jul 2015
Posts: 67
Likes: 8
From: Durham ON., nice rural area.
Default

Hi, will be hoping to fix the existing part before buying that repair kit as seeing prices around $200(USf) ouch; part like this likely costs Jaguar $20! (and I may not need it).
C2P21071XXX is coming up as the LH part.
And the plastic part will likely have faded and the new one will be yet another shade of??
Any advice for removing that door sill scuff plate, ***-u-me it really has to come off?
Will let you know how it goes..
 

Last edited by qcktvr; May 10, 2017 at 09:05 PM. Reason: missed something
Reply
Old May 10, 2017 | 09:23 PM
  #4  
JBzXJ40's Avatar
Senior Member
Joined: Mar 2016
Posts: 859
Likes: 321
From: Auckland NZ/ Houston, TX
Default

Is this the piece of trim you're referring to?


Reply
Old May 11, 2017 | 07:06 AM
  #5  
qcktvr's Avatar
Thread Starter
|
Member
Joined: Jul 2015
Posts: 67
Likes: 8
From: Durham ON., nice rural area.
Default

Yes, that's the piece. The fasteners are all hidden, I believe under the bright "Jaguar" emblem that my manual says is held on with adhesive... (and to discard?)
So easy to damage stuff when poking and prying, trying to figure out how...
Still thinking about it; 2 more cars to change wheels over, and the yard work...
Cheers
 
Reply
Old May 11, 2017 | 05:41 PM
  #6  
JBzXJ40's Avatar
Senior Member
Joined: Mar 2016
Posts: 859
Likes: 321
From: Auckland NZ/ Houston, TX
Default

Below is what Topix says to remove these 2 pieces of trim, and if I remember correctly, they are separate from each other.


Remove the scuff plate trim panel.


    REMOVAL AND INSTALLATION

    Loading...

    Removal
    1. Remove and discard the scuff plate decal.


      1. Remove the front scuff plate trim panel.


        Hope this helps
         
        Reply
        Old May 11, 2017 | 08:40 PM
          #7  
        qcktvr's Avatar
        Thread Starter
        |
        Member
        Joined: Jul 2015
        Posts: 67
        Likes: 8
        From: Durham ON., nice rural area.
        Default

        Thank You, fingers crossed, looks like the piece with the decal may not need to come off; hope to get that quarter trim panel out over the week end.
        Spent years of my life making interior trim so know how fragile it can be...
        Cheers
         
        Reply
        Old May 19, 2017 | 09:43 AM
          #8  
        qcktvr's Avatar
        Thread Starter
        |
        Member
        Joined: Jul 2015
        Posts: 67
        Likes: 8
        From: Durham ON., nice rural area.
        Default Conv. sliding panel - fixed - $0..

        Hi again,
        a quick update, all is fixed and working fine again without having to part with any $$$, so me is very happy.
        Thanks to all for pictures and hand holding...
        I predict that unless the design was updated, which is unlikely, then a high percentage of convertibles will suffer from failures in this sliding panel; it is a very poor design. When the top is down, which is how ours spends most of the summer, there is way too much stress on the cord that pulls the panel to the rear, hindsight I should have shortened the spring,(reduced the preload) in the cylinder under the panel.. The "pull" is also to one side, which aggravates the chance of the pins leaving their tracks..
        Should have taken pictures, sorry..
        My cord had pulled out of the small cylinder and the panel stayed fwd.
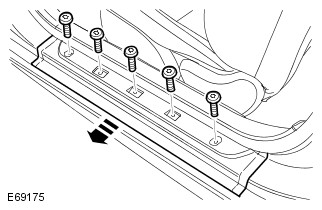
        With the 1/4 trm pnl out the cylinders were removed.
        The tracks were not broken.
        2 snap hooks hold the end cap on, released with a small screwdriver, LOTS of preload on the spring!
        Piston remained in the bottom, made a wire hook and pulled it out.
        Embarrassed to say, but could not see how the cord had been attached; looked at the longer cylinder but quite different.. (maybe lost a piece??)
        Pondered for awhile, then drilled 2 1/16in through piston in the flat areas under the 'O' ring, made a loop with some soft steel locking wire to hold the loop on the cord, used a piece of wire insulation on it to make it more friendly to the string..
        The piston has a very small bleed hole, they call it a damper, and this fix will have increased the air flow, but the stroke is so short and the top frame going up speed is so slow that in my opinion any dampng is just about meaningless..
        Anyway, it is all back together and working fine.. for now
        Now to think about why the drivers door does not lock..
         
        Reply
        Old May 19, 2017 | 11:44 AM
          #9  
        kj07xk's Avatar
        Veteran Member
        10 Year Member
        Liked
        Loved
        Community Favorite
        Joined: Jan 2015
        Posts: 5,301
        Likes: 2,570
        From: Naperville, Illinois USA
        Default

        Congrats!
        Did you have to remove the 'scuff plate' to get the 1/4 trim panel out?
        How did that go, did you have to 'discard' any decal?
         
        Reply
        Old May 19, 2017 | 06:40 PM
          #10  
        qcktvr's Avatar
        Thread Starter
        |
        Member
        Joined: Jul 2015
        Posts: 67
        Likes: 8
        From: Durham ON., nice rural area.
        Default

        No, only the int coloured piece has to come off. There is a squarish cover over the torx screw at the back end, mine was hanging off and easy to remove, now it is back in correctly it will be way more difficult to remove without damaging the panel, but it is way down out of sight, I *** u me someone was in there before. The clips pop out easily. The actual 1/4 trim also released very easily from its 4 clips. Both seat backs are joined and come out together.
        Not something to be afraid of for sure, I think the top going up would just push it forward without the other spring cylinder and a piece of elastic hooked to the top frame would pull it back to the top down position, the Jaguar design is a bit wackey imho...
        Cheers
         
        Reply
        Old Apr 28, 2018 | 11:27 AM
          #11  
        jwooky's Avatar
        Member
        Joined: Jul 2016
        Posts: 83
        Likes: 11
        Default

        Can anyone recommend a place to get these?

        C2P21070LEG

        C2P21071LEG
         
        Reply
        Old Apr 28, 2018 | 12:09 PM
          #12  
        qcktvr's Avatar
        Thread Starter
        |
        Member
        Joined: Jul 2015
        Posts: 67
        Likes: 8
        From: Durham ON., nice rural area.
        Default

        No, I expect you have searched, there are suppliers around... They are molded in colour, so after 11 yrs our originals have likely changed some...
        Have you had a look to see if you really need a new one(s)? My repair cost $0..
        Good luck
         
        Reply
        Old May 2, 2018 | 02:10 PM
          #13  
        jwooky's Avatar
        Member
        Joined: Jul 2016
        Posts: 83
        Likes: 11
        Default

        I have repaired them a couple times already. The little ears on the sliders are pretty warn and they get jammed often.

        Others have found them for ~$50, i keep finding them for ~200
         
        Reply
        Old Aug 2, 2018 | 09:55 AM
          #14  
        fritzthecat's Avatar
        Senior Member
        10 Year Member
        Loved
        Community Favorite
        Top Answer: 1
        Joined: Aug 2014
        Posts: 110
        Likes: 125
        From: Boca Raton, Florida
        Default Ya just gotta laugh...

        I just had to post this - it's from the X150Service manual I found. I think this is the section that deals with that trim panel. That's a 4000 page service manual that has EVERYTHING about these cars...


        except this.
         
        Reply
        Old Aug 2, 2018 | 10:56 AM
          #15  
        Ranchero50's Avatar
        Veteran Member
        Joined: Mar 2017
        Posts: 2,936
        Likes: 978
        From: Hagerstown MD
        Default

        Actually it's missing quite a few things that I've looked up. Linked paragraphs not existing etc.
         
        Reply
        Old Aug 2, 2018 | 06:44 PM
          #16  
        u102768's Avatar
        Veteran Member
        Joined: Jan 2010
        Posts: 2,941
        Likes: 1,511
        From: New Zealand
        Default

        Originally Posted by fritzthecat
        I just had to post this - it's from the X150Service manual I found. I think this is the section that deals with that trim panel. That's a 4000 page service manual that has EVERYTHING about these cars...

        except this.
        It is in the manual for the later cars so you could refer to that instead.
         
        Reply
        Old Aug 13, 2018 | 08:35 AM
          #17  
        fritzthecat's Avatar
        Senior Member
        10 Year Member
        Loved
        Community Favorite
        Top Answer: 1
        Joined: Aug 2014
        Posts: 110
        Likes: 125
        From: Boca Raton, Florida
        Default Found one!

        After a couple of hours of on-line searching, I found ONE site that even showed the part:

        https://www.sngbarratt.com/us/#!/Eng...IBLE-PORTFOLIO

        You have to navigate down through the various levels of break-out drawings, first to:
        * Interior Trim and Linings ->
        * Quarter Casings ->
        * Quarter Casing Rear Convertible Portfolio
        and it is part #10.
        All the other sites I checked, and there were about a dozen, when I got to that picture, the cover plate part wasn't shown. This place lists it for about $220. I found one on ebay after searching for the C2P21070 number, but it was tan and in Italy.
        I'm going to try a little harder to make the one I have work before I dump 220 bucks...

         
        Reply
        Old Aug 13, 2018 | 02:21 PM
          #18  
        WhiteXKR's Avatar
        Veteran Member
        15 Year Member
        Liked
        Loved
        Community Favorite
        Joined: Apr 2010
        Posts: 7,657
        Likes: 3,019
        From: Arlington VA USA
        Default Service Bulletin

        Jaguar has a useful TSB on repairing the sliders, including all part numbers. I have attached the document.
         
        Attached Files
        File Type: pdf
        JTB00199NAS1.pdf (295.7 KB, 642 views)
        Reply
        Old Mar 25, 2022 | 11:19 AM
          #19  
        Klaus0401's Avatar
        Junior Member
        Liked
        Joined: Aug 2021
        Posts: 28
        Likes: 7
        From: Near Stuttgart
        Default

        This was the file I searched for. Thank you very much.
         
        Reply
        Old Apr 25, 2022 | 12:54 PM
          #20  
        Gator8's Avatar
        Senior Member
        10 Year Member
        Liked
        Joined: Jul 2011
        Posts: 198
        Likes: 57
        From: Cantonment, FL
        Default

        Sorry if I’ve overlooked this, but how does one reattach the string to the panel? I can see it goes through the white cylinder.
         
        Reply


        All times are GMT -5. The time now is 01:57 AM.