When you click on links to various merchants on this site and make a purchase, this can result in this site earning a commission. Affiliate programs and affiliations include, but are not limited to, the eBay Partner Network.
I would not suggest using spacers on the Jaguar XKR just to get a wide stance.
Safety can be an issue and you need to make 100% sure that the spacers are custom milled for a hub centric spacer.
It would not be wise to sacrifice safety for appearence. The XKR looks great without the wide stance.
If you are going to use the exact Alcon setup as the Portfolio Editions as Stuart S. and I have, you will need to move up to a 20" rim on the front and the rear.
Thus, using 20" rims you can go to a slightly wider tire.
I would not eliminate the TPMS as the US DOT requires the TPMS on all modern cars for a reason, that is safety.
The Jaguar XKR was built for the use of the TPMS and you would be plagued with warnings on the dash without the TPMS.
And yes, the Jaguar was engineered to match wheels with the Alcon braking system.
If you ultimately decide to install the Alcon's you may have to go thru the same process as I did to get wheels milled to have proper fitment especially when seeking aftermarket wheels.
Finding aftermarket wheels for proper fitment to the Alcon's was a nightmare, but I did succeed in my quest.
Click the image to enlarge, click again for full screen.
..
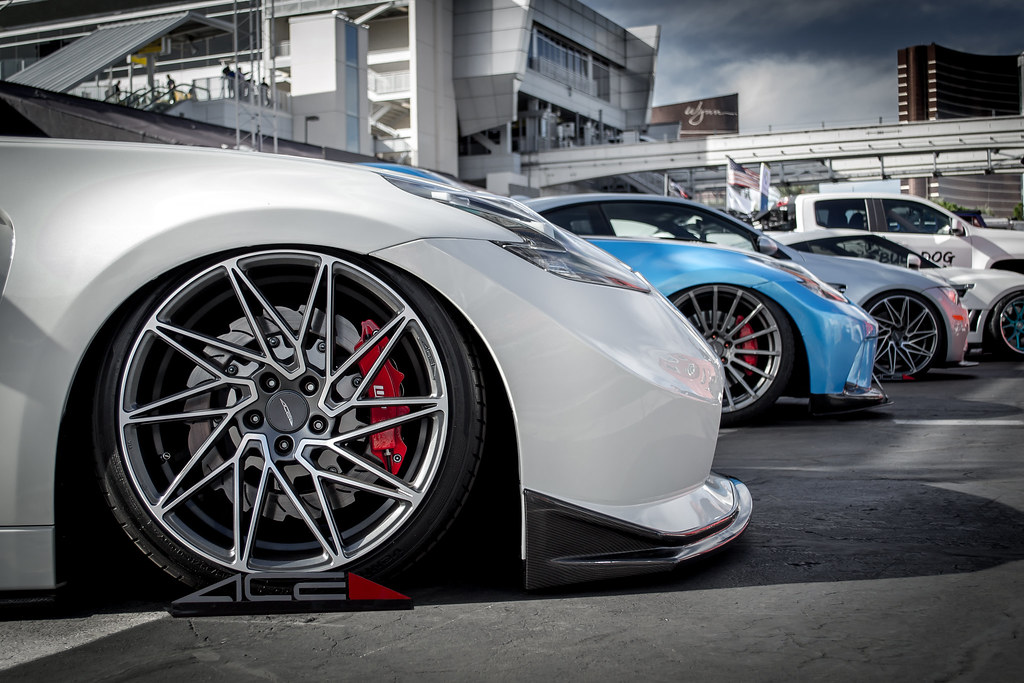
I have always had 20" rims and have yet to find any after market 20" wheel that would not fit the Alcons & 400mm rotors. The only issue I ran into is the inset TPMS valve stems in the middle of the barrel as opposed to the outside edge, will not clear the calipers, so either I need shorter or angled stems or flush mount or wheels with the traditional stem location on the outer edge of the wheel. I am quite familiar with your long and arduous quest to find wheels that would fit your car and love your choice. As I mentioned in your original thread, the Braelin wheels in Canada are known as ACE Alloy in the US and your style is known as Convex. At the time I had also been considering them and still am, but styles Dwvotion, Driven & Aspire.
Hi, Having done this very conversion, i.e. going from the 355mm & 326mm Teves single caliper system to the Alcons all round. Depending on what you have purchased it could be easy or you may need to purchase some more brackets.
Just on the parking brake - firstly it's not the same caliper as the "Brembo" calipers fitted to the early S-Type R and XJR (2004 -2005) as the Alcon discs on the rear are vented not solid. The differences can be identified by the correct ones are a shiny black and the incorrect ones for your application are a matt/ satin black.
You will need brackets to mount the parking brake caliper to the hub carrier - I have a full parts list - if you send me a PM with an email address I can send the excel sheet to you.
Have you got the caliper mounting brackets? I ask mainly as some are now no longer available - Tom Lenthall has an original set and will make up replacements should you require.
Just to note that there was a rear hub carrier VIN changeover from the hub carrier type similar to the front with a bolt in hub ( 4 bolts)
I.E. the bare carrier looks like this;
The park brake caliper attaches as per;
All assembled waiting for the disc as shown:
Jaguar do have a Vortex wheel which would fit your car as that wheel was an option - certainly in the UK - for the XKR-S, but the rear offset is i believe 26 not 52 as per the 2010 on XJR & XJR 75.
If there's anything else you need send me a note and I'll help as much as I can, it's all the incidental bits and pieces that you'll need, bolts, dust shields, and new flexi hoses - the Alcon ones have a different fitting.
And just as an FYI these are the pad dimensions for the 326mm and Alcon fronts;
Simon, thank you very much for the very detailed response. I do have the front and rear caliper brackets and bolts, but not the rear park brakes. Since I have never used the e-brake, I have opted to not bother with that.
As far as the flex hoses, I did NOT get new ones, so sounds like I will need those after all. I also did not get the shields, do I really need those? As for the hub change, will that matter in my application?
Does the X150 not function in the same way as the X350 in that when you remove the key/ power off the ignition the parkbrake is automatically activated?
I would imagine you would probably find plausibility errors from the park brake controller but of course one way to tell would be to unhook the cable from your existing calipers and then drive the car and see...
I'd certainly not recommend omitting it, but I had no choice as part of the UK MOT (inspection) the "handbrake" must function...
Personally I use it all the time atr traffic lights and you may be able to source the little brembo calipers used cheaply as they were used on the Aston Martin vantage and DB9 and I believe also the F355..
The shields are to protect the ball joint bush and tie rod rose joint bush. For the costs I'd replace them. You have to remove the existing ones by drilling out the rivets regardless.
For the hub change it depends on whether your hubs look like the pictures I uploaded, if they do then all you need to do is remove one of the bolts for the wheel bearing and the tie rod bolt and nut. Then install the new bracket, replace the tie rod bolt - upside down as the bracket now replaces the nut, reinstall the bolt to the bearing through the bracket and you're done.
The X350 wasn't that lucky so I had to change the hub carriers & bearings and halfshafts and handbrake cables etc....
With the car turned off and in park, I can still rock it fore and aft so I am assuming the brake is not engaging. If I manually set the brake I can hear it engage and the car does not move.
The existing shields are riveted and fit with the Alcon calipers tested fitted. Not sure what that means as far as need new ones? Regarding the rear hub, my apologies but I am not entirely clear if it matters if I do not have the park brakes fitted. Or does it not have anything to do with the park brake?
Well if you're not considering the parking brake then you should just need to bolt the brackets and calipers on. The hub carrier type is important only to allow the park brake caliper bracket to bolt on.
Just as an FYI jaguar recommend replacing the caliper bracket to hub mounting bolts every time they are loosened. And also to use some medium thread lock on the bolts which bolt the caliper to the bracket, 115Nm torque for those.
Hope this helps.
Thank you for the clarification. I did get new bracket to hub bolts as they were only around $1 each, the Alcon caliper to bracket bolts were $50 each X 8 so I did not order those. I ordered the front dust shields but not certain if I will need them, the ones already fitted are larger and more expensive, so we'll see what the new ones will be.
jahummer;[/B]1545762]I have always had 20" rims and have yet to find any after market 20" wheel that would not fit the Alcons & 400mm rotors. The only issue I ran into is the inset TPMS valve stems in the middle of the barrel as opposed to the outside edge, will not clear the calipers, so either I need shorter or angled stems or flush mount or wheels with the traditional stem location on the outer edge of the wheel. I am quite familiar with your long and arduous quest to find wheels that would fit your car and love your choice. As I mentioned in your original thread, the Braelin wheels in Canada are known as ACE Alloy in the US and your style is known as Convex. At the time I had also been considering them and still am, but styles Dwvotion, Driven & Aspire.
Yes, while the Braelin BR02 wheels like identical to the ACE Convex, FASTCO.ca has access to the molds of the ACE Convex. FASTCO.ca receives the aluminum wheels in a monoblock from China and are then are milled to exact specs using a MAZAK milling machine. I was also informed from the Director of Technical Operations at FASTCO.ca that they have the factory produce the monoblock with a stronger alloy aluminum than the ACE branded wheels.
The wheels in the images above look outstanding and there are a few wheels that look impressive to me personally.
Once you figure out the Alcon's and have new wheels mounted, be sure to post some nice images of the new set up.
As far as finding an aftermarket wheel that "does" have proper fitment, your recent success is much better than what I experienced in my quest for an aftermarket wheel to fit properly over the Alcon's.
The shields are to protect the ball joint bush and tie rod rose joint bush. For the costs I'd replace them. You have to remove the existing ones by drilling out the rivets regardless.
I got the shields and they aren't shaped like shields and they are small. Hopefully you can help? Thank you.
I got the shields and they aren't shaped like shields and they are small. Hopefully you can help? Thank you.
The shields replace the larger shield which is fitted for the 326/355mm discs and mounts at the lower 2 rivet holes on the vertical link, I've annotated a picture as I haven't one to hand, the angled portion obviously points inward to the centre of the car and ducts air through the vanes in the discs ( just as a side note the discs are handed because the vanes are angled in opposite directions, as are the small crescents on the discs )
Does this help? Hope so, I like the colour you have chosen, I'd like to see some complete pictures once you've got the system installed
Thank you very much. So the 2 holes line up, but how do they attach, screws, rivets?
One more question, any recommendations on pad grease and should it only be applied where the pistons touch the backing plate?
My pads (Akebono) came with grease, so applied it as they recommended, to where the piston touches the pad, and where the end part of the pad carrier (the metal backing) connects with the caliper.
So before ordering new wheels (which unfortunately have the same valve stem location as the ones I already own) I located stubby Asanti TPMS adapters and had them installed. Significantly shorter than the standard TPMS so I was excited that I may have found a solution. This morning I got a chance to test fit. The good news it the valve stems now clear the calipers but only with out the metal stem chrome dome style cap however as you will see in the pics below it clears with only about 1-2mm to spare at the center hump of the caliper, the rest of the caliper clear fine with the cap fitted. Now I do not have the rotors fitted yet as they won't be delivered until sometime today, so that may make some difference.
The question is, if it is 1-2mm clearance without a cap, is that safe?
Probably, just make sure the valve stem is away from the caliper when you're taking the wheels off/on, just to avoid scraping those pretty calipers.
I certainly do that. Decided to grind down the raised ALCON lettering, the stem passes between the A & L which should give me another 1mm-2mm clearance for a total of 3-4mm, and repaint.
My pads (Akebono) came with grease, so applied it as they recommended, to where the piston touches the pad, and where the end part of the pad carrier (the metal backing) connects with the caliper.
Finally got the front brakes finished a few days ago, ended up grinding off the Alcon lettering on the top of the calipers so now I have about 5mm clearance for the low profile TPMS valve stems. Using Pagid RS29 pads and 2-piece front rotors with AP Racing discs and Spires Alloy hats. Had to get original Alcon rotors and Jaguar pads for the rears yesterday so starting that install today. Will post good pics when all is done.
Finally completed the rear brakes yesterday. Over all a much easier job to do than I expected and especially since I have never done any work on brakes before. I'll give a brief summary, but if anyone would like more detail, feel free to ask.
Since I only had all of the parts for the front when I started last week, I did the fronts first. Aside from some initial test fitments and modifications to TPMS valve stems and grinding off the ALCON lettering on the top of the front calipers, it took me a couple of hours to do the front left conversion - removing the caliper, rotor & flex hose and installing the bracket with new bolts, AP/Spires 2-piece rotor, caliper with Pagid RS29 pads & flex hose. The XKR 355mm dust shield is of the traditional full rotor sized variety and riveted to the knuckle in 3 points, requiring grinding the rivets off to remove the shields. As I noted in a post above, the Alcon shields are unique and very small. Since I do not have a rivet gun, I did not install the shields. At some point down the road I will install them, same with the rears.
I then did the right front, which only took me about an hour since I now had a better understanding of what was involved. I flushed/bled the front brakes first, using Motul DOT RBF600 racing fluid and a Motive bleeder as a 20PSI pressure source only, replenishing the booster reservoir with new fluid. The fronts took about a quart of new fluid total. I did have to pump the brakes until the pedal became firm, a step not mentioned in the Motive instructions as the calipers would not bleed with just the pressure bleeder. A few days later I received the Jaguar/Alcon style rear rotors & Jaguar/Alcon rear pads. I started with the rear right, which took about 90 minutes as I had some difficulty with removing the parking brake and less than an hour to do the left rear as I found it was much easier to remove the parking brake cable and caliper while everything was still assembled. I bled and flushed the rear calipers, right to left with a pint of fluid total.
Also of note, ACE hardware has the $50 Alcon socket cap bolts for only $2.60 each.
Initial impressions are these brakes are much more powerful and quieter than the R performance but the pedal is much softer, the brakes respond just fine, but the pedal has less resistance and sinks to the floor a bit more than previously. I did recheck the fronts for air in the lines but the fluid bled air free. This could also have something to do with the pad and rotor materials as well has everything needing to be broken in.
By the way, since the rear knuckles on my car did not have the mounting points for the secondary E-brake and I have never used the E-brakes on any of my automatic transmission cars and Jags, I just cable tied the brake cables to the upper control arms where the cables were already in place. No errors or codes or lights so I am certain there will be no issues as long as I do not engage the E-brake. I checked the fuses for the control module but only found one for the handbrake switch. I may try pulling this to see what happens as this may prevent accidental engagement of the parking brake which I understand could be a problem with the cable disconnected from the calipers.
I would imagine you would probably find plausibility errors from the park brake controller but of course one way to tell would be to unhook the cable from your existing calipers and then drive the car and see...
I'd certainly not recommend omitting it, but I had no choice as part of the UK MOT (inspection) the "handbrake" must function...
Personally I use it all the time atr traffic lights and you may be able to source the little brembo calipers used cheaply as they were used on the Aston Martin vantage and DB9 and I believe also the F355..
Thanks again for all of your help. The installation went well and the brakes function brilliantly.
Now I am ready to do the park brakes. I did find a set of used ones from an Aston, they should be an exact fit, correct? However I have not yet located the needed brackets.
EDIT: meant to ask, for the park brakes & brackets, do I need to order all new bolts as noted in your parts list (caliper to bracket and bracket to hub & tierod) or will I be reusing any?
Last edited by jahummer; Jan 16, 2017 at 03:40 PM.