
Replacing Tail Light unit?

Thread Starter
|
Member
Joined: Jul 2014
Posts: 38
Likes: 6
From: Örebro, Sweden
My left outer tail light unit has a crack, and I've ordered a new one.
This is for a 2010 model XKR, so it's the LED version.
My question though is how I remove the unit.
Ive looked inside the trunk, and I see one nut holding the unit.
And then I also see inside a small lid in the trench betwen the body and the trunk that there is a lid. Behind that I see a connector.
So, is there any more nuts holding it, than the one I see?
And is there any other special things to observe while replacing the unit?
Veteran Member
Joined: May 2013
Posts: 3,425
Likes: 1,140
From: London, UK
There are 3 nuts inside the trunk, plus some sort of clip close to the rearmost nut - you can see all of them marked in purple on the attached image. The main warning is:
Torque for the nuts is 2Nm.
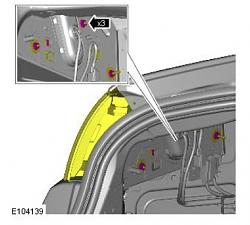
CAUTION: Take great care when removing the rear lamp assembly as the forward point of the lens can be easily damaged.

Veteran Member
Joined: May 2013
Posts: 3,425
Likes: 1,140
From: London, UK
To remove the lining ("Loadspace Trim Panel"), remove the battery cover, the lift-out floor panel and the spare wheel. Then remove the scuff plate and the side panel:
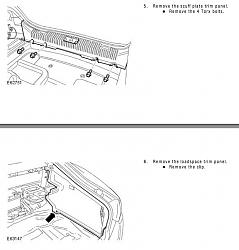
Installation is just the reverse - bolts should be torqued to 10Nm.

Installation is just the reverse - bolts should be torqued to 10Nm.
Thread Starter
|
Member
Joined: Jul 2014
Posts: 38
Likes: 6
From: Örebro, Sweden
Well now,
The above information was very helpful, and there was no problem getting rid of the old one.
But then there was a problem.
I got the replacement from a place called S.N.G Barrat in UK. The part that arrived has the exact same part number on its sticker as my old one. But the are differently wired.
See the two included pictures of the connector.
Why is this? Can it be due to that mine is a very early build of the new 5.0 face lift. Can it some how use seome other connections in the body?
Mine is off course the new LED tail lights. Is there any difference in the connections between the previous non LED lights, and the new LED lights?
If someone could check this in some electrical charts it would be greatly appreciated
My Car:

New unit:

The above information was very helpful, and there was no problem getting rid of the old one.
But then there was a problem.
I got the replacement from a place called S.N.G Barrat in UK. The part that arrived has the exact same part number on its sticker as my old one. But the are differently wired.
See the two included pictures of the connector.
Why is this? Can it be due to that mine is a very early build of the new 5.0 face lift. Can it some how use seome other connections in the body?
Mine is off course the new LED tail lights. Is there any difference in the connections between the previous non LED lights, and the new LED lights?
If someone could check this in some electrical charts it would be greatly appreciated
My Car:
New unit:
Veteran Member
Joined: May 2013
Posts: 3,425
Likes: 1,140
From: London, UK
The connector is called CA054 on my wiring diagram; however, the diagram only covers MY11, which is the correct year for your car but has nothing about later models. At least there isn't any indication that there are wiring differences between UK & European models. And, annoyingly, the lamp side of the connector has all black wires, so it's hard to determine what has changed.
The wires on the other side of the connector (on the end of the car's loom) will be as follows:
CA054/1 LH_TAIL_LAMP_CTRL GREEN
CA054/2 LH_STOP_LAMP_CTRL ORANGE
CA054/3
CA054/4 LH_REAR_LED_DI_CTRL ORANGE
CA054/5 GROUND BLACK
CA054/6 REAR_FOG_LAMP_CTRL ORANGE/YELLOW
If we can get someone to check the wires on a later car, we can probably figure out which ones have been moved around.
Last edited by Ngarara; Jul 17, 2014 at 05:12 AM. Reason: Lysdexia
Thread Starter
|
Member
Joined: Jul 2014
Posts: 38
Likes: 6
From: Örebro, Sweden
Thanks for the info, lets see if some one has any ideas about any newer versions.
I'll try also to see if I can find out what is what using a low amp power supply at work. Maybe I can get some idea what's going where. These are LED and no other electronics, so there should be no trouble testing around a bit.
I'll also check the colors on the body side of that connector and see if it is connected as your list.
I'm not sure if it is possible to move the pins around though. Usually these kind of pins require special tools to pull out.
So Investigation continues :-)
Trending Topics

Veteran Member
Joined: Jan 2010
Posts: 2,941
Likes: 1,511
From: New Zealand
I wonder if the connector has been incorrectly assembled?
Interestingly the 4.2L cars have all 6 connections in use so it can't even have mistakenly been wired up for those.
Thread Starter
|
Member
Joined: Jul 2014
Posts: 38
Likes: 6
From: Örebro, Sweden
There might be something wrong with this one. The supplier would get another one in from Jaguar in a couple of days, they will check how that one looks.
One more thing that might point to something wrong with the one I got is that my original one has a kind of seal/trim on top (black) (see picture). The new one does not. How about yours?
Tomorrow I will also take out the light again and compare it with your description.


One more thing that might point to something wrong with the one I got is that my original one has a kind of seal/trim on top (black) (see picture). The new one does not. How about yours?
Tomorrow I will also take out the light again and compare it with your description.

Thread Starter
|
Member
Joined: Jul 2014
Posts: 38
Likes: 6
From: Örebro, Sweden
Yeah, that looks like my original ones. Where did you get these from?
And also if you still can see. As which one of the above shown connectors does yours look like?
And also if you still can see. As which one of the above shown connectors does yours look like?
Thread Starter
|
Member
Joined: Jul 2014
Posts: 38
Likes: 6
From: Örebro, Sweden
I've checked the connector on the new unit I've gotten. And that one has an empty position on Pin: No 2, whilst on my car, and on the list above, the empty pin is No 3. So there has to be something wrong with the one I've gotten.
I'll get back to the supplier again.
I'll get back to the supplier again.
Thread Starter
|
Member
Joined: Jul 2014
Posts: 38
Likes: 6
From: Örebro, Sweden
Just to brief you on the final solution. It was as suspected a wrongly wired unit that I had recieved. This was discovered when SNG Barrat recieved a new one, and it was dirfferently wired.
They then directly shipped it to me, and that one worked perfectly.
Thanks for all the support in here
They then directly shipped it to me, and that one worked perfectly.
Thanks for all the support in here


Thread
Thread Starter
Forum
Replies
Last Post
Tony K
XJS ( X27 )
6
Mar 26, 2024 01:53 PM
X_Type_South_Africa
X-Type ( X400 )
6
Dec 9, 2015 05:37 PM
mhamilton
XJ XJ6 / XJ8 / XJR ( X350 & X358 )
8
Sep 15, 2015 05:13 PM
Currently Active Users Viewing This Thread: 1 (0 members and 1 guests)