
Swapped out the Intake Air Temperature sensor, got rid of the dreaded MIL


Thread Starter
|
Senior Member
Joined: Nov 2009
Posts: 185
Likes: 38
Hi folks
Just throwing some photos together in case anyone else has to change out their IAT (intake air temperature) sensor.
My check-engine/MIL light was lighting up and then resetting itself over the past month or so, but then was staying on more in recent days. Attaching a code reader reported the IAT giving degraded responses. I needed to change the air filter, so had a look at the sensor while I was in there - in case the wiring was damaged, or the thing was otherwise obviously damaged. Nope, all looked okay.
I ordered up a "Jaguar Air Flow Sensor C2c7636" from XJKLtd.co.uk and waited for it to arrive. Duly arrived and spent an hour this afternoon fitting it.
So here we go, here's what was involved in replacing it:
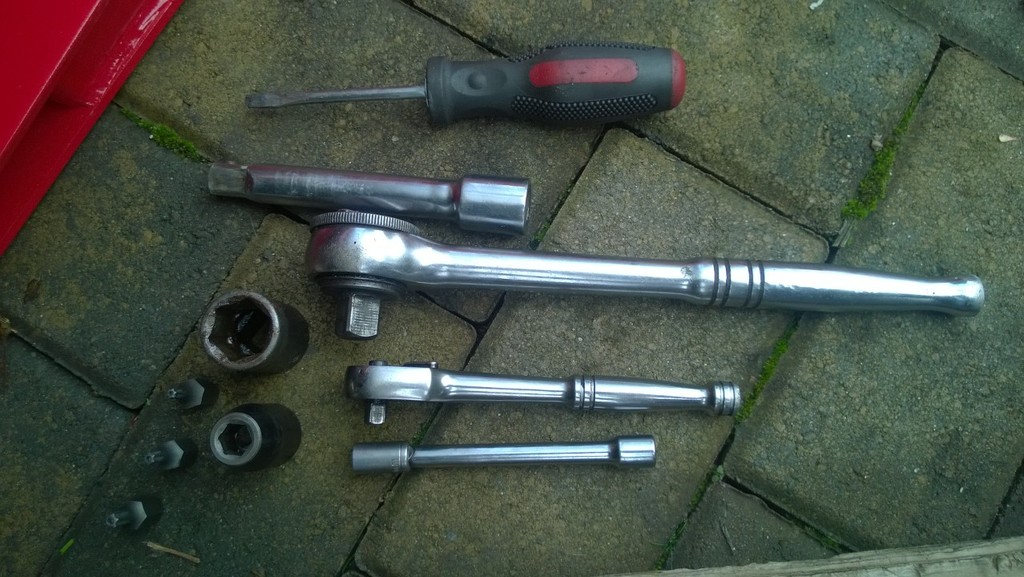
- you'll need 8mm, 10mm and 17mm sockets (17mm is for the wheelnuts), a ratchet, a short extension, a screwdriver and some torx bits - TH20, TH25 and TH30
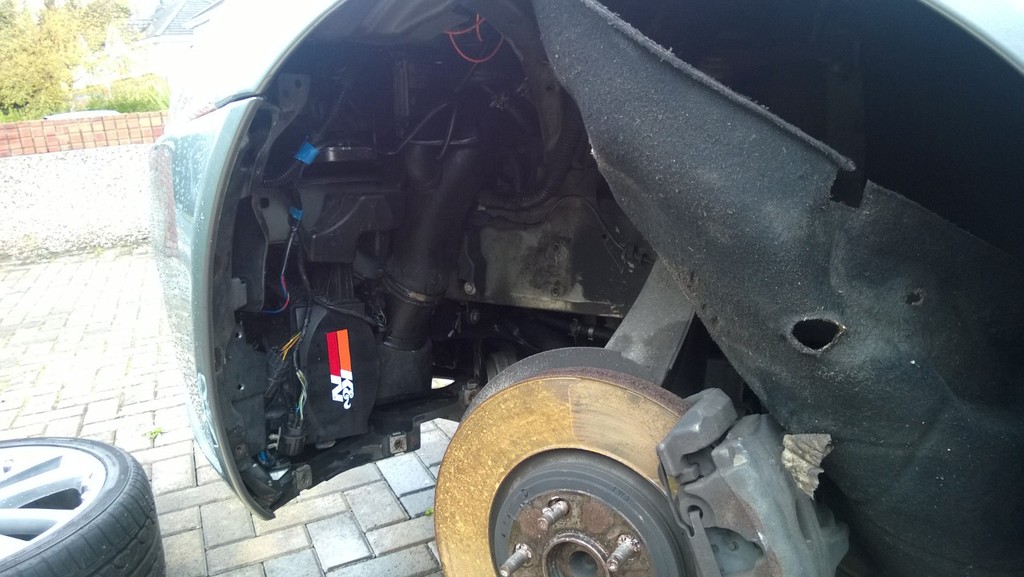
1. remove enough bolts from the wheelarch liner to be able to peel it back and suspend it behind the brake disc. Just be sure not to foul any of the wiring there.
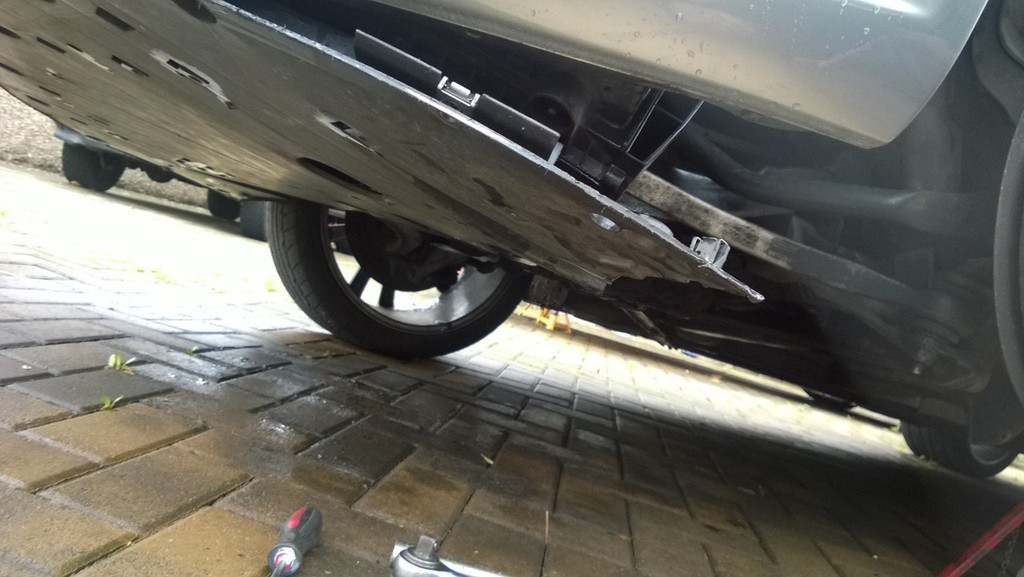
2. unbolt the left side of the undertray up to the centre front of the car. There's enough "give" in the material, you don't need to unbolt the whole thing.
3. there's the air box on the bottom left (K&N sticker on mine) and piping up into the engine bay. The airflow sensor (which has the IAT built-in) sits between the airbox and the piping.
4. Remove the two bolts holding the airbox to the chassis (red), and use the screwdriver to undo the clamp (green) giving you enough wiggle room to get at the two screws holding the airflow sensor body to the airbox. Undo the connector (yellow).

5. This is what the airflow meter body looks like:
6. And this is where it came from:
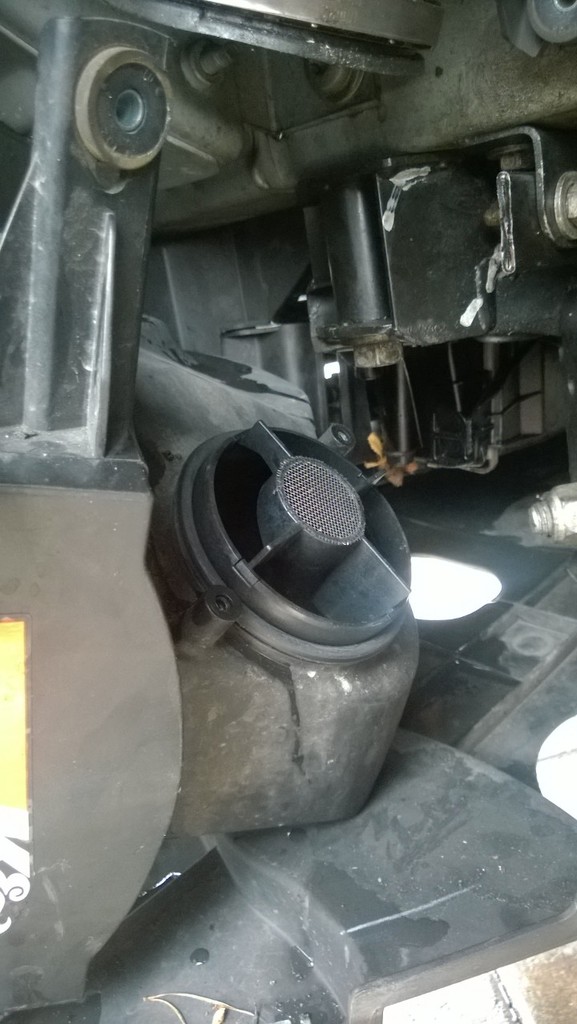
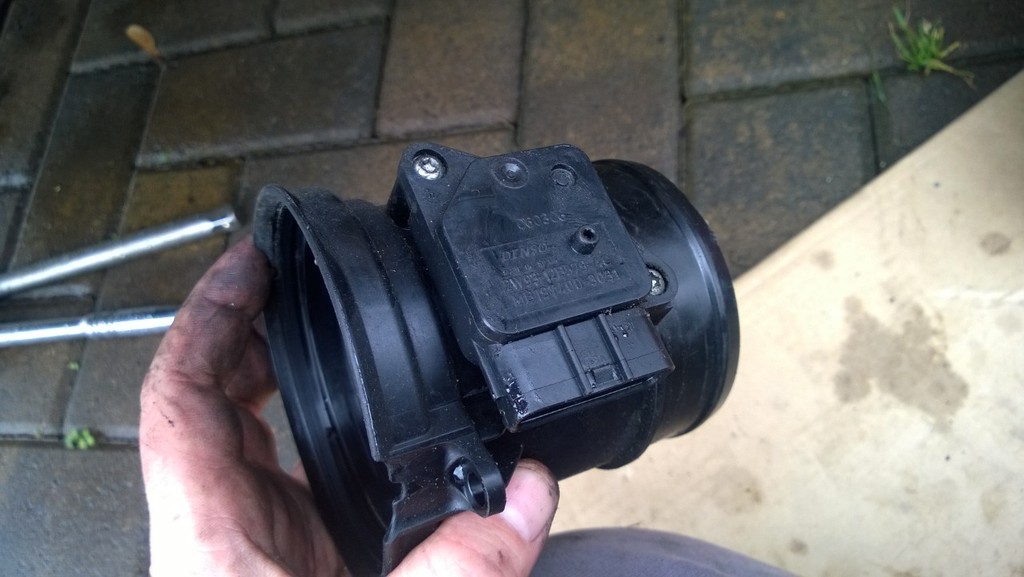
7. Undo the two screws and withdraw the sensor from the body. This is what the sensor looks like, new one on the right.


8. Insert the new sensor into the meter body, and place the unit back ontop of the airbox. Screw it in place and connect the tube, and tighten its clamp.
9. Bolt the airbox to the chassis with its bolts and close up the engine undertray.
10. Put the wheelarch liner back in place, but use a little coppergrease on the threads of the bolts. As with all bolts, do them up by hand to start with just so you don't crossthread them.
11. Either use your code-reader to reset the MIL or else drive for a few cycles until the system learns that the sensor is no longer producing errors (I think it is 5 cycles).
12. Bask in the non-glow of the check-engine-light !
Just throwing some photos together in case anyone else has to change out their IAT (intake air temperature) sensor.
My check-engine/MIL light was lighting up and then resetting itself over the past month or so, but then was staying on more in recent days. Attaching a code reader reported the IAT giving degraded responses. I needed to change the air filter, so had a look at the sensor while I was in there - in case the wiring was damaged, or the thing was otherwise obviously damaged. Nope, all looked okay.
I ordered up a "Jaguar Air Flow Sensor C2c7636" from XJKLtd.co.uk and waited for it to arrive. Duly arrived and spent an hour this afternoon fitting it.
So here we go, here's what was involved in replacing it:
- you'll need 8mm, 10mm and 17mm sockets (17mm is for the wheelnuts), a ratchet, a short extension, a screwdriver and some torx bits - TH20, TH25 and TH30

1. remove enough bolts from the wheelarch liner to be able to peel it back and suspend it behind the brake disc. Just be sure not to foul any of the wiring there.

2. unbolt the left side of the undertray up to the centre front of the car. There's enough "give" in the material, you don't need to unbolt the whole thing.

3. there's the air box on the bottom left (K&N sticker on mine) and piping up into the engine bay. The airflow sensor (which has the IAT built-in) sits between the airbox and the piping.
4. Remove the two bolts holding the airbox to the chassis (red), and use the screwdriver to undo the clamp (green) giving you enough wiggle room to get at the two screws holding the airflow sensor body to the airbox. Undo the connector (yellow).

5. This is what the airflow meter body looks like:

6. And this is where it came from:

7. Undo the two screws and withdraw the sensor from the body. This is what the sensor looks like, new one on the right.


8. Insert the new sensor into the meter body, and place the unit back ontop of the airbox. Screw it in place and connect the tube, and tighten its clamp.
9. Bolt the airbox to the chassis with its bolts and close up the engine undertray.
10. Put the wheelarch liner back in place, but use a little coppergrease on the threads of the bolts. As with all bolts, do them up by hand to start with just so you don't crossthread them.

11. Either use your code-reader to reset the MIL or else drive for a few cycles until the system learns that the sensor is no longer producing errors (I think it is 5 cycles).
12. Bask in the non-glow of the check-engine-light !

Last edited by franksm; Nov 15, 2015 at 01:04 PM.


Senior Member
Joined: Jul 2010
Posts: 449
Likes: 144
From: Salem, OR
On my '07, the intake air temp sensor has two metal screws which "self tap/thread" into the plastic carrier. This provides a good seal at factory assembly, but when redone/reininstalled later the thread seal into the plastic assembly can be imperfect. The female threads are now "worn". To counteract this I use a bit of silicon sealant on the metal screws and on the sealing surface of the intake air temp sensor. I also use a long zip tie to hold the intake air temp sensor tight against the carrier.
Thread Starter
|
Senior Member
Joined: Nov 2009
Posts: 185
Likes: 38
Aaargh... the check-engine light is back on. The car has been used hard in the past week or so, chocking up 300 miles of mixed motorway and street speeds. But the lamp came on this evening.
The codes are the same as before, P0097 and P0098. The MAF and IAT are brand new Jaguar items, and there are no air leaks or anything like that around the MAF. You might note the K&N filter fitted, but the code was there even with a fresh, standard air filter in place.
What might be causing these two codes ?
P0098 Intake Air Temperature Sensor 2 Circuit High Input
P0097 Intake Air Temperature Sensor 2 Circuit Low Input


Junior Member
Joined: Oct 2018
Posts: 3
Likes: 2
From: Amsterdam
Aaargh... the check-engine light is back on. The car has been used hard in the past week or so, chocking up 300 miles of mixed motorway and street speeds. But the lamp came on this evening.
The codes are the same as before, P0097 and P0098. The MAF and IAT are brand new Jaguar items, and there are no air leaks or anything like that around the MAF. You might note the K&N filter fitted, but the code was there even with a fresh, standard air filter in place.
What might be causing these two codes ?
P0098 Intake Air Temperature Sensor 2 Circuit High Input
P0097 Intake Air Temperature Sensor 2 Circuit Low Input
The codes are the same as before, P0097 and P0098. The MAF and IAT are brand new Jaguar items, and there are no air leaks or anything like that around the MAF. You might note the K&N filter fitted, but the code was there even with a fresh, standard air filter in place.
What might be causing these two codes ?
P0098 Intake Air Temperature Sensor 2 Circuit High Input
P0097 Intake Air Temperature Sensor 2 Circuit Low Input
Trending Topics
Thread Starter
|
Senior Member
Joined: Nov 2009
Posts: 185
Likes: 38
It did turn out to be the connector - one of the pins was not seated properly from the rear of the plug, so I pushed them all in with a pointy tool. Also cleaned the surfaces of the connector - they weren't too shabby, but it was easy to do with a cotton bud and a spray can of electrical contact cleaner. Codes went away.
I was to do it again, I'd hook up an ELM327 that can show live readings from the IAT in a graph, then wiggle the wires, see if anything shows up
I was to do it again, I'd hook up an ELM327 that can show live readings from the IAT in a graph, then wiggle the wires, see if anything shows up
Junior Member
Joined: Oct 2018
Posts: 3
Likes: 2
From: Amsterdam
It did turn out to be the connector - one of the pins was not seated properly from the rear of the plug, so I pushed them all in with a pointy tool. Also cleaned the surfaces of the connector - they weren't too shabby, but it was easy to do with a cotton bud and a spray can of electrical contact cleaner. Codes went away.
I was to do it again, I'd hook up an ELM327 that can show live readings from the IAT in a graph, then wiggle the wires, see if anything shows up
I was to do it again, I'd hook up an ELM327 that can show live readings from the IAT in a graph, then wiggle the wires, see if anything shows up

Senior Member


Joined: Oct 2020
Posts: 826
Likes: 684
Yes. Denso's are widely available for a reasonable price. As are others. MAF connector and relevant grounds are always a possibility. Always clean it first and check for vacuum leaks.

Thread
Thread Starter
Forum
Replies
Last Post
BaldEagle
XJ XJ6 / XJR6 ( X300 )
12
Dec 25, 2022 01:57 PM
Currently Active Users Viewing This Thread: 1 (0 members and 1 guests)