
Brake Switch Replacement How-To (W/ Pics) FAQ

Thread Starter
|
Junior Member
Joined: Apr 2010
Posts: 26
Likes: 34
From: North Carolina, USA
I recently replaced the brake light switch on my '98 XK8, and I thought I'd go ahead and document the process here for others. I am going to attempt to include several pictures. As this will be my first time doing so on this forum, I'll keep my fingers crossed.
Some of the steps/pictures included here may seem painfully obvious, but I subscribe to the theory that having too much information is vastly preferable to not having enough. So without further ado, here are my notes:
Supplies used:
New brake switch ($70+tax from dealer)
Socket wrench with 12" extension
8mm socket
Piece of scrap wood about 15" long
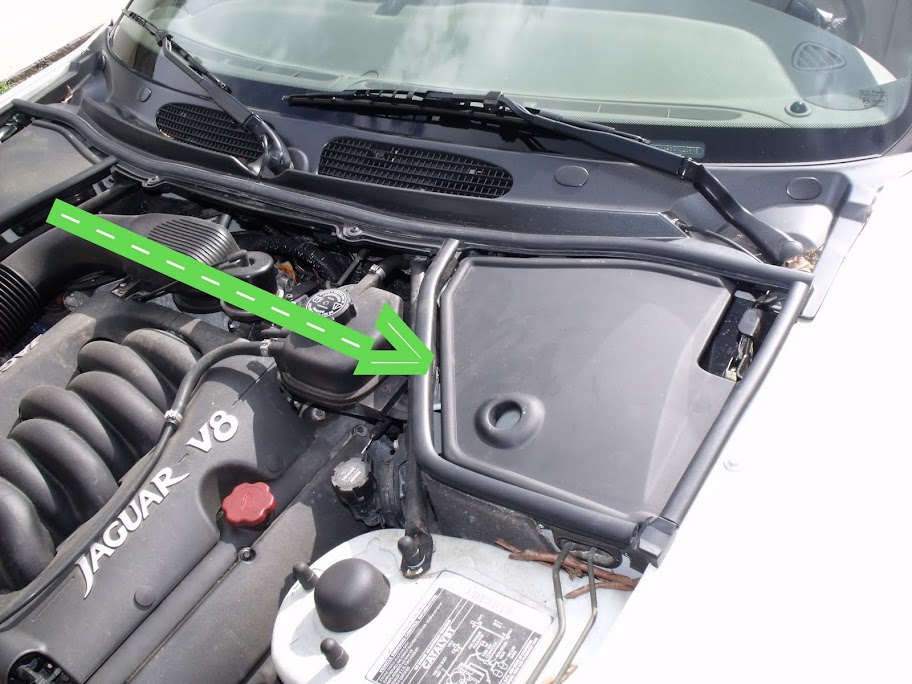
The nuts which mount the brake switch bracket to the vehicle's body are located under the hood/bonnet. After opening the hood, you need to remove the plastic cover identified by the green arrow below. Simply insert a finger or two into the hole presumably provided for this purpose and lift up and in towards the center of the car.
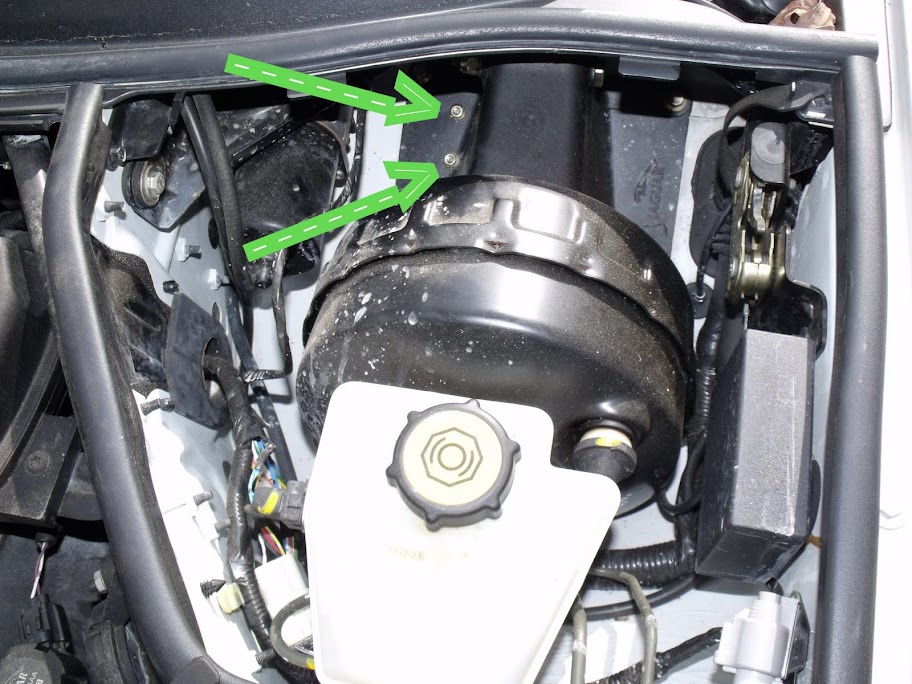
Next, remove the two 8mm nuts indicated in the picture below. You will need an extension if using a socket wrench. I used a 12" extension and had a few inches to spare.
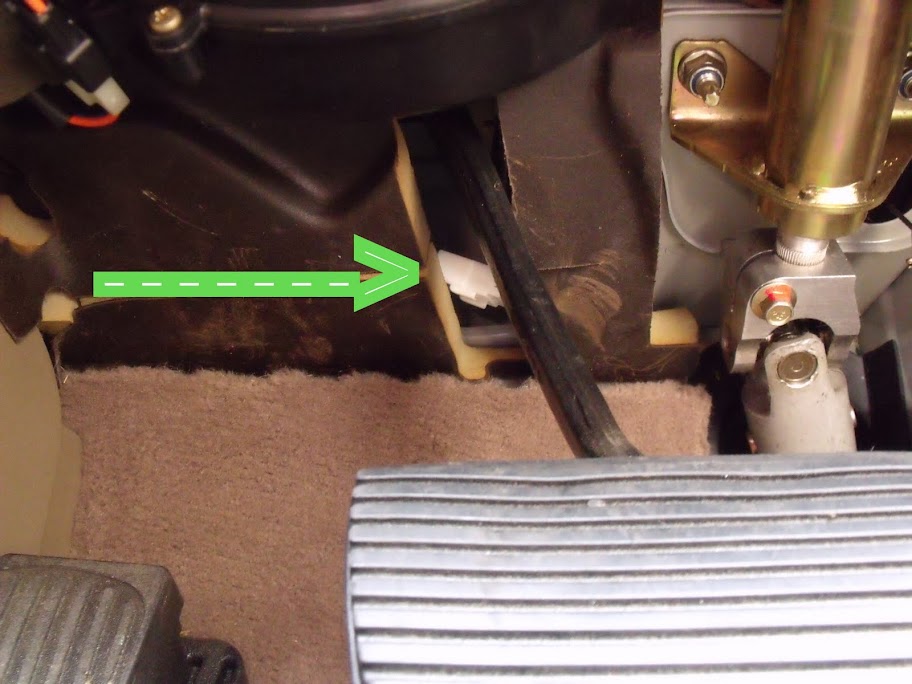
Now move to the vehicle's interior and unplug the switch's electrical connector, which is located behind the brake pedal. Mine was readily visible, but even if yours isn't, you should easily be able to find it by tracing the wire from the switch.
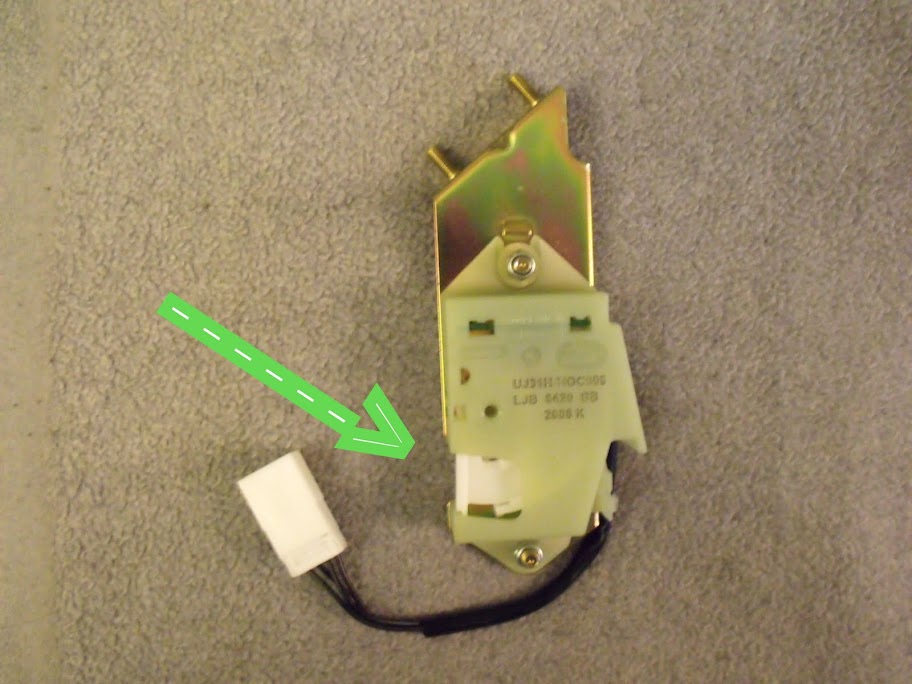
Remove the old switch and replace it with the new one. NOTE: The switch is designed to be engaged when the brake pedal is RELEASED. You will probably be working blind (I was unable to see the mouting holes no matter how I positioned myself), so if you do not orient the new switch properly, you will waste a lot of time trying in vain to mate the bracket's studs to the holes where they belong. There is a horizontal bar that protrudes from the brake pedal stem. This bar and the actual switch that is activated are shown in the two photos below.The side of the switch housing that allows the switch to make contact with the bar should face toward the front of the car.

If you are replacing the switch by yourself, you can wedge a piece of wood or something else under the switch to help hold it in place while you re-attach the nuts. Once the nuts are in place, re-connect the elctrical connector and test the switch. After the replacement, my brake lights stayed on even when the pedal was released. A gentle wiggle of the switch followed by a little additional tightening of the nuts solved the problem. Do not over-tighten the nuts. I don't have torque numbers for them, but maybe someone else here does.
That's it - job done. Good luck!
Some of the steps/pictures included here may seem painfully obvious, but I subscribe to the theory that having too much information is vastly preferable to not having enough. So without further ado, here are my notes:
Supplies used:
New brake switch ($70+tax from dealer)
Socket wrench with 12" extension
8mm socket
Piece of scrap wood about 15" long
The nuts which mount the brake switch bracket to the vehicle's body are located under the hood/bonnet. After opening the hood, you need to remove the plastic cover identified by the green arrow below. Simply insert a finger or two into the hole presumably provided for this purpose and lift up and in towards the center of the car.
Next, remove the two 8mm nuts indicated in the picture below. You will need an extension if using a socket wrench. I used a 12" extension and had a few inches to spare.
Now move to the vehicle's interior and unplug the switch's electrical connector, which is located behind the brake pedal. Mine was readily visible, but even if yours isn't, you should easily be able to find it by tracing the wire from the switch.
Remove the old switch and replace it with the new one. NOTE: The switch is designed to be engaged when the brake pedal is RELEASED. You will probably be working blind (I was unable to see the mouting holes no matter how I positioned myself), so if you do not orient the new switch properly, you will waste a lot of time trying in vain to mate the bracket's studs to the holes where they belong. There is a horizontal bar that protrudes from the brake pedal stem. This bar and the actual switch that is activated are shown in the two photos below.The side of the switch housing that allows the switch to make contact with the bar should face toward the front of the car.
If you are replacing the switch by yourself, you can wedge a piece of wood or something else under the switch to help hold it in place while you re-attach the nuts. Once the nuts are in place, re-connect the elctrical connector and test the switch. After the replacement, my brake lights stayed on even when the pedal was released. A gentle wiggle of the switch followed by a little additional tightening of the nuts solved the problem. Do not over-tighten the nuts. I don't have torque numbers for them, but maybe someone else here does.
That's it - job done. Good luck!
Last edited by sgtofmarines1775; Jun 7, 2010 at 03:49 PM.


 ...nice post c/w great pics and write up to boot......will surely be of benefit to others.
Junior Member
Joined: Jul 2010
Posts: 5
Likes: 2
From: Orange County, CA
Thanks Sgt, guide was a great help yesterday.
Aligning those bolts was challenging haha!
the main problem i found was the Bar got in the way of alligning them, so i used the 17 inch stick i cut to hold up the switch , to push the break pedal in while i positoned the switch, worked like a charm.
( if the break pedal is stiff to push start the engine )
Cheers again for the helpfull post
Veteran Member


Joined: May 2010
Posts: 4,114
Likes: 1,272
From: North Carolina
OH MY GOD!!! I don't know whether to thank sgtofmarines or to curse him! His instructions were helpful, I wouldn't have known where to start without them, but putting the switch back in the car nearly killed me. I'm going to be sore for days.
Removing the switch was easy. I just followed the directions in this thread. But putting it back in took 6.5 hours. SERIOUSLY! You guys know me, I don't shy away from tearing things apart and putting them back together, but if I had know how hard it would be to get the switch reinstalled I would have just taken it to the dealer. The f***ing thing just did not want to go back in place. I got my wife out in the garage to help me, and she was giving me directions from under the hood, trying to help me line up the two threaded studs with the the holes in the firewall. They just wouldn't line up! Then I tried threading some fishing line down through the holes and tying it to the studs. That didn't work. I even removed the driver's seat so that I could lay on my back on the floor and look up at the brake pedal. I started at ten o'clock this morning and had the switch out by 10:15. It was repaired by 10:45. I finally got it reinstalled at 4:30 this afternoon! Never again will I try to replace that switch. It's definitely going to the dealer.
Removing the switch was easy. I just followed the directions in this thread. But putting it back in took 6.5 hours. SERIOUSLY! You guys know me, I don't shy away from tearing things apart and putting them back together, but if I had know how hard it would be to get the switch reinstalled I would have just taken it to the dealer. The f***ing thing just did not want to go back in place. I got my wife out in the garage to help me, and she was giving me directions from under the hood, trying to help me line up the two threaded studs with the the holes in the firewall. They just wouldn't line up! Then I tried threading some fishing line down through the holes and tying it to the studs. That didn't work. I even removed the driver's seat so that I could lay on my back on the floor and look up at the brake pedal. I started at ten o'clock this morning and had the switch out by 10:15. It was repaired by 10:45. I finally got it reinstalled at 4:30 this afternoon! Never again will I try to replace that switch. It's definitely going to the dealer.
Trending Topics
Junior Member
Joined: Jul 2010
Posts: 20
Likes: 6
From: Fairhope, AL
First kudos to Sarge and many thanks for the great pictures and info! I just have to add that Reverend Sam gave me a nice chuckle with your post. It really made my day to know I am not alone. I am going out now to tackle the job.
Thanks to both
Thanks to both
Veteran Member
Joined: May 2010
Posts: 4,114
Likes: 1,272
From: North Carolina
Whenever I go down there we always go over to Foley and eat at Lamberts, home of the "throwed" rolls. Have you ever been there? It's awesome!
Veteran Member
Joined: Apr 2008
Posts: 3,472
Likes: 259
From: Atlanta, GA USA
What a small world! My mom lives in Hereon Village just up the street from Spanish Cove. I wonder if they know each other? My mom is an avid bridge player and has many friends in Spanish Cove. She doesn't seem to like Lamberts, so I have never been. We used to always go to Wolf Bay until it burned down. We have gone to their new place in Orange Beach, but it is just not the same. There is a new small restaurant in the old hotel in downtown Foley that is real good, Magnolia Tea Room.
Veteran Member
Joined: Apr 2008
Posts: 3,472
Likes: 259
From: Atlanta, GA USA
I am a member of the Panhandle British Car Association and try to attend some of their events when I am in the area. They have an active membership. I will be going down there for a week or so on October 5th. Maybe we could meet at the Magnolia Tea Room in downtown Foley one day. My Mom loves that place.
Veteran Member
Joined: May 2010
Posts: 4,114
Likes: 1,272
From: North Carolina
You HAVE to go to Lambert's. They have huge portions, but even before they bring out the food they have people walking around with delicious side dishes that they serve to you right there on paper towels. The okra is AWESOME! Also, right there at the intersection by the bridge and the used car dealership in Lillian is a cool little diner that has great burgers. Whenever I go visit my parents I always go to Lamberts and the diner.
By the way... get the ham steak at Lamberts. It's about 2 pounds of meat.
By the way... get the ham steak at Lamberts. It's about 2 pounds of meat.
Junior Member
Joined: Jul 2010
Posts: 20
Likes: 6
From: Fairhope, AL
Senior Member
Joined: Nov 2008
Posts: 944
Likes: 133
From: Chicago/Southern Wisconsin
2/2011: I just did mine following these excellent instructions. 10 mintues to remove, 15 to reinstall.
Things I learned:
1. After you remove to old switch, run the nuts onto the new one to make sure they go on smoothly.
2. Have someone stick a wires, (or bamboo skewers from the kitchen) through the mounting holes from the top side and use them to determine where the holes are from the underside. I was WAY off in my first attempt to locate the holes. I simply used one skewer as a guide adn the switch popped in, first time.
3. This is definately a 2 person job. It's a waste of time to try otherwise.

Junior Member
Joined: Mar 2009
Posts: 24
Likes: 5
From: uk
My switch only fails once every now and again, so I'd like to clean it and put it back.
I'm about to attempt this job ("should be 2 man job" but I'm on my own) and was wondering if it is neccessary to remove the two nuts from inside the bonnet/hud?
The switch assembly looks like it has a metal bracket and a plastic switch attached by a small bolt. Can I not simply remove that small bolt to remove the switch leaving the metal bracket attached to the body?
Thanks,
Tom