
ALL DONE FROM YOUR FORUM MEMBERS !!!!!! Thanks EVERYONE !!!


Thread Starter
|
Junior Member
Joined: Mar 2011
Posts: 29
Likes: 3
From: EBF
ALL DONE FROM YOUR FORUM MEMBERS !!!!!! Thanks EVERYONE !!!
Yup ! REpaired the ABS/Traction module I posted hints and now can post the pix!
REplaced the entire WIPER Assy for only $35 !!!!-- Works Great!
JB'd the passenger seat plasic cover- Can barely tell.
Adjusted the headlights up a little higher to show farther out.
Popped off the mirror in 10Secs !!! No cracked windshield !!!
$95 later and the mirror will be shipped out tomm to: orders@sybesmas.com
ALL DONE FROM YOUR FORUM MEMBERS !!!!!! Thanks EVERYONE !!!
Thread Starter
|
Junior Member
Joined: Mar 2011
Posts: 29
Likes: 3
From: EBF
Here are the pix and the super easy repairs quick hints and pics to help others-
Thanks everyone !!
THESE ARE HINTS/TRICKS only FIND THE GUIDES/POSTS HERE FIRST- Use them - MINE are ADDITIONAL NOTES ONLY !!!!!!!!!!!!!!!!!!!!
ABS/TRAC control hints:
Follow the guide/post on this forum-
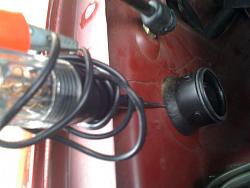
1. Completely remove the washer fill tube and use a 12 volt tester (pic) to hold it out when screwing back on.
2. DEFINITELY do NOT cut the (4) metal studs- stop when you 1st start to cut them.-Use a brand NEW saw blade 1/2 strokes!!
3. Finish with a putty knife--DO NOT CUT THROUGH TOO DEEP- get an adjustable putty knife and only reveal 1mm of the blade-else you might cut loose a surface mount component- I did- .
.
4. Use the RTV clear at Autozone/Advance Auto places.
5. If your module has crimps on the (4) studs- Use a nail tip to gently pry them off- Also keeps from losing the rings!!--to put back on use a pair of pliers to flatten out the rings- then use a regular ratchet scket to gently tap the rings back on-Do it on hard ground and GENTLY TAP--DO NOT TURN MODULE OVER EXPOSING THE INSIDES TO YOUR CUTTINGS and blow clean a paper towel to place it on.
Make sure you leave a small hole on the bottom in order for air to get inside-Else the electronics will corrode over the next 2 years-
Wiper- NEVER PLACE ARM OR LEAN ON THE BOTTOM OF THE WINSHIELD - It might crack !!!!!
1. Get the whole wiper Assy- 10 minutes to replace!
I got mine from Internet--Waynes Auto Salvage Goldsboro NC with warranty $35 !!-Follow the guide and pix in this forum- Gently horse it out by turning it side to side clearing each bolt holder until it comes out- Not that difficult-Dont forget to remove the plug as soon as you can turn the linkage enough-
2. Use a wiper or battery puller $9 from the internet-Sears, Northern Tools, NAPA, Advance,Autozone, does not have it. Sears might online-sd they do-not sure.
3. If you get the whole assy the chances are the wipers were already in the park position!! Just put the wiper arms back at the bottom of the windshield!!
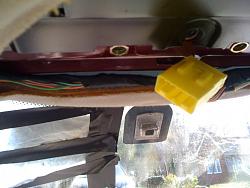
Mirror:
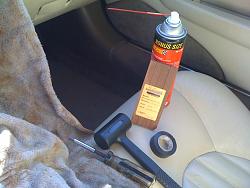
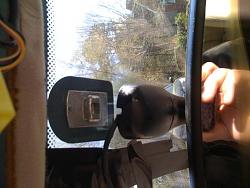
1. Use the tools in the (pic) and its super quick BUT DO NOT RUSH,HORSE,OR FORCE/PUSH- IT Should be an easy slide after the lube-
2. Use a mallet NOT A HAMMER --NAPA has a cheap 6.95 mallet perfect for this in their "bargain bin"
3. Use a "sample" flooring piece to set against the mirror as shown in the guide/post posted here.- 2 GENTLE taps should do it-
4 Lube and WAIT 20-30mins the top and sides while protecting the dash and shift and console with a large towel - the lube will drip profusely !!
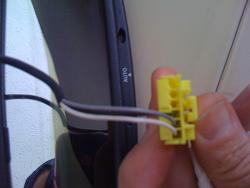
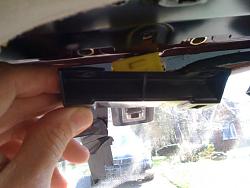
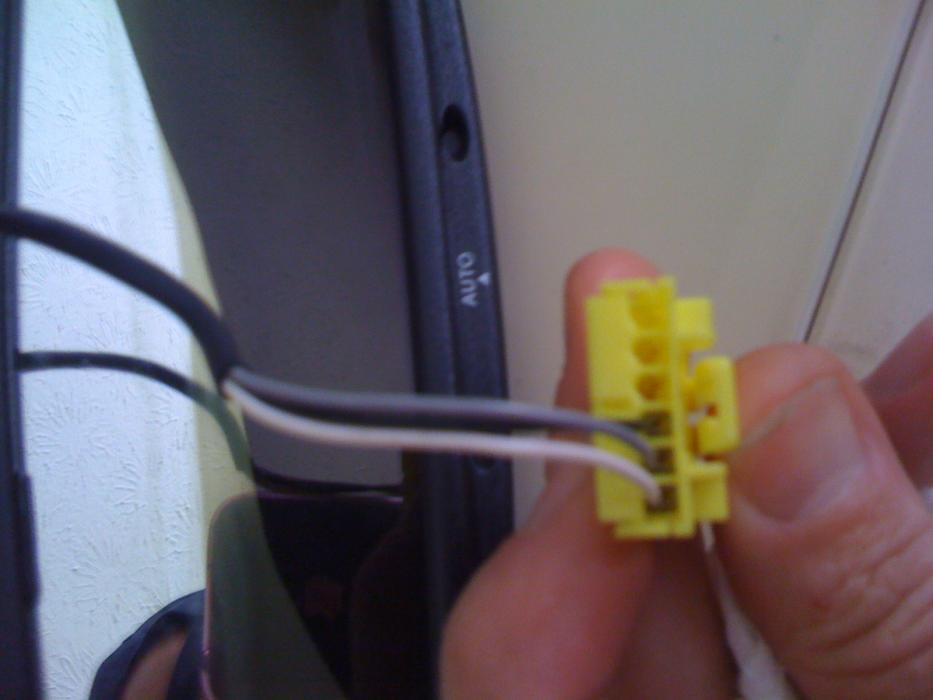
5. Remove the black plastic to reveal the mirror plug-unplug it FIRST before attempting any tapping.
THATS all the Tips I have - Good Luck -
Thanks everyone !!
THESE ARE HINTS/TRICKS only FIND THE GUIDES/POSTS HERE FIRST- Use them - MINE are ADDITIONAL NOTES ONLY !!!!!!!!!!!!!!!!!!!!
ABS/TRAC control hints:
Follow the guide/post on this forum-
1. Completely remove the washer fill tube and use a 12 volt tester (pic) to hold it out when screwing back on.
2. DEFINITELY do NOT cut the (4) metal studs- stop when you 1st start to cut them.-Use a brand NEW saw blade 1/2 strokes!!
3. Finish with a putty knife--DO NOT CUT THROUGH TOO DEEP- get an adjustable putty knife and only reveal 1mm of the blade-else you might cut loose a surface mount component- I did-
4. Use the RTV clear at Autozone/Advance Auto places.
5. If your module has crimps on the (4) studs- Use a nail tip to gently pry them off- Also keeps from losing the rings!!--to put back on use a pair of pliers to flatten out the rings- then use a regular ratchet scket to gently tap the rings back on-Do it on hard ground and GENTLY TAP--DO NOT TURN MODULE OVER EXPOSING THE INSIDES TO YOUR CUTTINGS and blow clean a paper towel to place it on.
Make sure you leave a small hole on the bottom in order for air to get inside-Else the electronics will corrode over the next 2 years-
Wiper- NEVER PLACE ARM OR LEAN ON THE BOTTOM OF THE WINSHIELD - It might crack !!!!!
1. Get the whole wiper Assy- 10 minutes to replace!
I got mine from Internet--Waynes Auto Salvage Goldsboro NC with warranty $35 !!-Follow the guide and pix in this forum- Gently horse it out by turning it side to side clearing each bolt holder until it comes out- Not that difficult-Dont forget to remove the plug as soon as you can turn the linkage enough-
2. Use a wiper or battery puller $9 from the internet-Sears, Northern Tools, NAPA, Advance,Autozone, does not have it. Sears might online-sd they do-not sure.
3. If you get the whole assy the chances are the wipers were already in the park position!! Just put the wiper arms back at the bottom of the windshield!!
Mirror:
1. Use the tools in the (pic) and its super quick BUT DO NOT RUSH,HORSE,OR FORCE/PUSH- IT Should be an easy slide after the lube-
2. Use a mallet NOT A HAMMER --NAPA has a cheap 6.95 mallet perfect for this in their "bargain bin"
3. Use a "sample" flooring piece to set against the mirror as shown in the guide/post posted here.- 2 GENTLE taps should do it-
4 Lube and WAIT 20-30mins the top and sides while protecting the dash and shift and console with a large towel - the lube will drip profusely !!
5. Remove the black plastic to reveal the mirror plug-unplug it FIRST before attempting any tapping.
THATS all the Tips I have - Good Luck -


Last edited by JAGme; Apr 5, 2011 at 11:58 PM. Reason: pictures left out

Nice one Jagme

so glad that you found the forum useful and helped you save $$$$......thats what its all about.
Thanks for sharing your tips on doing the jobs too and dong the write up and posting the pics....I'm sure someone will find them useful.


Senior Member
Joined: Nov 2008
Posts: 944
Likes: 133
From: Chicago/Southern Wisconsin
Excellent work JAGme.
Trending Topics

Senior Member
Joined: Mar 2011
Posts: 158
Likes: 21
From: Tampa, Florida
My ABS module has a built in vent that has a type of fibre cover to prevent water from flowing in.
I do like the idea of using the clear sealant as opposed to the gray that I used. Got to make a more attractive job.
Glad you solved the ABS problem and saved a cool $2,200 to $2,800 in dealer cost.
I do like the idea of using the clear sealant as opposed to the gray that I used. Got to make a more attractive job.
Glad you solved the ABS problem and saved a cool $2,200 to $2,800 in dealer cost.
Thread Starter
|
Junior Member
Joined: Mar 2011
Posts: 29
Likes: 3
From: EBF
Once you remove the black plastic cover (( just wedged in with 3 tabs no screws no bolts)) -- on the back of the lights at front next to ABS module and power steering reservoir ((one side)) you reveal the adjustments.
There are 2 very crappy plastic adjustments for right to left -- DO NOT ADJUST THESE UNLESS YOU HAVE TO-THEY SEEM VERY FRAGILE-but they are adjusted by one phillips screw
Im hopping you want to adjust up / down for the beam--
That is a small plastic medium duty about 7mm socket I think no larger than 10mm though bolt on the top of the light assembly -- it is grey and quite visable.
clockwise is up adjustment.
counterclockwise is down --- I think
Good Luck!
Peace,
Robert