
End of the weekend thoughts

Thread Starter
|
Senior Member
Joined: Feb 2011
Posts: 701
Likes: 240
From: Louisville, KY
Pulled tran's Friday night to find rear main seal had crawled out. Local Jag dealer not open on Saturday so I decide to spend time working on my punch list of piddly items:
ABS module - yup, C1095. Removed module to find a rebuilder's tag already on it. Found they had hard-glued the cover back on. Thanks. Of course that realization came after thinking it will be easy to use a screwdriver to pry the cover off - wrong/denied. Instead I was totally successful in knocking a capacitor completely off the board with that very same screwdriver. A trip to RadioShack + $1.58 cured that, then I soldered the anticipated loose motor/pcb connections (yeah, even though it had been 'rebuilt' the connections were cracked. I'm thinking the pump motor current draw is to blame for repetitive failures at the solder joints.)
Brake light switch - removed the switch to find a small amount of white stuff between two terminals. Not sure if that alone could cause issue. Tested both switches repeatedly, both reported correctly every time. Hmmm. Noticed that while slowly rolling cam to actuate the switches they were not clicking at the same time. I understand that there must be some sort of production tolerance allowed in the software for the switches not being perfectly aligned but I'm thinking with age they may spread beyond that allowance. There's no easy way to bend the arms to adjust for that so I cut a 1/8" wide strip of electrical tape and applied it to the trailing switch - it is now very close to clicking simultaneously. A second layer of tape made the switch come on early so I resorted back to the single layer. Will advise on how it works after I get it back on the road.
Power steering return line - same as most, leaking at the quick-connect just above the RH stabilizer bar mount. Considered cutting the crimp and using a clamp or two or even installing a compression fitting with a ****** end. Then I remembered we have a hand-held hydraulic hose crimper. I used that to re-crimp the original collar and was happy to find it worked like a champ.
Figured since the rear main seal pushed back and out it might be a good idea to check the PCV orifice. Cleaned it and the t-body.
Small vibration during hi-speed braking so I resurfaced the front rotors.
Crank seal - Went home and looked online to find replacement seal - Homer Simpson moment ensued - Doh! Why didn't I go to NAPA and get one for a LS? Probably the same, will check it out Monday.
Trans' mount & flex coupling - While removing the trans' I found the trans' mount and the Jurid flex coupling both cracked. Both are easy to find online, especially if you're willing to fork over ~$100 or more for each. Hmm... again to NAPA and found the LS mount appears identical for $56 (has to be less with my discount.) However they don't list the flex coupling. Googled the part number and found new ones on eBay for $49. Still don't understand why Jag is so spastic about changing the coupler or u-joints. I've done dozens over the years on other makes without issues.
Senior Member
Joined: Nov 2008
Posts: 944
Likes: 133
From: Chicago/Southern Wisconsin
Brake light switch - removed the switch to find a small amount of white stuff between two terminals. Not sure if that alone could cause issue. Tested both switches repeatedly, both reported correctly every time. Hmmm. Noticed that while slowly rolling cam to actuate the switches they were not clicking at the same time. I understand that there must be some sort of production tolerance allowed in the software for the switches not being perfectly aligned but I'm thinking with age they may spread beyond that allowance. There's no easy way to bend the arms to adjust for that so I cut a 1/8" wide strip of electrical tape and applied it to the trailing switch - it is now very close to clicking simultaneously. A second layer of tape made the switch come on early so I resorted back to the single layer. Will advise on how it works after I get it back on the road.
Keep up the good work and reporting, it is encouraging.

Thread Starter
|
Senior Member
Joined: Feb 2011
Posts: 701
Likes: 240
From: Louisville, KY
Veteran Member
Joined: Feb 2011
Posts: 1,059
Likes: 134
From: Mtn View, CA
Wow... you sure have gone through a lot of stuff recently. Hope it all gets worked out for you soon!
Trending Topics
Thread Starter
|
Senior Member
Joined: Feb 2011
Posts: 701
Likes: 240
From: Louisville, KY
It's not much of a party when I'm working - I do all of this at work, after hours, which means hurry up and get the heck out and, worst of all, no beer!
I live near Hurstbourne & Westport (east end) and work near UofL.
I live near Hurstbourne & Westport (east end) and work near UofL.
Thread Starter
|
Senior Member
Joined: Feb 2011
Posts: 701
Likes: 240
From: Louisville, KY
Results after driving a few hundred miles:
Brake light switch - when I first installed the switch (alone) the brake lights were always on (leave the trunk lid open to see the CHMSL (3rd brake light.) I found that the bracket for the switch is easily 'tweakable' without removing it, just a slight tug positioned it correctly. Anyway, it now performs flawlessly, whether it be a result of the tape or tug is anyone's guess. I'd suggest anyone withthe error just try tugging on it a bit to see if that eliminates the issue.
ABS module - resoldering the pump motor leads fixed the error (as expected) the Radio Shack capacitor fixed my snafu.
The Jurid coupling from eBay works just fine, no vibrations and only $49 + shipping.
The trans' mount from NAPA for a 2000 LS is a perfect replacement for $55.
Ditto the rear main seal for the engine - NAPA/Felpro for a 2000 LS.
So, for less than $200 (includes towing) and about six hours labor I avoided what would easily be around $5,000 at the Jag dealer. I'm good with that.

Veteran Member
Joined: Mar 2008
Posts: 5,390
Likes: 1,116
From: Ellijay
I have the cable and have made an attempt to lower the steering column to remove the motor/cable assembly without success.
Sorta like a manual from my youth that said 'remove engine, see engine section' and there was no engine section.
Sorta like a manual from my youth that said 'remove engine, see engine section' and there was no engine section.
Thread Starter
|
Senior Member
Joined: Feb 2011
Posts: 701
Likes: 240
From: Louisville, KY
This is what it looks like once the column is removed, hopefully it will help you understand what you are trying to accomplish:
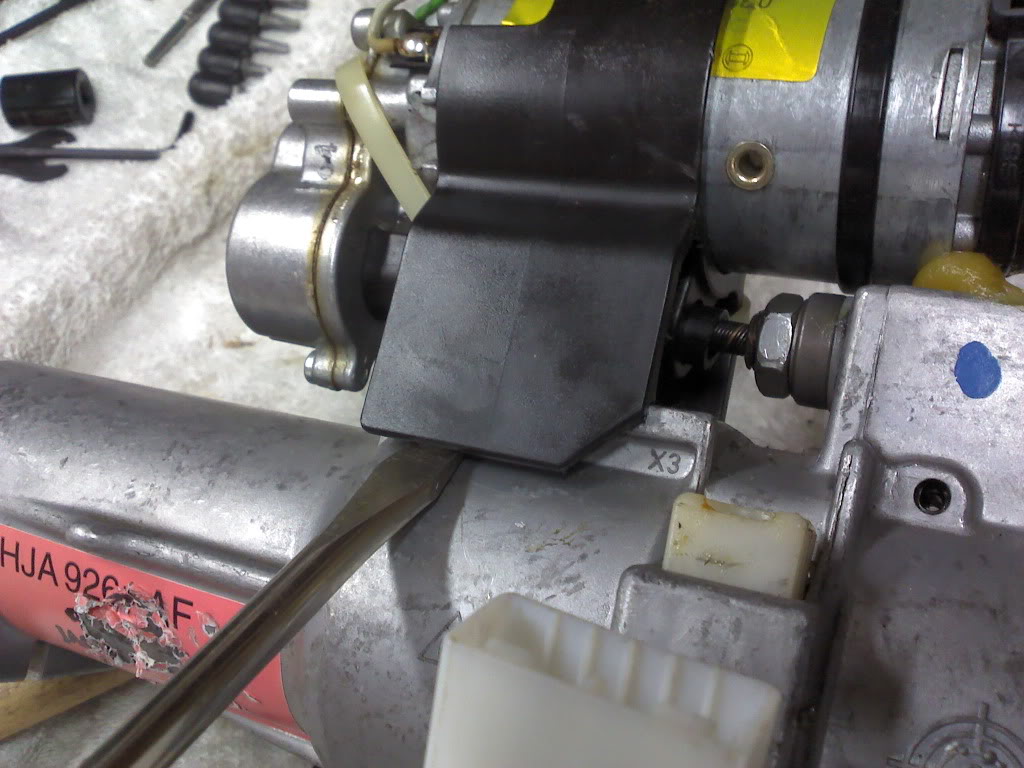
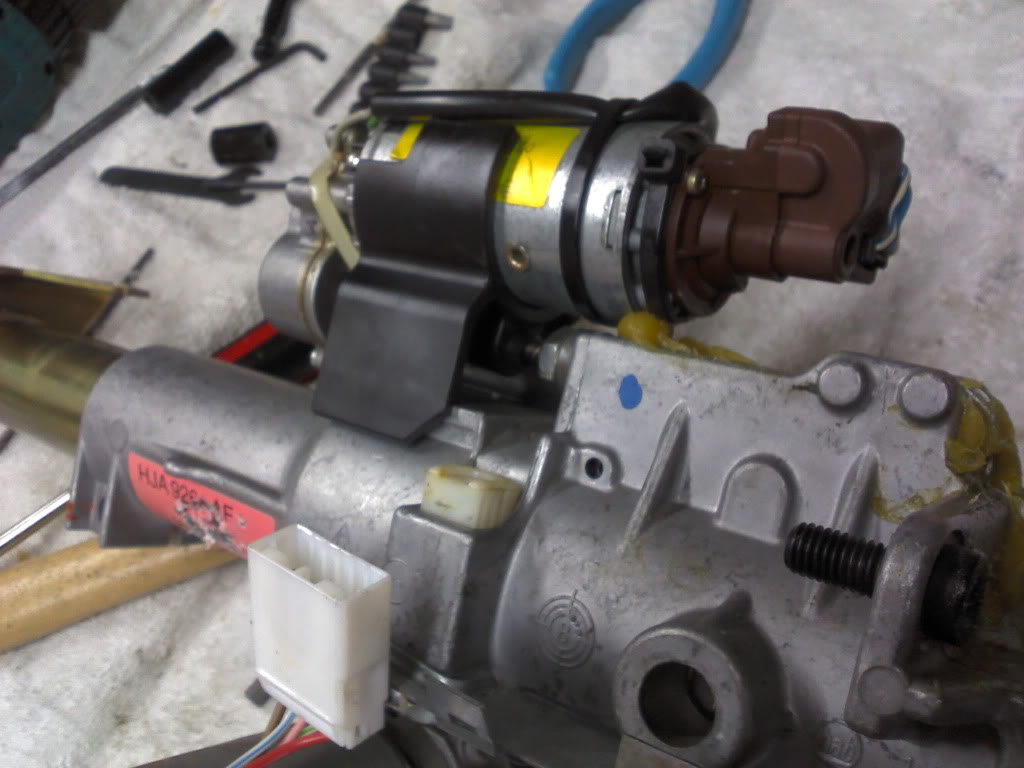
The saddle has a latch edge that can be gently pried with a screwdriver to pop over over the corresponding edge on the column. The difficult part is timing the cable at each end, you may try inserting one end and 'nudging' the power adjustment switch to rotate it into position.
The saddle has a latch edge that can be gently pried with a screwdriver to pop over over the corresponding edge on the column. The difficult part is timing the cable at each end, you may try inserting one end and 'nudging' the power adjustment switch to rotate it into position.
Thread Starter
|
Senior Member
Joined: Feb 2011
Posts: 701
Likes: 240
From: Louisville, KY
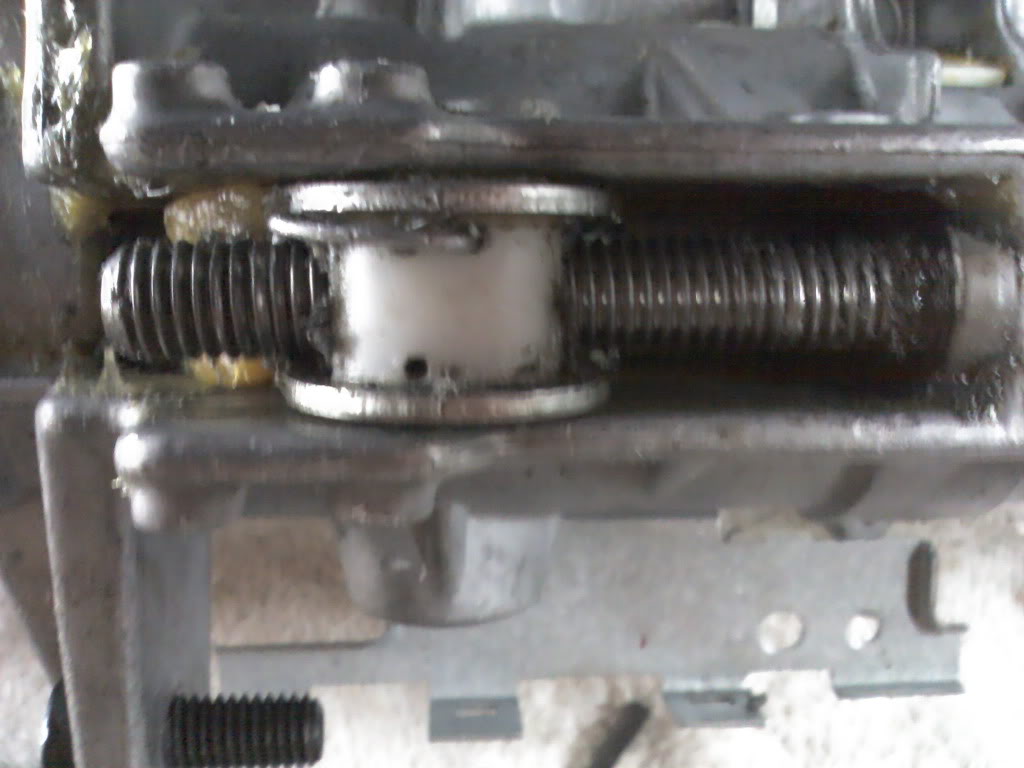
My issue is the nut that the screw, driven by the cable, passes through. In this picture you can see an early attempt to make a clip that would act as a thread. What I ended up doing for the time being is drill a series of holes through the nut, alongside the screw threads, and inserted spring wire. This forms a bit of thread inside the nut. Not strong enough for daily use but it holds the column in place and allows occasional adjustment. I have since found adequate (I hope) material to fashion a new nut but that will take time. That kind of time will be available when cold weather returns next fall.
Last edited by Beav; Apr 23, 2011 at 09:42 PM.

Senior Member


Joined: Oct 2010
Posts: 661
Likes: 108
From: Deland Florida
Very interesting. So the nylon "nut" that the screw threads into is all that actually supports the telescoping function? Not very robust is it. And I suppose the nylon piece is not available, and I further suppose Jag will only sell the entire steering column?
Thread Starter
|
Senior Member
Joined: Feb 2011
Posts: 701
Likes: 240
From: Louisville, KY
As I see it, the nut being 'plastic' serves two purposes: 1) it's more quiet and smoother than a metal nut would be and, 2) in the event of an accident it may serve as a breakaway allowing the column to collapse.
The yoke that supports the nut is secured to the column tube with shear bolts - the heads break away from the bolt at prescribed torque. There is no clearance reason for this so I'll assume they intended the item to never be removed. I'll also assume it's intention was for liability considerations.
For those that enjoy the auto function constantly enabled I'd like to remind that this part will eventually wear out and leave you with a column that will extend/retract with little to no resistance. Not much fun making a corner with the steering wheel bobbing in and out.

Senior Member
Joined: Jun 2009
Posts: 754
Likes: 71
From: San Antonio, TX
My issue is the nut that the screw, driven by the cable, passes through. In this picture you can see an early attempt to make a clip that would act as a thread. What I ended up doing for the time being is drill a series of holes through the nut, alongside the screw threads, and inserted spring wire. This forms a bit of thread inside the nut. Not strong enough for daily use but it holds the column in place and allows occasional adjustment. I have since found adequate (I hope) material to fashion a new nut but that will take time. That kind of time will be available when cold weather returns next fall.
I have the same problem with my XJ8. I was all set to replace motor and cable when I discovered the stripped nut.
What size of holes did you drill into the nut? Is there one hole per side?
Thanks,
Dan
Senior Member
Joined: Jul 2009
Posts: 647
Likes: 60
From: Kentucky
What I want to know is how you dropper the steering column at all. I tried to drop it once in order to get the reach cable replaced but eventually gave up and took the front seat out and worked blind to replace the cable.