
Found my coolant leak I've been chasing - add this to the current list of To-Do's

Thread Starter
|
Veteran member


Joined: Mar 2007
Posts: 11,345
Likes: 1,165
From: Oak Ridge, TN
Here's the culprit. This taken from the passenger side, behind the engine, perhaps going into the heater core? You can see the dried crusties, and I watch it drip...drip...drip while idling.
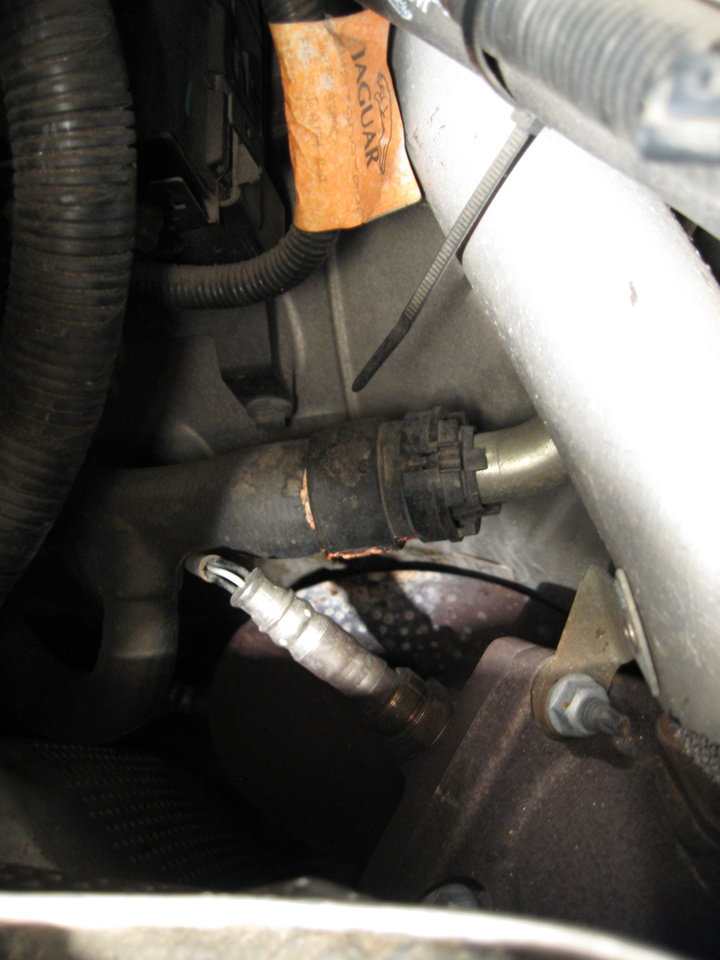
So, I'm off to explore what this is, and find a fix. It appears to be hose related right at that connection, maybe a removal/cleaning, and a new clamp (if the hose isn't split or damaged, and try it again. Of course, on second look, that plastic coupler looks to be leaking where the hose meets it. Hmmm, I may not know what it is until its removed or someone can tell my future.
Any thoughts or advice my friends?
Thread Starter
|
Veteran member
Joined: Mar 2007
Posts: 11,345
Likes: 1,165
From: Oak Ridge, TN
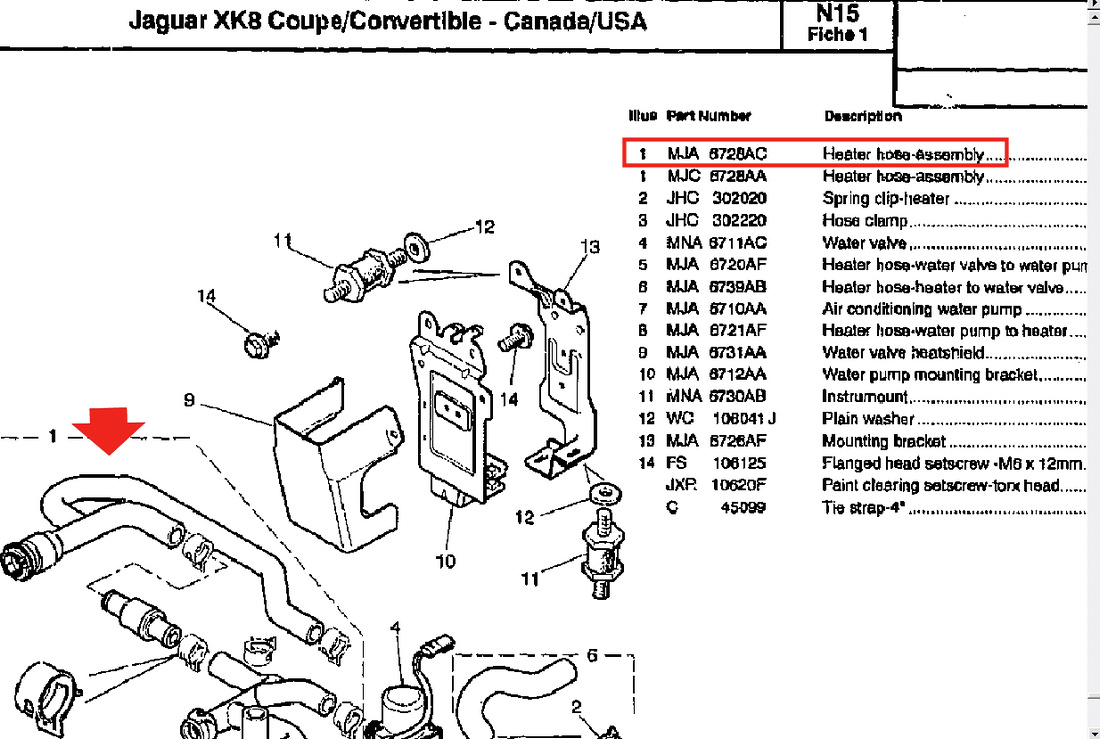
Think I found the part, seems to be an ENTIRE heater hose assembly ($140), not just a single part where this is leaking...great. This may have to wait a bit...unless someone has an idea?

Member
Joined: Jun 2010
Posts: 86
Likes: 3
From: Austin, TX
I had the same leak. That coupling is just the tip of the iceberg of what I think they call the "heater hose matrix" or something like that. It is a mass of molded hoses, couplings, check valves, etc on the firewall behind the engine. It has connections to the throttle body also.
Since the fitting is special and not available separately, and the hoses looked suspect, I elected to replace the hose matrix on my car. Surprisingly it was not too bad (about $120) at the dealer.
The replacement was pretty brutal on the hands, as there is not much room back there. You will need a hose clamp tool. Buy it, you will love it forever. I would suggest the craftsman brand ...
http://www.sears.com/shc/s/p_10153_1...u=00947390000P
Dan
Edit: Baa, you're quicker than me. I'm a slow typster.
Thread Starter
|
Veteran member
Joined: Mar 2007
Posts: 11,345
Likes: 1,165
From: Oak Ridge, TN
I bet a lift would be extremely nice to do this 'small' project. Can you get to all of them from the top of the engine bay? How long did it take ya? I bet the database says 3 hours...
I'll save this for next month, may not even do it myself. That hose clamp tool looks pretty snazzy though.
I'll save this for next month, may not even do it myself. That hose clamp tool looks pretty snazzy though.
Member
Joined: Jun 2010
Posts: 86
Likes: 3
From: Austin, TX
Did it all from the top. Most of it is over the tranny bellhousing, so I'm not sure you can get at any of it from underneath.
On the hose clamp tool ... once in a while you buy a tool that continually pays dividends and leaves you wondering why you didn't spring for this years before. This be one of them. So is my Rotozip, but that's another subject.
On the hose clamp tool ... once in a while you buy a tool that continually pays dividends and leaves you wondering why you didn't spring for this years before. This be one of them. So is my Rotozip, but that's another subject.
Member
Joined: Jun 2010
Posts: 86
Likes: 3
From: Austin, TX
2-3 hours. Much tooth-gnashing and cursing (it's pretty tight back there).
Beverages, figure 1 every 30 mins during, plus a few after to celebrate my victory.
Beverages, figure 1 every 30 mins during, plus a few after to celebrate my victory.
Trending Topics

Senior Member
Joined: Jul 2008
Posts: 154
Likes: 19
From: Encino, CA
I think that is the hose that my dealership called the octopus hose. There is one on each side of the engine. The dealership wanted about a grand to replace it. I went to an independent Jag shop. Repair Bill was $287. They replaced the passenger side hose and the part came with the driver side which the shop gave me to hold onto for when the driver side starts leaking.
Member
Joined: Mar 2009
Posts: 95
Likes: 6
From: Manitoba, Canada
o2manyfish, did your '06 need this hose assembly replaced already? How many miles on her?
Thread Starter
|
Veteran member
Joined: Mar 2007
Posts: 11,345
Likes: 1,165
From: Oak Ridge, TN
Update, the octopus is dead!
Thanks to Dan for some encouragement and advice on the phone last night. After a good slumber, I tackled the removal of the heater hose assembly (commonly known as the octopus) and finished removing it and reinstalling it, got the coolant back in around 3 hours.
I learned that if you remove the expansion tank, you will have much more room to get to those 3 lower connections/clamps.
My new hose-clamp tool suffered a bent cable, but I think it'll recover. It was invaluable during this process though.
My last fitting was the big one that has the teal colored ring, where the system was leaking from. Since it would not budge with some brute force, I broke out my small Wizard tool with a cutting wheel installed, and cut thru some of the plastic pieces along the fitting. Once I broke thru some hardened plastic, the pieces began breaking with hand pressure and it finally released.
Upon making this connection with the new hose, it connected with a 'snap', and then the teal ring just came forward and off. Hoping it was designed to break off when making the snap connection. My old fitting didn't have it, and after install, looked just like it did when I started.
Pressure seems to be holding, no drips after the coolant system bleeding procedure, so a couple jaunts around town today will test it thoroughly.
Thread Starter
|
Veteran member
Joined: Mar 2007
Posts: 11,345
Likes: 1,165
From: Oak Ridge, TN
thankfully, only lost four rubber gloves and pushed a cuticle back with a little slip, but otherwise, no blood sacrifice made (this time). My calves are killing me, and my back is sore from leaning over the side of the fender for such a long stretch of time.

remove the throttle body to ease access, and there are a couple hidden tie straps in back to cut off. Also I cut the hose apart and take out both ends. Break the tabs off that clamp to ease removal. Its a slide lock over orings to seal onto the pipe...That hose is a complete assembly and should have been replaced as such not wait till the drivers side leaks. That why the didnt charge as much, they did the real easy part instead of the whole thing.
Senior Member
Joined: Mar 2010
Posts: 231
Likes: 9
From: Joplin, MO
Is there a website for acquiring the "Octopus" hose assembly?
Also, Brutal, what do you recommend for antifreeze in 99 XK8 ? BTW, the car is running great and i see no signs of the MAJOR blowby after i have started the engine restore treatment!!
Thanks a ton for you help!!
Also, Brutal, what do you recommend for antifreeze in 99 XK8 ? BTW, the car is running great and i see no signs of the MAJOR blowby after i have started the engine restore treatment!!
Thanks a ton for you help!!
Thread Starter
|
Veteran member
Joined: Mar 2007
Posts: 11,345
Likes: 1,165
From: Oak Ridge, TN
Mike, I'll forward you the link to my source via PM, unfortunately, our sponsors that I often frequent, couldn't get down to this price that I found by a significant margin.
Senior Member
Joined: Dec 2009
Posts: 311
Likes: 13
From: Hawaii
My god, what kind of sadistic ******* designed that hose? I say make your own out of proper clamps and hose. It looks like instead of designing a distribution block for the coolant they just mucked around with hoses until it was "good enough"
Member
Joined: Jun 2010
Posts: 86
Likes: 3
From: Austin, TX
Not nearly as sadistic as the ******* that decided to run the coolant hose under the intake. That takes some kinda cunning, I tell ya.
Anyway, while cutting my arms and hands to shreds doing this replacement, it occurred to me that with a handful of hoses, elbows, and clamps, a guy could make one of these ... then there's the check valve thingy... and ... oh well just go pay the $120 and be done with it.
Anyway, while cutting my arms and hands to shreds doing this replacement, it occurred to me that with a handful of hoses, elbows, and clamps, a guy could make one of these ... then there's the check valve thingy... and ... oh well just go pay the $120 and be done with it.