

RaceDiagnostics
Veteran Member
close


Apr 4, 2026
- Join DateApr 2012
- LocationUK
- Posts:1,854
-
Likes:355
-
Liked:987 Times in 518 Posts
I car just passed the MOT yesterday but got an "advisory" i.e. needs attention, on both of the above, really disappointing as they were a pain to fit and are only 18 months old. Beware of using the ones I did from British Parts.
Anyway I am now considering fitting the standard Powerflex poly bushes.
Has anyone used these and have any comments?
Anyway I am now considering fitting the standard Powerflex poly bushes.
Has anyone used these and have any comments?
JgaXkr
Veteran Member
close

Today
- Join DateMar 2008
- LocationBoston Mass
- Posts:1,695
-
Likes:1,387
-
Liked:283 Times in 220 Posts
Quote:
Anyway I am now considering fitting the standard Powerflex poly bushes.
Has anyone used these and have any comments?
Go with the Powerflex purple bushings you will like them & they are easier to reinstall.Originally Posted by RaceDiagnostics
I car just passed the MOT yesterday but got an "advisory" i.e. needs attention, on both of the above, really disappointing as they were a pain to fit and are only 18 months old. Beware of using the ones I did from British Parts.Anyway I am now considering fitting the standard Powerflex poly bushes.
Has anyone used these and have any comments?
Veteran Member
avos
Veteran Member
close
Jun 12, 2025
- Join DateApr 2008
- LocationEurope
- Posts:3,616
-
Likes:171
-
Liked:1,070 Times in 761 Posts
I have had similar experiences with Britishparts, if you want to be sure of quality better to stick with the right oem parts. BP does sell aftermarket items from unknown origin/quality eventhough they show the OEM partno. so either check with them 1st or buy from sources that only sell OEM parts (I ussually buy from my local Jaguar Dealer, then I know I am sure).
Don't have any experience with the powerflex bushings, I personally stay with stock.
Don't have any experience with the powerflex bushings, I personally stay with stock.
I have also had problems with bushes from british parts. In my case the bushes that came with new rear anti roll bar links, which were far too soft, you could compress them right down with your fingers!
I had to go and buy the OEM parts before fitting them.
I had to go and buy the OEM parts before fitting them.
RaceDiagnostics
Veteran Member
close
Apr 4, 2026
- Join DateApr 2012
- LocationUK
- Posts:1,854
-
Likes:355
-
Liked:987 Times in 518 Posts
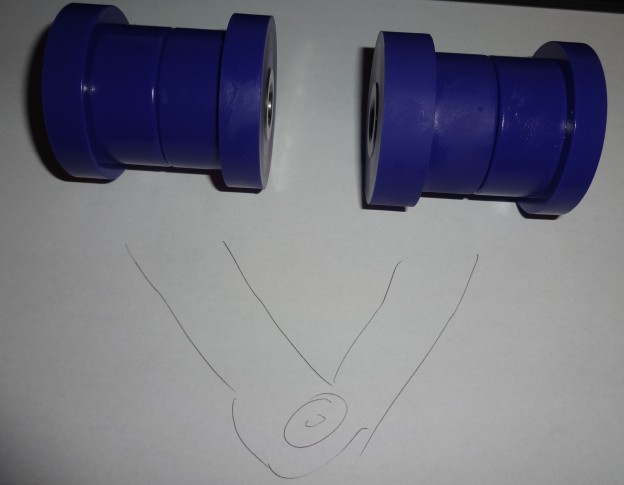
The Powerflex poly bushes arrived today, the lower arm rear bush halves are symmetrical but the front bush halves are asymmetric, the instructions say fit the two halves to match the asymmetry of the original bush, however my current (aftermarket) bush is symmetrical.
Does anyone know which half goes to the front and back?
Does anyone know which half goes to the front and back?
Veteran Member
Jandreu
Veteran Member
close
Sep 12, 2023
- Join DateMar 2014
- LocationGoldsboro, NC
- Posts:2,173
-
Likes:293
-
Liked:605 Times in 448 Posts
Just my two cents here but are you actually asking about the upper control arm bushings? The bushings and pencil drawing looks nothing like the lower control arm.
If so then while watching the Rev SAMs video I remember him saying something about putting the thinner bushing against the frame or the inside on each side.
If so then while watching the Rev SAMs video I remember him saying something about putting the thinner bushing against the frame or the inside on each side.
RaceDiagnostics
Veteran Member
close
Apr 4, 2026
- Join DateApr 2012
- LocationUK
- Posts:1,854
-
Likes:355
-
Liked:987 Times in 518 Posts
Quote:
If so then while watching the Rev SAMs video I remember him saying something about putting the thinner bushing against the frame or the inside on each side.
Originally Posted by Jandreu
Just my two cents here but are you actually asking about the upper control arm bushings? The bushings and pencil drawing looks nothing like the lower control arm.If so then while watching the Rev SAMs video I remember him saying something about putting the thinner bushing against the frame or the inside on each side.
These are for the lower arms, the sketch is not too good, as for the bushes the Rev used for the upper arms, they were total junk, I know because I used them too.

Veteran Member
jamdmyers
Veteran Member
close
Jun 18, 2024
- Join DateAug 2013
- LocationPoughkeepsie NY
- Posts:1,036
-
Likes:184
-
Liked:272 Times in 241 Posts
When I received mine I'd notice a small diff, I used a micrometer to measure the thickness of each side there will be a slight diff. As a side note once found mark them somehow accordingly to ease installation.
RaceDiagnostics
Veteran Member
close
Apr 4, 2026
- Join DateApr 2012
- LocationUK
- Posts:1,854
-
Likes:355
-
Liked:987 Times in 518 Posts
Quote:
Originally Posted by jamdmyers
When I received mine I'd notice a small diff, I used a micrometer to measure the thickness of each side there will be a slight diff. As a side note once found mark them somehow accordingly to ease installation.
I think you are talking about the uppers, no need for a micrometre to see the difference in the lowers, they are at lest a 1/4 inch different in width. I heard from another source that the thinner one goes to the front.
RaceDiagnostics
Veteran Member
close
Apr 4, 2026
- Join DateApr 2012
- LocationUK
- Posts:1,854
-
Likes:355
-
Liked:987 Times in 518 Posts
Well I wish I had done this job a month ago as my front tyres are now trashed, zero tread on the inside edge, gutted as they are only 4k miles old.
It took me two and a half hours to get the first lower arm off and the bushes out. The service manual misses out a lot of steps for the convertible, the cross brace and subframe brace need to come off the get the front bolt out.
Anyway I found a quicker way to get the bushes out which was good.
The front bush was in the worst shape, the inner part was wobbling around, the rear was just disintegrating.
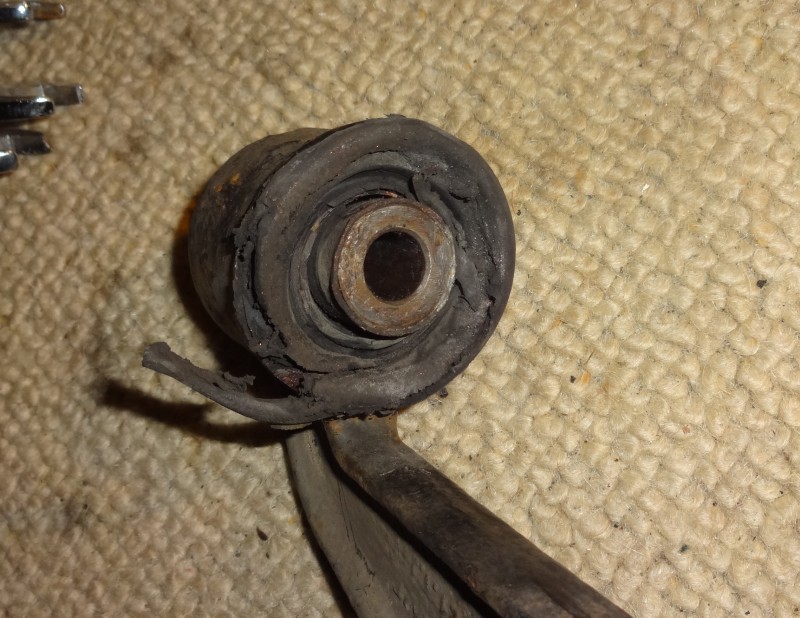
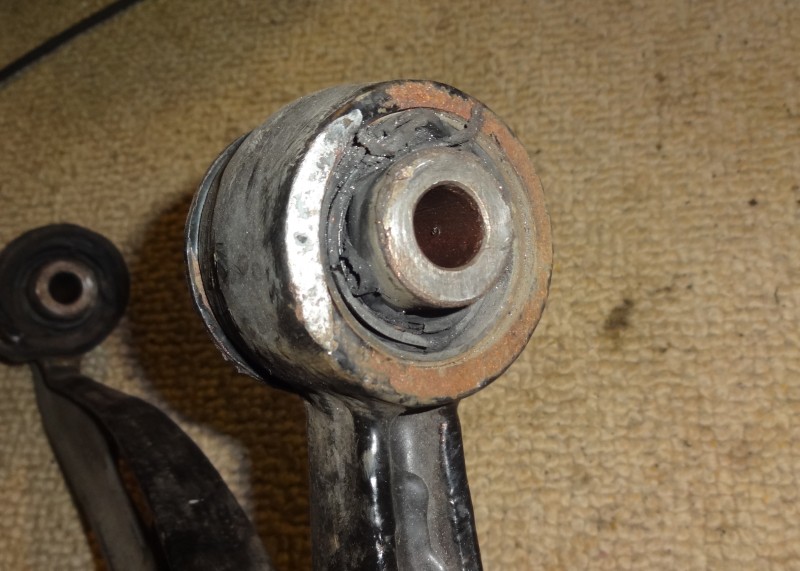
To get the bushes out I pushed out the inner part with my C clamp then hammered in a chisel between the bush and the arm till it fell out.


It took me two and a half hours to get the first lower arm off and the bushes out. The service manual misses out a lot of steps for the convertible, the cross brace and subframe brace need to come off the get the front bolt out.
Anyway I found a quicker way to get the bushes out which was good.
The front bush was in the worst shape, the inner part was wobbling around, the rear was just disintegrating.
To get the bushes out I pushed out the inner part with my C clamp then hammered in a chisel between the bush and the arm till it fell out.
Veteran Member
Jandreu
Veteran Member
close
Sep 12, 2023
- Join DateMar 2014
- LocationGoldsboro, NC
- Posts:2,173
-
Likes:293
-
Liked:605 Times in 448 Posts
RD I posted this when I changed my lower bushings, could have saved you a lot of time.
Just take the gator loose on the steering rack and turn the wheel all the way opposite the side you are working on. The rack and inner tie rod will now be out of the way of the lower rear control arm bolt.
https://www.jaguarforums.com/forum/x...ol-arm-120785/
Just take the gator loose on the steering rack and turn the wheel all the way opposite the side you are working on. The rack and inner tie rod will now be out of the way of the lower rear control arm bolt.
https://www.jaguarforums.com/forum/x...ol-arm-120785/
Veteran Member
Jandreu
Veteran Member
close
Sep 12, 2023
- Join DateMar 2014
- LocationGoldsboro, NC
- Posts:2,173
-
Likes:293
-
Liked:605 Times in 448 Posts
I'd like to see a pic after you put the bushings back in. Curious about the figment as your new blue ones don't look anything like the original.
Veteran Member
Jandreu
Veteran Member
close
Sep 12, 2023
- Join DateMar 2014
- LocationGoldsboro, NC
- Posts:2,173
-
Likes:293
-
Liked:605 Times in 448 Posts
Just noticed you said the front bolt...all I did was remove the clip that holds the oil cooler line and was able to tap my front bolts out.
With all the rust repairs and redoing previous repairs my hat is off to you. I don't think I'd be able to keep a happy thought in my head if I had the issues you've worked through!
With all the rust repairs and redoing previous repairs my hat is off to you. I don't think I'd be able to keep a happy thought in my head if I had the issues you've worked through!
RaceDiagnostics
Veteran Member
close
Apr 4, 2026
- Join DateApr 2012
- LocationUK
- Posts:1,854
-
Likes:355
-
Liked:987 Times in 518 Posts
Quote:
Wayne
Originally Posted by cjd777
Thanks, nice write up and pictures. Did the bolt come out fairly easy. Being only a few months old they sure a ugly.Wayne
The tyres are only 6 months old but the bushes have been in for about 18months.
The back bolt came out easy, I just loosened off the four steering rack mounting bolts. The front bolt was a pain as the front subframe stabiliser seemed to be in the way, I tried to hammer it past but in the end I had to loosen the front subframe bush bolt and rotate it out the way.
I think it will probably take me only an hour or so to get the other one off tomorrow night. Ill take some more pics with the new poly bushes.
RaceDiagnostics
Veteran Member
close
Apr 4, 2026
- Join DateApr 2012
- LocationUK
- Posts:1,854
-
Likes:355
-
Liked:987 Times in 518 Posts
Quote:
Here you go, I got two hours in tonight.Originally Posted by Jandreu
I'd like to see a pic after you put the bushings back in. Curious about the figment as your new blue ones don't look anything like the original.
The new bush metal inserts are the same length as the old ones, here is a comparison of new and old.
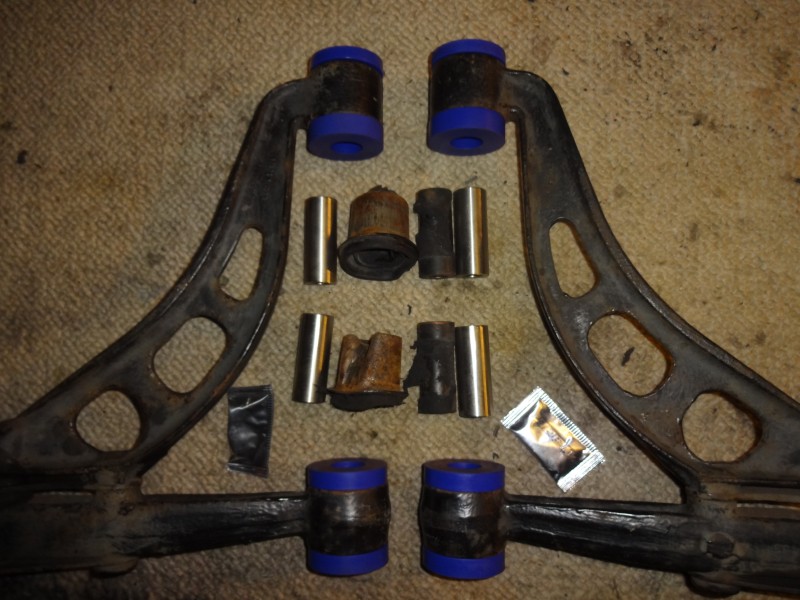
Test fitting to ensure the correct fitting of the thin and thick sides.
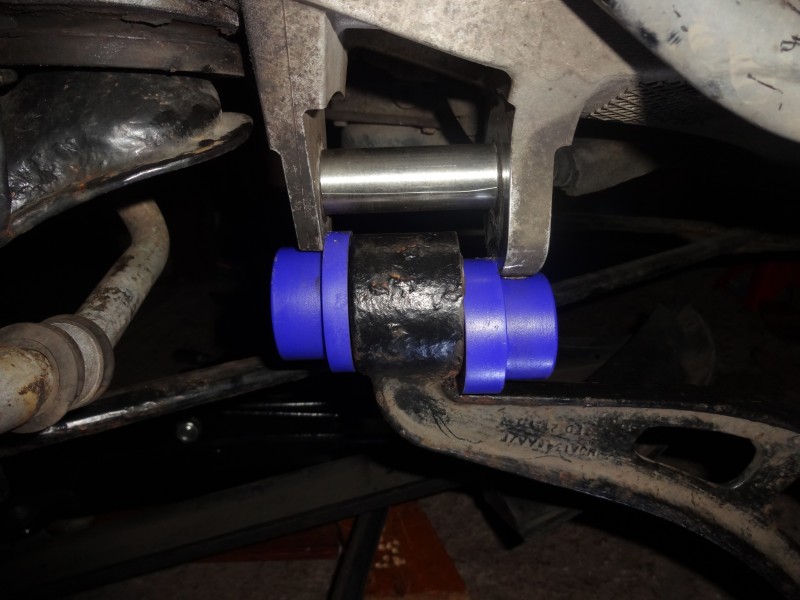
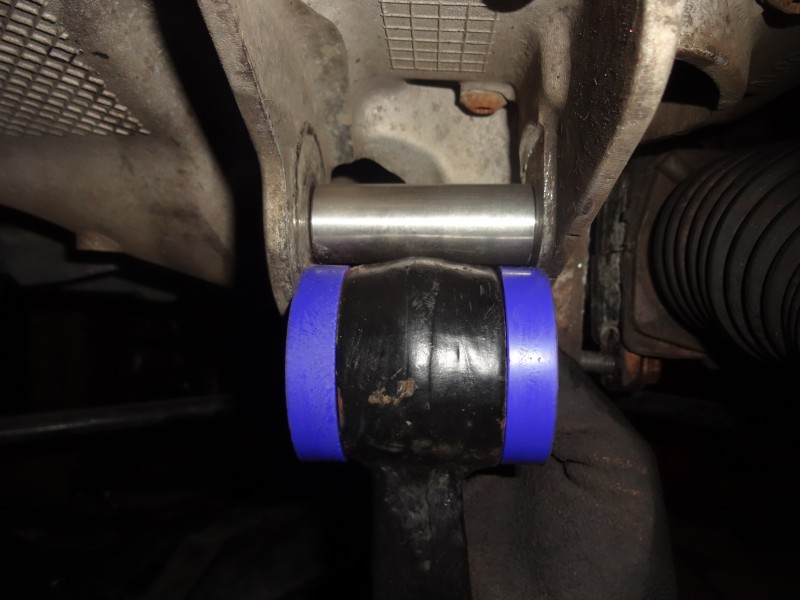
The bushes are slightly larger than the openings so I expect they are going to be trouble to refit.
Veteran Member
Jandreu
Veteran Member
close
Sep 12, 2023
- Join DateMar 2014
- LocationGoldsboro, NC
- Posts:2,173
-
Likes:293
-
Liked:605 Times in 448 Posts
Thanks RD, those look way easier to install, a little lube will probably help to squeeze them in, might also help to take the control arm apart and install front and rear seperately.
Hdpartsman00XKR
Senior Member
close
Jan 3, 2026
- Join DateNov 2012
- LocationCanton, Ga.
- Posts:289
-
Likes:184
-
Liked:105 Times in 56 Posts
Quote:
I just finished my front suspension today, found the lower arm to go in rather quickly fully assembled. used a little silicon grease to help, as you work them into their respective mounts use the front against the rear for leverage, took about 3 or 4 minutes to get in place. Yes, it's tight, but easier than expected.Originally Posted by Jandreu
Thanks RD, those look way easier to install, a little lube will probably help to squeeze them in, might also help to take the control arm apart and install front and rear seperately.
Senior Member
ArtyH
Senior Member
close
Feb 25, 2017
- Join DateAug 2013
- LocationNorth Northumberland England
- Posts:801
-
Likes:262
-
Liked:77 Times in 58 Posts
Great info R.D, will be interesting to see the end result and a comment on how it handles now. Thanks again for the info and pics. 
RaceDiagnostics
Veteran Member
close
Apr 4, 2026
- Join DateApr 2012
- LocationUK
- Posts:1,854
-
Likes:355
-
Liked:987 Times in 518 Posts
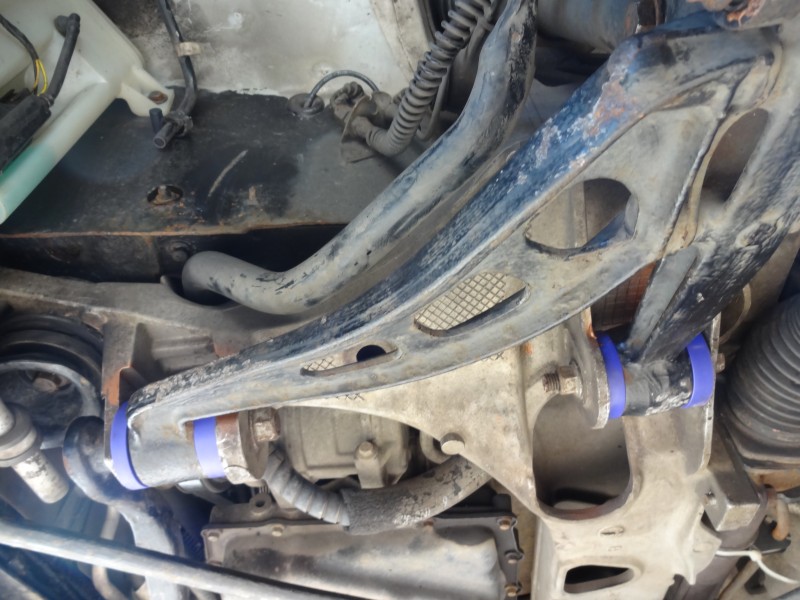
Ok another two hours last night to fit the arms and 2hours this morning to get everything buttoned back up. Total job was about 8 hours or so.
Fitting the arms with the new bushes was a very tight fit, it needed a trolley jack and bottle jack just to lever the two sides up (with both ends lubed with copper grease), then a lot of hammering to get the alignment perfect so that the bolts would go through unhindered.
As I said before it was the front bushes that were in the worst condition, perhaps not really a surprise when British parts are selling the same part for the front and the rear when there is clearly an offset for the front compared to the rear.
Lately I had started to get a lot of tramlining, that has now gone and the feel is excellent.