
Fuel Rail Shrader Valve Location

Thread Starter
|
Senior Member
Joined: Nov 2008
Posts: 458
Likes: 9
From: Oregon - We don't tan we rust
I've had both plastic engine covers off a couple of times looking for the fuel rail shrader valve and I'm lost.
I can't find it located in the JTIS info or alldata.com site. Can anyone tell me where this valve is located?
I can't find it located in the JTIS info or alldata.com site. Can anyone tell me where this valve is located?
Veteran Member
Joined: Aug 2009
Posts: 1,205
Likes: 434
From: Milwaukee, WI
JTIS states that it is located on the Fuel Rail but I could not locate it on my car.
When servicing the Gas Tank, the test port showed up inside the trunk, between the Gas Tank and the Gas Filler Tube. I could not find it on the Engine itself.
When servicing the Gas Tank, the test port showed up inside the trunk, between the Gas Tank and the Gas Filler Tube. I could not find it on the Engine itself.
Thread Starter
|
Senior Member
Joined: Nov 2008
Posts: 458
Likes: 9
From: Oregon - We don't tan we rust
In the trunk...that figures..
I like the picture of your car, it looks exactly like mine execpt for the rims and the vents in your hood. Wish I had an R.. Wish I had an R..!!
Thanks Paul
Thread Starter
|
Senior Member
Joined: Nov 2008
Posts: 458
Likes: 9
From: Oregon - We don't tan we rust
Thanks whiteSTR

Veteran Member
Joined: Aug 2009
Posts: 1,205
Likes: 434
From: Milwaukee, WI
JTIS (Issue 21) XK 2000 my Section 3 (Powertrain), Section 303-04 (Fuel Charging and Controls), Discription and Operation, Fuel Charging and Controls.
This section shows the Fuel Rails for N/A and S/C Engines, but does NOT show the locations of the Schrader Valve.
When my Engine would not start this spring, I looked for the Shrader Valve but could not find it.
Subsequently, I diagnosed both Fuel Pumps open circuit,and had them replaced by a local independent repair shop.
When the Panel at the rear of the Gas Tank was removed, I saw the Shrader Valve.
Trending Topics
Veteran Member
Joined: Aug 2009
Posts: 1,205
Likes: 434
From: Milwaukee, WI
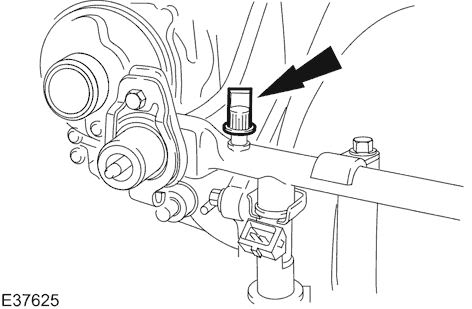
The JTIS Drawing shows a Shrader Valve on the Front end of the Left Fuel Rail. I found it. It's hidden under other wires and hoses. It has a Blue Cap.
Nevertheless, I remember seeing another Shrader Valve in the Trunk!!
The JTIS Drawing of the N/A Fuel Rail does NOT show a Shrader Valve on the Fuel Rail. However, this may be due to a Incorrect Drawing.
EDIT: A different JTIS Section shows the XK8 Shrader Valve Location. It is shown at the REAR of the Right Fuel Rail:
Last edited by Paul Pavlik; Sep 16, 2009 at 02:30 PM. Reason: Added XK8 Valve Drawing
Veteran Member
Joined: Aug 2009
Posts: 1,205
Likes: 434
From: Milwaukee, WI
Thanks: For anybody that is interested my proceedure was:
1) Find illustration in JTIS.
2) Press PrtScr (This saves entire Screen Image to
Windows ClipBoard)
3) Open IrfanView (or similar program, Windows PAINT will work) and select Edit and Paste.
4) Crop Illustration.
5) Save as jpeg.
6) Upload to PhotoBucket.com
7) Use Pic URL from PhotoBucket To enter Pic on
Forum Thread
Last edited by Paul Pavlik; Sep 16, 2009 at 05:56 PM. Reason: Added PAINT to Program List
Veteran Member
Joined: Aug 2009
Posts: 1,205
Likes: 434
From: Milwaukee, WI
I think you're right. I looked at the illustrations of the Evap System in JTIS and none of the components seem to show a Shrader Valve, but it makes sense since the Trunk Valve is near some of those Components.


Veteran Member
Joined: Aug 2009
Posts: 1,205
Likes: 434
From: Milwaukee, WI
Well, I decided to inspect the Trunk Area to look at the "Shrader Valve" that I observed after the Fuel Pump Repair.
It turns out that it's actually a COAX CABLE CONNECTOR with a white end cap on it. It's at the end of a Coax Cable that goes into the wiring harness.
Well it looks SOMETHING like a Shrader Valve.
Anyway, It's the connector for the Navigation/GPS Antenna. My car does not have Nav, so the Connector is Capped off.
Time for a annual Vision Test!!!!

Thread
Thread Starter
Forum
Replies
Last Post
Currently Active Users Viewing This Thread: 1 (0 members and 1 guests)