
Help!! brake rotor from hell

Thread Starter
|
Senior Member
Joined: Dec 2010
Posts: 160
Likes: 26
From: So cal
I finally got around to replacing my brakes on my 06 xk8, But i cant seem to get the front rotors off. I have tried every old trick but nothing works. This has me concerned that maybe my outdated repair cd does not apply to the 05 06 xk8. Is there possibly something else that needs to be removed other than the 17m bolts? The slot on the rotor hat is closed and not open, is this how all the oem rotors came, or is that unique to 05-06? I am afraid if I keep pounding away at this thing I may damage the wheel bearing, is that a legitimate concern? Any help or advice from you guys would be greatly appreciated

Theyre bad about rust build up at the hub to rotor in he center since the wheels hold water in there. Spray with penatrant and use a bigger hammer. I like to smack the face a couple times to break contact then go from the back
Thread Starter
|
Senior Member
Joined: Dec 2010
Posts: 160
Likes: 26
From: So cal
 the center is rusted so bad and in such a consistent pattern it actually fooled me into thinking it might be welded to the disk, im gonna wait and see if any of the pb oil can get through. I have already whacked it so much, is it possible to damage the wheel bearing if i keep it up? This thing is driving me crazy.
Veteran Member
Joined: Aug 2011
Posts: 1,294
Likes: 372
From: South Carolina
Graham...
Our friend Waterloo is having trouble with the FRONT rotor, not the rear!


Joined: Dec 2011
Posts: 120,439
Likes: 17,006
From: Durham, UK
Trending Topics
Thread Starter
|
Senior Member
Joined: Dec 2010
Posts: 160
Likes: 26
From: So cal
Ok I have done the torch, liquid wrench, the 3/8th extensions for wiggling leverage (which was a great idea and does grip well) and hammered the hell out of this thing, but still no luck, I'm going to try to rig a bolt and nut from home depot to push it out, if that does not work I may need to bring a priest.
Veteran Member
Joined: Jan 2012
Posts: 2,953
Likes: 1,120
From: Phoenix, AZ USA
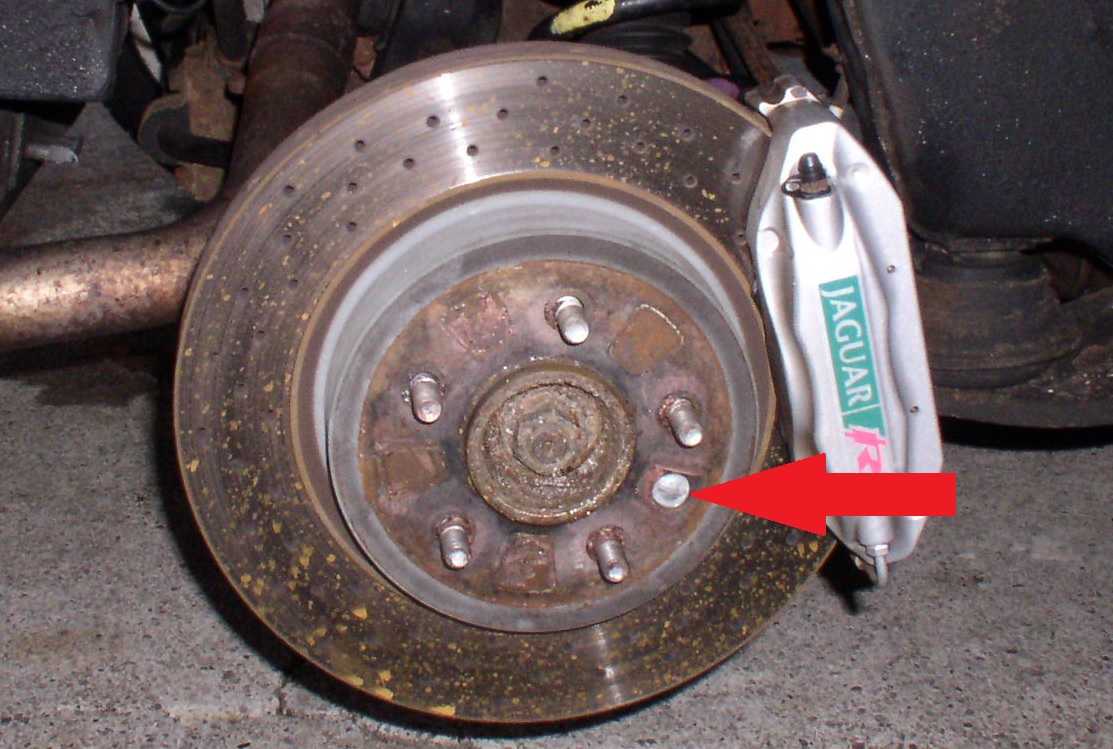
What are the "tab" looking things in the picture? I don't recall those being on my hubs when I changed the rotors.
Could they be biting into the hub and preventing the rotor from moving?
Could they be biting into the hub and preventing the rotor from moving?
Veteran Member
Joined: Feb 2012
Posts: 2,997
Likes: 713
From: Waco, Texas, US
I was going to suggest the trick of putting the wheel back on with the lugs loose. Then you roll a few feet and stab the brakes. Do this a few times (short distance of course) and it may break free.
However, I didn't have any tabs on mine either. Good catch Charlie.
However, I didn't have any tabs on mine either. Good catch Charlie.
Thread Starter
|
Senior Member
Joined: Dec 2010
Posts: 160
Likes: 26
From: So cal
I thought they were tabs too, that's why I was concerned the 06 was a different setup. But it turns out they are not tabs, the rust just formed in a really hard and consistent pattern. I'm going to look into that driving tip. I got the bolts to push one rotor and it has budged a tiny bit, but I have already snapped one bolt and chewed up the other. I'm going to have to fight these things until they come off completely since it appears all the metal has swelled considerably and there is no chance for a quick release by hammering them or popping them out with the bolts I got. How on earth could the metal swell this much on an 06 that has always been in a dry climate? The previous owner had painted the hats of the rotors, so I assumed that would help stop them from fusing, I guess he only painted the outsides. It looks I'm going to retire tonight defeated, but tomorrow is another day!
Senior Member
Joined: Oct 2012
Posts: 163
Likes: 45
From: Coeur d' Alene Idaho
Had a similar situation with my old Ford Explorer. I took my drill and a small bit and drilled a series of small holes through the disc around the perimeter of the hub. Eventually this removed enough material in the rusted area that allowed it to come free

Senior Member
Joined: Jan 2012
Posts: 480
Likes: 157
From: Green Valley, AZ
Wow....is this good to hear that my '06 was not the only one with this!
I used a drill mounted round wire brush to clean off the rust,
Lots of oil and time between rotor and hub,
Block of wood on the back side and hitting with a mini sledge,
Still would not come off.
Finally got the front rotors off by beating on the backside with a mini sledge and I do mean BEATING, destroyed both of them. Had to replace them...actually replaced all four rotors although the rears might have come off without destroying them, but I went straight to the BEATING the backside technique.
Got a set of cross drilled rotors, new set of brake pads.
Appears you will be doing the same.
Good luck.
Last edited by Lannyl81; Sep 15, 2013 at 11:40 AM.


Veteran Member
Joined: Feb 2011
Posts: 9,733
Likes: 2,201
From: on-the-edge
Had one like this come in once.
The customer had very carefully dressed up his rotor hat with spray bomb enamel paint. On both sides. The paint baked to the hub.
They'll eventually come off, but it's going to be a struggle. In the case above, the mechanic resorted to a sledge on the backside of the tire. It still took a while.
If you put the tire back on with the lugs loosened by an eighth of an inch and raise the tire to just a couple of inches off the ground, you can sit in front of the tire and kick against the tire with both legs. Rotate and repeat.
BTW, a couple of those studs look like they might be on the edge of stripping.
Last edited by plums; Sep 14, 2013 at 05:21 PM.
Thread Starter
|
Senior Member
Joined: Dec 2010
Posts: 160
Likes: 26
From: So cal
I got a chance to mount my second attack today. I followed the consensus here and beat them relentlessly with a sledge hammer. I hit them from behind the rotor outward, while turning them slowly. They were moving out so slowly that I had to mark them to make sure they were progressing. Strangely enough they never broke free even though I had already removed the rust in front of the rotor and lubed them. I had to bash them for what felt like forever until they were completely off. Obviously the rotors are now destroyed, I am very curious to see if the new rotors will need to be forced on. I believe the wheel design on this particular year is contributing to the problem and the rotors did indeed have some sort of paint or coating on them.
Anyhow, the moral of this story is- if your rotors look anything like mine, put the tires back on immediately and take it to a shop!
Anyhow, the moral of this story is- if your rotors look anything like mine, put the tires back on immediately and take it to a shop!
Senior Member
Joined: Feb 2011
Posts: 701
Likes: 240
From: Louisville, KY
Electrolysis resulting from dissimilar metals (iron hubs and rotors, aluminum wheels) can make the job a PITA if the wheels have been in place for a long time. A little anti-seize compound brushed around the portion of the hub that projects through the rotor and into the wheel can help future dismantling.

