
Installed New Radio Today!

Thread Starter
|
Senior Member
Joined: Jun 2010
Posts: 217
Likes: 82
From: SW Florida
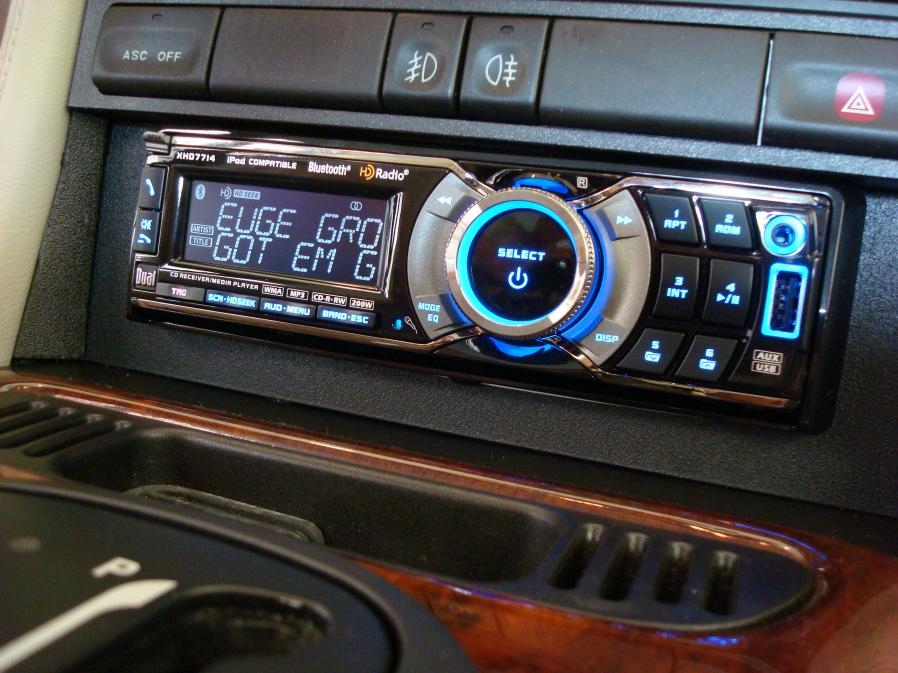
Today I installed a Dual XHD7714 head Unit that includes HD Radio, Bluetooth, MP3, USB, CD player and iPod control. Although I don't use an iPod, this unit has everything in one self contained single DIN unit. It accepts the PAC Audio SWI-PS steering wheel control interface which I installed as well. My '98 XK8 Coupe has the standard stereo with CD changer in the trunk which is now unplugged.
Installing the radio was straightforward. I followed the radio removal instructions in the JTIS and had no problems removing the center console once I carefully removed the snap-on J-gate surround. One tab was stubborn but I managed to release it without breaking anything. The rest was easy. Once the radio was out I removed the factory DIN sleeve as well and replaced it with the one included with the new unit so the radio would be properly held in place. The old sleeve comes out by just pushing the raised tabs on the top and bottom and sliding it out. The opening had to be enlarged slightly with a file to accommodate the new sleeve. Once you unplug the AC controls from the top of the stack the whole unit can be moved to your bench to remove the old sleeve and fit the new one.
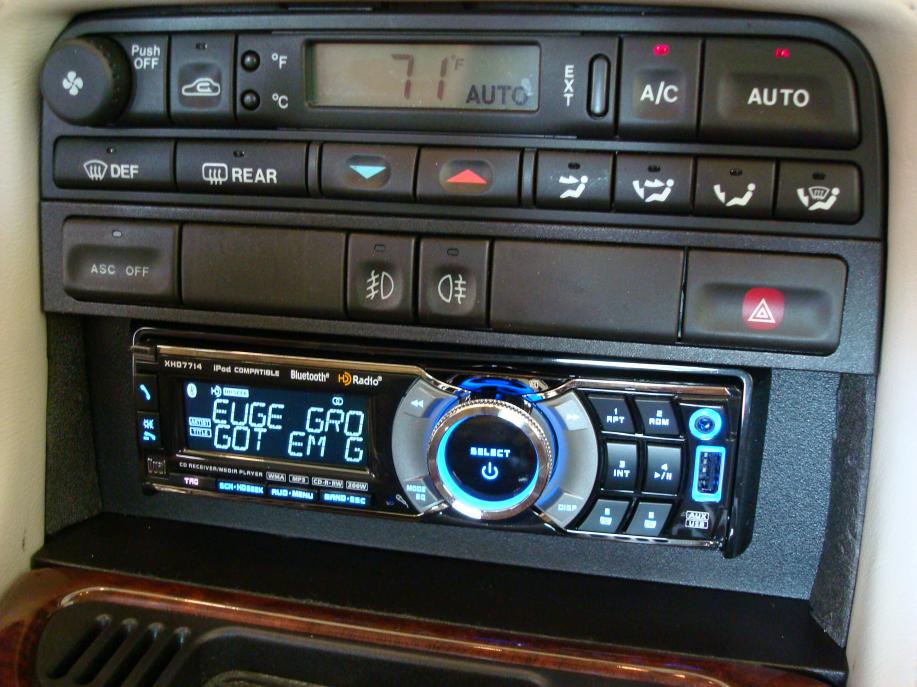
I fabricated a surround fascia using a piece of ABS plastic that I picked up at a car stereo supplier locally. It has a textured finish on one side and grooves for cutting spaced 1/8" apart vertically and horizontally on the other. This made cutting it with a utility knife simple and accurate. The cuts were perfect. TIP: Use a brand new blade and place a piece of tape along the line you're scoring so you can easily identify it! After making the cut run the edge of the blade across the cut to bevel it slightly.
Basically the fascia is simply a U shaped rectangle to cover the two sides and bottom of the opening. The facia is held in place by the lips on the DIN sleeve. The sleeve has bend out tabs to secure it to the control panel frame. The gaps left on the sides where the center console comes up are filled with high density foam that I had laying around from some old packing material. Before doing the wiring and installing the head unit I put the control panel and center console back together so all that was left was to complete the wiring, program the SW interface and slide in the unit.
Wiring was done using Quick-Taps. I still await the Autoleads PC2-55-4 harness that I ordered from the UK. No joy after two weeks of waiting so I just did the splices. Didn't really take much longer that way. The SWI-PS steering wheel interface programmed exactly as advertised. I downloaded the specific installation instructions from their website for the '99 XK8 and they apply to the '98 (and others) as well. One thing to watch for: the Purple-Yellow wire is easily confused with the Purple-Pink wire. Make sure you connect to the right one (factory connector position 2)!
Below are some photos of the finished product. You'll note that I didn't bring the fascia out flush with the upper control panel but left it recessed. I did that to keep the radio from sticking out like a sore thumb. This way the front of the radio is flush with the upper panel area. The face plate swings down to insert a CD and is removable.
One nice thing is that the radio can now be removed without disassembling anything. Just slide the supplied keys into the sides of the unit and it pulls right out.
Now that it's in I can tell you that it sounds great. It has sufficient power to drive the speakers louder than I care to with no noticeable distortion. The sound quality is as good as or better than the factory unit. The bluetooth instantly paired with my phone and works as advertised. Although the mike is in the head unit, my wife says that I sound loud and clear on the test call I made.
I'm very pleased with the result. Total cost: Under $200!
BTW, if you're doing this project in Houston in the summer bring a towel!
Here's some pictures:
Installing the radio was straightforward. I followed the radio removal instructions in the JTIS and had no problems removing the center console once I carefully removed the snap-on J-gate surround. One tab was stubborn but I managed to release it without breaking anything. The rest was easy. Once the radio was out I removed the factory DIN sleeve as well and replaced it with the one included with the new unit so the radio would be properly held in place. The old sleeve comes out by just pushing the raised tabs on the top and bottom and sliding it out. The opening had to be enlarged slightly with a file to accommodate the new sleeve. Once you unplug the AC controls from the top of the stack the whole unit can be moved to your bench to remove the old sleeve and fit the new one.
I fabricated a surround fascia using a piece of ABS plastic that I picked up at a car stereo supplier locally. It has a textured finish on one side and grooves for cutting spaced 1/8" apart vertically and horizontally on the other. This made cutting it with a utility knife simple and accurate. The cuts were perfect. TIP: Use a brand new blade and place a piece of tape along the line you're scoring so you can easily identify it! After making the cut run the edge of the blade across the cut to bevel it slightly.
Basically the fascia is simply a U shaped rectangle to cover the two sides and bottom of the opening. The facia is held in place by the lips on the DIN sleeve. The sleeve has bend out tabs to secure it to the control panel frame. The gaps left on the sides where the center console comes up are filled with high density foam that I had laying around from some old packing material. Before doing the wiring and installing the head unit I put the control panel and center console back together so all that was left was to complete the wiring, program the SW interface and slide in the unit.
Wiring was done using Quick-Taps. I still await the Autoleads PC2-55-4 harness that I ordered from the UK. No joy after two weeks of waiting so I just did the splices. Didn't really take much longer that way. The SWI-PS steering wheel interface programmed exactly as advertised. I downloaded the specific installation instructions from their website for the '99 XK8 and they apply to the '98 (and others) as well. One thing to watch for: the Purple-Yellow wire is easily confused with the Purple-Pink wire. Make sure you connect to the right one (factory connector position 2)!
Below are some photos of the finished product. You'll note that I didn't bring the fascia out flush with the upper control panel but left it recessed. I did that to keep the radio from sticking out like a sore thumb. This way the front of the radio is flush with the upper panel area. The face plate swings down to insert a CD and is removable.
One nice thing is that the radio can now be removed without disassembling anything. Just slide the supplied keys into the sides of the unit and it pulls right out.
Now that it's in I can tell you that it sounds great. It has sufficient power to drive the speakers louder than I care to with no noticeable distortion. The sound quality is as good as or better than the factory unit. The bluetooth instantly paired with my phone and works as advertised. Although the mike is in the head unit, my wife says that I sound loud and clear on the test call I made.
I'm very pleased with the result. Total cost: Under $200!
BTW, if you're doing this project in Houston in the summer bring a towel!
Here's some pictures:
Last edited by brobin; Jun 29, 2010 at 10:22 AM. Reason: new pics & installation details
Veteran member


Joined: Mar 2007
Posts: 11,344
Likes: 1,163
From: Oak Ridge, TN
Nice, good job with the install! Very glad to see you didn't have any problems with the install! Mine also has a BT mic in the head unit, but at highway speed my caller had a hard time hearing me. I hope yours is better.
I too was worried about the deck sticking out, and above the flush surface of the surrounding controls, so I asked my shop to do it the way you did (recessed) but they also constructed an additional surround faceplate to go around the deck. IT just sits snug around the HU and the top, bottom, and sides. Here were my results...in case you find yourself fishing for stations/volume buttons and wishing it was out a bit more, you'll have an idea of how it'll look.
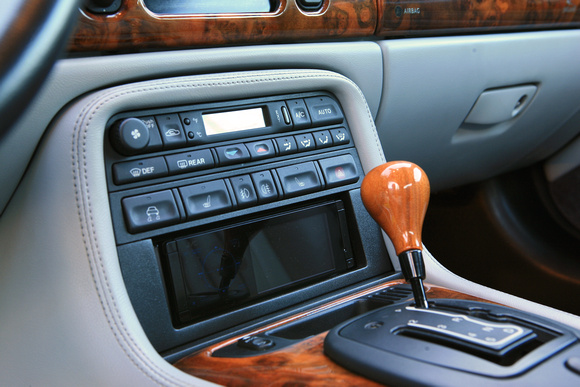
I too was worried about the deck sticking out, and above the flush surface of the surrounding controls, so I asked my shop to do it the way you did (recessed) but they also constructed an additional surround faceplate to go around the deck. IT just sits snug around the HU and the top, bottom, and sides. Here were my results...in case you find yourself fishing for stations/volume buttons and wishing it was out a bit more, you'll have an idea of how it'll look.
Thread Starter
|
Senior Member
Joined: Jun 2010
Posts: 217
Likes: 82
From: SW Florida
OK, THAT's how you did it! So there is a "real" fascia underneath for the actual sleeve mounting and then a friction fit surround on top, correct? I looked at yours before I started mine (it was my inspiration to proceed) but couldn't figure out the mounting system. Mine has a trim ring that snaps off so I could probably make a similar trim piece - now if I could find a piece of matching burl...
As for access to the Volume, Presets, Mode and Power On, they are controlled from the steering wheel so no fumbling! The Power On was a bonus that occurs when any button on the steering wheel control or the head unit is pressed as the unit has a "press any button for ON" feature. OFF requires pressing the actual power button on the unit. If that's not enough, there is also an IR remote furnished with the unit.
Thanks for making the pictures bigger... I'll try to snap some that are better focused. I haven't quite figured out how to post the big pictures myself. Is there a wiki for that?
Veteran Member

Joined: May 2010
Posts: 4,114
Likes: 1,273
From: North Carolina
OK, THAT's how you did it! So there is a "real" fascia underneath for the actual sleeve mounting and then a friction fit surround on top, correct? I looked at yours before I started mine (it was my inspiration to proceed) but couldn't figure out the mounting system. Mine has a trim ring that snaps off so I could probably make a similar trim piece - now if I could find a piece of matching burl...
As for access to the Volume, Presets, Mode and Power On, they are controlled from the steering wheel so no fumbling! The Power On was a bonus that occurs when any button on the steering wheel control or the head unit is pressed as the unit has a "press any button for ON" feature. OFF requires pressing the actual power button on the unit. If that's not enough, there is also an IR remote furnished with the unit.
Thanks for making the pictures bigger... I'll try to snap some that are better focused. I haven't quite figured out how to post the big pictures myself. Is there a wiki for that?
As for access to the Volume, Presets, Mode and Power On, they are controlled from the steering wheel so no fumbling! The Power On was a bonus that occurs when any button on the steering wheel control or the head unit is pressed as the unit has a "press any button for ON" feature. OFF requires pressing the actual power button on the unit. If that's not enough, there is also an IR remote furnished with the unit.
Thanks for making the pictures bigger... I'll try to snap some that are better focused. I haven't quite figured out how to post the big pictures myself. Is there a wiki for that?
It's easier than it reads.
Veteran member
Joined: Mar 2007
Posts: 11,344
Likes: 1,163
From: Oak Ridge, TN
So there is a "real" fascia underneath for the actual sleeve mounting and then a friction fit surround on top, correct?
Another quick way, without going to your album, is to upload each of your pics, you'll see each file in that popup box that you use to upload, just right click on the file, copy link location, and use THAT copy-link into the INSERT IMAGE command ->

Thread Starter
|
Senior Member
Joined: Jun 2010
Posts: 217
Likes: 82
From: SW Florida
Having been further inspired by our intrepid moderator's pictures I added an additional fascia trim piece to create a flush mount look. The picture below shows the trim temporarily held in place with some foam and it should look cleaner when it's finally done.
Which looks better? Recessed or flush?


Which looks better? Recessed or flush?
Trending Topics
Veteran member
Joined: Mar 2007
Posts: 11,344
Likes: 1,163
From: Oak Ridge, TN
flush will be much nicer when finished 4-sure! take ur time and round off the edges and get it just right color n texture wise ... can't wait to see the final result. (be sure to look at the finish in different light too, u'll see what I mean. the sheen is tough to match, but possible)
Thread Starter
|
Senior Member
Joined: Jun 2010
Posts: 217
Likes: 82
From: SW Florida
My wife voted - flush fit wins.
I removed the trim ring from the HU and cut a new fascia that fits better. The pic below shows the fit. A small "reveal" at the bottom of the HU is required to provide clearance for the swing down face.
Next I'll have to fine finish the edges and work on matching the panel texture & sheen better but sitting in the car it looks pretty good right now. The flash photo makes every little imperfection stand out. Now that I have good measurements I might find a better material and be able to create a more "manufactured" look. However, this project will now go on hold till November as I leave on an extended trip in the morning.
Aloha, y'all!

Veteran member
Joined: Mar 2007
Posts: 11,344
Likes: 1,163
From: Oak Ridge, TN
Here are the products used on the custom faceplate
(1) Krylon camo 'flat' black (lowes or home depot)
(2) Rust-oleum Textured black (lowes or home depot)
(3) Dupli-Color Auto Spray 'clear coat' (auto parts store)
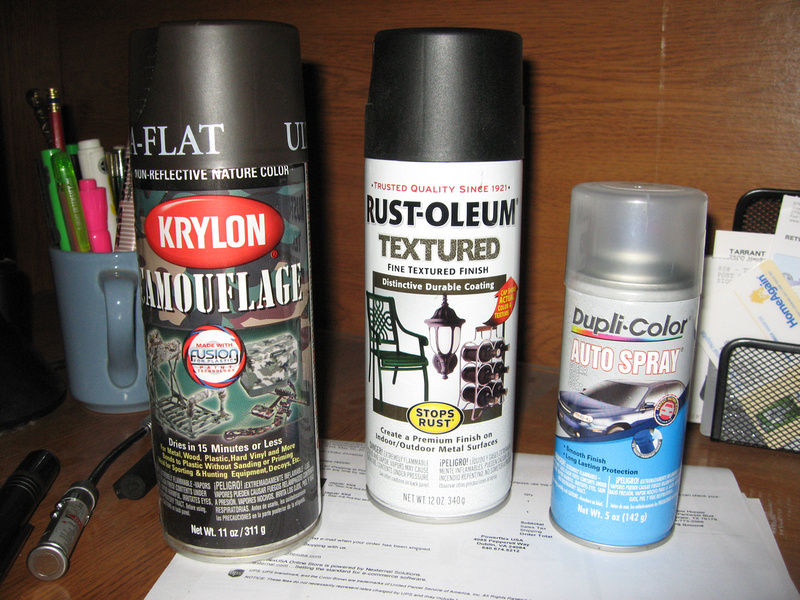
Its important to use the auto spray clear, because of the fine clear 'mist' output from this can, as the sheen can be very hard to get just right.
My process was something like - flat/texture/clear/texture/clear/flat/texture/flat/clear ...your progression will vary. Though it is easy to add texture, if you get too much, you'll be putting alot of flat on top to smooth it up, so go easy on the initial texture and gradually work your way up to the right 'feel' of the surface.
Remember to check it in different light (sunlight, work light) and get it as close as possible to the surrounding controls.
(1) Krylon camo 'flat' black (lowes or home depot)
(2) Rust-oleum Textured black (lowes or home depot)
(3) Dupli-Color Auto Spray 'clear coat' (auto parts store)
Its important to use the auto spray clear, because of the fine clear 'mist' output from this can, as the sheen can be very hard to get just right.
My process was something like - flat/texture/clear/texture/clear/flat/texture/flat/clear ...your progression will vary.
Though it is easy to add texture, if you get too much, you'll be putting alot of flat on top to smooth it up, so go easy on the initial texture and gradually work your way up to the right 'feel' of the surface. Remember to check it in different light (sunlight, work light) and get it as close as possible to the surrounding controls.
Thread Starter
|
Senior Member
Joined: Jun 2010
Posts: 217
Likes: 82
From: SW Florida
Thanks for that info and the pics. When I get back I'll get to work on that.
In the meantime, I brought the extra fascia material with me because I have a friend here with a laser cutting machine. I've seen him use it to cut plastic as well as wood so I'm going to see if he can precision cut a new fascia for me. I have all the measurements so if it works it'll save me a bunch of time later. He's also an expert in wood finishing so if he has a piece of burl that's a reasonable match to the car's (I brought pix) maybe he can make one in wood!
In the meantime, I brought the extra fascia material with me because I have a friend here with a laser cutting machine. I've seen him use it to cut plastic as well as wood so I'm going to see if he can precision cut a new fascia for me. I have all the measurements so if it works it'll save me a bunch of time later. He's also an expert in wood finishing so if he has a piece of burl that's a reasonable match to the car's (I brought pix) maybe he can make one in wood!

Member
Joined: Apr 2010
Posts: 64
Likes: 2
From: Dallas,Texas
Nice job..! You guys are inspiring me to actually do this myself in my 01 XK8. Figuring out the wiring harness is what concerns me the most. I cannot find a readable wiring schematic for this car. I know the deck wiring goes to the factory amp first, then to the speakers, but where did you find a wiring schematic ?
Veteran member
Joined: Mar 2007
Posts: 11,344
Likes: 1,163
From: Oak Ridge, TN
In the JTIS, there's an entire electrical section with nothing but wiring diagrams. If you don't have it, shoot me an email or PM with your home email, and I'll PDF (or image file) it over to you.
Thread Starter
|
Senior Member
Joined: Jun 2010
Posts: 217
Likes: 82
From: SW Florida
Nice job..! You guys are inspiring me to actually do this myself in my 01 XK8. Figuring out the wiring harness is what concerns me the most. I cannot find a readable wiring schematic for this car. I know the deck wiring goes to the factory amp first, then to the speakers, but where did you find a wiring schematic ?
Member
Joined: Apr 2010
Posts: 64
Likes: 2
From: Dallas,Texas
Don't let the wiring scare you off - it's the easiest part of the job. Just d/l the JTIS (or buy the disk on ebay) and look at section 16. There are diagrams for both the standard and premium systems. I ordered the wiring harness from a firm in the UK but ended up installing before it arrived as I was leaving for an extended trip and wanted to get it done before I left. If you, or anyone else here, can use it let me know as I have it with me.
I have a an 01 XK8 with Premium Alpine Factory system. If you think it is compatible...sure, I would love to take it off your hands. Just shoot me an pm...let me know what you want for it. Also, thanks everyone for the helpful replies. H20..(moderator) referred me to a shop in Fort Worth...(I'm in Dallas) that I think I am going to contact to do the custom faceplate. Thanks everyone....keep the suggestions coming......
Veteran member
Joined: Mar 2007
Posts: 11,344
Likes: 1,163
From: Oak Ridge, TN
Magnet, if the shop doesn't remember doing my car (it has been 2 years) let me know, I'm not that far from it, and I'll give them a refresher of how they constructed it the first time. I've even got an idea on how to 'better' it, just a bit.